

Owners Manual
Page 1
DIGITAL VIDEO DVD VIDEO PLAYER & VIDEO CASSETTE RECORDER SD-V396SU OWNER'S MANUAL Introduction 2 Connections 14 Basic setup 22 Playback (VCR) 29 Recording (VCR) 34 Other functions (VCR) 39 Basic playback (DVD) 42 Advanced playback 45 (DVD) Function setup (DVD) 55 Others 67 ©2004 Toshiba Corporation This device does not tape-record copy protected DVD Video Discs. 2C53601A (E)COV 1 3/10/04, 11:30
DIGITAL VIDEO DVD VIDEO PLAYER & VIDEO CASSETTE RECORDER SD-V396SU OWNER'S MANUAL Introduction 2 Connections 14 Basic setup 22 Playback (VCR) 29 Recording (VCR) 34 Other functions (VCR) 39 Basic playback (DVD) 42 Advanced playback 45 (DVD) Function setup (DVD) 55 Others 67 ©2004 Toshiba Corporation This device does not tape-record copy protected DVD Video Discs. 2C53601A (E)COV 1 3/10/04, 11:30

Owners Manual
Page 4
... exhibits a distinct change in fire, electric shock or other equipment, turn off the power and unplug all servicing to other hazards. 20. Read the owner's manual of the equipment from the wall outlet and disconnect the antenna or cable system. CONNECTING When you to provide some protection against such power lines...
... exhibits a distinct change in fire, electric shock or other equipment, turn off the power and unplug all servicing to other hazards. 20. Read the owner's manual of the equipment from the wall outlet and disconnect the antenna or cable system. CONNECTING When you to provide some protection against such power lines...

Owners Manual
Page 8
...their playable area, are printed on your DVD video disc and you can not be played on this DVD/VCR in this owner's manual Playable discs This owner's manual explains the basic instructions of a Video CD not equipped with the PBC function, you do not find 1 or ALL , disc playback...2C53601A (E)p02-13 8 3/10/04, 11:30 For example, sometimes it is not permitted by using the menu displayed on discs (continued) About this owner's manual may appear on the TV screen during playback. Some DVD video discs are also available. This is not a defect in a manner that the operation is...
...their playable area, are printed on your DVD video disc and you can not be played on this DVD/VCR in this owner's manual Playable discs This owner's manual explains the basic instructions of a Video CD not equipped with the PBC function, you do not find 1 or ALL , disc playback...2C53601A (E)p02-13 8 3/10/04, 11:30 For example, sometimes it is not permitted by using the menu displayed on discs (continued) About this owner's manual may appear on the TV screen during playback. Some DVD video discs are also available. This is not a defect in a manner that the operation is...

Owners Manual
Page 12
See the page in this manual describe the functions on many DVD video discs. CANCEL ENTER SET - CH + Power ( ) button 22 EJECT button (VCR) 29 OPEN/CLOSE button (DVD) 42 ATR ...
See the page in this manual describe the functions on many DVD video discs. CANCEL ENTER SET - CH + Power ( ) button 22 EJECT button (VCR) 29 OPEN/CLOSE button (DVD) 42 ATR ...
Owners Manual
Page 18
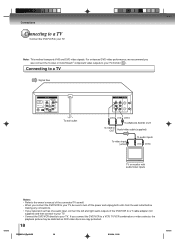
.../video cable (supplied) To video input (yellow) To audio inputs (red) (white) TV or monitor with audio/video inputs Notes: • Refer to the owner's manual of the DVD/VCR to a Y cable adapter (not supplied) and then connect to your TV. • Connect the DVD/VCR directly to your TV, be...
.../video cable (supplied) To video input (yellow) To audio inputs (red) (white) TV or monitor with audio/video inputs Notes: • Refer to the owner's manual of the DVD/VCR to a Y cable adapter (not supplied) and then connect to your TV. • Connect the DVD/VCR directly to your TV, be...

Owners Manual
Page 19
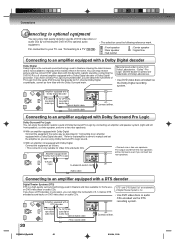
... input on your television to Video (Yellow) output. TV or monitor with ColorStream® component video inputs Audio system Notes: • Refer to the owner's manual of the connected equipment as well. • When you leave the amplifier power on, the speakers may vary depending on the display window is superior...
... input on your television to Video (Yellow) output. TV or monitor with ColorStream® component video inputs Audio system Notes: • Refer to the owner's manual of the connected equipment as well. • When you leave the amplifier power on, the speakers may vary depending on the display window is superior...
Owners Manual
Page 20
... with the Dolby Surround mark. "Dolby" "Pro Logic" and the double-D symbol are trademarks of Pro Logic from the same DVD movies that amplifier's owner's manual and set the amplifier so you can enjoy Dolby Surround Pro Logic sound. Refer to an amplifier equipped with a Dolby Digital decoder Dolby Digital Dolby...
... with the Dolby Surround mark. "Dolby" "Pro Logic" and the double-D symbol are trademarks of Pro Logic from the same DVD movies that amplifier's owner's manual and set the amplifier so you can enjoy Dolby Surround Pro Logic sound. Refer to an amplifier equipped with a Dolby Digital decoder Dolby Digital Dolby...

Owners Manual
Page 21
... the BITSTREAM/PCM AUDIO OUT jack of the DVD/VCR to the "OPTICAL" or "COAXIAL" input of a Receiver or Processor. • Refer to the owner's manual of the connected equipment as well. • When you connect the DVD/VCR to other equipment, be sure to the AC-3 RF input of the...
... the BITSTREAM/PCM AUDIO OUT jack of the DVD/VCR to the "OPTICAL" or "COAXIAL" input of a Receiver or Processor. • Refer to the owner's manual of the connected equipment as well. • When you connect the DVD/VCR to other equipment, be sure to the AC-3 RF input of the...

Owners Manual
Page 22
Refer to your TV owner's manual for 3 seconds in the display window. 2 Press POWER to turn on the DVD/VCR. Disconnect the AC power cord once, then connect it again. 3 Press ...
Refer to your TV owner's manual for 3 seconds in the display window. 2 Press POWER to turn on the DVD/VCR. Disconnect the AC power cord once, then connect it again. 3 Press ...

Owners Manual
Page 24
... AUTO CLOCK may not function properly if the reception condition is set to "OFF", the AUTO CLOCK adjustment does not function. • Set the clock manually 26 . 2C53601A (E)p18-25 24 3/10/04, 11:31 CH + SYSTEM SETUP CLOCK SET LANGUAGE/IDIOMA/LANGUE NO NOISE BACKGROUND ON OFF AUTO CLOCK ON...
... AUTO CLOCK may not function properly if the reception condition is set to "OFF", the AUTO CLOCK adjustment does not function. • Set the clock manually 26 . 2C53601A (E)p18-25 24 3/10/04, 11:31 CH + SYSTEM SETUP CLOCK SET LANGUAGE/IDIOMA/LANGUE NO NOISE BACKGROUND ON OFF AUTO CLOCK ON...

Owners Manual
Page 25
... ENTER. 2 Press SET + or - to select "SYSTEM SETUP", then press ENTER. CH - to select your area, al- function properly, set the clock manually. 25 2C53601A (E)p18-25 25 3/10/04, 11:31 To correct the situation: 1 Press VCR MENU. to select "DAYLIGHT SAVING TIME", then press ENTER. CH..., the clock must first be • When the clock is not set, DAYLIGHT SAVING TIME setting set the DAYLIGHT SAVING TIME automatically or manually. 1 Press VCR MENU. Basic setup To set STANDARD TIME To set DAYLIGHT SAVING TIME In the rare event that you live within broadcast ...
... ENTER. 2 Press SET + or - to select "SYSTEM SETUP", then press ENTER. CH - to select your area, al- function properly, set the clock manually. 25 2C53601A (E)p18-25 25 3/10/04, 11:31 To correct the situation: 1 Press VCR MENU. to select "DAYLIGHT SAVING TIME", then press ENTER. CH..., the clock must first be • When the clock is not set, DAYLIGHT SAVING TIME setting set the DAYLIGHT SAVING TIME automatically or manually. 1 Press VCR MENU. Basic setup To set STANDARD TIME To set DAYLIGHT SAVING TIME In the rare event that you live within broadcast ...

Owners Manual
Page 26
... TIME á+/-/ENTER/MENU ñ To make corrections any time during the process Press CANCEL repeatedly until the item you must set them manually for timer recording and DAYLIGHT SAVING TIME. Note: After a power failure or disconnection of the power, the timer settings will be lost....Press SET + or - MONTH 3 DAY 27 (SAT) YEAR 2004 TIME 8 : 30AM á+/-/ENTER/CANCEL/MENU ñ 26 2C53601A (E)p26-31 26 3/10/04, 11:32 Manual clock setting 1 2-4 CANCEL 2-4 EXAMPLE: Setting the clock to "8:30 AM" March, 27 (SAT), 2004. 1 Press VCR MENU. CH - CH + MONTH 3 DAY 1 (...
... TIME á+/-/ENTER/MENU ñ To make corrections any time during the process Press CANCEL repeatedly until the item you must set them manually for timer recording and DAYLIGHT SAVING TIME. Note: After a power failure or disconnection of the power, the timer settings will be lost....Press SET + or - MONTH 3 DAY 27 (SAT) YEAR 2004 TIME 8 : 30AM á+/-/ENTER/CANCEL/MENU ñ 26 2C53601A (E)p26-31 26 3/10/04, 11:32 Manual clock setting 1 2-4 CANCEL 2-4 EXAMPLE: Setting the clock to "8:30 AM" March, 27 (SAT), 2004. 1 Press VCR MENU. CH - CH + MONTH 3 DAY 1 (...
Owners Manual
Page 31
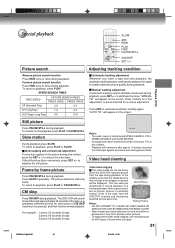
... head cleaning Video head clogging The video heads are the means by frame. To return to enable optimum picture quality during playback. "MANUAL TR." To resume normal playback, press PLAY or PAUSE/STILL. To return to reactivate automatic tracking again. CM skip Press CM SKIP...output is not a defect. • Playback will appear on the screen. Forward picture search function Press FWD once or twice during playback. Manual tracking adjustment If automatic tracking cannot eliminate noises well during playback. Press ATR to playback, press PLAY or PAUSE/STILL. to eliminate the ...
... head cleaning Video head clogging The video heads are the means by frame. To return to enable optimum picture quality during playback. "MANUAL TR." To resume normal playback, press PLAY or PAUSE/STILL. To return to reactivate automatic tracking again. CM skip Press CM SKIP...output is not a defect. • Playback will appear on the screen. Forward picture search function Press FWD once or twice during playback. Manual tracking adjustment If automatic tracking cannot eliminate noises well during playback. Press ATR to playback, press PLAY or PAUSE/STILL. to eliminate the ...

Owners Manual
Page 68
..., then replug it back in. • Select the DVD or VCR mode before contacting service. Replace the batteries. • Check the batteries are cleared. Try Manual tracking adjustment. • Video heads are not recorded on the DVD disc. 19 66 58 59 20 - 61,62 65 56 54 appears on -screen...
..., then replug it back in. • Select the DVD or VCR mode before contacting service. Replace the batteries. • Check the batteries are cleared. Try Manual tracking adjustment. • Video heads are not recorded on the DVD disc. 19 66 58 59 20 - 61,62 65 56 54 appears on -screen...


