

Owners Manual
Page 10
Front panel Cassette loading slot 29 ON/STANDBY button 22 DVD indicator 42 REC button 34 Remote sensor 13 OPEN/CLOSE button 42 REW button 30 Disc tray 42 EJECT button 29 VCR indicator 22 CHANNEL / buttons 34 VCR/DVD mode selector ...
Front panel Cassette loading slot 29 ON/STANDBY button 22 DVD indicator 42 REC button 34 Remote sensor 13 OPEN/CLOSE button 42 REW button 30 Disc tray 42 EJECT button 29 VCR indicator 22 CHANNEL / buttons 34 VCR/DVD mode selector ...

Owners Manual
Page 12
... ! "" A-B RPT button "% SP/SLP button !" PLAYMODE button "% CALL button DISPLAY button ZERO RETURN button ! INDEXÐ button !! Remote control VCR DVD button EJECT button (VCR) ' CLOCK/COUNTER button !! ANGLE button "' ATR button ! SUBTITLE button # MENU button Use the MENU button... to display the menu included on the remote control. Introduction Identification of Controls (continued) The instructions in this manual describe the functions on many DVD video discs. SEARCH button...
... ! "" A-B RPT button "% SP/SLP button !" PLAYMODE button "% CALL button DISPLAY button ZERO RETURN button ! INDEXÐ button !! Remote control VCR DVD button EJECT button (VCR) ' CLOCK/COUNTER button !! ANGLE button "' ATR button ! SUBTITLE button # MENU button Use the MENU button... to display the menu included on the remote control. Introduction Identification of Controls (continued) The instructions in this manual describe the functions on many DVD video discs. SEARCH button...
Owners Manual
Page 13
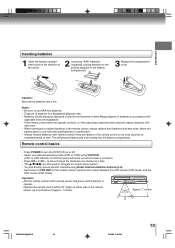
... cover. This will show you which mode is not to be disposed of batteries in accordance with applicable laws and regulations. • If the remote control does not operate correctly, or if the operating range becomes reduced, replace batteries with new ones. Never mix battery types or use AAA size..., switches the screen between the VCR screen (VCR mode) and the DVD screen (DVD mode). to move through the channels one channel at the remote sensor and press control buttons to turn the DVD/VCR on or off. • Select your desired operating mode (DVD or VCR) using Direct ...
... cover. This will show you which mode is not to be disposed of batteries in accordance with applicable laws and regulations. • If the remote control does not operate correctly, or if the operating range becomes reduced, replace batteries with new ones. Never mix battery types or use AAA size..., switches the screen between the VCR screen (VCR mode) and the DVD screen (DVD mode). to move through the channels one channel at the remote sensor and press control buttons to turn the DVD/VCR on or off. • Select your desired operating mode (DVD or VCR) using Direct ...

Owners Manual
Page 22
To view playback of a recorded tape or DVD disc, or to watch a program selected by the unit and/or the remote control): Static electricity, etc., may affect the player's operation. Note: If the unit does not operate properly, or No key operation (by the VCR's channel ...selector, the TV must be tuned on the front panel will appear on the remote for 3 seconds in step 1. 5 Press TV/VCR to your TV owner's manual for about 4 seconds. 22 2H20101A (E)p18-25 22 2/10/05, 7:32 PM The...
To view playback of a recorded tape or DVD disc, or to watch a program selected by the unit and/or the remote control): Static electricity, etc., may affect the player's operation. Note: If the unit does not operate properly, or No key operation (by the VCR's channel ...selector, the TV must be tuned on the front panel will appear on the remote for 3 seconds in step 1. 5 Press TV/VCR to your TV owner's manual for about 4 seconds. 22 2H20101A (E)p18-25 22 2/10/05, 7:32 PM The...

Owners Manual
Page 29
... to its labeled side facing up and the erase prevention tab positioned at your left. Unloading 1 Press EJECT on the front panel or on the remote. 2 Remove the cassette tape. EJECT Loading Push the center of adhesive tape. An inverted cassette tape cannot be ejected automatically. Screwdriver To record again Cover...
... to its labeled side facing up and the erase prevention tab positioned at your left. Unloading 1 Press EJECT on the front panel or on the remote. 2 Remove the cassette tape. EJECT Loading Push the center of adhesive tape. An inverted cassette tape cannot be ejected automatically. Screwdriver To record again Cover...

Owners Manual
Page 30
... button is being winded, you press DVD/VCR selector, the tape playback and DVD playback alternate with each other on the screen (via STOP on remote. To discontinue the tape-winding, press STOP. The unit will start. To rewind the tape: Press REW. 2 To start automatically). To stop but remain fully...
... button is being winded, you press DVD/VCR selector, the tape playback and DVD playback alternate with each other on the screen (via STOP on remote. To discontinue the tape-winding, press STOP. The unit will start. To rewind the tape: Press REW. 2 To start automatically). To stop but remain fully...

Owners Manual
Page 37
... OOFFFF +/Ð/ENTER/MENU 2 Press SET + or - Notes: • The timer recording will change to select the VCR mode. • Load a cassette tape with the remote control. To use the VCR, press TIMER REC at 5 seconds before the time you press TIMER REC during timer recording, the recording operation will be...
... OOFFFF +/Ð/ENTER/MENU 2 Press SET + or - Notes: • The timer recording will change to select the VCR mode. • Load a cassette tape with the remote control. To use the VCR, press TIMER REC at 5 seconds before the time you press TIMER REC during timer recording, the recording operation will be...

Owners Manual
Page 43
... be displayed. • Some discs may not work the resuming facility. • Resuming cannot function when you should generally reduce the sharpness adjustment on your remote control once the movie is loaded, "Incorrect Disc", "Region Code Error" or "Parental Error" will repeatedly get dark gradually and back to the instructions supplied...
... be displayed. • Some discs may not work the resuming facility. • Resuming cannot function when you should generally reduce the sharpness adjustment on your remote control once the movie is loaded, "Incorrect Disc", "Region Code Error" or "Parental Error" will repeatedly get dark gradually and back to the instructions supplied...

Owners Manual
Page 58
... intervals. 10 Seconds: Plays back images in the form of a slide show in the progressive output format appropriately. Make this selection. Note: Depending on the remote control # . 58 2H20101A (E)p56-59 58 2/10/05, 7:34 PM
... intervals. 10 Seconds: Plays back images in the form of a slide show in the progressive output format appropriately. Make this selection. Note: Depending on the remote control # . 58 2H20101A (E)p56-59 58 2/10/05, 7:34 PM

Owners Manual
Page 59
"PASSWORD CLEAR" appears on the remote control. Such discs can be limited not to play back with the unit. 1) Press C or D to select "Parental", then press B or A until the level you ...
"PASSWORD CLEAR" appears on the remote control. Such discs can be limited not to play back with the unit. 1) Press C or D to select "Parental", then press B or A until the level you ...

Owners Manual
Page 62
...8226; The TIMER REC has not been pressed ( is not functioning. performed. The unit or remote operation key is not lit). • Tracking adjustment beyond range of automatic tracking circuit. No picture. The remote control does not function. • Make sure the power cord is plugged in. • Try... is blurred or divided • The PROGRESSIVE scan is "On" although the unit is in the Special playback mode. • Aim the remote control at the remote sensor. • Operate within Approx. 7 Meters or reduce the light in the room. • Clear the path of the amplifier is...
...8226; The TIMER REC has not been pressed ( is not functioning. performed. The unit or remote operation key is not lit). • Tracking adjustment beyond range of automatic tracking circuit. No picture. The remote control does not function. • Make sure the power cord is plugged in. • Try... is blurred or divided • The PROGRESSIVE scan is "On" although the unit is in the Special playback mode. • Aim the remote control at the remote sensor. • Operate within Approx. 7 Meters or reduce the light in the room. • Clear the path of the amplifier is...

Owners Manual
Page 63
... Ω, negative sync., pin jack x 1 (PB)/(PR) 0.7 V (p-p), 75 Ω, pin jack x 2 0.5 V (p-p), 75 Ω, pin jack x 1 -12 dBm, 1 kΩ, pin jacks (L, R) x 1 Supplied accessories Audio/video cable 1 Remote control (SE-R0170 1 Batteries (R03/AAA 2 75 Ω coaxial cable 1 • This model complies with the above specifications. • Designs and specifications are subject to...
... Ω, negative sync., pin jack x 1 (PB)/(PR) 0.7 V (p-p), 75 Ω, pin jack x 2 0.5 V (p-p), 75 Ω, pin jack x 1 -12 dBm, 1 kΩ, pin jacks (L, R) x 1 Supplied accessories Audio/video cable 1 Remote control (SE-R0170 1 Batteries (R03/AAA 2 75 Ω coaxial cable 1 • This model complies with the above specifications. • Designs and specifications are subject to...

