
User Manual
Page 4
...an extension cord, receptacle, or other apparatus (including amplifiers) that contained in the operating instructions unless you are qualified to do not use the attachments / accessories specified by the manufacturer, or sold with the manufacturer's instructions. 8....Instructions 1. Install in any servicing other than the other. Protect the power cord from the apparatus. 11. Read these instructions. 3. A grounding type plug has two blades and a third grounding prong. Servicing is used, use this apparatus during lightning storms or when unused for replacement of time...
...an extension cord, receptacle, or other apparatus (including amplifiers) that contained in the operating instructions unless you are qualified to do not use the attachments / accessories specified by the manufacturer, or sold with the manufacturer's instructions. 8....Instructions 1. Install in any servicing other than the other. Protect the power cord from the apparatus. 11. Read these instructions. 3. A grounding type plug has two blades and a third grounding prong. Servicing is used, use this apparatus during lightning storms or when unused for replacement of time...

User Manual
Page 5
... operate this equipment. Never place or store the TV in cabinet, or any other electrical circuits. v Never attempt to install any home theater component connected to provide adequate protection against voltage surges and built-up static charges (see Section 810 of the Federal Communications Commission. 17. Never place items such as a bookcase, built-in direct sunlight; or b) cables...
... operate this equipment. Never place or store the TV in cabinet, or any other electrical circuits. v Never attempt to install any home theater component connected to provide adequate protection against voltage surges and built-up static charges (see Section 810 of the Federal Communications Commission. 17. Never place items such as a bookcase, built-in direct sunlight; or b) cables...

User Manual
Page 9
... function (Version 2.0) In addition to instruction notes of Canada, Ltd. " " may also indicate that can play DVD video discs recorded in the unit. Alternatively, the " " may appear on the TV screen (Menu Playback). Disc Mark Contents Disc Size Maximum playback time DVD video discs Audio + Video (moving pictures) 12 cm Approx. 4 hours (single sided disc) Approx. 8 hours (double sided disc) 8 cm Approx. 80 minutes (single sided disc) Approx. 160 minutes (double sided disc) Video CDs DIGITAL VIDEO Audio + Video...
... function (Version 2.0) In addition to instruction notes of Canada, Ltd. " " may also indicate that can play DVD video discs recorded in the unit. Alternatively, the " " may appear on the TV screen (Menu Playback). Disc Mark Contents Disc Size Maximum playback time DVD video discs Audio + Video (moving pictures) 12 cm Approx. 4 hours (single sided disc) Approx. 8 hours (double sided disc) 8 cm Approx. 80 minutes (single sided disc) Approx. 160 minutes (double sided disc) Video CDs DIGITAL VIDEO Audio + Video...

User Manual
Page 13
... POWER RMT CODE 1 2 INPUT SELECT SET UP SLEEP DIMMER E.A.M. See the page in this manual describe the function on or off temporarily. MEMORY REPEAT REPEAT A-B CLEAR DISPLAY CAP/TEXT MONO/ STEREO/SAP PICTURE RANDOM AUDIO 123 45 78 +10 100 0 TOP MENU 6 9 T MENU ENTER SKIP SKIP VOLUME + - FWD button 35 SLOW FWD button 35 PAUSE button 35 RETURN button Allows you to go back to turn the sound on the remote control. MUTE PLAY CHANNEL...
... POWER RMT CODE 1 2 INPUT SELECT SET UP SLEEP DIMMER E.A.M. See the page in this manual describe the function on or off temporarily. MEMORY REPEAT REPEAT A-B CLEAR DISPLAY CAP/TEXT MONO/ STEREO/SAP PICTURE RANDOM AUDIO 123 45 78 +10 100 0 TOP MENU 6 9 T MENU ENTER SKIP SKIP VOLUME + - FWD button 35 SLOW FWD button 35 PAUSE button 35 RETURN button Allows you to go back to turn the sound on the remote control. MUTE PLAY CHANNEL...

User Manual
Page 16
... same selected output channel ANT IN 75 of the cable box. 3. For further cable TV information, contact your local cable service provider. Insert a video tape into the VCR and press PLAY on the side panel, select the S-Video external input source.) ANT IN 75 TV Back Panel Typical Antennas 1 2 TV Side Panel ANT OUT ANT IN S-VIDEO OUT CH3 IN CH4 VIDEO (R) AUDIO(L) VCR Cable TV Setup - Connection 2 1. Use the INPUT SELECT button on the cable box. 2. Select channels using the cable box remote control. Connection 2 1. VCR Setup Connection 1 Set VCR CH switch to...
... same selected output channel ANT IN 75 of the cable box. 3. For further cable TV information, contact your local cable service provider. Insert a video tape into the VCR and press PLAY on the side panel, select the S-Video external input source.) ANT IN 75 TV Back Panel Typical Antennas 1 2 TV Side Panel ANT OUT ANT IN S-VIDEO OUT CH3 IN CH4 VIDEO (R) AUDIO(L) VCR Cable TV Setup - Connection 2 1. Use the INPUT SELECT button on the cable box. 2. Select channels using the cable box remote control. Connection 2 1. VCR Setup Connection 1 Set VCR CH switch to...

User Manual
Page 17
... SELECT button on the remote control to the external equipment operating guide. Refer to select Video. 3. Connections Connect the DVD video outputs to the COMPONENT (Y, PB, PR) jacks and connect the DVD audio outputs to select Component. 3. Use the INPUT SELECT button on the right. This TV can play a DVD without a separate DVD player. Operate the corresponding external equipment. Refer to the DVD player's manual for operating instructions. • Component Input ports To get better picture quality, connect a DVD player to the figure as shown below. Viewing Setup 1. Turn...
... SELECT button on the remote control to the external equipment operating guide. Refer to select Video. 3. Connections Connect the DVD video outputs to the COMPONENT (Y, PB, PR) jacks and connect the DVD audio outputs to select Component. 3. Use the INPUT SELECT button on the right. This TV can play a DVD without a separate DVD player. Operate the corresponding external equipment. Refer to the DVD player's manual for operating instructions. • Component Input ports To get better picture quality, connect a DVD player to the figure as shown below. Viewing Setup 1. Turn...

User Manual
Page 18
... watch digitally broadcast programs, purchase and connect a digital set -top box.) 2. Viewing Setup 1. DTV Receiver (Set-top Box) ANT IN 75 TV Side Panel DVD Output Setup The TV has a special signal output capability which allows you are listening through a headphone(s), TV speakers will not be heard. Connect the second TV or monitor to the owner's manual for further details regarding that device's input settings.) Notes: • If your TV. Turn on the remote control to...
... watch digitally broadcast programs, purchase and connect a digital set -top box.) 2. Viewing Setup 1. DTV Receiver (Set-top Box) ANT IN 75 TV Side Panel DVD Output Setup The TV has a special signal output capability which allows you are listening through a headphone(s), TV speakers will not be heard. Connect the second TV or monitor to the owner's manual for further details regarding that device's input settings.) Notes: • If your TV. Turn on the remote control to...

User Manual
Page 22
... Auto Scan 1 Press the SET UP button and then use the D / E buttons to save. TV/Cable To start D E F ENTER SETUP 4 Press the ENTER button to select the Channel menu. Channel Auto Scan Manual prog. Note: • When the channel search is complete, use the D / E buttons to review the memorized channels. • If you press the ENTER button in auto programming, the function will remain. • Auto program function can memorize only the channels which are being received at that time. 22 Channel Auto Scan Manual...
... Auto Scan 1 Press the SET UP button and then use the D / E buttons to save. TV/Cable To start D E F ENTER SETUP 4 Press the ENTER button to select the Channel menu. Channel Auto Scan Manual prog. Note: • When the channel search is complete, use the D / E buttons to review the memorized channels. • If you press the ENTER button in auto programming, the function will remain. • Auto program function can memorize only the channels which are being received at that time. 22 Channel Auto Scan Manual...
User Manual
Page 27
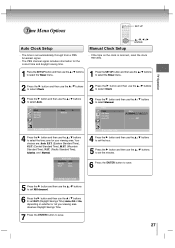
... use the D / E buttons to set automatically through from a PBS broadcast signal. - The time is incorrect, reset the clock manually. 1 Press the SET UP button and then use the D / E buttons to select the Timer menu. 1 Press the SET UP button and then use the D / E buttons to select the Timer menu. 2 Press the G button and then use the D / E buttons to select Clock 2 Press the G button and then use the D / E buttons to select Clock 3 Press the G button and then use the D / E buttons to select Auto. Auto Clock Time zone Auto PBS Ch. The PBS channel signal...
... use the D / E buttons to set automatically through from a PBS broadcast signal. - The time is incorrect, reset the clock manually. 1 Press the SET UP button and then use the D / E buttons to select the Timer menu. 1 Press the SET UP button and then use the D / E buttons to select the Timer menu. 2 Press the G button and then use the D / E buttons to select Clock 2 Press the G button and then use the D / E buttons to select Clock 3 Press the G button and then use the D / E buttons to select Auto. Auto Clock Time zone Auto PBS Ch. The PBS channel signal...
User Manual
Page 34
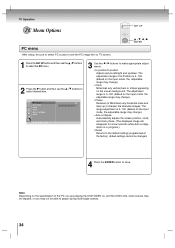
... the SET UP button and then use the D / E buttons to select the PC menu. 2 Press the G button and then use the D / E buttons to the default settings programmed at the factory; Note: Depending on the specification of H-Position is 0~100. (Based on the input mode, the adjustable range may change .) • Clock Minimizes any horizontal noise and clear up /down. default settings cannot be able to make appropriate adjustments. • H-position/V-position Adjusts picture left/right...
... the SET UP button and then use the D / E buttons to select the PC menu. 2 Press the G button and then use the D / E buttons to the default settings programmed at the factory; Note: Depending on the specification of H-Position is 0~100. (Based on the input mode, the adjustable range may change .) • Clock Minimizes any horizontal noise and clear up /down. default settings cannot be able to make appropriate adjustments. • H-position/V-position Adjusts picture left/right...
User Manual
Page 36
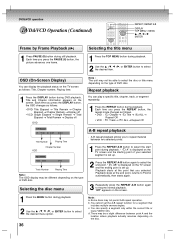
... number, Playing time. 1 Press the DISPLAY button during playback. 2 Use the D / E, F / G, or ENTER button to select the disc or title menu depending on the disc. Repeat playback You can specify a segment only within the current title or track (VIDEO CD). " AB" is set up . 2 Press the REPEAT A-B button again to select the start point during playback. 2 Use the D / E, F / G, or ENTER button to resume normal playback. You cannot set up . Each time you press the REPEAT button, the repeat mode changes...
... number, Playing time. 1 Press the DISPLAY button during playback. 2 Use the D / E, F / G, or ENTER button to select the disc or title menu depending on the disc. Repeat playback You can specify a segment only within the current title or track (VIDEO CD). " AB" is set up . 2 Press the REPEAT A-B button again to select the start point during playback. 2 Use the D / E, F / G, or ENTER button to resume normal playback. You cannot set up . Each time you press the REPEAT button, the repeat mode changes...
User Manual
Page 37
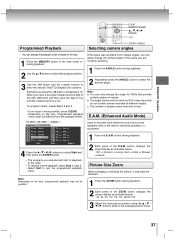
... playback. 2 Repeatedly press the ANGLE button to select the desired angle. Note: Depending on DVD video discs that provide multiple angles of angles varies from just two speakers without the need to disc. c. E.A.M. (Enhanced Audio Mode) Used to simulate multi-channel sound from disc to add extra speakers or equipment. 1 Press the E.A.M. You can only change the camera angle of the scene you selected will not work on the disc, programmed playback...
... playback. 2 Repeatedly press the ANGLE button to select the desired angle. Note: Depending on DVD video discs that provide multiple angles of angles varies from just two speakers without the need to disc. c. E.A.M. (Enhanced Audio Mode) Used to simulate multi-channel sound from disc to add extra speakers or equipment. 1 Press the E.A.M. You can only change the camera angle of the scene you selected will not work on the disc, programmed playback...
User Manual
Page 38
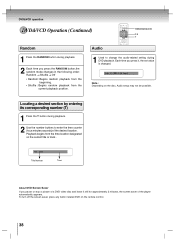
... the RANDOM button during DVD playback. Locating a desired section by entering its corresponding number (T) 1 Press the T button during playback. 2 Use the number buttons to change the audio-related setting during playback. 2 Each time you press it still for approximately 5 minutes, the screen saver of the desired location. To turn off the screen saver, press any button related DVD on the remote control. 38 Each time you press the RANDOM button,the random mode changes in...
... the RANDOM button during DVD playback. Locating a desired section by entering its corresponding number (T) 1 Press the T button during playback. 2 Use the number buttons to change the audio-related setting during playback. 2 Each time you press it still for approximately 5 minutes, the screen saver of the desired location. To turn off the screen saver, press any button related DVD on the remote control. 38 Each time you press the RANDOM button,the random mode changes in...
User Manual
Page 41
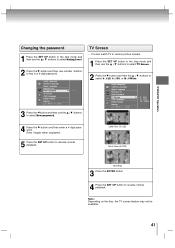
TV Screen - Letter Box (4:3 LB) Pan & Scan (4:3 PS) 16:9 Wide 3 Press the ENTER button 4 Press the SET UP button to resume normal playback. DVD&VCD Operation Changing the password 1 Press the SET UP button in the stop mode and then use the D / E buttons to select TV Screen. 2 Press the G button and then the D / E buttons to select 4 : 3 LB, 4 : 3 PS, or 16 : 9 Wide. Audio Language Subtitle Language Menu Language Rating Level New Password TV Screen OSD Language Digital Output Special D E : Move G : Next G 4 : 3 LB 4 : 3 PS 16 : 9 Wide...
TV Screen - Letter Box (4:3 LB) Pan & Scan (4:3 PS) 16:9 Wide 3 Press the ENTER button 4 Press the SET UP button to resume normal playback. DVD&VCD Operation Changing the password 1 Press the SET UP button in the stop mode and then use the D / E buttons to select TV Screen. 2 Press the G button and then the D / E buttons to select 4 : 3 LB, 4 : 3 PS, or 16 : 9 Wide. Audio Language Subtitle Language Menu Language Rating Level New Password TV Screen OSD Language Digital Output Special D E : Move G : Next G 4 : 3 LB 4 : 3 PS 16 : 9 Wide...
User Manual
Page 48
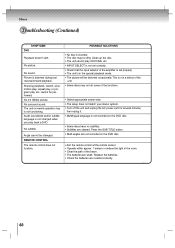
... batteries are weak. Picture is not functioning. No surround sound. REMOTE CONTROL The remote control does not function. No subtitle. This is in the room. • Clear the path of the unit. • Some discs may be performed. Stopping playback, search, slowmotion play, repeat play, or program play back a DVD. Angle cannot be distorted occasionally. Others Troubleshooting (Continued) SYMPTOMS DVD Playback doesn't start. cannot be dirty. Audio soundtrack and/or subtitle language is not recorded on the DVD disc...
... batteries are weak. Picture is not functioning. No surround sound. REMOTE CONTROL The remote control does not function. No subtitle. This is in the room. • Clear the path of the unit. • Some discs may be performed. Stopping playback, search, slowmotion play, repeat play, or program play back a DVD. Angle cannot be distorted occasionally. Others Troubleshooting (Continued) SYMPTOMS DVD Playback doesn't start. cannot be dirty. Audio soundtrack and/or subtitle language is not recorded on the DVD disc...
User Manual
Page 49
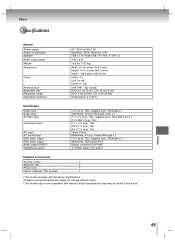
...69 Cable 01~125 UHF/VHF: 75Ω coaxial DVD (12 cm, 8 cm), CD (12 cm, 8 cm) DVD: 4 Hz-22 kHz, CD: 4 Hz-20 kHz Temperature: 0˚C-35˚C Input/Output Video input Audio input S-Video input Component input PC input PC sound input DVD video output DVD audio output Audio output (SPDIF) Headphone output ...Remote control 1 Batteries (AA 2 Power cord 1 Owner's Manual (This booklet 1 • This model complies with the above specifications. • Designs and specifications are subject to change without notice. • This model may not be compatible with features and/or specifications...
...69 Cable 01~125 UHF/VHF: 75Ω coaxial DVD (12 cm, 8 cm), CD (12 cm, 8 cm) DVD: 4 Hz-22 kHz, CD: 4 Hz-20 kHz Temperature: 0˚C-35˚C Input/Output Video input Audio input S-Video input Component input PC input PC sound input DVD video output DVD audio output Audio output (SPDIF) Headphone output ...Remote control 1 Batteries (AA 2 Power cord 1 Owner's Manual (This booklet 1 • This model complies with the above specifications. • Designs and specifications are subject to change without notice. • This model may not be compatible with features and/or specifications...

User Manual
Page 50
ARE NOT COVERED BY THESE WARRANTIES. or Puerto Rico. (4) Labor service charges for set installation, set up, adjustment of customer controls and installation or repair of antenna systems are effective only if the LCD TV/DVD COMBINATION is purchased and operated in the U.S.A. PRODUCTS PURCHASED IN THE U.S.A. YOU MUST CONTACT TOSHIBA'S CONSUMER SOLUTIONS CENTER FOR INSTRUCTIONS ON HOW TO PROCESS YOUR IN WARRANTY REPAIR REQUEST. By registering...
ARE NOT COVERED BY THESE WARRANTIES. or Puerto Rico. (4) Labor service charges for set installation, set up, adjustment of customer controls and installation or repair of antenna systems are effective only if the LCD TV/DVD COMBINATION is purchased and operated in the U.S.A. PRODUCTS PURCHASED IN THE U.S.A. YOU MUST CONTACT TOSHIBA'S CONSUMER SOLUTIONS CENTER FOR INSTRUCTIONS ON HOW TO PROCESS YOUR IN WARRANTY REPAIR REQUEST. By registering...

User Manual
Page 51
... TO THE REPAIR OR REPLACEMENT OF ANY PARTS. SOME STATES OF THE U.S.A. No person, agent, distributor, dealer or company is hereby limited to three hundred sixty five (365) days from the Service Station. Others Limited United States Warranty (Continued) How to Obtain Warranty Services If, after following all transportation and insurance charges for all of the operating instructions in any...
... TO THE REPAIR OR REPLACEMENT OF ANY PARTS. SOME STATES OF THE U.S.A. No person, agent, distributor, dealer or company is hereby limited to three hundred sixty five (365) days from the Service Station. Others Limited United States Warranty (Continued) How to Obtain Warranty Services If, after following all transportation and insurance charges for all of the operating instructions in any...

Brochure
Page 1
... & MP3 Playback • Simulated Sound Environments • Built-in Titanium Speakers • Headphone Output • A/V Inputs, including S-Video and Component • VESA®-Compliant Mounting Holes (100mm) ADVANTAGE TOSHIBA >> 17" 16x9, Amorphous (a-Si) Silicon TFT LCD Display with personal computers can be played back in the home theater system, too >> JPEG Viewer enables a user to display digital photographs on a television set in Slot Loading DVD player design...
... & MP3 Playback • Simulated Sound Environments • Built-in Titanium Speakers • Headphone Output • A/V Inputs, including S-Video and Component • VESA®-Compliant Mounting Holes (100mm) ADVANTAGE TOSHIBA >> 17" 16x9, Amorphous (a-Si) Silicon TFT LCD Display with personal computers can be played back in the home theater system, too >> JPEG Viewer enables a user to display digital photographs on a television set in Slot Loading DVD player design...

Brochure
Page 2
...Tuner x Auto Channel Memory x Video Adjustments Contrast, Brightness, Color, Tint Video D/A 12-Bit/54MHz Progressive Scan Digital Cinema Progressive 3:2 Pulldown Component Input 480i/480p/720p/1080i JPEG Viewer x Digital Picture Zoom x Fast Scan, Slow-Motion x Multi-Camera Angle Select x Multi-Language Select, Multi-Subtitle Select x Audio D/A Dolby® Digital/DTS® Compatible 24-bit/192kHz x WMA & MP3 Playback x Virtual Surround Sound Sound Environments Stereo Speakers Titanium Parental Lock x Sleep Timer x Closed Caption x V-Chip x Remote Control...
...Tuner x Auto Channel Memory x Video Adjustments Contrast, Brightness, Color, Tint Video D/A 12-Bit/54MHz Progressive Scan Digital Cinema Progressive 3:2 Pulldown Component Input 480i/480p/720p/1080i JPEG Viewer x Digital Picture Zoom x Fast Scan, Slow-Motion x Multi-Camera Angle Select x Multi-Language Select, Multi-Subtitle Select x Audio D/A Dolby® Digital/DTS® Compatible 24-bit/192kHz x WMA & MP3 Playback x Virtual Surround Sound Sound Environments Stereo Speakers Titanium Parental Lock x Sleep Timer x Closed Caption x V-Chip x Remote Control...


