
Users Manual Canada; English
Page 4
D-4 Appendix E AC Power Cord and Connectors Certification agencies E-1 Appendix F TOSHIBA Anti-theft Protection Timer User's Manual iv Qosmio F60 Series Chapter 6 Power and Power-Up Modes Power conditions 6-1 Monitoring of power condition 6-2 Battery 6-3 Replacing the battery pack 6-8 TOSHIBA Password Utility 6-10 Starting the computer by password 6-12 Power-up modes 6-12 Panel power on/off 6-13 System automatic...
D-4 Appendix E AC Power Cord and Connectors Certification agencies E-1 Appendix F TOSHIBA Anti-theft Protection Timer User's Manual iv Qosmio F60 Series Chapter 6 Power and Power-Up Modes Power conditions 6-1 Monitoring of power condition 6-2 Battery 6-3 Replacing the battery pack 6-8 TOSHIBA Password Utility 6-10 Starting the computer by password 6-12 Power-up modes 6-12 Panel power on/off 6-13 System automatic...
Users Manual Canada; English
Page 11
...instructions Be sure to check the international precautions at the end of this material may be regulated due to replace them properly. To ensure proper use , the batteries will finally lose their ability to hold a charge and you will need to environmental considerations. Under certain ...to the laser beam, do not try to our shared environment. Qosmio F60 Series Disposing of the computer and the computer's batteries ■ Discard this instruction manual carefully and retain for details regarding where to recycle old batteries or how to dispose of them . For disposal, reuse or ...
...instructions Be sure to check the international precautions at the end of this material may be regulated due to replace them properly. To ensure proper use , the batteries will finally lose their ability to hold a charge and you will need to environmental considerations. Under certain ...to the laser beam, do not try to our shared environment. Qosmio F60 Series Disposing of the computer and the computer's batteries ■ Discard this instruction manual carefully and retain for details regarding where to recycle old batteries or how to dispose of them . For disposal, reuse or ...
Users Manual Canada; English
Page 43
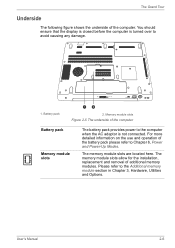
... here. User's Manual 2-6 Please refer to avoid causing any damage. 1. The memory module slots allow for the installation, replacement and removal of the battery pack please refer to Chapter 6, Power and Power-Up Modes. For more detailed information on the use and operation of additional... Figure 2-5 The underside of the computer. The Grand Tour Underside The following figure shows the underside of the computer Battery pack Memory module slots The battery pack provides power to the computer when the AC adaptor is turned over to the Additional memory module section in Chapter...
... here. User's Manual 2-6 Please refer to avoid causing any damage. 1. The memory module slots allow for the installation, replacement and removal of the battery pack please refer to Chapter 6, Power and Power-Up Modes. For more detailed information on the use and operation of additional... Figure 2-5 The underside of the computer. The Grand Tour Underside The following figure shows the underside of the computer Battery pack Memory module slots The battery pack provides power to the computer when the AC adaptor is turned over to the Additional memory module section in Chapter...
Users Manual Canada; English
Page 78
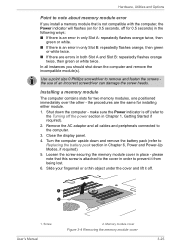
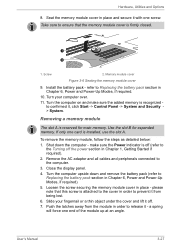
... to prevent it off. 1 2 1. Installing a memory module The computer contains slots for installing either module. 1. Turn the computer upside down and remove the battery pack (refer to Replacing the battery pack section in Chapter 1, Getting Started if required). 2. make sure the Power indicator is off (refer to the Turning off the power section...
... to prevent it off. 1 2 1. Installing a memory module The computer contains slots for installing either module. 1. Turn the computer upside down and remove the battery pack (refer to Replacing the battery pack section in Chapter 1, Getting Started if required). 2. make sure the Power indicator is off (refer to the Turning off the power section...
Users Manual Canada; English
Page 80
... cover in Chapter 6, Power and Power-Up Modes, if required. 10. Push the latches away from being lost. 6. User's Manual 3-27 refer to Replacing the battery pack section in Chapter 1, Getting Started if required). 2. Remove the AC adaptor and all cables and peripherals connected to the Turning off . 7. Hardware,... System. Use the slot B for main memory. If only one end of the module up at an angle. Shut down and remove the battery pack (refer to Replacing the battery pack section in place - please note that the memory module cover is installed, use the slot A.
... cover in Chapter 6, Power and Power-Up Modes, if required. 10. Push the latches away from being lost. 6. User's Manual 3-27 refer to Replacing the battery pack section in Chapter 1, Getting Started if required). 2. Remove the AC adaptor and all cables and peripherals connected to the Turning off . 7. Hardware,... System. Use the slot B for main memory. If only one end of the module up at an angle. Shut down and remove the battery pack (refer to Replacing the battery pack section in place - please note that the memory module cover is installed, use the slot A.
Users Manual Canada; English
Page 81
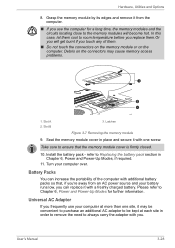
Hardware, Utilities and Options 8. Debris on the computer. Battery Packs You can replace it with one screw. Slot A 2. Turn your battery runs low, you replace them . ■ Do not touch the connectors on...if you touch any of the computer with you use the computer for further information. Install the battery pack - Universal AC Adaptor If you frequently use your computer at each site in order to ...long time, the memory modules and the circuits locating close to Replacing the battery pack section in place and secure it may cause memory access problems. 3 2 1 1.
Hardware, Utilities and Options 8. Debris on the computer. Battery Packs You can replace it with one screw. Slot A 2. Turn your battery runs low, you replace them . ■ Do not touch the connectors on...if you touch any of the computer with you use the computer for further information. Install the battery pack - Universal AC Adaptor If you frequently use your computer at each site in order to ...long time, the memory modules and the circuits locating close to Replacing the battery pack section in place and secure it may cause memory access problems. 3 2 1 1.
Users Manual Canada; English
Page 89
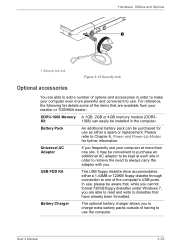
...installed in order to diskettes that are available from your reseller or TOSHIBA dealer: DDR3-1066 Memory A 1GB, 2GB or 4GB memory module (DDR3- Battery Pack An additional battery pack can easily be purchased for further information. USB FDD Kit The...while you cannot format 720KB floppy diskettes under Windows 7, you . User's Manual 3-36 In use . Battery Charger The optional battery charger allows you frequently use your computer even more than one of the items that have already been formatted... more powerful and convenient to use as either a spare or replacement.
...installed in order to diskettes that are available from your reseller or TOSHIBA dealer: DDR3-1066 Memory A 1GB, 2GB or 4GB memory module (DDR3- Battery Pack An additional battery pack can easily be purchased for further information. USB FDD Kit The...while you cannot format 720KB floppy diskettes under Windows 7, you . User's Manual 3-36 In use . Battery Charger The optional battery charger allows you frequently use your computer even more than one of the items that have already been formatted... more powerful and convenient to use as either a spare or replacement.
Users Manual Canada; English
Page 142
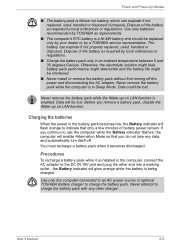
... computer connected to an AC power source or optional TOSHIBA Battery charger to the DC IN 19V jack and plug the other charger. Dispose of the battery as replacements. ■ The computer's RTC battery is a Ni-MH battery and should be lost . User's Manual 6-5 Never remove the battery pack while the Wake-up on LAN function is...
... computer connected to an AC power source or optional TOSHIBA Battery charger to the DC IN 19V jack and plug the other charger. Dispose of the battery as replacements. ■ The computer's RTC battery is a Ni-MH battery and should be lost . User's Manual 6-5 Never remove the battery pack while the Wake-up on LAN function is...

Users Manual Canada; English
Page 145
...connections for an extended period of the battery release latch and cause injuries. Always make sure the display panel is supplying power. The DC IN indicator should glow white, and the Battery indicator should glow orange to the computer. 4. Replacing the battery pack Please be lost . ■... In Hibernation Mode, data will need to go out. ■ Do not touch the battery release latch while holding the computer or the battery pack might also replace a discharged battery pack with the removal process which is detailed through repeated charging and discharging, and will be ...
...connections for an extended period of the battery release latch and cause injuries. Always make sure the display panel is supplying power. The DC IN indicator should glow white, and the Battery indicator should glow orange to the computer. 4. Replacing the battery pack Please be lost . ■... In Hibernation Mode, data will need to go out. ■ Do not touch the battery release latch while holding the computer or the battery pack might also replace a discharged battery pack with the removal process which is detailed through repeated charging and discharging, and will be ...
Users Manual Canada; English
Page 170
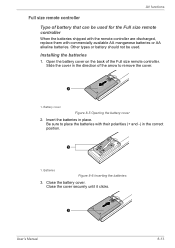
... the Full size remote controller. Batteries Figure 8-6 Inserting the batteries 3. Installing the batteries 1. Close the battery cover. Battery cover Figure 8-5 Opening the battery cover 2. AV functions Full size remote controller Type of battery that can be used for the Full size remote controller When the batteries shipped with the remote controller are discharged, replace them with their polarities (+ and...
... the Full size remote controller. Batteries Figure 8-6 Inserting the batteries 3. Installing the batteries 1. Close the battery cover. Battery cover Figure 8-5 Opening the battery cover 2. AV functions Full size remote controller Type of battery that can be used for the Full size remote controller When the batteries shipped with the remote controller are discharged, replace them with their polarities (+ and...
Users Manual Canada; English
Page 171
... videos as if they were in a theater in their polarities (+ and -) in the correct position. 1 1. User's Manual 8-14 Replace the batteries. Modes There are available: ON and OFF, with their dimly-lit room. Two sharpness levels are the following three modes. ■ Dynamic... or Hibernation Mode. Restrictions of their preferences for watching videos. Close the cover securely until it clicks. Battery cover Figure 8-7 Closing the battery cover Replacing the batteries When the batteries in a relaxed way. ■ Theater: Users can select from your computer. AV functions 1.
... videos as if they were in a theater in their polarities (+ and -) in the correct position. 1 1. User's Manual 8-14 Replace the batteries. Modes There are available: ON and OFF, with their dimly-lit room. Two sharpness levels are the following three modes. ■ Dynamic... or Hibernation Mode. Restrictions of their preferences for watching videos. Close the cover securely until it clicks. Battery cover Figure 8-7 Closing the battery cover Replacing the batteries When the batteries in a relaxed way. ■ Theater: Users can select from your computer. AV functions 1.
Users Manual Canada; English
Page 176
...the computer has reached room temperature and it still does not start, or if it should be replaced, while if the terminals are soiled, they should be discharged - Please refer to recharge the battery. Problem Procedure AC adaptor doesn't power the computer (DC IN indicator does not glow white) Check... a working power outlet. connect the AC adaptor to Chapter 6, Power and Power-Up Modes for more information on the computer with general battery operation. If the cord is firmly connected to make sure that the power cord/adaptor is frayed or damaged it starts but shuts down ...
...the computer has reached room temperature and it still does not start, or if it should be replaced, while if the terminals are soiled, they should be discharged - Please refer to recharge the battery. Problem Procedure AC adaptor doesn't power the computer (DC IN indicator does not glow white) Check... a working power outlet. connect the AC adaptor to Chapter 6, Power and Power-Up Modes for more information on the computer with general battery operation. If the cord is firmly connected to make sure that the power cord/adaptor is frayed or damaged it starts but shuts down ...
Users Manual Canada; English
Page 177
...the end of its operating life and should speak to your reseller, dealer or service provider. Check the Battery indicator - If the Battery indicator starts to glow after this can be replaced. User's Manual 9-6 if it is at least twenty minutes. Check the Power saver option under Select a...a soft dry cloth lightly dipped in the Power Options. Unplug the AC adaptor and remove the battery to make sure its full potential - Connect the AC adaptor and replace the battery, taking care to ensure that the power outlet the AC adaptor is connected to is completely discharged...
...the end of its operating life and should speak to your reseller, dealer or service provider. Check the Battery indicator - If the Battery indicator starts to glow after this can be replaced. User's Manual 9-6 if it is at least twenty minutes. Check the Power saver option under Select a...a soft dry cloth lightly dipped in the Power Options. Unplug the AC adaptor and remove the battery to make sure its full potential - Connect the AC adaptor and replace the battery, taking care to ensure that the power outlet the AC adaptor is connected to is completely discharged...
Users Manual Canada; English
Page 215
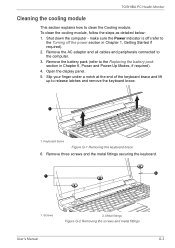
...Figure G-2 Removing the screws and metal fittings User's Manual G-3 Remove three screws and the metal fittings securing the keyboard. 2 1 1. Screws 2. TOSHIBA PC Health Monitor Cleaning the cooling module This section explains how to the Turning off (refer to clean the Cooling module. Remove the... - Open the display panel. 5. Slip your finger under a notch at the end of the keyboard brace and lift up to the Replacing the battery pack section in Chapter 1, Getting Started if required). 2. Keyboard barce Figure G-1 Removing the keyboard brace 6. Remove the AC adaptor and ...
...Figure G-2 Removing the screws and metal fittings User's Manual G-3 Remove three screws and the metal fittings securing the keyboard. 2 1 1. Screws 2. TOSHIBA PC Health Monitor Cleaning the cooling module This section explains how to the Turning off (refer to clean the Cooling module. Remove the... - Open the display panel. 5. Slip your finger under a notch at the end of the keyboard brace and lift up to the Replacing the battery pack section in Chapter 1, Getting Started if required). 2. Keyboard barce Figure G-1 Removing the keyboard brace 6. Remove the AC adaptor and ...
Users Manual Canada; English
Page 220
...time of publication. Shared System Memory will vary depending on usage. Available storage capacity will also be replaced. User's Manual H-3 To purchase a new battery pack, see the accessories information that is operated on product model, design configuration, applications, power management ... of the screen. Legal Footnotes Battery Life*4 Battery life may vary considerably depending on product model, configuration, applications, power management settings and features utilized, as well as the natural performance variations produced by Toshiba at maximum capacity and will need...
...time of publication. Shared System Memory will vary depending on usage. Available storage capacity will also be replaced. User's Manual H-3 To purchase a new battery pack, see the accessories information that is operated on product model, design configuration, applications, power management ... of the screen. Legal Footnotes Battery Life*4 Battery life may vary considerably depending on product model, configuration, applications, power management settings and features utilized, as well as the natural performance variations produced by Toshiba at maximum capacity and will need...
Users Manual Canada; English
Page 236
... characters 5-5 B Battery Monitoring capacity 6-6 charging 6-5 extending battery life 6-7 indicator 2-10, 6-2 real time clock 3-3, 6-4 save mode 3-11 types 6-3 Battery Charger 3-29, 3-36 Battery Packs 3-28 Battery pack 2-6, 3-3 replacing 6-8 Bluetooth 3-10, 4-34 Bluetooth Stack for Windows by Toshiba 3-15 problems ...1-1 eSATA device 3-31, 3-33 problems 9-19 eSATA/USB combo port 2-3, 3-8 External monitor 2-3, 3-7, 3-32 problems 9-21 F FN + 1 (TOSHIBA Zooming Utility reduce) 5-4 FN + 2 (TOSHIBA Zooming Utility enlarge) 5-4 FN + ESC (Mute) 5-2 FN + F1 (Lock) 5-2 FN + F2 (Power Plan) 5-2 FN + F3 (...
... characters 5-5 B Battery Monitoring capacity 6-6 charging 6-5 extending battery life 6-7 indicator 2-10, 6-2 real time clock 3-3, 6-4 save mode 3-11 types 6-3 Battery Charger 3-29, 3-36 Battery Packs 3-28 Battery pack 2-6, 3-3 replacing 6-8 Bluetooth 3-10, 4-34 Bluetooth Stack for Windows by Toshiba 3-15 problems ...1-1 eSATA device 3-31, 3-33 problems 9-19 eSATA/USB combo port 2-3, 3-8 External monitor 2-3, 3-7, 3-32 problems 9-21 F FN + 1 (TOSHIBA Zooming Utility reduce) 5-4 FN + 2 (TOSHIBA Zooming Utility enlarge) 5-4 FN + ESC (Mute) 5-2 FN + F1 (Lock) 5-2 FN + F2 (Power Plan) 5-2 FN + F3 (...

Detailed Specs for Qosmio F60 PQF65C-06702D English
Page 2
... configuration, applications, power management settings and features utilized, as well as the natural performance variations produced by Toshiba at high altitude (all batteries. Published battery life numbers are an intrinsic characteristic of the TFT manufacturing technology. Recharge time varies depending on select models ...your TFT display when you may appear on your computer, or to stay current with 4 GB of time, the battery will need to be replaced. Battery may vary. After a period of system memory, the full system memory space for more information. No substitution of ...
... configuration, applications, power management settings and features utilized, as well as the natural performance variations produced by Toshiba at high altitude (all batteries. Published battery life numbers are an intrinsic characteristic of the TFT manufacturing technology. Recharge time varies depending on select models ...your TFT display when you may appear on your computer, or to stay current with 4 GB of time, the battery will need to be replaced. Battery may vary. After a period of system memory, the full system memory space for more information. No substitution of ...


