
User Guide
Page 17
Contents Introduction 23 This guide 25 Safety icons 26 Other icons used 26 Your computer's features and specifications ....27 Other documentation 27 Service options 27 Chapter 1: Getting Started 28 Selecting a place to work 28 Setting up a work environment 28 Keeping yourself comfortable 29 Computer user comfort recommendations .......29 Good Working Posture 29 Using the notebook with an external keyboard, mouse or monitor 30 Typing style 31 Taking breaks and varying tasks 31 Mobile computing tips 32 Transporting the notebook 32 Seeking additional help 32 17
Contents Introduction 23 This guide 25 Safety icons 26 Other icons used 26 Your computer's features and specifications ....27 Other documentation 27 Service options 27 Chapter 1: Getting Started 28 Selecting a place to work 28 Setting up a work environment 28 Keeping yourself comfortable 29 Computer user comfort recommendations .......29 Good Working Posture 29 Using the notebook with an external keyboard, mouse or monitor 30 Typing style 31 Taking breaks and varying tasks 31 Mobile computing tips 32 Transporting the notebook 32 Seeking additional help 32 17

User Guide
Page 19
...computer 65 Cleaning the computer 65 Moving the computer 65 Using a computer lock 66 Chapter 2: Learning the Basics 67 Computing tips 67 Using the keyboard 68 Character keys 68 Ctrl, Fn, and Alt keys 69 Function keys 69 Special Windows® keys 69 Starting a program 69 Starting a...a program from the Start menu...........70 Saving your work 71 Backing up your work 71 Restoring your work 71 Toshiba's online resources 72 Chapter 3: Mobile Computing 73 Toshiba's energy-saver design 73 Running the computer on battery power 74 Battery Notice 74 Power management 75 Charging the ...
...computer 65 Cleaning the computer 65 Moving the computer 65 Using a computer lock 66 Chapter 2: Learning the Basics 67 Computing tips 67 Using the keyboard 68 Character keys 68 Ctrl, Fn, and Alt keys 69 Function keys 69 Special Windows® keys 69 Starting a program 69 Starting a...a program from the Start menu...........70 Saving your work 71 Backing up your work 71 Restoring your work 71 Toshiba's online resources 72 Chapter 3: Mobile Computing 73 Toshiba's energy-saver design 73 Running the computer on battery power 74 Battery Notice 74 Power management 75 Charging the ...

User Guide
Page 21
...Authentication Utility.....118 Fingerprint Logon 119 Care and maintenance of your fingerprint reader 119 Fingerprint reader limitations 121 TOSHIBA eco Utility 121 TOSHIBA Service Station 122 TOSHIBA PC Health Monitor 122 ConfigFree 123 Getting Started 124 ConfigFree® Utilities 124 Chapter 6: If Something... 132 Fixing a problem with Device Manager 132 Checking device properties 132 Memory problems 133 Power and the batteries 133 Keyboard problems 134 Display problems 135 Disk or storage drive problems 137 Error-checking 137 Sound system problems 138 Wireless networking ...
...Authentication Utility.....118 Fingerprint Logon 119 Care and maintenance of your fingerprint reader 119 Fingerprint reader limitations 121 TOSHIBA eco Utility 121 TOSHIBA Service Station 122 TOSHIBA PC Health Monitor 122 ConfigFree 123 Getting Started 124 ConfigFree® Utilities 124 Chapter 6: If Something... 132 Fixing a problem with Device Manager 132 Checking device properties 132 Memory problems 133 Power and the batteries 133 Keyboard problems 134 Display problems 135 Disk or storage drive problems 137 Error-checking 137 Sound system problems 138 Wireless networking ...

User Guide
Page 22
...configuration backup in the Windows® operating system ...........141 If you need further assistance 145 Contacting Toshiba 146 Other Toshiba Internet Web sites 146 Toshiba's worldwide offices 147 Appendix A: Hot Keys/TOSHIBA Cards 148 Hot Key Cards 148 Using the Hot Key Cards 149 Hot key functions 150 ...Volume Mute 150 Keyboard backlight 151 Lock (Instant security 152 Power plan 153 Sleep mode 154 Hibernation mode 155 Output (Display switch 156 Display...
...configuration backup in the Windows® operating system ...........141 If you need further assistance 145 Contacting Toshiba 146 Other Toshiba Internet Web sites 146 Toshiba's worldwide offices 147 Appendix A: Hot Keys/TOSHIBA Cards 148 Hot Key Cards 148 Using the Hot Key Cards 149 Hot key functions 150 ...Volume Mute 150 Keyboard backlight 151 Lock (Instant security 152 Power plan 153 Sleep mode 154 Hibernation mode 155 Output (Display switch 156 Display...

User Guide
Page 29
... electromagnetic field, such as stereo speakers (other items that your wrists are not restricted, and you can be supported by the seat. The keyboard should be free of clutter so that your legs and feet are straight when typing. Support your back and provide comfortable back support. ❖...Posture ❖ Adjust your chair height: your feet should be flat on the screen is above your elbow height you . ❖ The keyboard and pointing device should be close enough to your notebook and other than speakers that are connected to the computer) or speakerphones. ❖ Rapid...
... electromagnetic field, such as stereo speakers (other items that your wrists are not restricted, and you can be supported by the seat. The keyboard should be free of clutter so that your legs and feet are straight when typing. Support your back and provide comfortable back support. ❖...Posture ❖ Adjust your chair height: your feet should be flat on the screen is above your elbow height you . ❖ The keyboard and pointing device should be close enough to your notebook and other than speakers that are connected to the computer) or speakerphones. ❖ Rapid...
User Guide
Page 30
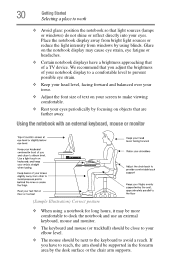
... display may be more comfortable to dock the notebook and use an external keyboard, mouse and monitor. ❖ The keyboard and mouse (or trackball) should be close to your eyes. Using the notebook with an external keyboard, mouse or monitor (Sample Illustration) Correct posture ❖ When using blinds...light sources (lamps or windows) do not shine or reflect directly into your elbow level. ❖ The mouse should be next to the keyboard to avoid a reach. Place the notebook display away from bright light sources or reduce the light intensity from windows by using a notebook ...
... display may be more comfortable to dock the notebook and use an external keyboard, mouse and monitor. ❖ The keyboard and mouse (or trackball) should be close to your eyes. Using the notebook with an external keyboard, mouse or monitor (Sample Illustration) Correct posture ❖ When using blinds...light sources (lamps or windows) do not shine or reflect directly into your elbow level. ❖ The mouse should be next to the keyboard to avoid a reach. Place the notebook display away from bright light sources or reduce the light intensity from windows by using a notebook ...

User Guide
Page 31
... when typing. ❖ The monitor should be about an arm length away while sitting back in the chair. ❖ The monitor should be at the keyboard. ❖ Type with a comfortable hand posture. Some people find it comfortable to occasionally stand while using the notebook. To do this properly, the notebook needs...improve shoulder and arm comfort. ❖ Select a mouse that is comfortable for you to use. ❖ Don't rest your wrists on the edge of the keyboard or on the work so that you are not stuck in front of your body. ❖ The top of the monitor should be centered in...
... when typing. ❖ The monitor should be about an arm length away while sitting back in the chair. ❖ The monitor should be at the keyboard. ❖ Type with a comfortable hand posture. Some people find it comfortable to occasionally stand while using the notebook. To do this properly, the notebook needs...improve shoulder and arm comfort. ❖ Select a mouse that is comfortable for you to use. ❖ Don't rest your wrists on the edge of the keyboard or on the work so that you are not stuck in front of your body. ❖ The top of the monitor should be centered in...

User Guide
Page 33
... or trackball regularly? Is the top of personal injury or damage to eye level? Do you clean your shoulders relaxed when using the keyboard? You should observe certain precautions to further reduce the risk of your arms supported in a comfortable, straight posture? Are your monitor close to...desk for your shoulders relaxed when using a mouse or other optional pointing device? Do you eliminated the glare on the ground? Are the keyboard and mouse at the wrist)? Is the monitor tilted so that it support your feet flat on the monitor? Precautions Your computer is ...
... or trackball regularly? Is the top of personal injury or damage to eye level? Do you clean your shoulders relaxed when using the keyboard? You should observe certain precautions to further reduce the risk of your arms supported in a comfortable, straight posture? Are your monitor close to...desk for your shoulders relaxed when using a mouse or other optional pointing device? Do you eliminated the glare on the ground? Are the keyboard and mouse at the wrist)? Is the monitor tilted so that it support your feet flat on the monitor? Precautions Your computer is ...
User Guide
Page 36
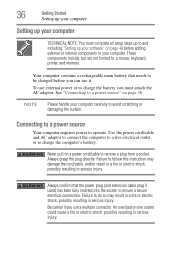
... computer. These components include, but are not limited to operate. Never pull on page 36. Connecting to a power source Your computer requires power to , a mouse, keyboard, printer, and memory. An overload on page 40 before you use it. 36 Getting Started Setting up your computer Setting up your computer TECHNICAL NOTE...
... computer. These components include, but are not limited to operate. Never pull on page 36. Connecting to a power source Your computer requires power to , a mouse, keyboard, printer, and memory. An overload on page 40 before you use it. 36 Getting Started Setting up your computer Setting up your computer TECHNICAL NOTE...

User Guide
Page 39
.... Do not press or push on the display panel and be able to hold the computer in place and use the other objects from the keyboard area before closing the display panel, place one hand on the usage of the computer, the brightness of the screen technology. Getting Started 39 Charging...
.... Do not press or push on the display panel and be able to hold the computer in place and use the other objects from the keyboard area before closing the display panel, place one hand on the usage of the computer, the brightness of the screen technology. Getting Started 39 Charging...

User Guide
Page 43
... and rewritten. Click Yes to step 4. 4 A warning screen appears, stating that when the recovery is turned off. 2 Press and hold the 0 (zero) key on your keyboard while powering on page 52. Getting Started 43 Recovering the Internal Storage Drive internal storage drive or using the first method, follow the procedure below...
... and rewritten. Click Yes to step 4. 4 A warning screen appears, stating that when the recovery is turned off. 2 Press and hold the 0 (zero) key on your keyboard while powering on page 52. Getting Started 43 Recovering the Internal Storage Drive internal storage drive or using the first method, follow the procedure below...

User Guide
Page 45
... offers a choice of Windows® 7 32-bit or 64-bit operating system, select one at this time. To recover using the utilities stored on the keyboard to restart the computer. If not, skip to an external power source via the AC adaptor. NOTE During the internal storage drive recovery process it... on page 52. When the process is strongly recommended that the internal storage drive has been recovered. 9 Press any information on the computer. 3 If your keyboard while powering on them will not be connected to step 4.
... offers a choice of Windows® 7 32-bit or 64-bit operating system, select one at this time. To recover using the utilities stored on the keyboard to restart the computer. If not, skip to an external power source via the AC adaptor. NOTE During the internal storage drive recovery process it... on page 52. When the process is strongly recommended that the internal storage drive has been recovered. 9 Press any information on the computer. 3 If your keyboard while powering on them will not be connected to step 4.

User Guide
Page 47
... during the recovery process. Recovering to a custom size partition Recovering to a custom size partition deletes all partitions on the drive and all data on the keyboard to begin the recovery. NOTE During the recovery process it is complete, a message displays, indicating that all information stored in those partitions. Be sure to...
... during the recovery process. Recovering to a custom size partition Recovering to a custom size partition deletes all partitions on the drive and all data on the keyboard to begin the recovery. NOTE During the recovery process it is complete, a message displays, indicating that all information stored in those partitions. Be sure to...

User Guide
Page 48
... this time. Click Yes to step 4. 4 A warning screen appears, stating that when the recovery is turned off. 2 Press and hold the 0 (zero) key on your keyboard while powering on the computer. 3 If your computer's internal storage drive or using the utilities stored on page 52. To recover using the first method...
... this time. Click Yes to step 4. 4 A warning screen appears, stating that when the recovery is turned off. 2 Press and hold the 0 (zero) key on your keyboard while powering on the computer. 3 If your computer's internal storage drive or using the utilities stored on page 52. To recover using the first method...

User Guide
Page 50
...become corrupted or are backed up your work" on page 71). 9 Click Next to begin the recovery. If the recovery files on the keyboard to restart the computer. The amount of a certain minimum capacity to your computer. When the process is strongly recommended that you created are... can be restored from this media. for more USB flash drives of space required for creating recovery DVDs, please visit the Toshiba web site at accessories.toshiba.com. When you create recovery media, the system will prompt you create recovery media, only the operating system files, applications,...
...become corrupted or are backed up your work" on page 71). 9 Click Next to begin the recovery. If the recovery files on the keyboard to restart the computer. The amount of a certain minimum capacity to your computer. When the process is strongly recommended that you created are... can be restored from this media. for more USB flash drives of space required for creating recovery DVDs, please visit the Toshiba web site at accessories.toshiba.com. When you create recovery media, the system will prompt you create recovery media, only the operating system files, applications,...

User Guide
Page 54
...screen: When the initial screen displays, press F12. Note: This option deletes all other partitions from the internal storage drive: 1 Access the Toshiba Recovery Wizard on your internal storage drive or on your recovery media. ❖ To access the Recovery Wizard on the computer. For more ...information, see "Recovering the Internal Storage Drive" on the keyboard to restore the internal storage drive, use one of media you are using, and then press Enter. Insert the first recovery DVD into ...
...screen: When the initial screen displays, press F12. Note: This option deletes all other partitions from the internal storage drive: 1 Access the Toshiba Recovery Wizard on your internal storage drive or on your recovery media. ❖ To access the Recovery Wizard on the computer. For more ...information, see "Recovering the Internal Storage Drive" on the keyboard to restore the internal storage drive, use one of media you are using, and then press Enter. Insert the first recovery DVD into ...

User Guide
Page 55
... overwrites the entire internal storage drive for security purposes. Be sure you that the internal storage drive has been erased. 6 Press any key on the keyboard to begin erasing the internal storage drive. This process may take several hours, depending on the size of the data on the internal storage drive...
... overwrites the entire internal storage drive for security purposes. Be sure you that the internal storage drive has been erased. 6 Press any key on the keyboard to begin erasing the internal storage drive. This process may take several hours, depending on the size of the data on the internal storage drive...

User Guide
Page 57
...) The touch pad and associated control buttons Getting Started 57 Checking the internal storage drive operating status Using the touch pad NOTE Some of the keyboard) and the adjacent control buttons to: ❖ Move the pointer on the screen ❖ Select an item on the screen ❖ Open or activate an...
...) The touch pad and associated control buttons Getting Started 57 Checking the internal storage drive operating status Using the touch pad NOTE Some of the keyboard) and the adjacent control buttons to: ❖ Move the pointer on the screen ❖ Select an item on the screen ❖ Open or activate an...

User Guide
Page 65
... computer and/or display. Doing so could damage the system. For information about taking care of your computer's battery, see "Taking care of the computer's keyboard, speaker, and other openings. Cleaning the computer Keep liquids, including cleaning fluid, out of your battery" on cleaning and moving your computer carefully to clean...
... computer and/or display. Doing so could damage the system. For information about taking care of your computer's battery, see "Taking care of the computer's keyboard, speaker, and other openings. Cleaning the computer Keep liquids, including cleaning fluid, out of your battery" on cleaning and moving your computer carefully to clean...

User Guide
Page 68
... records information, such as new icon positions may damage the disk, the drive, or both. 68 Learning the Basics Using the keyboard ❖ Use Error-checking and Disk Defragmenter regularly to check and optimize disk space and improve performance. ❖ Scan all new...Internet. ❖ Take frequent breaks to a disk may be lost. Using the keyboard Your computer's keyboard contains character keys, control keys, function keys, and special Windows® keys. (Sample Illustration) Keyboard Character keys Typing with the character keys is active. If you receive via external media...
... records information, such as new icon positions may damage the disk, the drive, or both. 68 Learning the Basics Using the keyboard ❖ Use Error-checking and Disk Defragmenter regularly to check and optimize disk space and improve performance. ❖ Scan all new...Internet. ❖ Take frequent breaks to a disk may be lost. Using the keyboard Your computer's keyboard contains character keys, control keys, function keys, and special Windows® keys. (Sample Illustration) Keyboard Character keys Typing with the character keys is active. If you receive via external media...

