

User Guide
Page 18
Contents Introduction 25 This guide 27 Safety icons 28 Other icons used 28 Your computer's features and specifications ....29 Other documentation 29 Service options 29 Chapter 1: Getting Started 30 Selecting a place to work 30 Setting up a work environment 30 Keeping yourself comfortable 31 Computer user comfort recommendations .......31 Good Working Posture 31 Using the notebook with an external keyboard, mouse or monitor 32 Typing style 33 Taking breaks and varying tasks 33 Mobile computing tips 34 Transporting the notebook 34 Seeking additional help 34 18
Contents Introduction 25 This guide 27 Safety icons 28 Other icons used 28 Your computer's features and specifications ....29 Other documentation 29 Service options 29 Chapter 1: Getting Started 30 Selecting a place to work 30 Setting up a work environment 30 Keeping yourself comfortable 31 Computer user comfort recommendations .......31 Good Working Posture 31 Using the notebook with an external keyboard, mouse or monitor 32 Typing style 33 Taking breaks and varying tasks 33 Mobile computing tips 34 Transporting the notebook 34 Seeking additional help 34 18

User Guide
Page 20
...76 Cleaning the computer 76 Moving the computer 76 Using a computer lock 76 Chapter 2: Learning the Basics 78 Computing tips 78 Using the keyboard 79 Character keys 80 Ctrl, Fn, and Alt keys 80 Function keys 80 Special Windows® keys 81 Starting a program 81 Starting a...Recording optical media 86 Removing a disc with the computer on 87 Removing a disc with the computer off 87 Toshiba's online resources 88 Chapter 3: Mobile Computing 89 Toshiba's energy-saver design 89 Running the computer on battery power 90 Battery Notice 90 Power management 91 Using additional batteries...
...76 Cleaning the computer 76 Moving the computer 76 Using a computer lock 76 Chapter 2: Learning the Basics 78 Computing tips 78 Using the keyboard 79 Character keys 80 Ctrl, Fn, and Alt keys 80 Function keys 80 Special Windows® keys 81 Starting a program 81 Starting a...Recording optical media 86 Removing a disc with the computer on 87 Removing a disc with the computer off 87 Toshiba's online resources 88 Chapter 3: Mobile Computing 89 Toshiba's energy-saver design 89 Running the computer on battery power 90 Battery Notice 90 Power management 91 Using additional batteries...

User Guide
Page 23
... help you 155 Fixing a problem with Device Manager 156 Checking device properties 156 Memory problems 157 Power and the batteries 157 Keyboard problems 159 Display problems 159 Disk or storage drive problems 161 Error-checking 161 Optical disc drive problems 162 Sound system problems ... backup in the Windows® operating system ...........171 If you need further assistance 175 Contacting Toshiba 176 Other Toshiba Internet Web sites 176 Toshiba's worldwide offices 177 Appendix A: Hot Keys/TOSHIBA Cards 178 Hot Key Cards 178 Using the Hot Key Cards 179 Hot key functions 180...
... help you 155 Fixing a problem with Device Manager 156 Checking device properties 156 Memory problems 157 Power and the batteries 157 Keyboard problems 159 Display problems 159 Disk or storage drive problems 161 Error-checking 161 Optical disc drive problems 162 Sound system problems ... backup in the Windows® operating system ...........171 If you need further assistance 175 Contacting Toshiba 176 Other Toshiba Internet Web sites 176 Toshiba's worldwide offices 177 Appendix A: Hot Keys/TOSHIBA Cards 178 Hot Key Cards 178 Using the Hot Key Cards 179 Hot key functions 180...

User Guide
Page 24
24 Contents Lock (Instant security 181 Power plan 182 Sleep mode 183 Hibernation mode 184 Output (Display switch 185 Display brightness 186 Disabling or enabling wireless devices............187 Disabling or enabling the touch pad 188 Keyboard hot key functions 189 Appendix B: Power Cord/Cable Connectors 190 Glossary 191 Index 206
24 Contents Lock (Instant security 181 Power plan 182 Sleep mode 183 Hibernation mode 184 Output (Display switch 185 Display brightness 186 Disabling or enabling wireless devices............187 Disabling or enabling the touch pad 188 Keyboard hot key functions 189 Appendix B: Power Cord/Cable Connectors 190 Glossary 191 Index 206
User Guide
Page 31
... the thigh. ❖ The space under your desk should be free of clutter so that your legs and feet are straight when typing. The keyboard should be tilted so that the image on the screen is above your elbow height you may need to slope the notebook to keep your...changes in temperature or humidity and sources of temperature change such as the keyboard and comfortably support your arms, allowing your shoulders to relax. ❖ When using the keyboard, it should be centered in front of you. ❖ The keyboard and pointing device should be evenly supported by the chair arm supports ...
... the thigh. ❖ The space under your desk should be free of clutter so that your legs and feet are straight when typing. The keyboard should be tilted so that the image on the screen is above your elbow height you may need to slope the notebook to keep your...changes in temperature or humidity and sources of temperature change such as the keyboard and comfortably support your arms, allowing your shoulders to relax. ❖ When using the keyboard, it should be centered in front of you. ❖ The keyboard and pointing device should be evenly supported by the chair arm supports ...
User Guide
Page 32
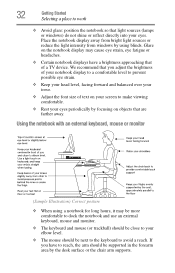
... eye strain. ❖ Keep your head level, facing forward and balanced over your elbow level. ❖ The mouse should be next to the keyboard to avoid a reach. Place the notebook display away from bright light sources or reduce the light intensity from windows by using a notebook for long ... by focusing on objects that of text on the notebook display may be more comfortable to dock the notebook and use an external keyboard, mouse and monitor. ❖ The keyboard and mouse (or trackball) should be close to your torso. ❖ Adjust the font size of a TV device. Using...
... eye strain. ❖ Keep your head level, facing forward and balanced over your elbow level. ❖ The mouse should be next to the keyboard to avoid a reach. Place the notebook display away from bright light sources or reduce the light intensity from windows by using a notebook for long ... by focusing on objects that of text on the notebook display may be more comfortable to dock the notebook and use an external keyboard, mouse and monitor. ❖ The keyboard and mouse (or trackball) should be close to your torso. ❖ Adjust the font size of a TV device. Using...
User Guide
Page 33
... your notebook computer, or other optional pointing devices like mouse or trackball) with straight wrists. ❖ Type lightly. ❖ Learn the keyboard shortcuts for long periods of the monitor should be more productive. ❖ Use the pointing device (e.g., touch pad, Accupoint®, or tablet...❖ The monitor should be about an arm length away while sitting back in the chair. ❖ The monitor should be at the keyboard. ❖ Type with a comfortable hand posture. A monitor that you might consider customized prescription computer glasses. To do this properly, the ...
... your notebook computer, or other optional pointing devices like mouse or trackball) with straight wrists. ❖ Type lightly. ❖ Learn the keyboard shortcuts for long periods of the monitor should be more productive. ❖ Use the pointing device (e.g., touch pad, Accupoint®, or tablet...❖ The monitor should be about an arm length away while sitting back in the chair. ❖ The monitor should be at the keyboard. ❖ Type with a comfortable hand posture. A monitor that you might consider customized prescription computer glasses. To do this properly, the ...

User Guide
Page 35
... read? Have you take breaks, at least once an hour? You should observe certain precautions to further reduce the risk of the computer. Are the keyboard and mouse at elbow level? Are your hands and wrists aligned in the forearm area (not at the wrist)? Are your shoulders relaxed when using... the keyboard? Is the top of travel. Is the monitor tilted so that it support your feet flat on the monitor? Do you eliminated the glare on...
... read? Have you take breaks, at least once an hour? You should observe certain precautions to further reduce the risk of the computer. Are the keyboard and mouse at elbow level? Are your hands and wrists aligned in the forearm area (not at the wrist)? Are your shoulders relaxed when using... the keyboard? Is the top of travel. Is the monitor tilted so that it support your feet flat on the monitor? Do you eliminated the glare on...

User Guide
Page 38
... or electric shock, possibly resulting in serious injury. Be careful if you can use it. Connecting to a power source Your computer requires power to , a mouse, keyboard, printer, memory, and an ExpressCard®. Failure to remove a plug from a socket. NOTE Please handle your computer. Use the power cord/cable and AC adaptor...
... or electric shock, possibly resulting in serious injury. Be careful if you can use it. Connecting to a power source Your computer requires power to , a mouse, keyboard, printer, memory, and an ExpressCard®. Failure to remove a plug from a socket. NOTE Please handle your computer. Use the power cord/cable and AC adaptor...
User Guide
Page 41
... may appear on the display panel and be completely charged and ready to hold the computer in place and use the other objects from the keyboard area before closing the display panel, place one hand on the applications, power management settings, and features used. NOTE When opening or closing the display...
... may appear on the display panel and be completely charged and ready to hold the computer in place and use the other objects from the keyboard area before closing the display panel, place one hand on the applications, power management settings, and features used. NOTE When opening or closing the display...

User Guide
Page 54
... an external power source via the AC adaptor. NOTE During the recovery process it is turned off. 2 Press and hold the 0 (zero) key on your keyboard while powering on the computer. 3 If your system offers a choice of Windows® 7 32-bit or 64-bit operating system, select one at this time...
... an external power source via the AC adaptor. NOTE During the recovery process it is turned off. 2 Press and hold the 0 (zero) key on your keyboard while powering on the computer. 3 If your system offers a choice of Windows® 7 32-bit or 64-bit operating system, select one at this time...
User Guide
Page 56
If you that all information stored on the keyboard to out-of-box state. (Sample Image) Recovery of Factory Default Software screen appears. A confirmation message displays reminding you have created other partitions (for example, a D: ...
If you that all information stored on the keyboard to out-of-box state. (Sample Image) Recovery of Factory Default Software screen appears. A confirmation message displays reminding you have created other partitions (for example, a D: ...

User Guide
Page 57
Click Yes to step 4. 4 A warning screen appears stating that when the recovery is turned off. 2 Press and hold the 0 (zero) key on your keyboard while powering on page 64. If not, skip to continue. (Sample Image) Warning screen Getting Started 57 Recovering the Internal Storage Drive You can recover ...
Click Yes to step 4. 4 A warning screen appears stating that when the recovery is turned off. 2 Press and hold the 0 (zero) key on your keyboard while powering on page 64. If not, skip to continue. (Sample Image) Warning screen Getting Started 57 Recovering the Internal Storage Drive You can recover ...

User Guide
Page 59
...174; 7 32-bit or 64-bit operating system, select one at this time. If not, skip to a custom size partition deletes all partitions on the keyboard to save your system offers a choice of -box state, and allows you have created such media. Be sure to restart the computer. NOTE During the...if you to an external power source via the AC adaptor. When the process is turned off. 2 Press and hold the 0 (zero) key on your keyboard while powering on the computer. 3 If your work " on your computer's internal storage drive or using the second method, see "Backing up your computer be...
...174; 7 32-bit or 64-bit operating system, select one at this time. If not, skip to a custom size partition deletes all partitions on the keyboard to save your system offers a choice of -box state, and allows you have created such media. Be sure to restart the computer. NOTE During the...if you to an external power source via the AC adaptor. When the process is turned off. 2 Press and hold the 0 (zero) key on your keyboard while powering on the computer. 3 If your work " on your computer's internal storage drive or using the second method, see "Backing up your computer be...

User Guide
Page 61
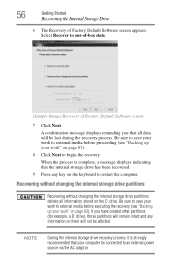
... storage drive fails, you that all data will be lost during the recovery process. Also, if your recovery media. If the recovery files on the keyboard to restart the computer. Select Recover to a custom size partition. (Sample Image) Recovery of Factory Default Software screen 7 Use the on page 83). 9 Click Next...
... storage drive fails, you that all data will be lost during the recovery process. Also, if your recovery media. If the recovery files on the keyboard to restart the computer. Select Recover to a custom size partition. (Sample Image) Recovery of Factory Default Software screen 7 Use the on page 83). 9 Click Next...

User Guide
Page 65
When the initial screen displays, press F12. Click Yes to continue. 6 When the Toshiba Recovery Wizard opens and the Selecting a Process screen displays, select Recovery of Factory Default Software and then click Next. 7 Select one of the following options: &#... Enter. 5 A warning screen appears, stating that when the recovery is complete, a message displays indicating that the drive has been recovered. 9 Press any key on the keyboard to restart the computer.
When the initial screen displays, press F12. Click Yes to continue. 6 When the Toshiba Recovery Wizard opens and the Selecting a Process screen displays, select Recovery of Factory Default Software and then click Next. 7 Select one of the following options: &#... Enter. 5 A warning screen appears, stating that when the recovery is complete, a message displays indicating that the drive has been recovered. 9 Press any key on the keyboard to restart the computer.
User Guide
Page 67
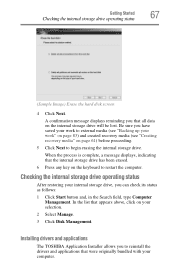
... created recovery media (see "Creating recovery media" on the internal storage drive will be lost. Installing drivers and applications The TOSHIBA Application Installer allows you to restart the computer. Checking the internal storage drive operating status After restoring your computer. Getting Started ...the process is complete, a message displays, indicating that the internal storage drive has been erased. 6 Press any key on the keyboard to reinstall the drivers and applications that were originally bundled with your internal storage drive, you that appears above, click on your ...
... created recovery media (see "Creating recovery media" on the internal storage drive will be lost. Installing drivers and applications The TOSHIBA Application Installer allows you to restart the computer. Checking the internal storage drive operating status After restoring your computer. Getting Started ...the process is complete, a message displays, indicating that the internal storage drive has been erased. 6 Press any key on the keyboard to reinstall the drivers and applications that were originally bundled with your internal storage drive, you that appears above, click on your ...
User Guide
Page 68
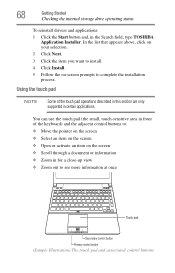
... on the screen ❖ Open or activate an item on the screen ❖ Scroll through a document or information ❖ Zoom in the Search field, type TOSHIBA Application Installer. You can use the touch pad (the small, touch-sensitive area in front of the touch pad operations described in this section are... Touch pad Secondary control button Primary control button (Sample Illustration) The touch pad and associated control buttons Using the touch pad NOTE Some of the keyboard) and the adjacent control buttons to complete the installation process.
... on the screen ❖ Open or activate an item on the screen ❖ Scroll through a document or information ❖ Zoom in the Search field, type TOSHIBA Application Installer. You can use the touch pad (the small, touch-sensitive area in front of the touch pad operations described in this section are... Touch pad Secondary control button Primary control button (Sample Illustration) The touch pad and associated control buttons Using the touch pad NOTE Some of the keyboard) and the adjacent control buttons to complete the installation process.

User Guide
Page 76
.... Never spray cleaner directly onto the computer and/or display. For information about taking care of your computer's battery, see "Taking care of the computer's keyboard, speaker, and other openings. Do not pick up the computer by its display panel or by the back. 76 Getting Started Caring for your computer...
.... Never spray cleaner directly onto the computer and/or display. For information about taking care of your computer's battery, see "Taking care of the computer's keyboard, speaker, and other openings. Do not pick up the computer by its display panel or by the back. 76 Getting Started Caring for your computer...

User Guide
Page 79
... lost. If you will lose all new files for files you have a separate backup copy. Using the keyboard Your computer's keyboard contains character keys, control keys, function keys, and special Windows® keys. (Sample Illustration) Keyboard However, if your internal storage drive suddenly fails, you do not let the Windows® operating system... media, email, or download from or writing to put off backing up your desktop setup, during its shutdown procedure. Learning the Basics 79 Using the keyboard ❖ Back up because it takes time.
... lost. If you will lose all new files for files you have a separate backup copy. Using the keyboard Your computer's keyboard contains character keys, control keys, function keys, and special Windows® keys. (Sample Illustration) Keyboard However, if your internal storage drive suddenly fails, you do not let the Windows® operating system... media, email, or download from or writing to put off backing up your desktop setup, during its shutdown procedure. Learning the Basics 79 Using the keyboard ❖ Back up because it takes time.

