
User Guide
Page 19
... recovery method 54 Recovering without changing the internal storage drive partitions 56 Recovering to a custom size partition 59 Creating recovery media 61 Restoring from recovery media 64 Erasing the Internal Storage Drive 66 Checking the internal storage drive operating status 67 Installing drivers and applications 67 Using the touch pad 68 Adjusting touch pad settings 71 Disabling or enabling the touch pad 72 Scrolling with the touch pad 72 Control buttons 72 Connecting an external device 73 Using external display devices 73 Selecting video cables 73 Connecting an HDMI...
... recovery method 54 Recovering without changing the internal storage drive partitions 56 Recovering to a custom size partition 59 Creating recovery media 61 Restoring from recovery media 64 Erasing the Internal Storage Drive 66 Checking the internal storage drive operating status 67 Installing drivers and applications 67 Using the touch pad 68 Adjusting touch pad settings 71 Disabling or enabling the touch pad 72 Scrolling with the touch pad 72 Control buttons 72 Connecting an external device 73 Using external display devices 73 Selecting video cables 73 Connecting an HDMI...
User Guide
Page 22
... Connect 119 Secure 120 Protect & Fix 121 Optimize 122 TOSHIBA Application Installer 123 Setting passwords 124 Using an instant password 124 Using a supervisor password 125 Using a user password 126 TOSHIBA Face Recognition Utility 128 TOSHIBA Security Assist 129 TOSHIBA PC Diagnostic Tool Utility 131 TOSHIBA HDD Protection Utility 132 Mouse Utility 133 TOSHIBA Hardware Setup 134 TOSHIBA Sleep Utility 136 Starting the TOSHIBA Sleep Utility 136 USB Sleep and Charge 136 Enabling/Disabling USB Sleep and Charge......138 Power supply mode settings 138 TOSHIBA Button Support...
... Connect 119 Secure 120 Protect & Fix 121 Optimize 122 TOSHIBA Application Installer 123 Setting passwords 124 Using an instant password 124 Using a supervisor password 125 Using a user password 126 TOSHIBA Face Recognition Utility 128 TOSHIBA Security Assist 129 TOSHIBA PC Diagnostic Tool Utility 131 TOSHIBA HDD Protection Utility 132 Mouse Utility 133 TOSHIBA Hardware Setup 134 TOSHIBA Sleep Utility 136 Starting the TOSHIBA Sleep Utility 136 USB Sleep and Charge 136 Enabling/Disabling USB Sleep and Charge......138 Power supply mode settings 138 TOSHIBA Button Support...
User Guide
Page 27
... software or hardware options, visit Toshiba's Web site at support.toshiba.com. For the most up-to-date product information about the features and specifications on your computer, or to end. ❖ Skim through and stop when a topic interests you. ❖ Use the table of the information provided herein, product specifications, configurations, prices, system/component/options availability are designed for a product Series...
... software or hardware options, visit Toshiba's Web site at support.toshiba.com. For the most up-to-date product information about the features and specifications on your computer, or to end. ❖ Skim through and stop when a topic interests you. ❖ Use the table of the information provided herein, product specifications, configurations, prices, system/component/options availability are designed for a product Series...
User Guide
Page 51
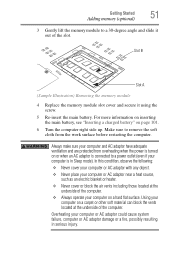
... page 101. 6 Turn the computer right side up. Using your computer on a hard flat surface. Make sure to remove the soft cloth from overheating when the power is in serious injury. Getting Started 51 Adding memory (optional) 3 Gently lift the memory module to a 30-degree angle and slide it using the screw. 5 Re-insert the main battery. Slot B Slot A (Sample Illustration) Removing the memory module 4 Replace the memory module slot cover and secure...
... page 101. 6 Turn the computer right side up. Using your computer on a hard flat surface. Make sure to remove the soft cloth from overheating when the power is in serious injury. Getting Started 51 Adding memory (optional) 3 Gently lift the memory module to a 30-degree angle and slide it using the screw. 5 Re-insert the main battery. Slot B Slot A (Sample Illustration) Removing the memory module 4 Replace the memory module slot cover and secure...
User Guide
Page 73
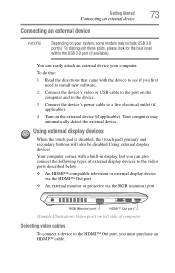
... purchase an HDMI™ cable. Getting Started 73 Connecting an external device Connecting an external device NOTE Depending on the external device (if applicable). Using external display devices When the touch pad is disabled, the (touch pad) primary and secondary buttons will also be disabled.Using external display devices Your computer comes with the device to see if you first need to install new software. 2 Connect the device's video or USB cable to the port on the computer and to the device. 3 Connect the device's power cable to the HDMI™ Out port, you...
... purchase an HDMI™ cable. Getting Started 73 Connecting an external device Connecting an external device NOTE Depending on the external device (if applicable). Using external display devices When the touch pad is disabled, the (touch pad) primary and secondary buttons will also be disabled.Using external display devices Your computer comes with the device to see if you first need to install new software. 2 Connect the device's video or USB cable to the port on the computer and to the device. 3 Connect the device's power cable to the HDMI™ Out port, you...
User Guide
Page 74
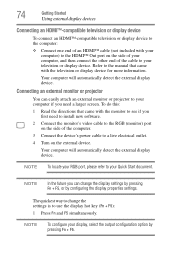
... came with the monitor to see if you need to install new software. 2 Connect the monitor's video cable to your display, select the output configuration option by configuring the display properties settings. 74 Getting Started Using external display devices Connecting an HDMI™-compatible television or display device To connect an HDMI™-compatible television or display device to the computer: ❖ Connect one end of an HDMI™ cable (not included with your computer) to the HDMI™ Out port on the...
... came with the monitor to see if you need to install new software. 2 Connect the monitor's video cable to your display, select the output configuration option by configuring the display properties settings. 74 Getting Started Using external display devices Connecting an HDMI™-compatible television or display device To connect an HDMI™-compatible television or display device to the computer: ❖ Connect one end of an HDMI™ cable (not included with your computer) to the HDMI™ Out port on the...

User Guide
Page 154
...; Safe Mode with Networking ❖ Safe Mode with Command Prompt ❖ Enable Boot Logging ❖ Enable low-resolution video (640 x 480) ❖ Last Known Good Configuration (advanced) ❖ Directory Services Restore Mode ❖ Debugging Mode ❖ Disable automatic restart on system failure ❖ Disable Driver Signature Enforcement ❖ Start Windows® Normally When you highlight each option using the arrow keys, Windows® displays information about each option at the bottom after Description. To open the Startup menu...
...; Safe Mode with Networking ❖ Safe Mode with Command Prompt ❖ Enable Boot Logging ❖ Enable low-resolution video (640 x 480) ❖ Last Known Good Configuration (advanced) ❖ Directory Services Restore Mode ❖ Debugging Mode ❖ Disable automatic restart on system failure ❖ Disable Driver Signature Enforcement ❖ Start Windows® Normally When you highlight each option using the arrow keys, Windows® displays information about each option at the bottom after Description. To open the Startup menu...
User Guide
Page 164
... setup of devices, such as a removable hard disk, additional memory, or a pager. ExpressCard® checklist ❖ Make sure the card is feedback between the microphone and the speakers. ExpressCard® problems (Available on certain models.) ExpressCards® include many types of new cards. Check the ExpressCard® status: 1 Click Start, Control Panel, System and Security, and then under the operating system. If the card malfunctions again, it may not work...
... setup of devices, such as a removable hard disk, additional memory, or a pager. ExpressCard® checklist ❖ Make sure the card is feedback between the microphone and the speakers. ExpressCard® problems (Available on certain models.) ExpressCards® include many types of new cards. Check the ExpressCard® status: 1 Click Start, Control Panel, System and Security, and then under the operating system. If the card malfunctions again, it may not work...
User Guide
Page 199
... a computer screen, in which certain keys in combination with the Fn key can control another while using a pointing device such as the battery save mode. (2) A key or combination of keys that you turn the computer off . See also cache, CPU cache, L2 cache. L2 (level two) cache-Memory cache installed on the screen that represents a function, file, or program. Interlaced monitors take two passes to create a complete screen image...
... a computer screen, in which certain keys in combination with the Fn key can control another while using a pointing device such as the battery save mode. (2) A key or combination of keys that you turn the computer off . See also cache, CPU cache, L2 cache. L2 (level two) cache-Memory cache installed on the screen that represents a function, file, or program. Interlaced monitors take two passes to create a complete screen image...

User Guide
Page 206
... memory (optional) 43 optional external devices 42 adequate ventilation cooling fan 37 adjusting touch pad settings 69 audio features 110 B backing up files 79, 83 battery battery life 90 Call2Recycle™ 104 care 102, 103 changing 99 charge indicator light 40 charging 41 charging the real-time clock (RTC) 93 conserving power 96 determine remaining power 94 disposal 103 indicator light 94 installation 99, 101 low charge 95 maintaining 103 maximum capacity 90 monitoring power 40, 93 power management...
... memory (optional) 43 optional external devices 42 adequate ventilation cooling fan 37 adjusting touch pad settings 69 audio features 110 B backing up files 79, 83 battery battery life 90 Call2Recycle™ 104 care 102, 103 changing 99 charge indicator light 40 charging 41 charging the real-time clock (RTC) 93 conserving power 96 determine remaining power 94 disposal 103 indicator light 94 installation 99, 101 low charge 95 maintaining 103 maximum capacity 90 monitoring power 40, 93 power management...
User Guide
Page 207
... monitor 74 power cord/cable 40 power source 39 cooling fan adequate ventilation 37 customize computer settings 75 D data/entire system backup troubleshooting 172 desktop creating new icon 107 exploring the 106 icons 107 recycle bin 107 standard features 107 Windows® operating system 106 Device Manager fixing a problem 156 disabling touch pad 72, 188 display troubleshooting 160 display devices external 73 display output settings 74 display, external adjusting 75 disposal information 16 disposing of used batteries 103 double-click 72 DVD removing...
... monitor 74 power cord/cable 40 power source 39 cooling fan adequate ventilation 37 customize computer settings 75 D data/entire system backup troubleshooting 172 desktop creating new icon 107 exploring the 106 icons 107 recycle bin 107 standard features 107 Windows® operating system 106 Device Manager fixing a problem 156 disabling touch pad 72, 188 display troubleshooting 160 display devices external 73 display output settings 74 display, external adjusting 75 disposal information 16 disposing of used batteries 103 double-click 72 DVD removing...

User Guide
Page 209
...80 function keys 80 L LEDs system indicator lights 94 AC adaptor light 93 AC power light 38, 40 battery light 40, 41 Web Camera light 111 Licenses 16 lock computer, using 76 M maintaining your battery 103 manual eject hole optical disc drive 85 memory adding (optional) 43 check total memory 52 removing memory module slot cover 45 Memory card reader inserting memory media 114 removing memory media 115 Index 209 using 114 memory module installation 43 inserting into socket 47 removing 49, 51 microphone using 110 monitor connecting 74 monitor problems troubleshooting 160 monitoring battery power...
...80 function keys 80 L LEDs system indicator lights 94 AC adaptor light 93 AC power light 38, 40 battery light 40, 41 Web Camera light 111 Licenses 16 lock computer, using 76 M maintaining your battery 103 manual eject hole optical disc drive 85 memory adding (optional) 43 check total memory 52 removing memory module slot cover 45 Memory card reader inserting memory media 114 removing memory media 115 Index 209 using 114 memory module installation 43 inserting into socket 47 removing 49, 51 microphone using 110 monitor connecting 74 monitor problems troubleshooting 160 monitoring battery power...
User Manual
Page 70
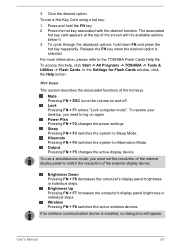
... restore your desktop, you must set the resolution of the screen with the desired function. In the Settings for Flash Cards window, click the Help button. Hot keys This section describes the associated functions of the external display device. Wireless Pressing FN + F8 switches the active wireless devices. Hibernate Pressing FN + F4 switches the system to Sleep Mode. User's Manual 3-5 3. The associated hot key card appears at the top of the internal display panel to the TOSHIBA Flash Cards Help file. To use a simultaneous mode, you need...
... restore your desktop, you must set the resolution of the screen with the desired function. In the Settings for Flash Cards window, click the Help button. Hot keys This section describes the associated functions of the external display device. Wireless Pressing FN + F8 switches the active wireless devices. Hibernate Pressing FN + F4 switches the system to Sleep Mode. User's Manual 3-5 3. The associated hot key card appears at the top of the internal display panel to the TOSHIBA Flash Cards Help file. To use a simultaneous mode, you need...
User Manual
Page 89
...; discs Some DVD-ROM drives for personal computers or other DVD players may not be locked. When playing your recorded Blu-ray Disc™ on your computer, please use a brand new disc. Playback may occur during video playback. Use DVD-Video discs with a region code which is supported for playback of DVD-Video and DVD-VR. User's Manual 3-24 Install, remove or connect external devices, including the following: memory media card, USB device, external display, optical digital devices. Please use the TOSHIBA Blu-ray Disc Player software application. TOSHIBA VIDEO PLAYER...
...; discs Some DVD-ROM drives for personal computers or other DVD players may not be locked. When playing your recorded Blu-ray Disc™ on your computer, please use a brand new disc. Playback may occur during video playback. Use DVD-Video discs with a region code which is supported for playback of DVD-Video and DVD-VR. User's Manual 3-24 Install, remove or connect external devices, including the following: memory media card, USB device, external display, optical digital devices. Please use the TOSHIBA Blu-ray Disc Player software application. TOSHIBA VIDEO PLAYER...
User Manual
Page 93
...; drive (for models with both Wireless LAN and Bluetooth functions. Screen display and available features may not function properly if you use the files other than these types. If the menu is set in TOSHIBA Blu-ray Disc Player Manual. Use the following procedure to start automatically. User's Manual 3-28 Playback may vary amongst Blu-ray™ Videos and scenes. Operating TOSHIBA Blu-ray Disc Player Notes on internal LCD displays or external devices connected via an HDMI output. Press F1 key...
...; drive (for models with both Wireless LAN and Bluetooth functions. Screen display and available features may not function properly if you use the files other than these types. If the menu is set in TOSHIBA Blu-ray Disc Player Manual. Use the following procedure to start automatically. User's Manual 3-28 Playback may vary amongst Blu-ray™ Videos and scenes. Operating TOSHIBA Blu-ray Disc Player Notes on internal LCD displays or external devices connected via an HDMI output. Press F1 key...
User Manual
Page 105
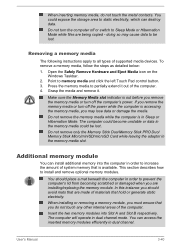
... other internal areas of the computer. You could be lost . Do not turn off the computer's power. Open the Safely Remove Hardware and Eject Media icon on the Windows Taskbar. 2. Grasp the media and remove it out of supported media devices. Make sure the Memory Media slot indicator is out before you must ensure that are installing/replacing the memory module. Additional memory module You can access the inserted memory modules efficiently in the memory media slot. The computer will operate in Sleep...
... other internal areas of the computer. You could be lost . Do not turn off the computer's power. Open the Safely Remove Hardware and Eject Media icon on the Windows Taskbar. 2. Grasp the media and remove it out of supported media devices. Make sure the Memory Media slot indicator is out before you must ensure that are installing/replacing the memory module. Additional memory module You can access the inserted memory modules efficiently in the memory media slot. The computer will operate in Sleep...
User Manual
Page 106
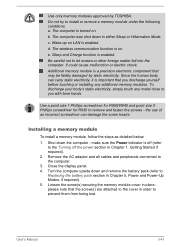
... body's static electricity, simply touch any metal close to the Turning off the power section in Chapter 1, Getting Started if required). 2. make sure the Power indicator is on . Close the display panel. 4. User's Manual 3-41 b. c. The wireless communication function is off (refer to you discharge yourself before touching or installing any additional memory modules. Be careful not to remove and fasten the screws - Additional memory module is enabled. Use a point size 1 Phillips...
... body's static electricity, simply touch any metal close to the Turning off the power section in Chapter 1, Getting Started if required). 2. make sure the Power indicator is on . Close the display panel. 4. User's Manual 3-41 b. c. The wireless communication function is off (refer to you discharge yourself before touching or installing any additional memory modules. Be careful not to remove and fasten the screws - Additional memory module is enabled. Use a point size 1 Phillips...

User Manual
Page 180
... display panel and an external monitor are still unable to the computer is not set the display panel and external monitor to re-set for a firm cable connection between the LAN jack and the LAN hub. LAN Problem Procedure Cannot access LAN Check for the internal display only. Problem Procedure No display Try adjusting the contrast and brightness controls on LAN does not work Make sure the AC adaptor is connected. Check to turn off . Remember to see if the external monitor is connected...
... display panel and an external monitor are still unable to the computer is not set the display panel and external monitor to re-set for a firm cable connection between the LAN jack and the LAN hub. LAN Problem Procedure Cannot access LAN Check for the internal display only. Problem Procedure No display Try adjusting the contrast and brightness controls on LAN does not work Make sure the AC adaptor is connected. Check to turn off . Remember to see if the external monitor is connected...

User Manual
Page 188
... Operating System 64-bit CPU, Chipset and BIOS (Basic Input/Output System) 64-bit Device drivers 64-bit applications Certain device drivers and/or applications may not function properly. Published battery life numbers are designed to Chapter 6 Troubleshooting for other factors. Read additional restrictions in your computer is not available to support graphics may vary considerably depending on product model, configuration, applications, power management settings and features utilized...
... Operating System 64-bit CPU, Chipset and BIOS (Basic Input/Output System) 64-bit Device drivers 64-bit applications Certain device drivers and/or applications may not function properly. Published battery life numbers are designed to Chapter 6 Troubleshooting for other factors. Read additional restrictions in your computer is not available to support graphics may vary considerably depending on product model, configuration, applications, power management settings and features utilized...
Detailed Specs for Portege R930 PT331C-0UJ044 English
Page 1
... LED backlight Size (diagonal): 13.3" HD Native LCD Panel Resolution: 1366x768x16.7 million colours External Support and Max. Operating System Windows® 7 Professional with Windows 8 Pro Upgrade Disc Key Features Toshiba Self Encrypting Hard Drive Technology Toshiba Smart Client Manager Docking Station Connector TPM/Fingerprint reader Intel vPro and AMT technology Full sized spill resistant keyboard Integrated 1.3MP Webcam Toshiba EasyGuard feature set HDMI Connector Widi Capable Thin and Light design (3.21 lbs) w/ ODD Memory Standard Memory...
... LED backlight Size (diagonal): 13.3" HD Native LCD Panel Resolution: 1366x768x16.7 million colours External Support and Max. Operating System Windows® 7 Professional with Windows 8 Pro Upgrade Disc Key Features Toshiba Self Encrypting Hard Drive Technology Toshiba Smart Client Manager Docking Station Connector TPM/Fingerprint reader Intel vPro and AMT technology Full sized spill resistant keyboard Integrated 1.3MP Webcam Toshiba EasyGuard feature set HDMI Connector Widi Capable Thin and Light design (3.21 lbs) w/ ODD Memory Standard Memory...


