Maintenance Manual
Page 66
... initialization Message Read EC version CMOS default setup check ACPI table initialization KBC initialization PCI initialization PIC test Check if self test is required Password initialization Initializing LAN information Wake UP check CMOS data initialization(2) PnP initialization Set SETUP item Wait for VGA EC access process completion Power-off...initialization Store CMOS error information to SMRAM Timer initialization Read power supply system information EC initialization Get Battery information Get LCD EDID information VGA BIOS initialization 2-24 PORTEGE M100 Maintenance Manual (960-452)
... initialization Message Read EC version CMOS default setup check ACPI table initialization KBC initialization PCI initialization PIC test Check if self test is required Password initialization Initializing LAN information Wake UP check CMOS data initialization(2) PnP initialization Set SETUP item Wait for VGA EC access process completion Power-off...initialization Store CMOS error information to SMRAM Timer initialization Read power supply system information EC initialization Get Battery information Get LCD EDID information VGA BIOS initialization 2-24 PORTEGE M100 Maintenance Manual (960-452)

Maintenance Manual
Page 68
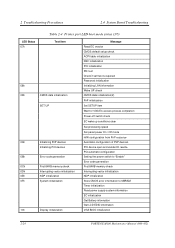
...1Fh Test item Pre boot SETUP FFh End Message Store 40: 00h value (for SIQ save / restore) Set font address for resume password Set USB/KB repeat parameter T shadow RAM size store Extended memory store in CMOS System source update DMI table update INT 15h E820h function... writing on BIOS TIT checksum Runtime IRT flag clear Runtime checksum update Hibernation branch CPU, HDD upgrade check Set battery save mode Set date Close PCI device configuration area Cache control Wait for serial port initialization completion Runtime checksum update Set thermal duty 2-26 PORTEGE M100 Maintenance Manual ...
...1Fh Test item Pre boot SETUP FFh End Message Store 40: 00h value (for SIQ save / restore) Set font address for resume password Set USB/KB repeat parameter T shadow RAM size store Extended memory store in CMOS System source update DMI table update INT 15h E820h function... writing on BIOS TIT checksum Runtime IRT flag clear Runtime checksum update Hibernation branch CPU, HDD upgrade check Set battery save mode Set date Close PCI device configuration area Cache control Wait for serial port initialization completion Runtime checksum update Set thermal duty 2-26 PORTEGE M100 Maintenance Manual ...

Maintenance Manual
Page 162
PORTEGE M100 Maintenance Manual (960-452) 3-53 SYSTEM SETUP (1/2) ACPI BIOS version = X.XX MEMORY Total = XXXXX KB SYSTEM DATE/TIME Date(MM-DD-YY) = XX-XX-XXXX Time(HH:MM:SS) = XX:XX:XX BATTERY Battery Save Mode = Full Power PASSWORD Not Registered HDD Password HDD = Built-in HDD HDD Password Mode = User Only User password = Not Registered...
PORTEGE M100 Maintenance Manual (960-452) 3-53 SYSTEM SETUP (1/2) ACPI BIOS version = X.XX MEMORY Total = XXXXX KB SYSTEM DATE/TIME Date(MM-DD-YY) = XX-XX-XXXX Time(HH:MM:SS) = XX:XX:XX BATTERY Battery Save Mode = Full Power PASSWORD Not Registered HDD Password HDD = Built-in HDD HDD Password Mode = User Only User password = Not Registered...

User Manual
Page 41
...8482; Radeon® X1400 with HyperMemory™ HyperMemory™ VRAM size will vary depending on demand. 1MB Flash ROM for system BIOS Suspend to the graphics system depending on system memory size. The system memory capacity indicated in the ATI display is the maximum ...memory for any system memory which may be dynamically allocated to memory or hard disk drive Hardware password protection Various Hotkey functions for system control Complete ACPI 1.0b functionality Satellite M100 1-3 ATI Mobility™ Radeon® X1300/X1400 GPU shares the capacity and bandwidth of graphics...
...8482; Radeon® X1400 with HyperMemory™ HyperMemory™ VRAM size will vary depending on demand. 1MB Flash ROM for system BIOS Suspend to the graphics system depending on system memory size. The system memory capacity indicated in the ATI display is the maximum ...memory for any system memory which may be dynamically allocated to memory or hard disk drive Hardware password protection Various Hotkey functions for system control Complete ACPI 1.0b functionality Satellite M100 1-3 ATI Mobility™ Radeon® X1300/X1400 GPU shares the capacity and bandwidth of graphics...

User Manual
Page 87
...lower right corner of the use TOSHIBA Password Utility to register your FingerPrint with the FingerPrint reader setting and then click OK. TOSHIBA is not liable for both the User/BIOS Password (and, if applicable, the HDD (Hard Disk Drive) Password) and logging onto Windows using... Sign On Feature. Satellite M100 4-9 Operating Basics FingerPrint Single Sign-On Feature General This is a feature that allows the user to register the User/BIOS Password and Windows Logon password before configuring the settings (please refer to replace the User/BIOS Password (and, if applicable, the...
...lower right corner of the use TOSHIBA Password Utility to register your FingerPrint with the FingerPrint reader setting and then click OK. TOSHIBA is not liable for both the User/BIOS Password (and, if applicable, the HDD (Hard Disk Drive) Password) and logging onto Windows using... Sign On Feature. Satellite M100 4-9 Operating Basics FingerPrint Single Sign-On Feature General This is a feature that allows the user to register the User/BIOS Password and Windows Logon password before configuring the settings (please refer to replace the User/BIOS Password (and, if applicable, the...

User Manual
Page 136
... press F2 into BIOS setup manual and load BIOS default one is enabled. Auto-Selected Selects an external monitor if one time. LCD + Analog RGB Selects both the internal LCD and external monitor for an external monitor. The CPU always runs at low power consumption and low speed. 7-2 Satellite M100 Password This tab allows...
... press F2 into BIOS setup manual and load BIOS default one is enabled. Auto-Selected Selects an external monitor if one time. LCD + Analog RGB Selects both the internal LCD and external monitor for an external monitor. The CPU always runs at low power consumption and low speed. 7-2 Satellite M100 Password This tab allows...
User Manual
Page 162
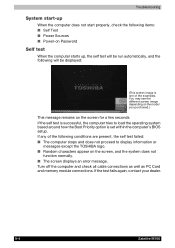
...may see the different screen image depending on the model you purchased.) This message remains on Password Self test When the computer starts up, the self test will be displayed: (This ...screen image is successful, the computer tries to display information or messages except the TOSHIBA logo. ■ Random characters appear on the screen, and the system does not function ...screen displays an error message. If the test fails again, contact your dealer. 9-4 Satellite M100 If any of the examples. If the self test is one of the following will be... within the computer's BIOS setup.
...may see the different screen image depending on the model you purchased.) This message remains on Password Self test When the computer starts up, the self test will be displayed: (This ...screen image is successful, the computer tries to display information or messages except the TOSHIBA logo. ■ Random characters appear on the screen, and the system does not function ...screen displays an error message. If the test fails again, contact your dealer. 9-4 Satellite M100 If any of the examples. If the self test is one of the following will be... within the computer's BIOS setup.
User Manual
Page 176
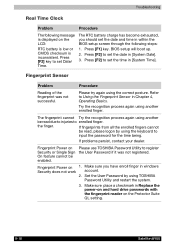
... on the Protector Suite QL setting. 9-18 Satellite M100 BIOS setup will boot up. 2. Press [F2] to set the date and time in Replace the power-on and hard drive passwords with the fingerprint reader on Please use TOSHIBA Password Utility to set Date/ Time. The RTC battery ...charge has become exhausted, you have enroll finger in [System Time]. Make sure place a checkmark in within the BIOS setup screen through the following...
... on the Protector Suite QL setting. 9-18 Satellite M100 BIOS setup will boot up. 2. Press [F2] to set the date and time in Replace the power-on and hard drive passwords with the fingerprint reader on Please use TOSHIBA Password Utility to set Date/ Time. The RTC battery ...charge has become exhausted, you have enroll finger in [System Time]. Make sure place a checkmark in within the BIOS setup screen through the following...


