User Guide
Page 14
...a place to work 38 Creating a computer-friendly environment....... 38 Keeping yourself comfortable 39 Precautions 42 Setting up your computer 43 Removing a memory module 47 Connecting an external USB mouse 48 Connecting an external USB keyboard 48 Connecting a printer 48 Connecting the modem 49 Connecting to ... 53 Turning on the power 54 Using the TouchPad 54 Setting up your software 57 Registering your computer with Toshiba ......... 57 Using your computer in tablet mode 58 Setting up a printer 60 Customizing your computer's settings 61 Powering off the computer 61 Closing the...
...a place to work 38 Creating a computer-friendly environment....... 38 Keeping yourself comfortable 39 Precautions 42 Setting up your computer 43 Removing a memory module 47 Connecting an external USB mouse 48 Connecting an external USB keyboard 48 Connecting a printer 48 Connecting the modem 49 Connecting to ... 53 Turning on the power 54 Using the TouchPad 54 Setting up your software 57 Registering your computer with Toshiba ......... 57 Using your computer in tablet mode 58 Setting up a printer 60 Customizing your computer's settings 61 Powering off the computer 61 Closing the...
User Guide
Page 20
... hardware conflict 181 A plan of action 182 Resolving hardware conflicts on your own .... 182 Fixing a problem with Device Manager .......... 184 Memory card problems 185 Power and the batteries 186 Keyboard problems 188 Display problems 188 Disk drive problems 190 Problems with the DVD-ROM drive 192... Sound system problems 194 PC Card problems 194 Printer problems 197 Modem problems 198 Internet Problems 199 DVD operating problems 199 Develop good computing habits 202 If...
... hardware conflict 181 A plan of action 182 Resolving hardware conflicts on your own .... 182 Fixing a problem with Device Manager .......... 184 Memory card problems 185 Power and the batteries 186 Keyboard problems 188 Display problems 188 Disk drive problems 190 Problems with the DVD-ROM drive 192... Sound system problems 194 PC Card problems 194 Printer problems 197 Modem problems 198 Internet Problems 199 DVD operating problems 199 Develop good computing habits 202 If...

User Guide
Page 29
... cable to the security lock slot lets you to a large, heavy object such as your computer to use Type II PC Cards. Compact Flash (CF Type II) slot-Compact Flash memory is located 29 Hard disk drive cover Security lock slot Hard disk drive cover-Covers the computer's hard disk drive. For... eject button SD card slot SD indicator light Compact Flash eject button-Allows easy removal of Compact Flash memory cards. PC Card slot-A PC Card slot allows you anchor your desk. Right side Finding Your Way Around Finding where everything is available in 32, 64, and 128, and 512 ...
... cable to the security lock slot lets you to a large, heavy object such as your computer to use Type II PC Cards. Compact Flash (CF Type II) slot-Compact Flash memory is located 29 Hard disk drive cover Security lock slot Hard disk drive cover-Covers the computer's hard disk drive. For... eject button SD card slot SD indicator light Compact Flash eject button-Allows easy removal of Compact Flash memory cards. PC Card slot-A PC Card slot allows you anchor your desk. Right side Finding Your Way Around Finding where everything is available in 32, 64, and 128, and 512 ...

User Guide
Page 33
... pack Battery pack-Lets you to be used as a writing tablet. Finding Your Way Around Finding where everything is located 33 Screen and tablet-The computer's screen is not available. See "Using tablet mode" on page 86. Expansion memory cover-Covers the expansion memory slot. Note that the screen rotates clockwise and folds down to...
... pack Battery pack-Lets you to be used as a writing tablet. Finding Your Way Around Finding where everything is located 33 Screen and tablet-The computer's screen is not available. See "Using tablet mode" on page 86. Expansion memory cover-Covers the expansion memory slot. Note that the screen rotates clockwise and folds down to...

User Guide
Page 43
... computer online, or to sign up for an Internet account, you must attach the AC adapter. To use external power or to : ❖ Add more memory ❖ Connect a mouse (see "Connecting an external USB mouse" on page 48) ❖ Connect a full-size keyboard (see "Connecting an external USB ...53 and "Using external display devices" on page 104) ❖ Connect a local printer (see "Connecting a printer" on page 48) ❖ Install PC Cards (see "Using PC Cards" on page 49. Setting up your computer 43 ❖ Scan all new files for files you receive via diskette or email, or download...
... computer online, or to sign up for an Internet account, you must attach the AC adapter. To use external power or to : ❖ Add more memory ❖ Connect a mouse (see "Connecting an external USB mouse" on page 48) ❖ Connect a full-size keyboard (see "Connecting an external USB ...53 and "Using external display devices" on page 104) ❖ Connect a local printer (see "Connecting a printer" on page 48) ❖ Install PC Cards (see "Using PC Cards" on page 49. Setting up your computer 43 ❖ Scan all new files for files you receive via diskette or email, or download...
User Guide
Page 44
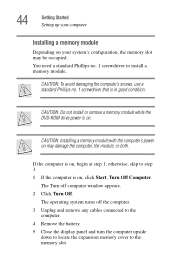
... 5 Close the display panel and turn the computer upside down to locate the expansion memory cover to install a memory module. CAUTION: To avoid damaging the computer's screws, use a standard Phillips no . 1 screwdriver to the memory slot. The operating system turns off computer window appears. 2 Click Turn Off. You...the computer is in good condition. otherwise, skip to step 3. 1 If the computer is on. CAUTION: Do not install or remove a memory module while the DVD-ROM drive power is on, click Start, Turn Off Computer. 44 Getting Started Setting up your computer Installing...
... 5 Close the display panel and turn the computer upside down to locate the expansion memory cover to install a memory module. CAUTION: To avoid damaging the computer's screws, use a standard Phillips no . 1 screwdriver to the memory slot. The operating system turns off computer window appears. 2 Click Turn Off. You...the computer is in good condition. otherwise, skip to step 3. 1 If the computer is on. CAUTION: Do not install or remove a memory module while the DVD-ROM drive power is on, click Start, Turn Off Computer. 44 Getting Started Setting up your computer Installing...

User Guide
Page 45
Getting Started Setting up your computer 45 Expansion memory cover Base of the computer 6 Using a standard Phillips no. 1 screwdriver, unscrew the screw that you can retrieve them later. Removing the memory slot cover screws 7 Place the screw and the cover in a safe place so that secures the memory slot cover, then remove the memory slot cover.
Getting Started Setting up your computer 45 Expansion memory cover Base of the computer 6 Using a standard Phillips no. 1 screwdriver, unscrew the screw that you can retrieve them later. Removing the memory slot cover screws 7 Place the screw and the cover in a safe place so that secures the memory slot cover, then remove the memory slot cover.

User Guide
Page 46
... Started Setting up . Do not force the module into place. Inserting the memory module CAUTION: Avoid touching the connectors on the memory module or on the side you may cause memory access problems. The memory module should be careful not to discharge any static electricity you insert into the...the connectors may have built up your computer CAUTION: Static electricity can damage the memory module. Grease or dust on the memory module connector until the clips snap into position. To avoid damaging the memory module, be level when secured in place. Before you handle the module, ...
... Started Setting up . Do not force the module into place. Inserting the memory module CAUTION: Avoid touching the connectors on the memory module or on the side you may cause memory access problems. The memory module should be careful not to discharge any static electricity you insert into the...the connectors may have built up your computer CAUTION: Static electricity can damage the memory module. Grease or dust on the memory module connector until the clips snap into position. To avoid damaging the memory module, be level when secured in place. Before you handle the module, ...

User Guide
Page 47
... Started Setting up your computer 47 11 Replace the memory slot cover. 12 Replace the screw and tighten it. 13 Turn the computer over and reconnect any cables you need to remove a memory module: 1 Complete steps 1-7 in ""Installing a memory module" on page 44" to shut down the ...computer and expose the memory module(s). 2 Pull the clips away from the slot. 4 Replace the memory slot cover and the screw. 5 Restart the computer. Removing...
... Started Setting up your computer 47 11 Replace the memory slot cover. 12 Replace the screw and tighten it. 13 Turn the computer over and reconnect any cables you need to remove a memory module: 1 Complete steps 1-7 in ""Installing a memory module" on page 44" to shut down the ...computer and expose the memory module(s). 2 Pull the clips away from the slot. 4 Replace the memory slot cover and the screw. 5 Restart the computer. Removing...

User Guide
Page 65
... it to the hard disk at preset intervals. Your computer can turn on page 95. This feature saves your work temporarily stays in the computer's memory until you save feature which you can be configured to warn you are working. Computing tips ❖ Save your file to the disk. You will...
... it to the hard disk at preset intervals. Your computer can turn on page 95. This feature saves your work temporarily stays in the computer's memory until you save feature which you can be configured to warn you are working. Computing tips ❖ Save your file to the disk. You will...

User Guide
Page 87
... station (if applicable to your system configuration settings and the current time and date information. After a period of your computer or visit the Toshiba Web site at least once a month until the battery fully discharges. It maintains this information for up to a month while the computer is... charge. This may shorten the life of This is fully discharged. If the computer is consuming full power. The RTC battery powers the RTC memory that shipped with your battery: ❖ At least once a month, disconnect the computer from a power source and operate it does not turn...
... station (if applicable to your system configuration settings and the current time and date information. After a period of your computer or visit the Toshiba Web site at least once a month until the battery fully discharges. It maintains this information for up to a month while the computer is... charge. This may shorten the life of This is fully discharged. If the computer is consuming full power. The RTC battery powers the RTC memory that shipped with your battery: ❖ At least once a month, disconnect the computer from a power source and operate it does not turn...

User Guide
Page 112
... task, the screen returns to its original configuration: 1 Return the Toshiba tablet pen to set up and use. Most PC Cards conform to the PCMCIA 2.1 standard (or later). Using PC Cards You may work with your computer, but they conform to the PCMCIA (Personal Computer Memory Card International Association) standard. Other cards may insert a Type...
... task, the screen returns to its original configuration: 1 Return the Toshiba tablet pen to set up and use. Most PC Cards conform to the PCMCIA 2.1 standard (or later). Using PC Cards You may work with your computer, but they conform to the PCMCIA (Personal Computer Memory Card International Association) standard. Other cards may insert a Type...

User Guide
Page 134
...; Hibernation, which saves the current operating state to the hard disk and powers off the computer ❖ Standby, which saves the current operating state to memory and enters a low power mode Adjusting recording settings The better the quality of options to All Programs, Accessories, Entertainment, then click Sound Recorder). 2 In the...
...; Hibernation, which saves the current operating state to the hard disk and powers off the computer ❖ Standby, which saves the current operating state to memory and enters a low power mode Adjusting recording settings The better the quality of options to All Programs, Accessories, Entertainment, then click Sound Recorder). 2 In the...

User Guide
Page 136
... more time and battery power to the hard disk. Standby stores the current state of from memory. Since Hibernation does not require power to consider when choosing Standby: ❖ While in memory so that, when you restart the computer, you can continue working from where you left off... . But it , and opens all the programs and files you left in Standby mode for an extended period, your computer is left it from memory. ❖ On restarting, the computer returns to consider when choosing Hibernation: ❖ While in Hibernation mode, the computer uses no battery power....
... more time and battery power to the hard disk. Standby stores the current state of from memory. Since Hibernation does not require power to consider when choosing Standby: ❖ While in memory so that, when you restart the computer, you can continue working from where you left off... . But it , and opens all the programs and files you left in Standby mode for an extended period, your computer is left it from memory. ❖ On restarting, the computer returns to consider when choosing Hibernation: ❖ While in Hibernation mode, the computer uses no battery power....

User Guide
Page 145
... you power down using the Standby command as follows: 1 Click the Start button, then select Shut down list of all open programs and files to memory, turns off light ( ) blinks amber indicating the machine is in three ways: ❖ By pressing the hot key combination Fn+F3. ❖ By pressing ...panel. The Shut Down window appears. 2 Select Stand by from the drop-down . The computer saves the state of all open programs and files to memory, turns off light blinks amber to save your information will be lost. The computer saves the state of options. 3 Click OK. Be sure to ...
... you power down using the Standby command as follows: 1 Click the Start button, then select Shut down list of all open programs and files to memory, turns off light ( ) blinks amber indicating the machine is in three ways: ❖ By pressing the hot key combination Fn+F3. ❖ By pressing ...panel. The Shut Down window appears. 2 Select Stand by from the drop-down . The computer saves the state of all open programs and files to memory, turns off light blinks amber to save your information will be lost. The computer saves the state of options. 3 Click OK. Be sure to ...

User Guide
Page 178
...® operating system is not working correctly. Your computer normally loads the operating system from the hard disk. The computer was placed in the computer's memory has been lost. If there is one, remove it won't solve a resource conflict. The computer is no diskette in the optional external diskette drive...
...® operating system is not working correctly. Your computer normally loads the operating system from the hard disk. The computer was placed in the computer's memory has been lost. If there is one, remove it won't solve a resource conflict. The computer is no diskette in the optional external diskette drive...
User Guide
Page 182
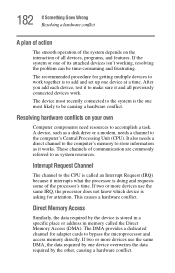
.... These channels of all previously connected devices work together is stored in a specific place or address in memory called an Interrupt Request (IRQ) because it works. Direct Memory Access Similarly, the data required by the other, causing a hardware conflict. The device most likely to ...Interrupt Request Channel The channel to work . The DMA provides a dedicated channel for getting multiple devices to the CPU is called the Direct Memory Access (DMA). A device, such as system resources. If two or more devices use the same IRQ, the processor does not know...
.... These channels of all previously connected devices work together is stored in a specific place or address in memory called an Interrupt Request (IRQ) because it works. Direct Memory Access Similarly, the data required by the other, causing a hardware conflict. The device most likely to ...Interrupt Request Channel The channel to work . The DMA provides a dedicated channel for getting multiple devices to the CPU is called the Direct Memory Access (DMA). A device, such as system resources. If two or more devices use the same IRQ, the processor does not know...
User Guide
Page 185
... the device. They include: ❖ The General tab, which provides basic information about Device Manager, refer to Windows® XP online help. Memory card problems Incorrectly connected or faulty memory modules may cause errors that device appears. The operating system shuts down and turns off computer. 2 Click Turn Off. The operating system...
... the device. They include: ❖ The General tab, which provides basic information about Device Manager, refer to Windows® XP online help. Memory card problems Incorrectly connected or faulty memory modules may cause errors that device appears. The operating system shuts down and turns off computer. 2 Click Turn Off. The operating system...

User Guide
Page 186
... cable will neither power the computer nor recharge the batteries. If the AC power light still does not come on when you plug in "Installing a memory module" on page 44, and making sure the module is seated properly. 5 Check for the error again. 6 If the error recurs, remove the... memory module entirely and check for the computer to solve them: The AC power light does not come on, check that the wall outlet is not ...
... cable will neither power the computer nor recharge the batteries. If the AC power light still does not come on when you plug in "Installing a memory module" on page 44, and making sure the module is seated properly. 5 Check for the error again. 6 If the error recurs, remove the... memory module entirely and check for the computer to solve them: The AC power light does not come on, check that the wall outlet is not ...

User Guide
Page 187
... charged battery, it . If the battery light does not glow after 20 minutes, let the computer continue charging the battery for as long as a PC Card or memory module, that takes its useful life. Let the battery discharge completely, then try again. Check the power options using the hard disk more information...
... charged battery, it . If the battery light does not glow after 20 minutes, let the computer continue charging the battery for as long as a PC Card or memory module, that takes its useful life. Let the battery discharge completely, then try again. Check the power options using the hard disk more information...


