
User Guide
Page 13
13 Contents Creating a computer-friendly environment....... 35 Keeping yourself comfortable 36 Precautions 39 Setting up your computer 40 Installing additional memory (optional 40 Connecting a mouse 44 Connecting a printer 45 Connecting the modem 45 Connecting to a power source 46 Connecting other ...Opening the display panel 49 Turning on the power 49 Using the TouchPad 50 Setting up your software 51 Registering your computer with Toshiba ......... 52 Customizing your computer's settings 53 Powering off the computer 54 Closing the display panel 55 Different ways to turn the ...
13 Contents Creating a computer-friendly environment....... 35 Keeping yourself comfortable 36 Precautions 39 Setting up your computer 40 Installing additional memory (optional 40 Connecting a mouse 44 Connecting a printer 45 Connecting the modem 45 Connecting to a power source 46 Connecting other ...Opening the display panel 49 Turning on the power 49 Using the TouchPad 50 Setting up your software 51 Registering your computer with Toshiba ......... 52 Customizing your computer's settings 53 Powering off the computer 54 Closing the display panel 55 Different ways to turn the ...

User Guide
Page 18
... conflict 154 A plan of action 155 Resolving hardware conflicts on your own .... 155 Fixing a problem with Device Manager .......... 157 Memory card problems 158 Power and the batteries 159 Keyboard problems 161 Display problems 161 Disk drive problems 163 Sound system problems 165 PC ...169 Modem problems 170 Develop good computing habits 170 If you need further assistance 172 Before you call 172 Contacting Toshiba 172 Other Toshiba Internet Web sites 174 Toshiba's worldwide offices 174 Appendix A: Hot Keys 178 Volume Control 178 Volume Mute 179 Password security 179 Without a...
... conflict 154 A plan of action 155 Resolving hardware conflicts on your own .... 155 Fixing a problem with Device Manager .......... 157 Memory card problems 158 Power and the batteries 159 Keyboard problems 161 Display problems 161 Disk drive problems 163 Sound system problems 165 PC ...169 Modem problems 170 Develop good computing habits 170 If you need further assistance 172 Before you call 172 Contacting Toshiba 172 Other Toshiba Internet Web sites 174 Toshiba's worldwide offices 174 Appendix A: Hot Keys 178 Volume Control 178 Volume Mute 179 Password security 179 Without a...

User Guide
Page 25
The Secure Digital card slot holds a highly secure, stampsize flash memory card with the display panel closed 25 Front with a capacity of 16 MB, 32 MB, 64 MB or 128 MB. The Secure Digital LED light ...
The Secure Digital card slot holds a highly secure, stampsize flash memory card with the display panel closed 25 Front with a capacity of 16 MB, 32 MB, 64 MB or 128 MB. The Secure Digital LED light ...
User Guide
Page 28
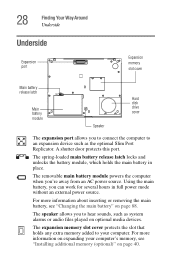
...which holds the main battery in full power mode without an external power source. The expansion memory slot cover protects the slot that holds any extra memory added to your computer's memory, see "Changing the main battery" on optional media devices. A shutter door protects this port... For more information about inserting or removing the main battery, see "Installing additional memory (optional)" on page 40. 28 Finding Your Way Around Underside Underside Expansion port Expansion memory slot cover Main battery release latch Main battery module Hard disk drive cover Speaker The...
...which holds the main battery in full power mode without an external power source. The expansion memory slot cover protects the slot that holds any extra memory added to your computer's memory, see "Changing the main battery" on optional media devices. A shutter door protects this port... For more information about inserting or removing the main battery, see "Installing additional memory (optional)" on page 40. 28 Finding Your Way Around Underside Underside Expansion port Expansion memory slot cover Main battery release latch Main battery module Hard disk drive cover Speaker The...

User Guide
Page 40
... for files you can use it. To register your computer Your computer contains a rechargeable main battery that needs to a telephone line. Additional memory comes in modem to be charged before you receive via diskette or email, or download from the Internet. See "Connecting to run most of... (see "Connecting a printer" on page 45) ❖ Install PC Cards (see "Using PC Cards" on page 99) Installing additional memory (optional) Your computer comes with enough memory to an AC outlet" on page 45. Setting up your computer online, or to use your computer ❖ Scan all new files...
... for files you can use it. To register your computer Your computer contains a rechargeable main battery that needs to a telephone line. Additional memory comes in modem to be charged before you receive via diskette or email, or download from the Internet. See "Connecting to run most of... (see "Connecting a printer" on page 45) ❖ Install PC Cards (see "Using PC Cards" on page 99) Installing additional memory (optional) Your computer comes with enough memory to an AC outlet" on page 45. Setting up your computer online, or to use your computer ❖ Scan all new files...
User Guide
Page 41
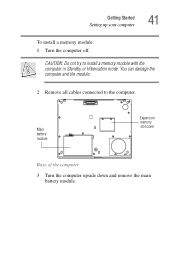
Getting Started Setting up your computer 41 To install a memory module: 1 Turn the computer off. You can damage the computer and the module. 2 Remove all cables connected to install a memory module with the computer in Standby or Hibernation mode. Main battery module Expansion memory slot cover Base of the computer 3 Turn the computer upside down and remove the main battery module. CAUTION: Do not try to the computer.
Getting Started Setting up your computer 41 To install a memory module: 1 Turn the computer off. You can damage the computer and the module. 2 Remove all cables connected to install a memory module with the computer in Standby or Hibernation mode. Main battery module Expansion memory slot cover Base of the computer 3 Turn the computer upside down and remove the main battery module. CAUTION: Do not try to the computer.

User Guide
Page 42
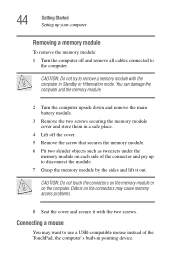
42 Getting Started Setting up your computer Removing the memory slot cover screws 4 Remove the two screws securing the expansion memory slot cover and store them in a safe place. Inserting the memory module NOTE: Use a point size 0 Phillips screwdriver. 5 Lift off the cover.
42 Getting Started Setting up your computer Removing the memory slot cover screws 4 Remove the two screws securing the expansion memory slot cover and store them in a safe place. Inserting the memory module NOTE: Use a point size 0 Phillips screwdriver. 5 Lift off the cover.

User Guide
Page 43
...press the module above the connector. Do not press on , it should automatically recognize the total memory capacity. CAUTION: Use only the screw that came with the two screws. Use the Toshiba Hardware Setup program to ensure a solid connection. NOTE: When you turn the computer on the ...electronic components. 7 Secure the memory model with the one screw that the added memory is recognized. If it with the memory module. CAUTION: Do not touch...
...press the module above the connector. Do not press on , it should automatically recognize the total memory capacity. CAUTION: Use only the screw that came with the two screws. Use the Toshiba Hardware Setup program to ensure a solid connection. NOTE: When you turn the computer on the ...electronic components. 7 Secure the memory model with the one screw that the added memory is recognized. If it with the memory module. CAUTION: Do not touch...
User Guide
Page 44
...mode. 44 Getting Started Setting up your computer Removing a memory module To remove the memory module: 1 Turn the computer off the cover. 5 Remove the screw that secures the memory module. 6 Fit two slender objects such as tweezers under the memory module on each side of the TouchPad, the computer's... built-in pointing device. You can damage the computer and the memory module. 2 Turn the computer upside down and remove the main battery module. 3 Remove the two screws securing the memory module cover and store them in a safe place. 4 Lift off and remove all...
...mode. 44 Getting Started Setting up your computer Removing a memory module To remove the memory module: 1 Turn the computer off the cover. 5 Remove the screw that secures the memory module. 6 Fit two slender objects such as tweezers under the memory module on each side of the TouchPad, the computer's... built-in pointing device. You can damage the computer and the memory module. 2 Turn the computer upside down and remove the main battery module. 3 Remove the two screws securing the memory module cover and store them in a safe place. 4 Lift off and remove all...
User Guide
Page 58
... save it to the disk. You will lose all unsaved work, if, for details. 58 This feature saves your work temporarily stays in the computer's memory until you can be configured to the hard disk at preset intervals. Your computer can turn on page 85. Your work frequently. See "Setting battery...
... save it to the disk. You will lose all unsaved work, if, for details. 58 This feature saves your work temporarily stays in the computer's memory until you can be configured to the hard disk at preset intervals. Your computer can turn on page 85. Your work frequently. See "Setting battery...

User Guide
Page 77
... to carry additional charged battery packs with you. Mobile Computing Running the computer on the base of the computer. The RTC battery powers the RTC memory, which stores your system configuration settings and the current time and date for up to use the computer for more than a few hours. You can...
... to carry additional charged battery packs with you. Mobile Computing Running the computer on the base of the computer. The RTC battery powers the RTC memory, which stores your system configuration settings and the current time and date for up to use the computer for more than a few hours. You can...

User Guide
Page 99
... a mouse or a printer, see "Connecting a mouse" on page 44 or "Connecting a printer" on page 45. This slot contains a spacekeeper insert to the PCMCIA (Personal Computer Memory Card International Association) standard. Most PC Cards conform to keep it in display only, external monitor only, and simultaneous display. 3 Release the Fn key. If...
... a mouse or a printer, see "Connecting a mouse" on page 44 or "Connecting a printer" on page 45. This slot contains a spacekeeper insert to the PCMCIA (Personal Computer Memory Card International Association) standard. Most PC Cards conform to keep it in display only, external monitor only, and simultaneous display. 3 Release the Fn key. If...

User Guide
Page 119
... the Recording Volume and Preferred device. 4 Click OK. 119 Enhancing Productivity Powering down the computer Adjusting recording settings The better the quality of options to memory and enters a low power mode ❖ Restart, which saves the current operating state to choose from: ❖ Turn Off or Shut down your computer, save...
... the Recording Volume and Preferred device. 4 Click OK. 119 Enhancing Productivity Powering down the computer Adjusting recording settings The better the quality of options to memory and enters a low power mode ❖ Restart, which saves the current operating state to choose from: ❖ Turn Off or Shut down your computer, save...

User Guide
Page 120
... operating system, for an extended time. ❖ Restarting from Turn Off or Shut down uses the most efficient mode if you will be away from memory. Use it from your computer for example to activate changes to a Windows® network server (domain server). Restoring information from the hard disk takes longer...
... operating system, for an extended time. ❖ Restarting from Turn Off or Shut down uses the most efficient mode if you will be away from memory. Use it from your computer for example to activate changes to a Windows® network server (domain server). Restoring information from the hard disk takes longer...

User Guide
Page 121
... up than the Standby option, because information is being retrieved from the hard disk instead of the computer in memory so that, when you restart the computer, you can continue working from memory. ❖ On restarting, the computer returns to save your information will be lost if the battery discharges while the...
... up than the Standby option, because information is being retrieved from the hard disk instead of the computer in memory so that, when you restart the computer, you can continue working from memory. ❖ On restarting, the computer returns to save your information will be lost if the battery discharges while the...

User Guide
Page 130
... Using Standby 2 Click Stand By. The on /off light blinks green to indicate the machine is in Standby mode. NOTE: If you are connected to memory, turns off the display, and goes into a low-power mode. Going into Standby mode more quickly You can also put the computer into a low-power... ways: ❖ By pressing the hot key combination Fn+F3. ❖ By pressing the power button ❖ By closing the display panel. Be sure to memory, turns off the display, and goes into Standby mode in Stand by from the drop-down . If you power down using the Standby command as...
... Using Standby 2 Click Stand By. The on /off light blinks green to indicate the machine is in Standby mode. NOTE: If you are connected to memory, turns off the display, and goes into a low-power mode. Going into Standby mode more quickly You can also put the computer into a low-power... ways: ❖ By pressing the hot key combination Fn+F3. ❖ By pressing the power button ❖ By closing the display panel. Be sure to memory, turns off the display, and goes into Standby mode in Stand by from the drop-down . If you power down using the Standby command as...

User Guide
Page 147
... the drives for the operating system. Choose the desired tab and accompanying options. ❖ LAN - Allows you to view current BIOS, hard disk drive and memory settings. ❖ Password - Select the boot device by pressing the power button, then quickly pressing the right or left arrow keys, then pressing the Enter... set user passwords. ❖ Device Config-Shows the Device configuration options. Allows you enable or disable the Wake-up on LAN feature. ❖ General - 147 Toshiba Utilities TOSHIBA Console ❖ Boot Priority -
... the drives for the operating system. Choose the desired tab and accompanying options. ❖ LAN - Allows you to view current BIOS, hard disk drive and memory settings. ❖ Password - Select the boot device by pressing the power button, then quickly pressing the right or left arrow keys, then pressing the Enter... set user passwords. ❖ Device Config-Shows the Device configuration options. Allows you enable or disable the Wake-up on LAN feature. ❖ General - 147 Toshiba Utilities TOSHIBA Console ❖ Boot Priority -

User Guide
Page 151
... to choose it as your boot-up device. The computer displays the Non-System disk or disk error message. You are probably in the computer's memory has been lost. Insert a system diskette into a live wall outlet for several hours. If there is not accessing the hard disk or the optional external...
... to choose it as your boot-up device. The computer displays the Non-System disk or disk error message. You are probably in the computer's memory has been lost. Insert a system diskette into a live wall outlet for several hours. If there is not accessing the hard disk or the optional external...

User Guide
Page 155
..., such as a disk drive or a modem, needs a channel to as it and all devices, programs, and features. It also needs a direct channel to the computer's memory to work . If there is still a problem, the operating system should display a message that explains what the processor is . These channels of the processor's time...
..., such as a disk drive or a modem, needs a channel to as it and all devices, programs, and features. It also needs a direct channel to the computer's memory to work . If there is still a problem, the operating system should display a message that explains what the processor is . These channels of the processor's time...

User Guide
Page 156
...computer. In theory, if every device connected to Plug and Play-compliant devices. Plug in memory called the Direct Memory Access (DMA). For an older device, remove it . 156 If Something Goes Wrong Resolving a hardware conflict Direct Memory Access Similarly, the data required by the other, causing a hardware conflict. As a result,... to resolve hardware conflicts: ❖ Disable the device. Plug and Play is automatically set up to bypass the microprocessor and access memory directly. If you can occur. The DMA provides a dedicated channel for the same system resources.
...computer. In theory, if every device connected to Plug and Play-compliant devices. Plug in memory called the Direct Memory Access (DMA). For an older device, remove it . 156 If Something Goes Wrong Resolving a hardware conflict Direct Memory Access Similarly, the data required by the other, causing a hardware conflict. As a result,... to resolve hardware conflicts: ❖ Disable the device. Plug and Play is automatically set up to bypass the microprocessor and access memory directly. If you can occur. The DMA provides a dedicated channel for the same system resources.


