
User Guide
Page 8
8 Contents White balance 44 Chapter 4: Voice Recording 45 Voice recording 45 Audio Playback 47 Delete Audio File 47 Chapter 5: Playback Mode 48 Button functions 48 LCD screen information ... Mode 53 Chapter 6: Viewing Files on the computer 54 Installing bundled software 54 Transferring files to a computer 55 Chapter 7: Uploading Files to the Internet 56 CAMILEO® Uploader 56 Set up account information for the web site ...........59 Chapter 8: Webcam Mode 60 Chapter 9: Troubleshooting 61 Chapter 10: Other Information 62...
8 Contents White balance 44 Chapter 4: Voice Recording 45 Voice recording 45 Audio Playback 47 Delete Audio File 47 Chapter 5: Playback Mode 48 Button functions 48 LCD screen information ... Mode 53 Chapter 6: Viewing Files on the computer 54 Installing bundled software 54 Transferring files to a computer 55 Chapter 7: Uploading Files to the Internet 56 CAMILEO® Uploader 56 Set up account information for the web site ...........59 Chapter 8: Webcam Mode 60 Chapter 9: Troubleshooting 61 Chapter 10: Other Information 62...
User Guide
Page 9
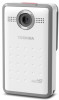
... video recording at Full HD resolution of video trimming to edit the video without the need for buying the CAMILEO Clip camcorder. Overview Your Toshiba camcorder comes equipped with less memory. ❖ High-quality images up to 16MP can record H.264 format movies. This format allows ... either be adjusted automatically or changed manually. 9 This guide introduces the camcorder's features as well as some basic procedures to control over the videos and photos you for a computer. ❖ ISO sensitivity and color balance can also connect it to an HDTV via a mini HDMITM cable (Mini...
... video recording at Full HD resolution of video trimming to edit the video without the need for buying the CAMILEO Clip camcorder. Overview Your Toshiba camcorder comes equipped with less memory. ❖ High-quality images up to 16MP can record H.264 format movies. This format allows ... either be adjusted automatically or changed manually. 9 This guide introduces the camcorder's features as well as some basic procedures to control over the videos and photos you for a computer. ❖ ISO sensitivity and color balance can also connect it to an HDTV via a mini HDMITM cable (Mini...

User Guide
Page 20
20 Getting Started Menu options Filter White balance AUTO BLACK & WHITE CLASSIC NEGATIVE AUTO DAYLIGHT FLUORESCENT TUNGSTEN Shoot without any special effect on the photo. Automatic adjustment. ON Smile detection The camcorder can check the recorded photo files. Use under tungsten light condition. Photo Mode Menu In ...to ISO 800 for 3 seconds, then disappear. Use under outsides light condition. PHOTO GALLERY Go to black and white. auto ISO 800 The camcorder adjusts the ISO sensitivity of the normal. Disable self timer. Manually sets to sepia look. ON Date printing ...
20 Getting Started Menu options Filter White balance AUTO BLACK & WHITE CLASSIC NEGATIVE AUTO DAYLIGHT FLUORESCENT TUNGSTEN Shoot without any special effect on the photo. Automatic adjustment. ON Smile detection The camcorder can check the recorded photo files. Use under tungsten light condition. Photo Mode Menu In ...to ISO 800 for 3 seconds, then disappear. Use under outsides light condition. PHOTO GALLERY Go to black and white. auto ISO 800 The camcorder adjusts the ISO sensitivity of the normal. Disable self timer. Manually sets to sepia look. ON Date printing ...

User Guide
Page 27
...; SOUND • TV FORMAT • LANGUAGES • DATE & TIME • FORMAT • RESTORE DEFAULT • START RECORDING • AUDIO GALLERY • SCENE • FILTER • WHITE BALANCE ❖ Please refer to Chapter 4 for the detailed information about VOICE RECORDING. ❖ Please refer to Chapter 5 for Menu Video Mode Menu Operation 1 Press ( ) to...
...; SOUND • TV FORMAT • LANGUAGES • DATE & TIME • FORMAT • RESTORE DEFAULT • START RECORDING • AUDIO GALLERY • SCENE • FILTER • WHITE BALANCE ❖ Please refer to Chapter 4 for the detailed information about VOICE RECORDING. ❖ Please refer to Chapter 5 for Menu Video Mode Menu Operation 1 Press ( ) to...

User Guide
Page 28
...; SOUND • TV FORMAT • LANGUAGES • DATE & TIME • FORMAT • RESTORE DEFAULT • START RECORDING • AUDIO GALLERY • SCENE • FILTER • WHITE BALANCE ❖ Please refer to Chapter 4 for Menu Photo Mode Menu Operation 1 Press ( ) to switch to Photo mode. 28 Preview/Record Mode Options for the detailed...
...; SOUND • TV FORMAT • LANGUAGES • DATE & TIME • FORMAT • RESTORE DEFAULT • START RECORDING • AUDIO GALLERY • SCENE • FILTER • WHITE BALANCE ❖ Please refer to Chapter 4 for Menu Photo Mode Menu Operation 1 Press ( ) to switch to Photo mode. 28 Preview/Record Mode Options for the detailed...
User Guide
Page 42
... Depends on the carousel, and then press the OK ( ) button to enter its menu. 3 The menu contains three options: SCENE, FILTER, and WHITE BALANCE, for you to adjust the camcorder settings. 4 Use the Right/Left button to select the desired option on shipping area Level 3 NOTE Please refer to exit. Effects Operation 1 Press...
... Depends on the carousel, and then press the OK ( ) button to enter its menu. 3 The menu contains three options: SCENE, FILTER, and WHITE BALANCE, for you to adjust the camcorder settings. 4 Use the Right/Left button to select the desired option on shipping area Level 3 NOTE Please refer to exit. Effects Operation 1 Press...

User Guide
Page 44
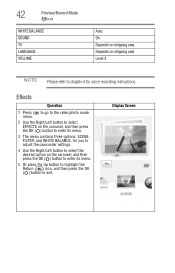
.../Record Mode Effects White balance The camcorder adjusts the color balance of images automatically. Display Screen Three manual white balance settings are available: ❖ AUTO: The camcorder automatically adjusts white balance. ❖ DAYLIGHT: Under outdoor condition. ❖ FLUORESCENT: Under fluorescent light condition. ❖ TUNGSTEN: Under tungsten light condition. Operation 1 In the effects menu, select the WHITE BALANCE icon and then press...
.../Record Mode Effects White balance The camcorder adjusts the color balance of images automatically. Display Screen Three manual white balance settings are available: ❖ AUTO: The camcorder automatically adjusts white balance. ❖ DAYLIGHT: Under outdoor condition. ❖ FLUORESCENT: Under fluorescent light condition. ❖ TUNGSTEN: Under tungsten light condition. Operation 1 In the effects menu, select the WHITE BALANCE icon and then press...