
User Guide
Page 2
...on a circuit different from that interference will not occur in a residential installation. 2 Regulatory Information FCC Information Product Name: Camcorder Model number: CAMILEO® X400 Series FCC notice "Declaration of Conformity Information" This equipment has been tested and found to comply with the...harmful interference to radio or television reception, which the receiver is encouraged to try to correct the interference by TOSHIBA could void the user's authority to provide reasonable protection against harmful interference in a particular installation. These limits are designed...
...on a circuit different from that interference will not occur in a residential installation. 2 Regulatory Information FCC Information Product Name: Camcorder Model number: CAMILEO® X400 Series FCC notice "Declaration of Conformity Information" This equipment has been tested and found to comply with the...harmful interference to radio or television reception, which the receiver is encouraged to try to correct the interference by TOSHIBA could void the user's authority to provide reasonable protection against harmful interference in a particular installation. These limits are designed...
User Guide
Page 3
... or leave it in direct sunlight. otherwise the warranty will be voided. 2 Avoid all contact with water, and dry hands before using the camcorder when there is subject to comply with care. Doing so may cause undesired operation. Operation is a storm or lightning. 6 Do not use... batteries of the FCC Rules. Contact Address: TOSHIBA America Information Systems, Inc. 9740 Irvine Boulevard Irvine, California 92618-1697 Telephone: (949) 583-3000 Safety Instructions 1 Do not drop, puncture or ...
... or leave it in direct sunlight. otherwise the warranty will be voided. 2 Avoid all contact with water, and dry hands before using the camcorder when there is subject to comply with care. Doing so may cause undesired operation. Operation is a storm or lightning. 6 Do not use... batteries of the FCC Rules. Contact Address: TOSHIBA America Information Systems, Inc. 9740 Irvine Boulevard Irvine, California 92618-1697 Telephone: (949) 583-3000 Safety Instructions 1 Do not drop, puncture or ...
User Guide
Page 4
... deteriorate and the battery life might be completely secured, discontinue use the supplied AC adaptor or USB cable, or an optional Toshiba battery charger to charge the battery. Severe burns can cause serious injury or death. Use only button cell batteries recommended by ...Dispose of properly. Dispose of children. About the remote control battery Chemical burns and choking hazard due to charge the battery with this camcorder contains a button cell battery. See http://www.dtsc.ca.gov/hazardouswaste/perchlorate. Use care when changing the button cell battery. California...
... deteriorate and the battery life might be completely secured, discontinue use the supplied AC adaptor or USB cable, or an optional Toshiba battery charger to charge the battery. Severe burns can cause serious injury or death. Use only button cell batteries recommended by ...Dispose of properly. Dispose of children. About the remote control battery Chemical burns and choking hazard due to charge the battery with this camcorder contains a button cell battery. See http://www.dtsc.ca.gov/hazardouswaste/perchlorate. Use care when changing the button cell battery. California...
User Guide
Page 7
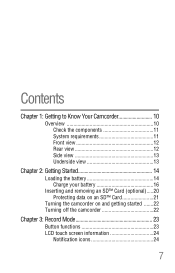
Contents Chapter 1: Getting to Know Your Camcorder 10 Overview 10 Check the components 11 System requirements 11 Front view 12 Rear view 12 Side view 13 Underside view 13 Chapter 2: Getting Started 14 Loading the battery 14 Charge your battery 16 Inserting and removing an SD™ Card (optional).....20 Protecting data on an SD™ Card 21 Turning the camcorder on and getting started .......22 Turning off the camcorder 22 Chapter 3: Record Mode 23 Button functions 23 LCD touch screen information 24 Notification icons 24 7
Contents Chapter 1: Getting to Know Your Camcorder 10 Overview 10 Check the components 11 System requirements 11 Front view 12 Rear view 12 Side view 13 Underside view 13 Chapter 2: Getting Started 14 Loading the battery 14 Charge your battery 16 Inserting and removing an SD™ Card (optional).....20 Protecting data on an SD™ Card 21 Turning the camcorder on and getting started .......22 Turning off the camcorder 22 Chapter 3: Record Mode 23 Button functions 23 LCD touch screen information 24 Notification icons 24 7
User Guide
Page 8
... 47 Touch function icons 48 Playback mode operations 49 Video Playback 50 Photo Playback 50 Delete a file in Playback mode 50 Video Trim 51 Chapter 5: Camcorder Settings 52 Setup Menu 52 Menu Sound 52 TV 53 Language 53 Time Settings 54 Format 54 Default Setting 55 Chapter 6: Viewing Photos and Videos...
... 47 Touch function icons 48 Playback mode operations 49 Video Playback 50 Photo Playback 50 Delete a file in Playback mode 50 Video Trim 51 Chapter 5: Camcorder Settings 52 Setup Menu 52 Menu Sound 52 TV 53 Language 53 Time Settings 54 Format 54 Default Setting 55 Chapter 6: Viewing Photos and Videos...
User Guide
Page 10
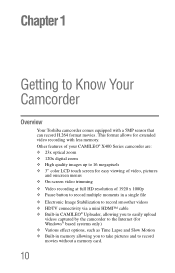
... HDTV connectivity via a mini HDMI™ cable ❖ Built-in memory allowing you to take pictures and to Know Your Camcorder Overview Your Toshiba camcorder comes equipped with less memory. This format allows for Windows® based systems only) ❖ Various effect options, such as... Time Lapse and Slow Motion ❖ Built-in CAMILEO® Uploader, allowing you to easily upload videos captured by the camcorder to the ...
... HDTV connectivity via a mini HDMI™ cable ❖ Built-in memory allowing you to take pictures and to Know Your Camcorder Overview Your Toshiba camcorder comes equipped with less memory. This format allows for Windows® based systems only) ❖ Various effect options, such as... Time Lapse and Slow Motion ❖ Built-in CAMILEO® Uploader, allowing you to easily upload videos captured by the camcorder to the ...
User Guide
Page 11
...space ❖ DVD-ROM ❖ Available USB 2.0 port Check the components Unpack the box and make sure all items listed below are included: Camcorder Mini USB cable Mini HDMI™ cable AC adaptor Lithium-ion rechargeable battery* Lens cover set (lens cover and strap) Quick Start CD-ROM ...User's Guide (this document), and Warranty information Deluxe soft case (Sample Illustration) Components *Preinstalled in memory is used for Firmware to operate the camcorder. ❖ Memory card slot allowing you to remove the protective film on the lens before using. Getting to Know Your...
...space ❖ DVD-ROM ❖ Available USB 2.0 port Check the components Unpack the box and make sure all items listed below are included: Camcorder Mini USB cable Mini HDMI™ cable AC adaptor Lithium-ion rechargeable battery* Lens cover set (lens cover and strap) Quick Start CD-ROM ...User's Guide (this document), and Warranty information Deluxe soft case (Sample Illustration) Components *Preinstalled in memory is used for Firmware to operate the camcorder. ❖ Memory card slot allowing you to remove the protective film on the lens before using. Getting to Know Your...
User Guide
Page 12
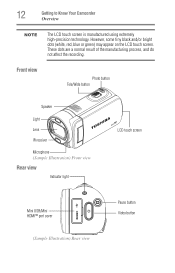
Front view Photo button Tele/Wide button Speaker Light Lens IR receiver Microphone (Sample Illustration) Front view Rear view Indicator light LCD touch screen Mini USB/Mini HDMI™ port cover (Sample Illustration) Rear view Pause button Video button However, some tiny black and/or bright dots (white, red, blue or green) may appear on the LCD touch screen. These dots are a normal result of the manufacturing process, and do not affect the recording. 12 Getting to Know Your Camcorder Overview NOTE The LCD touch screen is manufactured using extremely high-precision technology.
Front view Photo button Tele/Wide button Speaker Light Lens IR receiver Microphone (Sample Illustration) Front view Rear view Indicator light LCD touch screen Mini USB/Mini HDMI™ port cover (Sample Illustration) Rear view Pause button Video button However, some tiny black and/or bright dots (white, red, blue or green) may appear on the LCD touch screen. These dots are a normal result of the manufacturing process, and do not affect the recording. 12 Getting to Know Your Camcorder Overview NOTE The LCD touch screen is manufactured using extremely high-precision technology.
User Guide
Page 13
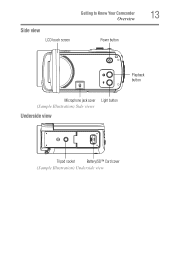
Side view LCD touch screen Getting to Know Your Camcorder Overview Power button 13 Playback button Microphone jack cover Light button (Sample Illustration) Side views Underside view Tripod socket Battery/SD™ Card cover (Sample Illustration) Underside view
Side view LCD touch screen Getting to Know Your Camcorder Overview Power button 13 Playback button Microphone jack cover Light button (Sample Illustration) Side views Underside view Tripod socket Battery/SD™ Card cover (Sample Illustration) Underside view
User Guide
Page 14
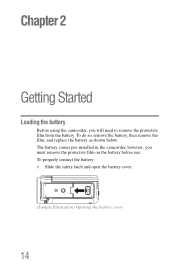
The battery comes pre-installed in the camcorder, however, you will need to remove the protective film from the battery. Chapter 2 Getting Started Loading the battery Before using the camcorder, you must remove the protective film on the battery before use. To do so, remove the battery, then remove the film, and replace the battery as shown below. To properly connect the battery: 1 Slide the safety latch and open the battery cover. (Sample Illustration) Opening the battery cover 14
The battery comes pre-installed in the camcorder, however, you will need to remove the protective film from the battery. Chapter 2 Getting Started Loading the battery Before using the camcorder, you must remove the protective film on the battery before use. To do so, remove the battery, then remove the film, and replace the battery as shown below. To properly connect the battery: 1 Slide the safety latch and open the battery cover. (Sample Illustration) Opening the battery cover 14
User Guide
Page 16
...You must use . The battery could also damage the battery and product. In AC charging mode, the light will turn off the camcorder. This could cause serious injury or a fire, and could overheat and ignite. Always cover the metal terminals with insulating tape when ...bag) whenever transporting it into a fire, and never allow exposure to another conductive object. 16 Getting Started Loading the battery Charge your camcorder before use the supplied AC adaptor or the USB cable to disassemble, tamper with another conductive object which could result in serious injury....
...You must use . The battery could also damage the battery and product. In AC charging mode, the light will turn off the camcorder. This could cause serious injury or a fire, and could overheat and ignite. Always cover the metal terminals with insulating tape when ...bag) whenever transporting it into a fire, and never allow exposure to another conductive object. 16 Getting Started Loading the battery Charge your camcorder before use the supplied AC adaptor or the USB cable to disassemble, tamper with another conductive object which could result in serious injury....
User Guide
Page 20
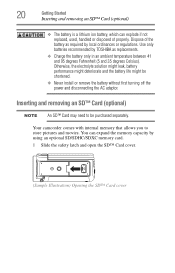
...purchased separately. Inserting and removing an SD™ Card (optional) NOTE An SD™ Card may need to store pictures and movies. Your camcorder comes with internal memory that allows you to be shortened. ❖ Never install or remove the battery without first turning off the power and ... recommended by local ordinances or regulations. You can explode if not replaced, used, handled or disposed of the battery as required by TOSHIBA as replacements. ❖ Charge the battery only in an ambient temperature between 41 and 95 degrees Fahrenheit (5 and 35 degrees Celsius).
...purchased separately. Inserting and removing an SD™ Card (optional) NOTE An SD™ Card may need to store pictures and movies. Your camcorder comes with internal memory that allows you to be shortened. ❖ Never install or remove the battery without first turning off the power and ... recommended by local ordinances or regulations. You can explode if not replaced, used, handled or disposed of the battery as required by TOSHIBA as replacements. ❖ Charge the battery only in an ambient temperature between 41 and 95 degrees Fahrenheit (5 and 35 degrees Celsius).
User Guide
Page 21
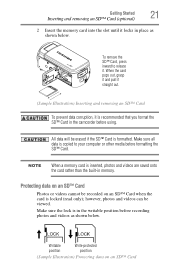
... writable position before recording photos and videos as shown below . Make sure the lock is recommended that you format the SD™ Card in the camcorder before formatting the SD™ Card. Make sure all data is formatted. Protecting data on an SD™ Card Photos or videos cannot be recorded...
... writable position before recording photos and videos as shown below . Make sure the lock is recommended that you format the SD™ Card in the camcorder before formatting the SD™ Card. Make sure all data is formatted. Protecting data on an SD™ Card Photos or videos cannot be recorded...
User Guide
Page 22
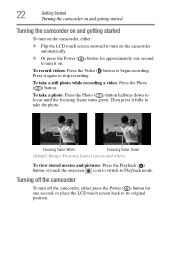
... and pictures: Press the Playback ( ) button or touch the onscreen icon to switch to begin recording. Turning off the camcorder To turn off the camcorder, either : ❖ Flip the LCD touch screen outward to turn on the camcorder automatically. ❖ Or press the Power ( ) button for approximately one second to turn on the... camcorder, either press the Power ( ) button for one second, or place the LCD touch screen back to focus until the focusing frame turns green. To take a ...
... and pictures: Press the Playback ( ) button or touch the onscreen icon to switch to begin recording. Turning off the camcorder To turn off the camcorder, either : ❖ Flip the LCD touch screen outward to turn on the camcorder automatically. ❖ Or press the Power ( ) button for approximately one second to turn on the... camcorder, either press the Power ( ) button for one second, or place the LCD touch screen back to focus until the focusing frame turns green. To take a ...
User Guide
Page 23
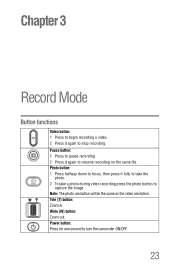
Note: The photo resolution will be the same as the video resolution. Power button: Press for one second to stop recording. Chapter 3 Record Mode Button functions Video button: 1 Press to begin recording a video. 2 Press it again to turn the camcorder ON/OFF. 23 Pause button: 1 Press to pause recording. 2 Press it fully to take the photo. 2 To take a photo during video recording press the photo button to resume recording on the same file. Wide (W) button: Zoom out. Tele (T) button: Zoom in. Photo button: 1 Press halfway down to focus, then press it again to capture the image.
Note: The photo resolution will be the same as the video resolution. Power button: Press for one second to stop recording. Chapter 3 Record Mode Button functions Video button: 1 Press to begin recording a video. 2 Press it again to turn the camcorder ON/OFF. 23 Pause button: 1 Press to pause recording. 2 Press it fully to take the photo. 2 To take a photo during video recording press the photo button to resume recording on the same file. Wide (W) button: Zoom out. Tele (T) button: Zoom in. Photo button: 1 Press halfway down to focus, then press it again to capture the image.
User Guide
Page 27
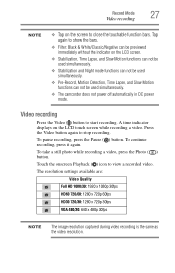
... mode functions can not be used simultaneously. ❖ Pre-Record, Motion Detection, Time Lapse, and Slow Motion functions can not be used simultaneously. ❖ The camcorder does not power off automatically in DC power mode. To pause recording, press the Pause ( ) button. Press the Video button again to view a recorded video...
... mode functions can not be used simultaneously. ❖ Pre-Record, Motion Detection, Time Lapse, and Slow Motion functions can not be used simultaneously. ❖ The camcorder does not power off automatically in DC power mode. To pause recording, press the Pause ( ) button. Press the Video button again to view a recorded video...
User Guide
Page 28
... of high contrast and backlight, so objects appear brighter and clearer. 1 Press the Light button. The Digital Zoom is at maximum, zooming stops temporarily. The camcorder zooms in beyond the Optical Zoom range. The Resolution settings available are: Image Quality High-16MP: 4608 x 3456 Standard-5MP: 2592 x 1944 Low-3MP: 2048...
... of high contrast and backlight, so objects appear brighter and clearer. 1 Press the Light button. The Digital Zoom is at maximum, zooming stops temporarily. The camcorder zooms in beyond the Optical Zoom range. The Resolution settings available are: Image Quality High-16MP: 4608 x 3456 Standard-5MP: 2592 x 1944 Low-3MP: 2048...

User Guide
Page 29
... Menu Sound Exposure Measure TV Scene Language Filter Time Setting White Balance Format Default Setting Delete Video Delete Photo Select & Delete Delete All *Please see "Camcorder Settings" on page 52 for more information about Setup. The options menu appears. 3 Touch to select the specific option you want to change, and touch...
... Menu Sound Exposure Measure TV Scene Language Filter Time Setting White Balance Format Default Setting Delete Video Delete Photo Select & Delete Delete All *Please see "Camcorder Settings" on page 52 for more information about Setup. The options menu appears. 3 Touch to select the specific option you want to change, and touch...
User Guide
Page 31
... exit. HD 720/60 Records videos at 640 x 480p 30fps resolution. VGA 480/30 Records videos at 1280 x 720p 60fps resolution. Screen Screen Stabilization Your camcorder provides a feature that steadies the image to help create clearer videos. Record Mode 31 Menu options/operations Resolution The Resolution settings available are: Full HD...
... exit. HD 720/60 Records videos at 640 x 480p 30fps resolution. VGA 480/30 Records videos at 1280 x 720p 60fps resolution. Screen Screen Stabilization Your camcorder provides a feature that steadies the image to help create clearer videos. Record Mode 31 Menu options/operations Resolution The Resolution settings available are: Full HD...
User Guide
Page 32
...begin recording automatically if movement is aimed at face(s), the face frame(s) appear. This function helps to automatically record videos when the camcorder detects movement. Operation 1 In the Video Setting menu, touch the Face Tracking icon twice. 2 Touch to select the desired ... capture subjects in backlit conditions. It stops recording when movement stops. Screen In Record mode, when the camcorder is detected. Screen Face Tracking The camcorder detects and focuses on face(s) automatically. Operation 1 In the Video Setting menu, touch the Motion Detect icon twice. 2 ...
...begin recording automatically if movement is aimed at face(s), the face frame(s) appear. This function helps to automatically record videos when the camcorder detects movement. Operation 1 In the Video Setting menu, touch the Face Tracking icon twice. 2 Touch to select the desired ... capture subjects in backlit conditions. It stops recording when movement stops. Screen In Record mode, when the camcorder is detected. Screen Face Tracking The camcorder detects and focuses on face(s) automatically. Operation 1 In the Video Setting menu, touch the Motion Detect icon twice. 2 ...


