
User Guide
Page 2
... for CE marking is being used as result. Automotive environment: Please search the owner instructions of the related vehicle for advices regarding the use of the applicable EU Directives. Responsible for a so called Residential, Commercial & Light Industry Environment. Medical environment: The compliance to big machinery or power units. where 3-phase 380V mains is Toshiba Europe GmbH, Hammfelddamm 8, 41460...
... for CE marking is being used as result. Automotive environment: Please search the owner instructions of the related vehicle for advices regarding the use of the applicable EU Directives. Responsible for a so called Residential, Commercial & Light Industry Environment. Medical environment: The compliance to big machinery or power units. where 3-phase 380V mains is Toshiba Europe GmbH, Hammfelddamm 8, 41460...

User Guide
Page 11
... format a media card 29 Turning the camcorder on and getting started ........29 Accessing the MENU screen 30 Setting the date and time 32 Resetting the date and time 33 Starting again from the power save mode 33 Chapter 3: Recording 35 Recording a video clip 35 Changing the video settings 36 Taking still photos 37 Zooming in or out on a subject 38 Changing the photo settings 39 Capturing a still photo while recording a video clip 39 Saving one frame from a video clip as a still image 40 Chapter 4: Playback 41 Playing...
... format a media card 29 Turning the camcorder on and getting started ........29 Accessing the MENU screen 30 Setting the date and time 32 Resetting the date and time 33 Starting again from the power save mode 33 Chapter 3: Recording 35 Recording a video clip 35 Changing the video settings 36 Taking still photos 37 Zooming in or out on a subject 38 Changing the photo settings 39 Capturing a still photo while recording a video clip 39 Saving one frame from a video clip as a still image 40 Chapter 4: Playback 41 Playing...

User Guide
Page 13
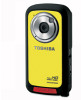
...; Color LCD screen for extended video recording with a 5 Megapixel sensor that can record H.264 format videos. This format allows for easy viewing of video and photos ❖ Video recording at full HD resolution of 1920 x1080 ❖ HDTV connectivity via an HDMI™ cable (HDMI™ cable sold separately) ❖ Built-in YouTube® Direct application, allowing you to upload videos captured by the camcorder to YouTube® more effortlessly ❖ 10x digital zoom...
...; Color LCD screen for extended video recording with a 5 Megapixel sensor that can record H.264 format videos. This format allows for easy viewing of video and photos ❖ Video recording at full HD resolution of 1920 x1080 ❖ HDTV connectivity via an HDMI™ cable (HDMI™ cable sold separately) ❖ Built-in YouTube® Direct application, allowing you to upload videos captured by the camcorder to YouTube® more effortlessly ❖ 10x digital zoom...
User Guide
Page 15
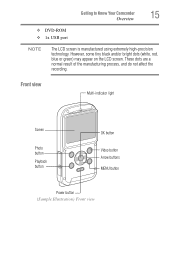
Getting to Know Your Camcorder 15 Overview ❖ DVD-ROM ❖ 1x USB port NOTE The LCD screen is manufactured using extremely high-precision technology. These dots are a normal result of the manufacturing process, and do not affect the recording. Front view Multi-indicator light Screen Photo button Playback button OK button Video button Arrow buttons MENU button Power button (Sample Illustration) Front view However, some tiny black and/or bright dots (white, red, blue or green) may appear on the LCD screen.
Getting to Know Your Camcorder 15 Overview ❖ DVD-ROM ❖ 1x USB port NOTE The LCD screen is manufactured using extremely high-precision technology. These dots are a normal result of the manufacturing process, and do not affect the recording. Front view Multi-indicator light Screen Photo button Playback button OK button Video button Arrow buttons MENU button Power button (Sample Illustration) Front view However, some tiny black and/or bright dots (white, red, blue or green) may appear on the LCD screen.

User Guide
Page 25
... the power cable/cord plug from the plug socket and stop using the battery if you might have to wait for safety. If caustic electrolyte fluid from contacting your body, possibly resulting in order to avoid any possible minor injury due to cool down before removing the battery, in serious injury. Battery warning indicators ❖ Always immediately turn on the product's power again...
... the power cable/cord plug from the plug socket and stop using the battery if you might have to wait for safety. If caustic electrolyte fluid from contacting your body, possibly resulting in order to avoid any possible minor injury due to cool down before removing the battery, in serious injury. Battery warning indicators ❖ Always immediately turn on the product's power again...
User Guide
Page 26
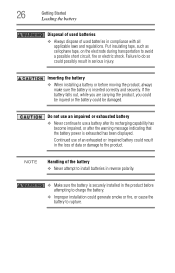
Inserting the battery ❖ When installing a battery or before attempting to charge the battery. ❖ Improper installation could result in the loss of data or damage to the product. Continued use a battery after its recharging capability has become impaired, or after the warning message indicating that the battery power is inserted correctly and securely. NOTE Handling of the battery ❖ Never attempt to rupture...
Inserting the battery ❖ When installing a battery or before attempting to charge the battery. ❖ Improper installation could result in the loss of data or damage to the product. Continued use a battery after its recharging capability has become impaired, or after the warning message indicating that the battery power is inserted correctly and securely. NOTE Handling of the battery ❖ Never attempt to rupture...

User Guide
Page 27
...). Inserting and removing a media card Your camcorder comes with internal memory that you capture will be shortened. ❖ Never install or remove the battery without first turning off the power and disconnecting the AC adaptor. The Media card reader supports the use of properly. Temperature alert icon If, while using an optional media card. Getting Started 27 Temperature alert icon ❖ Only use batteries recommended by TOSHIBA as required by using the camcorder, the...
...). Inserting and removing a media card Your camcorder comes with internal memory that you capture will be shortened. ❖ Never install or remove the battery without first turning off the power and disconnecting the AC adaptor. The Media card reader supports the use of properly. Temperature alert icon If, while using an optional media card. Getting Started 27 Temperature alert icon ❖ Only use batteries recommended by TOSHIBA as required by using the camcorder, the...

User Guide
Page 29
... not closed completely, the camcorder will no card is installed, images are recorded to the camcorder's internal memory. Follow the onscreen instructions to turn on the camera, the sound settings screen appears. The internal memory ( ) icon appears on the camcorder screen when the camcorder is caught in the camcorder and press the Power button. Turning the camcorder on and getting started" on and getting started To turn on the camcorder, press the Power ( ) button for approximately one second...
... not closed completely, the camcorder will no card is installed, images are recorded to the camcorder's internal memory. Follow the onscreen instructions to turn on the camera, the sound settings screen appears. The internal memory ( ) icon appears on the camcorder screen when the camcorder is caught in the camcorder and press the Power button. Turning the camcorder on and getting started" on and getting started To turn on the camcorder, press the Power ( ) button for approximately one second...

User Guide
Page 30
... change, and then press the OK button. The Settings screen for that item appears. The MENU screen appears. MENU LED LIGHT FACE CHASER PHOTO VIEW CLOCK SET LANGUAGE TV OUTPUT OK MENU button (Sample Illustration) Accessing the MENU screen 3 Press the MENU button again to close the MENU screen. 4 Use the Up/Down arrow buttons to select the item you wish to the MENU screen. 30 Getting Started Turning the camcorder on and getting started Accessing the MENU screen 1 Turn on the camcorder...
... change, and then press the OK button. The Settings screen for that item appears. The MENU screen appears. MENU LED LIGHT FACE CHASER PHOTO VIEW CLOCK SET LANGUAGE TV OUTPUT OK MENU button (Sample Illustration) Accessing the MENU screen 3 Press the MENU button again to close the MENU screen. 4 Use the Up/Down arrow buttons to select the item you wish to the MENU screen. 30 Getting Started Turning the camcorder on and getting started Accessing the MENU screen 1 Turn on the camcorder...
User Guide
Page 33
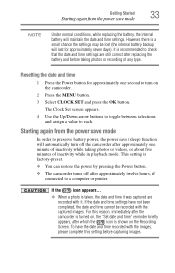
... setting before taking photos or videos, or about five minutes of any type. This setting is a small chance the settings may be recorded with the captured images. Getting Started 33 Starting again from the power save mode In order to preserve battery power, the power save mode NOTE Under normal conditions, while replacing the battery, the internal battery will maintain the date and time settings. Starting again from the power save (sleep) function will automatically turn on the Recording Screen...
... setting before taking photos or videos, or about five minutes of any type. This setting is a small chance the settings may be recorded with the captured images. Getting Started 33 Starting again from the power save mode In order to preserve battery power, the power save mode NOTE Under normal conditions, while replacing the battery, the internal battery will maintain the date and time settings. Starting again from the power save (sleep) function will automatically turn on the Recording Screen...

User Guide
Page 36
...The Video settings screen appears. Changing the video settings 1 With the Recording screen displayed, press the Right arrow button. VIDEO 1920x1080 30fps SHQ (Sample Image) Video settings screen 2 To return to end the recording. 36 Recording Recording a video clip NOTE It is the same as the video resolution. NOTE The resolution of still images taken while recording a video is not necessary to hold down the Video button while recording a video. 2M REC 00:00:09 Recording 5 time Photo button Video button MENU button Remaining recording time available Power button (Sample...
...The Video settings screen appears. Changing the video settings 1 With the Recording screen displayed, press the Right arrow button. VIDEO 1920x1080 30fps SHQ (Sample Image) Video settings screen 2 To return to end the recording. 36 Recording Recording a video clip NOTE It is the same as the video resolution. NOTE The resolution of still images taken while recording a video is not necessary to hold down the Video button while recording a video. 2M REC 00:00:09 Recording 5 time Photo button Video button MENU button Remaining recording time available Power button (Sample...
User Guide
Page 39
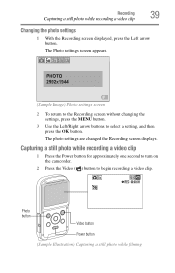
The photo settings are changed the Recording screen displays. Capturing a still photo while recording a video clip 1 Press the Power button for approximately one second to turn on the camcorder. 2 Press the Video ( ) button to select a setting, and then press the OK button. The Photo settings screen appears. PHOTO 2592x1944 (Sample Image) Photo settings screen 2 To return to the Recording screen without changing the settings, press the MENU button. 3 Use the Left/Right arrow buttons to begin recording a video clip. 5M REC 00:00:09 Photo button Video button Power button (Sample ...
The photo settings are changed the Recording screen displays. Capturing a still photo while recording a video clip 1 Press the Power button for approximately one second to turn on the camcorder. 2 Press the Video ( ) button to select a setting, and then press the OK button. The Photo settings screen appears. PHOTO 2592x1944 (Sample Image) Photo settings screen 2 To return to the Recording screen without changing the settings, press the MENU button. 3 Use the Left/Right arrow buttons to begin recording a video clip. 5M REC 00:00:09 Photo button Video button Power button (Sample ...

User Guide
Page 40
... video clip is audible ❖ During recording, the sound of media card used, recording may be viewed properly, making it is not a malfunction. NOTE When the remaining video recording time is approximately fifty seconds, it appear jerky. 40 Recording Capturing a still photo while recording a video clip 3 To take a still photo. 2 Press the Photo ( ) button. Saving one frame from a video clip as on the recording file size, as well as a still image 1 Play back the video clip. Pause the playback...
... video clip is audible ❖ During recording, the sound of media card used, recording may be viewed properly, making it is not a malfunction. NOTE When the remaining video recording time is approximately fifty seconds, it appear jerky. 40 Recording Capturing a still photo while recording a video clip 3 To take a still photo. 2 Press the Photo ( ) button. Saving one frame from a video clip as on the recording file size, as well as a still image 1 Play back the video clip. Pause the playback...
User Guide
Page 42
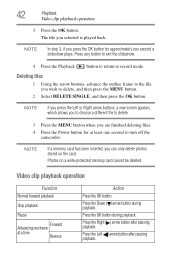
... button after pausing playback. Deleting files 1 Using the arrow buttons, advance the outline frame to delete, and then press the MENU button. 2 Select DELETE SINGLE, and then press the OK button. Photos on the card. Press any button to exit the slideshow. 4 Press the Playback ( ) button to return to turn off the camcorder. Press the Down ( ) arrow button during playback. Video clip playback operation Function Normal forward playback Stop playback Pause Forward Advancing one second to record mode. 42 Playback Video clip playback operation 3 Press...
... button after pausing playback. Deleting files 1 Using the arrow buttons, advance the outline frame to delete, and then press the MENU button. 2 Select DELETE SINGLE, and then press the OK button. Photos on the card. Press any button to exit the slideshow. 4 Press the Playback ( ) button to return to turn off the camcorder. Press the Down ( ) arrow button during playback. Video clip playback operation Function Normal forward playback Stop playback Pause Forward Advancing one second to record mode. 42 Playback Video clip playback operation 3 Press...
User Guide
Page 45
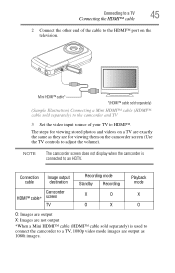
...; cable (HDMI™ cable sold separately) is connected to an HDTV. NOTE The camcorder screen does not display when the camcorder is used to connect the camcorder to a TV, 1080p video mode images are for viewing stored photos and videos on the television. Connection Image output cable destination Camcorder HDMI™ cable* screen TV Recording mode Standby Recording X O O X Playback mode X O O: Images are output X: Images are not output *When a Mini HDMI™ cable (HDMI™ cable sold separately) to the camcorder and TV 3 Set the video input source of the cable...
...; cable (HDMI™ cable sold separately) is connected to an HDTV. NOTE The camcorder screen does not display when the camcorder is used to connect the camcorder to a TV, 1080p video mode images are for viewing stored photos and videos on the television. Connection Image output cable destination Camcorder HDMI™ cable* screen TV Recording mode Standby Recording X O O X Playback mode X O O: Images are output X: Images are not output *When a Mini HDMI™ cable (HDMI™ cable sold separately) to the camcorder and TV 3 Set the video input source of the cable...
User Guide
Page 47
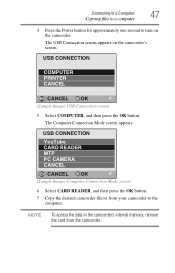
... the camcorder. Connecting to a Computer 47 Copying files to a computer 4 Press the Power button for approximately one second to the computer. NOTE To access the data in the camcorder's internal memory, remove the card from your camcorder to turn on the camcorder's screen. The Computer Connection Mode screen appears. USB CONNECTION YouTube CARD READER MTP PC CAMERA CANCEL CANCEL OK OK (Sample Image) Computer Connection Mode screen 6 Select CARD READER, and then press the OK button. 7 Copy the desired camcorder file(s) from the camcorder. USB CONNECTION...
... the camcorder. Connecting to a Computer 47 Copying files to a computer 4 Press the Power button for approximately one second to the computer. NOTE To access the data in the camcorder's internal memory, remove the card from your camcorder to turn on the camcorder's screen. The Computer Connection Mode screen appears. USB CONNECTION YouTube CARD READER MTP PC CAMERA CANCEL CANCEL OK OK (Sample Image) Computer Connection Mode screen 6 Select CARD READER, and then press the OK button. 7 Copy the desired camcorder file(s) from the camcorder. USB CONNECTION...
User Guide
Page 54
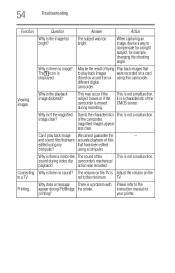
... image clear? sound during recording. instruction manual for example, changing the shooting angle. Why is a problem with Please refer to the minimum. The volume on the to a TV set to the appear during PictBridge the printer. different digital camcorder. This may occur if the subject moves or if the camcorder is Adjust the volume on the TV is moved during video clip camcorder's mechanical playback? of trying Play back images...
... image clear? sound during recording. instruction manual for example, changing the shooting angle. Why is a problem with Please refer to the minimum. The volume on the to a TV set to the appear during PictBridge the printer. different digital camcorder. This may occur if the subject moves or if the camcorder is Adjust the volume on the TV is moved during video clip camcorder's mechanical playback? of trying Play back images...

User Guide
Page 55
... internal memory" message appear? There is no available Delete unnecessary files, memory on the Move the lock switch to a dealer for service. appear? (protect) position. A problem such as The card contains files inability to a different medium, format the card. memory. A temporary internal Remove the battery form circuity problem may be the camcorder, wait a few the cause. minutes, then reinstall the battery and try again. After saving your files to record or play that were saved using...
... internal memory" message appear? There is no available Delete unnecessary files, memory on the Move the lock switch to a dealer for service. appear? (protect) position. A problem such as The card contains files inability to a different medium, format the card. memory. A temporary internal Remove the battery form circuity problem may be the camcorder, wait a few the cause. minutes, then reinstall the battery and try again. After saving your files to record or play that were saved using...

User Guide
Page 58
...District of Columbia may obtain warranty service by contacting the telephone support center at 1-888-592-0944. The One (1) Year Standard Limited Warranty for Toshiba Computer Accessories can be found online at 1-949-583-3305. Warranty Service Customers located in the fifty (...and District of Columbia may obtain warranty service by visiting the Toshiba Acclaim Web site at www.acclaim.toshiba.com or by contacting the telephone support center at http://pcsupport.toshiba.com/accessories1yr. 58 Other Information Warranty Warranty Online Warranty Information This product comes with a...
...District of Columbia may obtain warranty service by contacting the telephone support center at 1-888-592-0944. The One (1) Year Standard Limited Warranty for Toshiba Computer Accessories can be found online at 1-949-583-3305. Warranty Service Customers located in the fifty (...and District of Columbia may obtain warranty service by visiting the Toshiba Acclaim Web site at www.acclaim.toshiba.com or by contacting the telephone support center at http://pcsupport.toshiba.com/accessories1yr. 58 Other Information Warranty Warranty Online Warranty Information This product comes with a...

BW10.pdf
Page 1
... Lens: Fixed focus lens (F=2.8) Focus range: Normal: 11.8"~inf LCD monitor: 2" LCD Digital Zoom: 10X Storage media: Built-in 64MB Nand Flash Memory (usable storage around 34MB) Expansion: SD/SDHC/SDXC up to 64GB Still picture resolution 5MP (2592x1944) / 2MP (1920x1080) / 0.9MP (1280x720) / 0.3MP (640x480) Movie resolution: FHD (1920x1080p/30fps) / HD (1280x720p/30fps) / VGA (640x480/30fps) White balance: Auto Exposure: Auto Self-timer: Light: Video stabilization: File format: Interface: TV output Power saving mode: Battery information: Approximate photo...
... Lens: Fixed focus lens (F=2.8) Focus range: Normal: 11.8"~inf LCD monitor: 2" LCD Digital Zoom: 10X Storage media: Built-in 64MB Nand Flash Memory (usable storage around 34MB) Expansion: SD/SDHC/SDXC up to 64GB Still picture resolution 5MP (2592x1944) / 2MP (1920x1080) / 0.9MP (1280x720) / 0.3MP (640x480) Movie resolution: FHD (1920x1080p/30fps) / HD (1280x720p/30fps) / VGA (640x480/30fps) White balance: Auto Exposure: Auto Self-timer: Light: Video stabilization: File format: Interface: TV output Power saving mode: Battery information: Approximate photo...


