
User Guide
Page 2
...in accordance with the limits for help. If this equipment, not expressly approved by TOSHIBA or parties authorized by one or more of the following measures: ❖ Reorient or... of the FCC rules. 2 Regulatory Information FCC Information Product Name: Camcorder Model number: CAMILEO™ S30 FCC notice "Declaration of Conformity Information" This equipment has been tested and found to comply...reception, which the receiver is encouraged to try to correct the interference by TOSHIBA could void the user's authority to provide reasonable protection against harmful interference in a...
...in accordance with the limits for help. If this equipment, not expressly approved by TOSHIBA or parties authorized by one or more of the following measures: ❖ Reorient or... of the FCC rules. 2 Regulatory Information FCC Information Product Name: Camcorder Model number: CAMILEO™ S30 FCC notice "Declaration of Conformity Information" This equipment has been tested and found to comply...reception, which the receiver is encouraged to try to correct the interference by TOSHIBA could void the user's authority to provide reasonable protection against harmful interference in a...
User Guide
Page 4
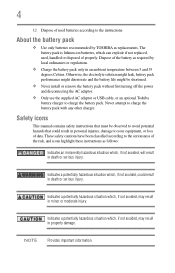
... to the instructions. 4 12 Dispose of used , handled or disposed of properly. About the battery pack ❖ Use only batteries recommended by TOSHIBA as required by local ordinances or regulations. ❖ Charge the battery pack only in death or serious injury. NOTE Provides important information. Otherwise, ...be shortened. ❖ Never install or remove the battery pack without first turning off the power and disconnecting the AC adaptor. ❖ Only use the supplied AC adaptor or USB cable, or an optional Toshiba battery charger to your equipment, or loss of the risk, and icons ...
... to the instructions. 4 12 Dispose of used , handled or disposed of properly. About the battery pack ❖ Use only batteries recommended by TOSHIBA as required by local ordinances or regulations. ❖ Charge the battery pack only in death or serious injury. NOTE Provides important information. Otherwise, ...be shortened. ❖ Never install or remove the battery pack without first turning off the power and disconnecting the AC adaptor. ❖ Only use the supplied AC adaptor or USB cable, or an optional Toshiba battery charger to your equipment, or loss of the risk, and icons ...

User Guide
Page 6
Contents Chapter 1: Getting to Know Your Camcorder 9 Overview 9 Check the Components 10 System Requirements 10 Front/Side views 11 Rear view 12 Underside view 12 Chapter 2: Getting Started 13 Loading the battery 13 Charging the battery 14 Inserting and removing an SD™ Card (optional).....19 Protecting data on an SD™ Card 20 Turning the camcorder on and getting started .......20 Turning off the camcorder 20 Chapter 3: Record Mode 21 Button functions 21 LCD touch screen information 22 Notification icons 22 Touch function icons 24 6
Contents Chapter 1: Getting to Know Your Camcorder 9 Overview 9 Check the Components 10 System Requirements 10 Front/Side views 11 Rear view 12 Underside view 12 Chapter 2: Getting Started 13 Loading the battery 13 Charging the battery 14 Inserting and removing an SD™ Card (optional).....19 Protecting data on an SD™ Card 20 Turning the camcorder on and getting started .......20 Turning off the camcorder 20 Chapter 3: Record Mode 21 Button functions 21 LCD touch screen information 22 Notification icons 22 Touch function icons 24 6
User Guide
Page 14
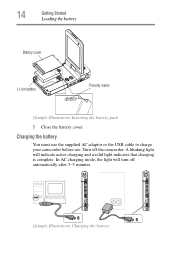
14 Getting Started Loading the battery Battery cover Li-ion battery Polarity marks (Sample Illustration) Inserting the battery pack 5 Close the battery cover. A blinking light will turn off the camcorder. In AC charging mode, the light will indicate active charging and a solid light indicates that charging is complete. Charging the battery You must use the supplied AC adaptor or the USB cable to charge your camcorder before use. Turn off automatically after 3~5 minutes. (Sample Illustration) Charging the battery
14 Getting Started Loading the battery Battery cover Li-ion battery Polarity marks (Sample Illustration) Inserting the battery pack 5 Close the battery cover. A blinking light will turn off the camcorder. In AC charging mode, the light will indicate active charging and a solid light indicates that charging is complete. Charging the battery You must use the supplied AC adaptor or the USB cable to charge your camcorder before use. Turn off automatically after 3~5 minutes. (Sample Illustration) Charging the battery
User Guide
Page 17
...carefully and immediately remove the battery pack from the product. Battery pack warning indicators ❖ Always immediately turn on the product's power again until an authorized Toshiba service provider has checked it off and disconnect the power cable/cord plug from the plug socket and stop... caustic electrolyte fluid from the battery pack should contact any possible minor injury due to help prevent permanent eye damage. Do not turn the power off under running water and obtain prompt medical attention, to heat exposure. Getting Started 17 Loading the battery Battery safety...
...carefully and immediately remove the battery pack from the product. Battery pack warning indicators ❖ Always immediately turn on the product's power again until an authorized Toshiba service provider has checked it off and disconnect the power cable/cord plug from the plug socket and stop... caustic electrolyte fluid from the battery pack should contact any possible minor injury due to help prevent permanent eye damage. Do not turn the power off under running water and obtain prompt medical attention, to heat exposure. Getting Started 17 Loading the battery Battery safety...

User Guide
Page 19
... (Sample Illustration) Inserting and removing an SD™ Card NOTE When a memory card is lithium ion batteries, which can expand the memory capacity by TOSHIBA as shown below. Inserting and removing an SD™ Card (optional) NOTE An SD™ Card must be shortened. ❖ Never install or remove... the battery pack without first turning off the power and disconnecting the AC adaptor. You can explode if not replaced, used, handled or disposed of the battery as required by ...
... (Sample Illustration) Inserting and removing an SD™ Card NOTE When a memory card is lithium ion batteries, which can expand the memory capacity by TOSHIBA as shown below. Inserting and removing an SD™ Card (optional) NOTE An SD™ Card must be shortened. ❖ Never install or remove... the battery pack without first turning off the power and disconnecting the AC adaptor. You can explode if not replaced, used, handled or disposed of the battery as required by ...

User Guide
Page 20
...on the camcorder automatically. ❖ Or press the Power button for approximately one second, or you can place the LCD touch screen back to turn off the camcorder: You can be recorded on an SD™ Card when the card is in the writeable position before recording photos and videos ...as shown below. To take a photo. Turning off the camcorder To turn on . The Video Record mode LED Indicator ( ) glows. Press the Record ( ) button to Video Record mode. Make sure the lock is locked (...
...on the camcorder automatically. ❖ Or press the Power button for approximately one second, or you can place the LCD touch screen back to turn off the camcorder: You can be recorded on an SD™ Card when the card is in the writeable position before recording photos and videos ...as shown below. To take a photo. Turning off the camcorder To turn on . The Video Record mode LED Indicator ( ) glows. Press the Record ( ) button to Video Record mode. Make sure the lock is locked (...

User Guide
Page 21
Tele (T) button: Zoom in. Power button: Press for one second to take a still photo. Press the button again to stop recording. 2 In Photo Record mode, press to turn ON/OFF the camcorder. 21 LED light button: LED light ON/LED light OFF/Digital light ON. Pause button: 1 Press to pause recording. 2 Press again to record videos. Chapter 3 Record Mode Button functions Mode button: 1 Switch between Video mode and Photo mode. Record button: 1 In Video Record mode, press to continue recording. Wide (W) button: Zoom out.
Tele (T) button: Zoom in. Power button: Press for one second to take a still photo. Press the button again to stop recording. 2 In Photo Record mode, press to turn ON/OFF the camcorder. 21 LED light button: LED light ON/LED light OFF/Digital light ON. Pause button: 1 Press to pause recording. 2 Press again to record videos. Chapter 3 Record Mode Button functions Mode button: 1 Switch between Video mode and Photo mode. Record button: 1 In Video Record mode, press to continue recording. Wide (W) button: Zoom out.
User Guide
Page 26
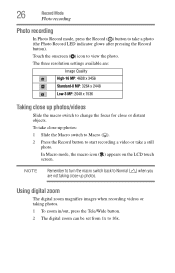
26 Record Mode Photo recording Photo recording In Photo Record mode, press the Record ( ) button to take a still photo. NOTE Remember to turn the macro switch back to start recording a video or take a photo (the Photo Record LED indicator glows after pressing the Record button). Using digital zoom ...
26 Record Mode Photo recording Photo recording In Photo Record mode, press the Record ( ) button to take a still photo. NOTE Remember to turn the macro switch back to start recording a video or take a photo (the Photo Record LED indicator glows after pressing the Record button). Using digital zoom ...
User Guide
Page 28
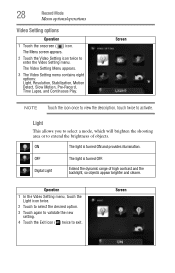
... options: Light, Resolution, Stabilization, Motion Detect, Slow Motion, Pre-Record, Time Lapse, and Continuous Play. OFF Digital Light The light is turned ON and provides illumination. ON The light is turned OFF. Extend the dynamic range of objects. 28 Record Mode Menu options/operations Video Setting options Operation 1 Touch the onscreen ( ) icon...
... options: Light, Resolution, Stabilization, Motion Detect, Slow Motion, Pre-Record, Time Lapse, and Continuous Play. OFF Digital Light The light is turned ON and provides illumination. ON The light is turned OFF. Extend the dynamic range of objects. 28 Record Mode Menu options/operations Video Setting options Operation 1 Touch the onscreen ( ) icon...

User Guide
Page 33
... brighter and clearer. Screen Resolution Three resolution settings are available: High-16M Take photos at 2048 x 1536, 3 MP quality. OFF Digital Light The light is turned ON and provides illumination. Standard-8M Take photos at 3264 x 2448, 8 MP quality. Extend the dynamic range of objects. ON The light is...
... brighter and clearer. Screen Resolution Three resolution settings are available: High-16M Take photos at 2048 x 1536, 3 MP quality. OFF Digital Light The light is turned ON and provides illumination. Standard-8M Take photos at 3264 x 2448, 8 MP quality. Extend the dynamic range of objects. ON The light is...
User Guide
Page 65
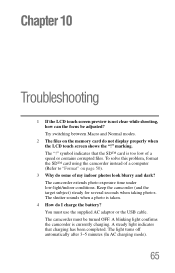
...the target subject) steady for several seconds when taking photos. The camcorder must use the supplied AC adaptor or the USB cable. The light turns off automatically after 3~5 minutes (In AC charging mode). 65 marking. The camcorder extends photo exposure time under low-light/indoor conditions. The ...How do I charge the battery? A steady light indicates that the SD™ card is not clear while shooting, how can the focus be turned OFF. You must be adjusted? Chapter 10 Troubleshooting 1 If the LCD touch screen preview is too low of my indoor photos look blurry and ...
...the target subject) steady for several seconds when taking photos. The camcorder must use the supplied AC adaptor or the USB cable. The light turns off automatically after 3~5 minutes (In AC charging mode). 65 marking. The camcorder extends photo exposure time under low-light/indoor conditions. The ...How do I charge the battery? A steady light indicates that the SD™ card is not clear while shooting, how can the focus be turned OFF. You must be adjusted? Chapter 10 Troubleshooting 1 If the LCD touch screen preview is too low of my indoor photos look blurry and ...


