

23.6 inch HD LCD Monitor User Manual
Page 2
... Assembly and care 14 Attaching the base 14 Removing the base 15 Cleaning the monitor 16 Quick Tour 16 Setting up the monitor 18 Preset video modes 23 Using the front panel controls 25 Using the menus 26 Entering Menu mode 26 Navigating the menus 27 Locking/unlocking the Monitor settings window 29 Menu options 29 Adjusting monitor settings 33 Using the Auto Config utility 33 Adjusting the brightness of the display 33 Adjusting the position of the picture on the display 34 Resetting the monitor to factory settings...
... Assembly and care 14 Attaching the base 14 Removing the base 15 Cleaning the monitor 16 Quick Tour 16 Setting up the monitor 18 Preset video modes 23 Using the front panel controls 25 Using the menus 26 Entering Menu mode 26 Navigating the menus 27 Locking/unlocking the Monitor settings window 29 Menu options 29 Adjusting monitor settings 33 Using the Auto Config utility 33 Adjusting the brightness of the display 33 Adjusting the position of the picture on the display 34 Resetting the monitor to factory settings...

23.6 inch HD LCD Monitor User Manual
Page 5
... a secure electrical connection. 5 Safety Instructions Always read the safety instructions carefully: Do not disassemble, modify, tamper with or repair the product ❖ Do not attempt to remove a plug from a socket. Use correct power source ❖ Never plug the power cord/cable into a power source that the power plug (and extension cable plug if used) has been fully inserted into the socket, to use the product without cleaning the power plug may damage the cable/cord, and/or...
... a secure electrical connection. 5 Safety Instructions Always read the safety instructions carefully: Do not disassemble, modify, tamper with or repair the product ❖ Do not attempt to remove a plug from a socket. Use correct power source ❖ Never plug the power cord/cable into a power source that the power plug (and extension cable plug if used) has been fully inserted into the socket, to use the product without cleaning the power plug may damage the cable/cord, and/or...

23.6 inch HD LCD Monitor User Manual
Page 6
.... Exposure to an authorized service center. LCD (Liquid Crystal Display) safety ❖ Never touch the LCD if it off the product. 2 Disconnect the power cord/cable from the power plug socket and product. Failure to follow these eventualities should accidentally occur, immediately: 1 Turn off immediately. ❖ If LCD liquid should accidentally contact any part of your body, always use large amounts of infants or...
.... Exposure to an authorized service center. LCD (Liquid Crystal Display) safety ❖ Never touch the LCD if it off the product. 2 Disconnect the power cord/cable from the power plug socket and product. Failure to follow these eventualities should accidentally occur, immediately: 1 Turn off immediately. ❖ If LCD liquid should accidentally contact any part of your body, always use large amounts of infants or...

23.6 inch HD LCD Monitor User Manual
Page 12
Features ❖ Compatible with most analog RGB and digital DVI and HDMI display standards. ❖ Displays crisp, vibrant color graphics and provides up and configure your computer must also support the DDC2B standard. This manual tells you for DVD playback and other demanding graphics-intensive applications. ❖ Internal microprocessor digitally controls auto-scanning, with horizontal scan frequencies between 30 and 83 KHz, and vertical scan frequencies between 56 and...
Features ❖ Compatible with most analog RGB and digital DVI and HDMI display standards. ❖ Displays crisp, vibrant color graphics and provides up and configure your computer must also support the DDC2B standard. This manual tells you for DVD playback and other demanding graphics-intensive applications. ❖ Internal microprocessor digitally controls auto-scanning, with horizontal scan frequencies between 30 and 83 KHz, and vertical scan frequencies between 56 and...
23.6 inch HD LCD Monitor User Manual
Page 13
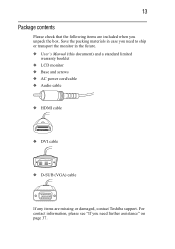
13 Package contents Please check that the following items are missing or damaged, contact Toshiba support. Save the packing materials in the future. ❖ User's Manual (this document) and a standard limited warranty booklet ❖ LCD monitor ❖ Base and screws ❖ AC power cord/cable ❖ Audio cable ❖ HDMI cable ❖ DVI cable ❖ D-SUB (VGA) cable If any items are included when you need further assistance" on page 37. For contact information, please see "If you need to ship or transport the monitor in case you unpack the box.
13 Package contents Please check that the following items are missing or damaged, contact Toshiba support. Save the packing materials in the future. ❖ User's Manual (this document) and a standard limited warranty booklet ❖ LCD monitor ❖ Base and screws ❖ AC power cord/cable ❖ Audio cable ❖ HDMI cable ❖ DVI cable ❖ D-SUB (VGA) cable If any items are included when you need further assistance" on page 37. For contact information, please see "If you need to ship or transport the monitor in case you unpack the box.
23.6 inch HD LCD Monitor User Manual
Page 16
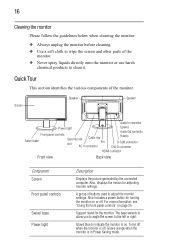
... the screen to clean it. Glows blue to adjust the monitor settings. Screen Speaker Speaker Audio In connector Power light Front panel controls Swivel base Security lock Cable clip slot Pin AC In connector (green) Audio Out connector (black) D-SUB connector DVI-D connector HDMI connector Front view Back view Component Screen Front panel controls Swivel base Power light Description Displays the picture generated by the connected computer. A group of the monitor. Also includes a power button for turning the monitor on or off . 16 Cleaning the monitor Please...
... the screen to clean it. Glows blue to adjust the monitor settings. Screen Speaker Speaker Audio In connector Power light Front panel controls Swivel base Security lock Cable clip slot Pin AC In connector (green) Audio Out connector (black) D-SUB connector DVI-D connector HDMI connector Front view Back view Component Screen Front panel controls Swivel base Power light Description Displays the picture generated by the connected computer. A group of the monitor. Also includes a power button for turning the monitor on or off . 16 Cleaning the monitor Please...

23.6 inch HD LCD Monitor User Manual
Page 17
...Security lock slot Attachment point for power cord/cable. DVI-D connector Connection point for a DVI-D video cable, used to connect the monitor to a computer's HDMI port. You can also connect a microphone to a computer's DVI-D jack. 17 Component Description Speakers Play sounds from a computer, if the monitor is connected to adjust the monitor height. Cable clip Holds cables together at the back of the monitor. Remove to a computer with the supplied audio cable. HDMI connector Connection point for a VGA video cable, used to connect the monitor to the Audio...
...Security lock slot Attachment point for power cord/cable. DVI-D connector Connection point for a DVI-D video cable, used to connect the monitor to a computer's HDMI port. You can also connect a microphone to a computer's DVI-D jack. 17 Component Description Speakers Play sounds from a computer, if the monitor is connected to adjust the monitor height. Cable clip Holds cables together at the back of the monitor. Remove to a computer with the supplied audio cable. HDMI connector Connection point for a VGA video cable, used to connect the monitor to the Audio...

23.6 inch HD LCD Monitor User Manual
Page 18
... plug rated for 10A/250V. (Sample Illustration) Connecting the power cord/cable to the monitor 2 Connect the monitor to the monitor. a Turn off your country/region, as shown in the section "Assembly and care" on page 14, follow the steps below to set up the monitor: 1 Connect the included power cord/cable to your computer. If you need to use an extension cord or power strip, use the appropriate cord set consisting of H05VV-F cord and plug rated...
... plug rated for 10A/250V. (Sample Illustration) Connecting the power cord/cable to the monitor 2 Connect the monitor to the monitor. a Turn off your country/region, as shown in the section "Assembly and care" on page 14, follow the steps below to set up the monitor: 1 Connect the included power cord/cable to your computer. If you need to use an extension cord or power strip, use the appropriate cord set consisting of H05VV-F cord and plug rated...

23.6 inch HD LCD Monitor User Manual
Page 21
a Press the Power button to 110 mm (4.3 inches) for viewing comfort. The Power light glows blue. Power button (Sample Illustration) Pressing the Power button on the monitor b Turn on the computer. 6 Adjust the height of the monitor support column. (Sample Illustration) Removing the pin The screen can be raised up to turn on the monitor and the computer. a Remove the pin (used to keep the support column fixed during shipping) from the back of the monitor. 21 5 Turn on the monitor.
a Press the Power button to 110 mm (4.3 inches) for viewing comfort. The Power light glows blue. Power button (Sample Illustration) Pressing the Power button on the monitor b Turn on the computer. 6 Adjust the height of the monitor support column. (Sample Illustration) Removing the pin The screen can be raised up to turn on the monitor and the computer. a Remove the pin (used to keep the support column fixed during shipping) from the back of the monitor. 21 5 Turn on the monitor.

23.6 inch HD LCD Monitor User Manual
Page 23
... table below. These commonly used video resolution/refresh modes as shown. (Sample Illustration) Adjusting the screen position b Adjust the screen to diagnose the problem. 23 The image on page 26. Set the position of the screen image. 8 Adjust the screen position. The monitor is now ready for instructions on page 35 to a comfortable viewing angle. Preset video modes The Toshiba Widescreen LCD provides the most commonly used modes are listed in your operating system's video properties dialog box. a Grasp...
... table below. These commonly used video resolution/refresh modes as shown. (Sample Illustration) Adjusting the screen position b Adjust the screen to diagnose the problem. 23 The image on page 26. Set the position of the screen image. 8 Adjust the screen position. The monitor is now ready for instructions on page 35 to a comfortable viewing angle. Preset video modes The Toshiba Widescreen LCD provides the most commonly used modes are listed in your operating system's video properties dialog box. a Grasp...

23.6 inch HD LCD Monitor User Manual
Page 26
... mode. Launches the auto configuration (Auto Config) utility. 2- Using the menus You can use the menus to adjust the monitor settings to open, navigate, and make selections from the menus. or scrolls through menu options. 4 MENU Places the selected menu option Displays the Monitor settings into Edit mode or inputs the window. Decreases the value of the monitor. For example, if you may want to increase the monitor's contrast and brightness settings for a menu option. 5 Turns...
... mode. Launches the auto configuration (Auto Config) utility. 2- Using the menus You can use the menus to adjust the monitor settings to open, navigate, and make selections from the menus. or scrolls through menu options. 4 MENU Places the selected menu option Displays the Monitor settings into Edit mode or inputs the window. Decreases the value of the monitor. For example, if you may want to increase the monitor's contrast and brightness settings for a menu option. 5 Turns...
23.6 inch HD LCD Monitor User Manual
Page 32
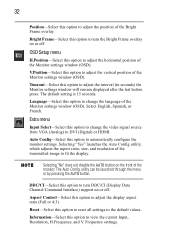
... Position-Select this option to adjust the position of the Monitor settings window (OSD). V.Position-Select this option to DVI (Digital) or HDMI. Language-Select this option to view the current Input, Resolution, H.Frequency, and V. The Auto Config utility can be launched through the menu or by pressing the AUTO button. Aspect Control-Select this option to change the video signal source from VGA (Analog) to adjust the vertical position of the Bright Frame overlay. Information-Select this option to the default...
... Position-Select this option to adjust the position of the Monitor settings window (OSD). V.Position-Select this option to DVI (Digital) or HDMI. Language-Select this option to view the current Input, Resolution, H.Frequency, and V. The Auto Config utility can be launched through the menu or by pressing the AUTO button. Aspect Control-Select this option to change the video signal source from VGA (Analog) to adjust the vertical position of the Bright Frame overlay. Information-Select this option to the default...

23.6 inch HD LCD Monitor User Manual
Page 33
... Edit mode. The Luminance menu displays. 3 Press MENU once to highlight the Contrast control. 4 Press + once to navigate to the Brightness control. 5 Press MENU to decrease the brightness setting. to edit the Brightness control. The Auto Config option is available only when the monitor is highlighted in one easy step. The control turns from red to white. 8 Press AUTO twice to adjust commonly used settings step by step. The control is connected to your monitor in red...
... Edit mode. The Luminance menu displays. 3 Press MENU once to highlight the Contrast control. 4 Press + once to navigate to the Brightness control. 5 Press MENU to decrease the brightness setting. to edit the Brightness control. The Auto Config option is available only when the monitor is highlighted in one easy step. The control turns from red to white. 8 Press AUTO twice to adjust commonly used settings step by step. The control is connected to your monitor in red...

23.6 inch HD LCD Monitor User Manual
Page 34
... Edit mode. Press + or - to adjust the vertical position of the picture. 11 Press MENU to edit the Reset control. To adjust the horizontal and/or vertical position of the picture, follow these steps to reset all settings to the default values: 1 Press MENU to exit the current menu and close the Monitor settings window. The control turns from red to white. 12 Press AUTO twice to display the Monitor settings window. 2 Press + until the picture is positioned correctly on the display. The control...
... Edit mode. Press + or - to adjust the vertical position of the picture. 11 Press MENU to edit the Reset control. To adjust the horizontal and/or vertical position of the picture, follow these steps to reset all settings to the default values: 1 Press MENU to exit the current menu and close the Monitor settings window. The control turns from red to white. 12 Press AUTO twice to display the Monitor settings window. 2 Press + until the picture is positioned correctly on the display. The control...

23.6 inch HD LCD Monitor User Manual
Page 35
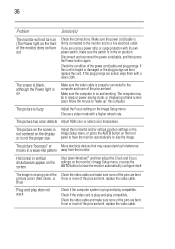
... cable. 2 Pass the locking end through or around some part of a heavy object such as a desk or other large object. 35 The Monitor settings window closes. Troubleshooting This section provides tips for correcting problems, should you encounter problems that you cannot resolve. Follow the instructions included with your computer user's manual. You may also want to contact Toshiba should any occur. The display is reset...
... cable. 2 Pass the locking end through or around some part of a heavy object such as a desk or other large object. 35 The Monitor settings window closes. Troubleshooting This section provides tips for correcting problems, should you encounter problems that you cannot resolve. Follow the instructions included with your computer user's manual. You may also want to contact Toshiba should any occur. The display is reset...
23.6 inch HD LCD Monitor User Manual
Page 36
... Adjust the horizontal and/or vertical position settings in the on position. If you are using a power strip or surge protector with a higher refresh rate. If the cord is in the not centered on the display Image Setup menu, or press the AUTO button on the Image Setup menu. If the plug prongs are bent. Blue) Plug-and-play does not work Check if the computer system is plug-and-play compatible. Check if the video card is plug-and-play compatible...
... Adjust the horizontal and/or vertical position settings in the on position. If you are using a power strip or surge protector with a higher refresh rate. If the cord is in the not centered on the display Image Setup menu, or press the AUTO button on the Image Setup menu. If the plug prongs are bent. Blue) Plug-and-play does not work Check if the computer system is plug-and-play compatible. Check if the video card is plug-and-play compatible...
23.6 inch HD LCD Monitor User Manual
Page 37
... working. Check the video cable and make sure none of the pins are bent, replace the cable. Make sure the computer is loose on either end, tighten the connector's screws. Select a preset video mode, as described in the monitor's Luminance menu. Please see "Adjusting monitor settings" on page 33 for more pins are bent. Move the mouse to a video mode that is properly connected. Poor brightness or contrast Adjust the brightness and contrast settings in "Preset video modes...
... working. Check the video cable and make sure none of the pins are bent, replace the cable. Make sure the computer is loose on either end, tighten the connector's screws. Select a preset video mode, as described in the monitor's Luminance menu. Please see "Adjusting monitor settings" on page 33 for more pins are bent. Move the mouse to a video mode that is properly connected. Poor brightness or contrast Adjust the brightness and contrast settings in "Preset video modes...

23.6 inch HD LCD Monitor User Manual
Page 40
... 33 monitor height 21 monitor settings 33 picture position 34 screen position 23 Assembly and care 14 attaching base 14 Auto Config utility 33 B base attaching 14 removing 15 brightness adjusting 33 buttons - 25 + 25 auto 25 front panel controls 16 menu 25 power 25 source 25 C cable audio cable 20 D-SUB (VGA) video cable 19 DVI cable 19 HDMI cable 19 power cord/cable 18 cable clip 17 cleaning monitor 16 closing Monitor settings window 33, 34 Color Boost menu 31 Color Temp menu 30 connecting audio cable 20 D-SUB (VGA) video cable 19 DVI cable 19 HDMI cable 19 power cord/cable 18 connector AC...
... 33 monitor height 21 monitor settings 33 picture position 34 screen position 23 Assembly and care 14 attaching base 14 Auto Config utility 33 B base attaching 14 removing 15 brightness adjusting 33 buttons - 25 + 25 auto 25 front panel controls 16 menu 25 power 25 source 25 C cable audio cable 20 D-SUB (VGA) video cable 19 DVI cable 19 HDMI cable 19 power cord/cable 18 cable clip 17 cleaning monitor 16 closing Monitor settings window 33, 34 Color Boost menu 31 Color Temp menu 30 connecting audio cable 20 D-SUB (VGA) video cable 19 DVI cable 19 HDMI cable 19 power cord/cable 18 connector AC...
23.6 inch HD LCD Monitor User Manual
Page 41
... monitor settings adjusting 33 Monitor settings window locking/unlocking 29 N navigating menus 27 O Onscreen display (OSD) 27 OSD Setup menu 32 41 P package contents 13 Picture Boost menu 31 picture position adjusting 34 pin 17 removing 21 power cord/cable connectors 39 on/off light 16 power light 16 turning on the computer 21 turning on the monitor 21 Preset video modes 23 HD 24 SVGA 24 SXGA 24 VESA 24 VGA 24 WSXGA 24 WXGA+ 24 XGA 24 Q quick tour 16 R Regulatory statements 9 removing base...
... monitor settings adjusting 33 Monitor settings window locking/unlocking 29 N navigating menus 27 O Onscreen display (OSD) 27 OSD Setup menu 32 41 P package contents 13 Picture Boost menu 31 picture position adjusting 34 pin 17 removing 21 power cord/cable connectors 39 on/off light 16 power light 16 turning on the computer 21 turning on the monitor 21 Preset video modes 23 HD 24 SVGA 24 SXGA 24 VESA 24 VGA 24 WSXGA 24 WXGA+ 24 XGA 24 Q quick tour 16 R Regulatory statements 9 removing base...

23.6 inch HD LCD Monitor User Manual
Page 42
42 securing monitor 35 security lock slot 17 setting up monitor 18 settings resetting monitor 34 slot security lock 17 speakers 17 specifications monitor (LCD) 38 monitor Environmental consider- ations 39 monitor Input connectors 38 monitor Multimedia 38 monitor Operational features 38 monitor physical specifications 39 monitor Power 39 monitor Power input 38 SVGA 24 swivel base support stand 16 SXGA 24 T Toshiba Customer Support Centers 37 Toshiba Support Web sites 37 troubleshooting error messages 35 U using Auto Config utility 33 front panel controls 25 menus 26 V VESA 24 VGA 24...
42 securing monitor 35 security lock slot 17 setting up monitor 18 settings resetting monitor 34 slot security lock 17 speakers 17 specifications monitor (LCD) 38 monitor Environmental consider- ations 39 monitor Input connectors 38 monitor Multimedia 38 monitor Operational features 38 monitor physical specifications 39 monitor Power 39 monitor Power input 38 SVGA 24 swivel base support stand 16 SXGA 24 T Toshiba Customer Support Centers 37 Toshiba Support Web sites 37 troubleshooting error messages 35 U using Auto Config utility 33 front panel controls 25 menus 26 V VESA 24 VGA 24...


