

21.6 inch HD LCD Monitor User Manual
Page 2
... Assembly and care 14 Attaching the base 14 Removing the base 14 Cleaning the monitor 14 Quick Tour 15 Setting up the monitor 16 Preset video modes 22 Using the front panel controls 22 Using the menus 24 Entering Menu mode 24 Navigating the menus 25 Locking/unlocking the Monitor settings window 26 Menu options 26 Adjusting monitor settings 30 Using the Auto Config utility 30 Adjusting the brightness of the display 30 Adjusting the position of the picture on the display 30 Resetting the monitor to factory settings...
... Assembly and care 14 Attaching the base 14 Removing the base 14 Cleaning the monitor 14 Quick Tour 15 Setting up the monitor 16 Preset video modes 22 Using the front panel controls 22 Using the menus 24 Entering Menu mode 24 Navigating the menus 25 Locking/unlocking the Monitor settings window 26 Menu options 26 Adjusting monitor settings 30 Using the Auto Config utility 30 Adjusting the brightness of the display 30 Adjusting the position of the picture on the display 30 Resetting the monitor to factory settings...

21.6 inch HD LCD Monitor User Manual
Page 5
... alter a power cable/cord. ❖ Never bend or twist a power cable/cord. ❖ Never pull on the power plug connectors or connector base, turn the power off and disconnect the power plug, and then clean the connector and/or connector base with or repair the product. An overload on a power cable/cord. ❖ Never run a power cable/cord through a pinch point such as a door or window. ❖ Never place a power cable/cord near a heat source. ❖ Never use . Always grasp the plug directly...
... alter a power cable/cord. ❖ Never bend or twist a power cable/cord. ❖ Never pull on the power plug connectors or connector base, turn the power off and disconnect the power plug, and then clean the connector and/or connector base with or repair the product. An overload on a power cable/cord. ❖ Never run a power cable/cord through a pinch point such as a door or window. ❖ Never place a power cable/cord near a heat source. ❖ Never use . Always grasp the plug directly...
21.6 inch HD LCD Monitor User Manual
Page 6
.... LCD (Liquid Crystal Display) safety ❖ Never touch the LCD if it off the product. 2 Disconnect the power cord/cable from the power plug socket and product. Choking hazards ❖ Never leave small parts such as the liquid contained within the reach of the LCD liquid contacts your body, always use .... heat since the product base surface increases in serious injury. Do not turn on a flat and hard surface that is damaged, causing a liquid crystal leak, never ingest or touch the liquid. Failure to an authorized service center. Swallowing a small part may result in damage ...
.... LCD (Liquid Crystal Display) safety ❖ Never touch the LCD if it off the product. 2 Disconnect the power cord/cable from the power plug socket and product. Choking hazards ❖ Never leave small parts such as the liquid contained within the reach of the LCD liquid contacts your body, always use .... heat since the product base surface increases in serious injury. Do not turn on a flat and hard surface that is damaged, causing a liquid crystal leak, never ingest or touch the liquid. Failure to an authorized service center. Swallowing a small part may result in damage ...
21.6 inch HD LCD Monitor User Manual
Page 12
... troubleshooting. This manual tells you for Windows® applications. ❖ Compact, sleek cabinet design saves desk space. ❖ Supports the DDC2B (Display Data Channel 2B) standard, which enables easier monitor setup through which the monitor automatically informs the host system about its capabilities, such as supported resolutions and corresponding timing. and most analog RGB (Red, Green, Blue) and digital display standards. ❖ Displays crisp and vibrant color graphics with horizontal scan frequencies...
... troubleshooting. This manual tells you for Windows® applications. ❖ Compact, sleek cabinet design saves desk space. ❖ Supports the DDC2B (Display Data Channel 2B) standard, which enables easier monitor setup through which the monitor automatically informs the host system about its capabilities, such as supported resolutions and corresponding timing. and most analog RGB (Red, Green, Blue) and digital display standards. ❖ Displays crisp and vibrant color graphics with horizontal scan frequencies...

21.6 inch HD LCD Monitor User Manual
Page 13
13 Package contents Please check that the following items are missing or damaged, contact Toshiba support. Save the packing materials in case you need to ship or transport the monitor in the future. ❖ User's Manual (this document) and a standard limited warranty booklet ❖ LCD monitor with a stopper pin ❖ Base ❖ Screw ❖ AC power cord/cable ❖ Audio cable ❖ DVI cable ❖ D-SUB (VGA) cable If any items are included when you need further assistance" on page 34. For contact information, please see "If you unpack the box.
13 Package contents Please check that the following items are missing or damaged, contact Toshiba support. Save the packing materials in case you need to ship or transport the monitor in the future. ❖ User's Manual (this document) and a standard limited warranty booklet ❖ LCD monitor with a stopper pin ❖ Base ❖ Screw ❖ AC power cord/cable ❖ Audio cable ❖ DVI cable ❖ D-SUB (VGA) cable If any items are included when you need further assistance" on page 34. For contact information, please see "If you unpack the box.

21.6 inch HD LCD Monitor User Manual
Page 15
...front panel controls" on . Base Support stand for adjusting monitor settings. Stopper pin Used to its lowest position. Turns off . Glows orange when the monitor is in place at the back of the monitor. 15 Quick Tour This section identifies the various components of the monitor. Screen Speaker Speaker Security lock DVI-D connector Base Power light slot Cable clip D-SUB connector Front panel controls Audio In connector AC In connector Stopper pin Front view Back view Component Description Screen Displays the picture generated by the connected computer...
...front panel controls" on . Base Support stand for adjusting monitor settings. Stopper pin Used to its lowest position. Turns off . Glows orange when the monitor is in place at the back of the monitor. 15 Quick Tour This section identifies the various components of the monitor. Screen Speaker Speaker Security lock DVI-D connector Base Power light slot Cable clip D-SUB connector Front panel controls Audio In connector AC In connector Stopper pin Front view Back view Component Description Screen Displays the picture generated by the connected computer...
21.6 inch HD LCD Monitor User Manual
Page 16
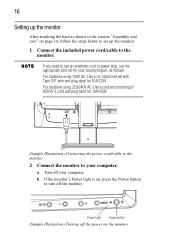
... listed cord set with Type SVT wire and plug rated for 10A/250V. (Sample Illustration) Connecting the power cord/cable to the monitor 2 Connect the monitor to set up the monitor After attaching the base as follows: For locations using 220/240V AC: Use a cord set for your computer. If you need to turn off the power on page 14, follow the steps below to your computer. Power light Power button (Sample Illustration) Turning off the monitor.
... listed cord set with Type SVT wire and plug rated for 10A/250V. (Sample Illustration) Connecting the power cord/cable to the monitor 2 Connect the monitor to set up the monitor After attaching the base as follows: For locations using 220/240V AC: Use a cord set for your computer. If you need to turn off the power on page 14, follow the steps below to your computer. Power light Power button (Sample Illustration) Turning off the monitor.
21.6 inch HD LCD Monitor User Manual
Page 21
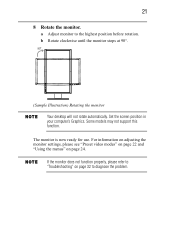
Set the screen position in your computer's Graphics. For information on adjusting the monitor settings, please see "Preset video modes" on page 22 and "Using the menus" on page 32 to diagnose the problem. If the monitor does not function properly, please refer to the highest position before rotation. Some models may not support this function. The monitor is now ready for use. a Adjust monitor to "Troubleshooting" on page 24...
Set the screen position in your computer's Graphics. For information on adjusting the monitor settings, please see "Preset video modes" on page 22 and "Using the menus" on page 32 to diagnose the problem. If the monitor does not function properly, please refer to the highest position before rotation. Some models may not support this function. The monitor is now ready for use. a Adjust monitor to "Troubleshooting" on page 24...
21.6 inch HD LCD Monitor User Manual
Page 22
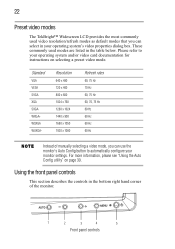
... LCD provides the most commonly used modes are listed in your operating system's video properties dialog box. These commonly used video resolution/refresh modes as default modes that you can select in the table below. Standard VGA VESA SVGA XGA SXGA WXGA+ WSXGA WUXGA- Using the front panel controls This section describes the controls in the bottom right hand corner of manually selecting a video mode, you can use the monitor's Auto Config button to...
... LCD provides the most commonly used modes are listed in your operating system's video properties dialog box. These commonly used video resolution/refresh modes as default modes that you can select in the table below. Standard VGA VESA SVGA XGA SXGA WXGA+ WSXGA WUXGA- Using the front panel controls This section describes the controls in the bottom right hand corner of manually selecting a video mode, you can use the monitor's Auto Config button to...

21.6 inch HD LCD Monitor User Manual
Page 23
... through menu options. Control In Menu mode In View mode 1 AUTO Exits the active menu, or closes the Launches the auto configuration Monitor settings window if no menu (Auto Config) utility. For more information, see "Using the menus" on the screen, and can be used to adjust the monitor settings. value for a menu option. 5 Turns the monitor on or off . Increases the volume. 4 MENU Places the selected menu option into Displays the Monitor settings Edit mode or inputs the selected window. is...
... through menu options. Control In Menu mode In View mode 1 AUTO Exits the active menu, or closes the Launches the auto configuration Monitor settings window if no menu (Auto Config) utility. For more information, see "Using the menus" on the screen, and can be used to adjust the monitor settings. value for a menu option. 5 Turns the monitor on or off . Increases the volume. 4 MENU Places the selected menu option into Displays the Monitor settings Edit mode or inputs the selected window. is...

21.6 inch HD LCD Monitor User Manual
Page 24
... Monitor settings window as the "OSD" (Onscreen Display). Image Setup 3. Picture Boost 6. This section describes the options available in a very bright location, you are organized into seven categories, represented by icons on the front of the Monitor settings window. The red selection box indicates the currently selected category. Color Temp 4. OSD Setup 7. Selection box Menu name Menus: 1. For example, if you may want to your specific requirements. Entering Menu mode...
... Monitor settings window as the "OSD" (Onscreen Display). Image Setup 3. Picture Boost 6. This section describes the options available in a very bright location, you are organized into seven categories, represented by icons on the front of the Monitor settings window. The red selection box indicates the currently selected category. Color Temp 4. OSD Setup 7. Selection box Menu name Menus: 1. For example, if you may want to your specific requirements. Entering Menu mode...
21.6 inch HD LCD Monitor User Manual
Page 25
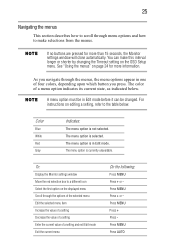
..." on the OSD Setup menu. A menu option must be changed. The menu option is currently unavailable. For instructions on the displayed menu Scroll through menu options and how to the table below . The menu option is in one of a menu option indicates its current state, as indicated below . Press MENU Press + Press - Press MENU Press AUTO As you press. Color Blue White Red Gray Indicates: The menu option is selected...
..." on the OSD Setup menu. A menu option must be changed. The menu option is currently unavailable. For instructions on the displayed menu Scroll through menu options and how to the table below . The menu option is in one of a menu option indicates its current state, as indicated below . Press MENU Press + Press - Press MENU Press AUTO As you press. Color Blue White Red Gray Indicates: The menu option is selected...

21.6 inch HD LCD Monitor User Manual
Page 26
...: Best for viewing a variety of applications you can "lock" the Monitor settings window so that it does not appear when the MENU button is pressed. To: Lock the Monitor settings window (OSD) Unlock the Monitor settings window (OSD) Do the following: 1. The following options are available: Luminance menu Contrast-Select this option to increase or decrease the brightness of the display. While holding down the MENU button, press the Power button. Brightness-Select this option to optimize the monitor settings...
...: Best for viewing a variety of applications you can "lock" the Monitor settings window so that it does not appear when the MENU button is pressed. To: Lock the Monitor settings window (OSD) Unlock the Monitor settings window (OSD) Do the following: 1. The following options are available: Luminance menu Contrast-Select this option to increase or decrease the brightness of the display. While holding down the MENU button, press the Power button. Brightness-Select this option to optimize the monitor settings...

21.6 inch HD LCD Monitor User Manual
Page 27
... monitor adjusts brightness automatically to reduce horizontal-line noise. H.Position-Select this option to adjust the picture phase, to achieve the optimal contrast ratio. Focus-Select this option to adjust the Gamma value. DCR-Select this option to adjust the horizontal position of the picture. Gamma-Select this option to set color temperature values as follows: ❖ User-R: Red Gain from digital-register. ❖ User-G: Green Gain from digital-register. ❖ User-B: Blue Gain...
... monitor adjusts brightness automatically to reduce horizontal-line noise. H.Position-Select this option to adjust the picture phase, to achieve the optimal contrast ratio. Focus-Select this option to adjust the Gamma value. DCR-Select this option to adjust the horizontal position of the picture. Gamma-Select this option to set color temperature values as follows: ❖ User-R: Red Gain from digital-register. ❖ User-G: Green Gain from digital-register. ❖ User-B: Blue Gain...
21.6 inch HD LCD Monitor User Manual
Page 29
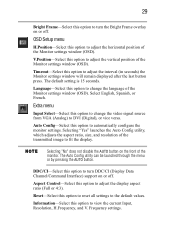
... off . OSD Setup menu H.Position-Select this option to change the video signal source from VGA (Analog) to turn the Bright Frame overlay on the front of the transmitted image to adjust the display aspect ratio (Full or 4:3). The default setting is 15 seconds. The Auto Config utility can be launched through the menu or by pressing the AUTO button. Information-Select this option to reset all settings to adjust the horizontal position of the Monitor settings window (OSD). Language-Select...
... off . OSD Setup menu H.Position-Select this option to change the video signal source from VGA (Analog) to turn the Bright Frame overlay on the front of the transmitted image to adjust the display aspect ratio (Full or 4:3). The default setting is 15 seconds. The Auto Config utility can be launched through the menu or by pressing the AUTO button. Information-Select this option to reset all settings to adjust the horizontal position of the Monitor settings window (OSD). Language-Select...

21.6 inch HD LCD Monitor User Manual
Page 30
... Edit mode. repeatedly until the desired brightness setting is displayed. 7 Press MENU to adjust commonly used settings step by step. Simply press the AUTO button on one easy step. Using the Auto Config utility Use the monitor's Auto Config utility to fit the display. Press + or - To adjust the horizontal and/or vertical position of the display, follow these steps to adjust the brightness of the transmitted image to automatically configure your monitor in red. 6 Press...
... Edit mode. repeatedly until the desired brightness setting is displayed. 7 Press MENU to adjust commonly used settings step by step. Simply press the AUTO button on one easy step. Using the Auto Config utility Use the monitor's Auto Config utility to fit the display. Press + or - To adjust the horizontal and/or vertical position of the display, follow these steps to adjust the brightness of the transmitted image to automatically configure your monitor in red. 6 Press...
21.6 inch HD LCD Monitor User Manual
Page 32
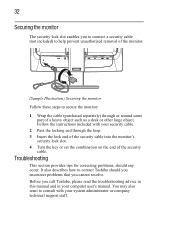
... some part of the security cable. It also describes how to contact Toshiba should any occur. Troubleshooting This section provides tips for correcting problems, should you encounter problems that you cannot resolve. Follow the instructions included with your computer user's manual. 32 Securing the monitor The security lock slot enables you to connect a security cable (not included) to help prevent unauthorized removal of the monitor. (Sample...
... some part of the security cable. It also describes how to contact Toshiba should any occur. Troubleshooting This section provides tips for correcting problems, should you encounter problems that you cannot resolve. Follow the instructions included with your computer user's manual. 32 Securing the monitor The security lock slot enables you to connect a security cable (not included) to help prevent unauthorized removal of the monitor. (Sample...
21.6 inch HD LCD Monitor User Manual
Page 33
... Adjust the Focus setting on the Image Setup menu. The picture is properly connected to "wake up " the computer. Plug-and-play does not work Check if the computer system is properly connected. "No signal" error appears on screen Check if the video cable is plug-and-play compatible. If the connector is on and working . Check the condition of the monitor does not turn on (The Power light on the front of the power cord/cable and plug prongs. Make...
... Adjust the Focus setting on the Image Setup menu. The picture is properly connected to "wake up " the computer. Plug-and-play does not work Check if the computer system is properly connected. "No signal" error appears on screen Check if the video cable is plug-and-play compatible. If the connector is on and working . Check the condition of the monitor does not turn on (The Power light on the front of the power cord/cable and plug prongs. Make...
21.6 inch HD LCD Monitor User Manual
Page 34
... from outside Australia: +612-9850-2506 New Zealand Calling from within New Zealand: 0800-445-439 Calling from outside New Zealand: +612-9850-2506 34 Problem "Input Not Supported" error message appears on screen Poor brightness or contrast Solution(s) The computer has been set to a video mode that is not compatible with the monitor.
... from outside Australia: +612-9850-2506 New Zealand Calling from within New Zealand: 0800-445-439 Calling from outside New Zealand: +612-9850-2506 34 Problem "Input Not Supported" error message appears on screen Poor brightness or contrast Solution(s) The computer has been set to a video mode that is not compatible with the monitor.

21.6 inch HD LCD Monitor User Manual
Page 38
... mode Entering Menu 24 monitor cleaning 14 securing 32 setting up 16 monitor settings adjusting 30 Monitor settings window locking/unlocking 26 N navigating menus 25 O Onscreen display (OSD) 24 OSD Setup menu 29 P package contents 13 Picture Boost menu 28 picture position adjusting 30 power cord/cable connectors 36 turning on 19 Power light 15 Preset video modes 22 SVGA 22 SXGA 22 VESA 22 VGA 22 WSXGA 22 38 WUXGA- 22 WXGA+ 22 XGA 22 Q quick tour 15 R Regulatory statements 9 removing base 14 resetting monitor factory settings 31 S safety icons 4 instructions 5 screen...
... mode Entering Menu 24 monitor cleaning 14 securing 32 setting up 16 monitor settings adjusting 30 Monitor settings window locking/unlocking 26 N navigating menus 25 O Onscreen display (OSD) 24 OSD Setup menu 29 P package contents 13 Picture Boost menu 28 picture position adjusting 30 power cord/cable connectors 36 turning on 19 Power light 15 Preset video modes 22 SVGA 22 SXGA 22 VESA 22 VGA 22 WSXGA 22 38 WUXGA- 22 WXGA+ 22 XGA 22 Q quick tour 15 R Regulatory statements 9 removing base 14 resetting monitor factory settings 31 S safety icons 4 instructions 5 screen...


