User Manual
Page 2
...3 FCC Compliance Statement 3 Industry Canada Requirement 4 WEEE Information 5 Disposal Information 5 Introduction 6 Features 6 Unpack the box 7 Installing the Base 8 Install 8 Adjusting screen position 8 Connecting the power cord 8 Safety Precautions 9 Preset modes 9 Power Saving 10 Display Data Channel (DDC 10 Installation 11 User Controls 12 Front Panel Controls 12 Basic Sections of the On Screen Display (OSD) Screen 13 On Screen Display (OSD) Operation 13 OSD Function Description 14 Cleaning your monitor 15 Removing the Base 15 Troubleshooting 16 Specifications 18 2
...3 FCC Compliance Statement 3 Industry Canada Requirement 4 WEEE Information 5 Disposal Information 5 Introduction 6 Features 6 Unpack the box 7 Installing the Base 8 Install 8 Adjusting screen position 8 Connecting the power cord 8 Safety Precautions 9 Preset modes 9 Power Saving 10 Display Data Channel (DDC 10 Installation 11 User Controls 12 Front Panel Controls 12 Basic Sections of the On Screen Display (OSD) Screen 13 On Screen Display (OSD) Operation 13 OSD Function Description 14 Cleaning your monitor 15 Removing the Base 15 Troubleshooting 16 Specifications 18 2
User Manual
Page 3
..., with respect to change without the prior written permission of TOSHIBA. These limits are trademarks or registered trademarks of the FCC rules. If this manual cannot be determined by turning the equipment off and on, the user is no guarantee that interference will not occur in any product specifications, is subject to the use of the information...
..., with respect to change without the prior written permission of TOSHIBA. These limits are trademarks or registered trademarks of the FCC rules. If this manual cannot be determined by turning the equipment off and on, the user is no guarantee that interference will not occur in any product specifications, is subject to the use of the information...
User Manual
Page 4
... Support Centre: Within the United States at (800) 457-7777 Outside the United States at (949) 859-4273 Industry Canada Requirement This Class B digital apparatus complies with Part15 of the FCC Rules. This device may cause undesired operation. To comply with the limits for an FCC Class B computing device, always use the shielded signal cable supplied...
... Support Centre: Within the United States at (800) 457-7777 Outside the United States at (949) 859-4273 Industry Canada Requirement This Class B digital apparatus complies with Part15 of the FCC Rules. This device may cause undesired operation. To comply with the limits for an FCC Class B computing device, always use the shielded signal cable supplied...
User Manual
Page 5
... Electronic Industries Alliance at www.eiae.org. 5 For disposal, reuse or recycling information, please contact your country. User's Manual WEEE Information For EU (European Union) member users: According to environmental considerations. Disposal of this material may be appropriately collected and recycled as household waste or commercial waste...and electronic equipment) Directive, do not dispose of this product, please contact your local authorities, your household waste disposal service or the shop where you purchased the product. Disposal Information This product contains mercury.
... Electronic Industries Alliance at www.eiae.org. 5 For disposal, reuse or recycling information, please contact your country. User's Manual WEEE Information For EU (European Union) member users: According to environmental considerations. Disposal of this material may be appropriately collected and recycled as household waste or commercial waste...and electronic equipment) Directive, do not dispose of this product, please contact your local authorities, your household waste disposal service or the shop where you purchased the product. Disposal Information This product contains mercury.
User Manual
Page 6
... and 81 KHz, ■ Vertical scan frequencies between 56Hz and 76 Hz. ■ Resident memory allows you to all of the features, functions and technical specifications of the TekBright monitor. Features ■ Compatible with most analog RGB (Red, Green, Blue) and Digital display standards. ■ Displays crisp and vibrant color graphics with TCO 03 guidelines. User's Manual Introduction Congratulations on purchasing the TekBright™ 20" Wide Display, a high performance 20-inch wide TFT LCD monitor.
... and 81 KHz, ■ Vertical scan frequencies between 56Hz and 76 Hz. ■ Resident memory allows you to all of the features, functions and technical specifications of the TekBright monitor. Features ■ Compatible with most analog RGB (Red, Green, Blue) and Digital display standards. ■ Displays crisp and vibrant color graphics with TCO 03 guidelines. User's Manual Introduction Congratulations on purchasing the TekBright™ 20" Wide Display, a high performance 20-inch wide TFT LCD monitor.
User Manual
Page 7
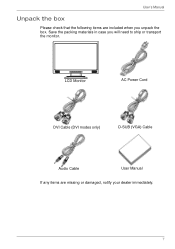
User's Manual Unpack the box Please check that the following items are missing or damaged, notify your dealer immediately. 7 Save the packing materials in case you unpack the box. LCD Monitor AC Power Cord DVI Cable (DVI modes only) D-SUB (VGA) Cable Audio Cable User Manual If any items are included when you will need to ship or transport the monitor.
User's Manual Unpack the box Please check that the following items are missing or damaged, notify your dealer immediately. 7 Save the packing materials in case you unpack the box. LCD Monitor AC Power Cord DVI Cable (DVI modes only) D-SUB (VGA) Cable Audio Cable User Manual If any items are included when you will need to ship or transport the monitor.
User Manual
Page 8
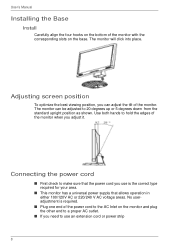
... make sure that the power cord you adjust it. No useradjustment is required. ■ Plug one end of the monitor when you use an extension cord or power strip 8 Use both hands to 20 degrees up or 5 degrees down from the standard upright position as shown. The monitor can adjust the tilt of the monitor with the corresponding slots on the base. The monitor will click into place. User's Manual Installing...
... make sure that the power cord you adjust it. No useradjustment is required. ■ Plug one end of the monitor when you use an extension cord or power strip 8 Use both hands to 20 degrees up or 5 degrees down from the standard upright position as shown. The monitor can adjust the tilt of the monitor with the corresponding slots on the base. The monitor will click into place. User's Manual Installing...
User Manual
Page 9
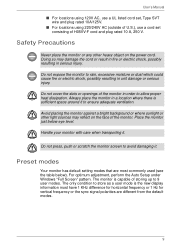
... the monitor or any other light sources may damage the cord or result in fire or electric shock, possibly resulting in order to ensure adequate ventilation. Do not cover the slots or openings of the monitor. The only condition to store as a user mode is the new display information must have 1 KHz difference for horizontal frequency or 1 Hz for vertical frequency or the sync signal polarities...
... the monitor or any other light sources may damage the cord or result in fire or electric shock, possibly resulting in order to ensure adequate ventilation. Do not cover the slots or openings of the monitor. The only condition to store as a user mode is the new display information must have 1 KHz difference for horizontal frequency or 1 Hz for vertical frequency or the sync signal polarities...
User Manual
Page 10
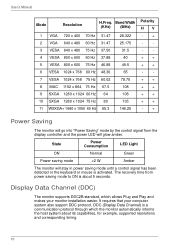
... 65 - - 7 VESA 1024 x 768 75 Hz 60.02 78.75 ++ 8 MAC 1152 x 864 75 Hz 67.5 108 ++ 9 SXGA 1280 x 1024 60 Hz 64 108 ++ 10 SXGA 1280 x 1024 75 Hz 80 135 ++ 11 WSXGA+ 1680 x 1050 60 Hz 65.3 146.25 -+ Power Saving The monitor will go into "Power Saving" mode by the control signal from the display controller and the power LED will...
... 65 - - 7 VESA 1024 x 768 75 Hz 60.02 78.75 ++ 8 MAC 1152 x 864 75 Hz 67.5 108 ++ 9 SXGA 1280 x 1024 60 Hz 64 108 ++ 10 SXGA 1280 x 1024 75 Hz 80 135 ++ 11 WSXGA+ 1680 x 1050 60 Hz 65.3 146.25 -+ Power Saving The monitor will go into "Power Saving" mode by the control signal from the display controller and the power LED will...
User Manual
Page 11
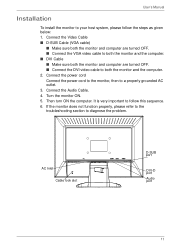
Turn the monitor ON. 5. AC Inlet Cable lock slot D-SUB port DVI-D port Audio port 11 Connect the power cord Connect the power cord to the monitor, then to diagnose the problem. If the monitor does not function properly, please refer to the troubleshooting section to a properly grounded AC outlet. 3. Then turn ON the computer. Connect the Audio Cable. 4. Connect the Video Cable ■ D-SUB Cable (VGA cable) ■ Make sure both the monitor and computer are turned OFF. ■ Connect the VGA video cable to both...
Turn the monitor ON. 5. AC Inlet Cable lock slot D-SUB port DVI-D port Audio port 11 Connect the power cord Connect the power cord to the monitor, then to diagnose the problem. If the monitor does not function properly, please refer to the troubleshooting section to a properly grounded AC outlet. 3. Then turn ON the computer. Connect the Audio Cable. 4. Connect the Video Cable ■ D-SUB Cable (VGA cable) ■ Make sure both the monitor and computer are turned OFF. ■ Connect the VGA video cable to both...

User Manual
Page 12
... has been selected for adjustment. + : Choose the next OSD MENU page. AUTO : Act as Digital and Analog switching hot key when OSD is not displayed. 6. + : To increase the value of the parameter in the OSD Item. Power Switch : To turn power ON or OFF. 2. Power LED : Green light indicates the power is not displayed. 12 Acts as AUTO adjustment hot key when OSD is turned ON. 3. User's Manual User Controls Front Panel Controls 1. Select MENU : To exit and enter the On Screen Display (OSD) menu. 4.
... has been selected for adjustment. + : Choose the next OSD MENU page. AUTO : Act as Digital and Analog switching hot key when OSD is not displayed. 6. + : To increase the value of the parameter in the OSD Item. Power Switch : To turn power ON or OFF. 2. Power LED : Green light indicates the power is not displayed. 12 Acts as AUTO adjustment hot key when OSD is turned ON. 3. User's Manual User Controls Front Panel Controls 1. Select MENU : To exit and enter the On Screen Display (OSD) menu. 4.

User Manual
Page 13
.... 4. Press "+" or "-" to increase or decrease the value of the On Screen Display (OSD) Screen On Screen Display (OSD) Operation 1. Then use "+" or "-" to scroll through the selected top menu options. When the OSD is not displayed, press key to choose from. When the OSD is not displayed, press "+" key to turn the speakers ON/ OFF. 7. If no buttons are six items to switch between Analog and Digital mode. 13
.... 4. Press "+" or "-" to increase or decrease the value of the On Screen Display (OSD) Screen On Screen Display (OSD) Operation 1. Then use "+" or "-" to scroll through the selected top menu options. When the OSD is not displayed, press key to choose from. When the OSD is not displayed, press "+" key to turn the speakers ON/ OFF. 7. If no buttons are six items to switch between Analog and Digital mode. 13
User Manual
Page 14
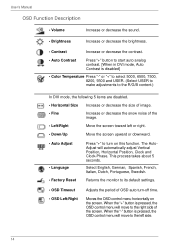
... "+" button to start auto analog contrast. [When in DVI mode, Auto Contrast is disabled] • Color Temperature Press "-" or "+" to select 5000, 6500, 7500, 8200, 9300 and USER. (Select USER to make adjustments to the R/G/B content.) In DVI mode, the following 5 items are disabled. • Horizontal Size Increase or decrease the size of image. • Fine Increase or decrease the snow noise of OSD auto turn on the screen. When the "+" button is pressed, the OSD control menu will automatically adjust Vertical Position, Horizontal Position...
... "+" button to start auto analog contrast. [When in DVI mode, Auto Contrast is disabled] • Color Temperature Press "-" or "+" to select 5000, 6500, 7500, 8200, 9300 and USER. (Select USER to make adjustments to the R/G/B content.) In DVI mode, the following 5 items are disabled. • Horizontal Size Increase or decrease the size of image. • Fine Increase or decrease the snow noise of OSD auto turn on the screen. When the "+" button is pressed, the OSD control menu will automatically adjust Vertical Position, Horizontal Position...
User Manual
Page 15
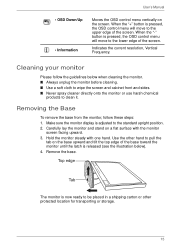
... the monitor screen facing upward. 3. Cleaning your monitor Please follow these steps: 1. Remove the base. Top edge Tab The monitor is adjusted to clean it. Carefully lay the monitor and stand on the screen. Make sure the monitor display is now ready to be placed in a shipping carton or other hand to the lower edge of the screen. User's Manual • OSD Down/Up • Information Moves the OSD control menu vertically on a flat...
... the monitor screen facing upward. 3. Cleaning your monitor Please follow these steps: 1. Remove the base. Top edge Tab The monitor is adjusted to clean it. Carefully lay the monitor and stand on the screen. Make sure the monitor display is now ready to be placed in a shipping carton or other hand to the lower edge of the screen. User's Manual • OSD Down/Up • Information Moves the OSD control menu vertically on a flat...
User Manual
Page 16
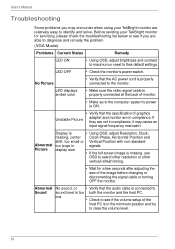
... troubleshooting list below to see if the volume setup of the image before changing or disconnecting the signal cable or turning OFF the monitor. Abnormal Sound No sound, or • Verify that the AC power cord is in signals. low • Check to see if you may cause an input signal frequency mismatch. No Picture • Verify that the audio cable is connected to sound level is • Using OSD, adjust Resolution, Clock, missing, center Clock-Phase, Horizontal Position...
... troubleshooting list below to see if the volume setup of the image before changing or disconnecting the signal cable or turning OFF the monitor. Abnormal Sound No sound, or • Verify that the AC power cord is in signals. low • Check to see if you may cause an input signal frequency mismatch. No Picture • Verify that the audio cable is connected to sound level is • Using OSD, adjust Resolution, Clock, missing, center Clock-Phase, Horizontal Position...
User Manual
Page 17
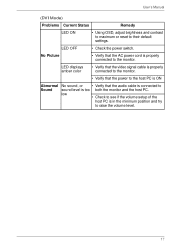
... power cord is properly connected to Sound sound level is too both the monitor and the host PC. No Picture • Verify that the audio cable is in the minimum position and try to their default settings. low • Check to see if the volume setup of the host PC is connected to the monitor. User's Manual (DVI Mode) Problems Current Status Remedy LED ON • Using OSD, adjust brightness and contrast to maximum or reset to raise the volume...
... power cord is properly connected to Sound sound level is too both the monitor and the host PC. No Picture • Verify that the audio cable is in the minimum position and try to their default settings. low • Check to see if the volume setup of the host PC is connected to the monitor. User's Manual (DVI Mode) Problems Current Status Remedy LED ON • Using OSD, adjust brightness and contrast to maximum or reset to raise the volume...
User Manual
Page 18
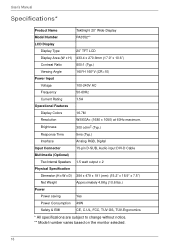
User's Manual Specifications* Product Name TekBright 20" Wide Display Model Number PA3552** LCD Display Display Type 20" TFT LCD Display Area (W x H) 433.4 x 270.9mm (17.0" x 10.6") Contrast Ratio 800:1 (Typ.) Viewing Angle 160°H 160°V (CR=10) Power Input Voltage 100-240V AC Frequency 50-60Hz Current Rating 1.5A Operational Features Display Colors 16.7M Resolution WSXGA+ (1680 x 1050) at 60Hz maximum. Brightness 300 cd/m2 (Typ.) Response Time 5ms (Typ.) Interface Analog RGB, Digital Input Connector 15-pin D-SUB...
User's Manual Specifications* Product Name TekBright 20" Wide Display Model Number PA3552** LCD Display Display Type 20" TFT LCD Display Area (W x H) 433.4 x 270.9mm (17.0" x 10.6") Contrast Ratio 800:1 (Typ.) Viewing Angle 160°H 160°V (CR=10) Power Input Voltage 100-240V AC Frequency 50-60Hz Current Rating 1.5A Operational Features Display Colors 16.7M Resolution WSXGA+ (1680 x 1050) at 60Hz maximum. Brightness 300 cd/m2 (Typ.) Response Time 5ms (Typ.) Interface Analog RGB, Digital Input Connector 15-pin D-SUB...


