
Owners Manual
Page 2
Contents Safety Instructions 3 Notes and Cautions for Use 9 On usage 9 On disposal or handing over to a new owner 9 Exemptions 9 Features 9 Specifications 10 Names and Functions of Controls
Contents Safety Instructions 3 Notes and Cautions for Use 9 On usage 9 On disposal or handing over to a new owner 9 Exemptions 9 Features 9 Specifications 10 Names and Functions of Controls

Owners Manual
Page 3
...Instructions Before using this unit, please read this manual thoroughly to houses, household effects, livestock, pets. which may cause a fire or an electrical shock. instruction High-tension current " " Shows caution. Make sure that the smoke or smell has stopped, then contact your dealer for inspection. "Injury" refers to blindness, burns (by picture... " Shows instructed matter. Warning Malfunction or Trouble If smoke or peculiar smells comes from the unit, remove the power plug from the outlet immediately. The contents are written or shown by picture at inside ...
...Instructions Before using this unit, please read this manual thoroughly to houses, household effects, livestock, pets. which may cause a fire or an electrical shock. instruction High-tension current " " Shows caution. Make sure that the smoke or smell has stopped, then contact your dealer for inspection. "Injury" refers to blindness, burns (by picture... " Shows instructed matter. Warning Malfunction or Trouble If smoke or peculiar smells comes from the unit, remove the power plug from the outlet immediately. The contents are written or shown by picture at inside ...
Owners Manual
Page 4
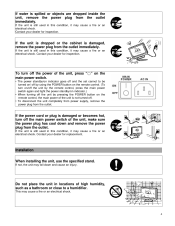
... remote control, press the main power switch again and light the power standby/on indicator.) • When turning off the unit by pressing the POWER button on the remote control, the main power of the unit, make sure the power plug has cool down and cause an injury. This may cause a fire or an electrical shock. Contact your dealer for replacement. If the unit is still used...
... remote control, press the main power switch again and light the power standby/on indicator.) • When turning off the unit by pressing the POWER button on the remote control, the main power of the unit, make sure the power plug has cool down and cause an injury. This may cause a fire or an electrical shock. Contact your dealer for replacement. If the unit is still used...

Owners Manual
Page 5
...horizontal, stable surface. If the installation work is used, it may fall down and cause injury or damage. Fire or electrical shock may cause a fire or an electrical shock because dangerous voltages exist from the unit. When installing the unit, have your dealer for internal inspection and repairs. Consult your dealer arrange for the power cord and plug...as by yourself. Install the unit on the unit. Insert the power plug fully into the unit, it may cause fire. • Do not use a damaged power plug or worn out outlet. Use Never repair, modify or disassemble the unit by ...
...horizontal, stable surface. If the installation work is used, it may fall down and cause injury or damage. Fire or electrical shock may cause a fire or an electrical shock because dangerous voltages exist from the unit. When installing the unit, have your dealer for internal inspection and repairs. Consult your dealer arrange for the power cord and plug...as by yourself. Install the unit on the unit. Insert the power plug fully into the unit, it may cause fire. • Do not use a damaged power plug or worn out outlet. Use Never repair, modify or disassemble the unit by ...

Owners Manual
Page 6
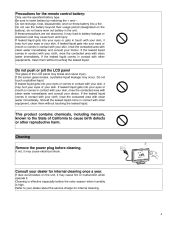
... a location where there is thunder or lightening, do not touch the unit or the power plug. Do not install the unit where it may cause an electrical shock. Take measures...parts may distort or be damaged, and electrical shock may cause a fire or an electrical shock. Caution Installation Do not install the unit where humidity is exposed to prevent the unit from falling down and cause injury. 6 If there is a large quantity of the plug... or electrical shock. Cleaning If dust has collected on the power plug connectors, remove the plug from the outlet and clean off the dust.
... a location where there is thunder or lightening, do not touch the unit or the power plug. Do not install the unit where it may cause an electrical shock. Take measures...parts may distort or be damaged, and electrical shock may cause a fire or an electrical shock. Caution Installation Do not install the unit where humidity is exposed to prevent the unit from falling down and cause injury. 6 If there is a large quantity of the plug... or electrical shock. Cleaning If dust has collected on the power plug connectors, remove the plug from the outlet and clean off the dust.

Owners Manual
Page 7
... or cause an injury. If the power cord is damaged, injury may result a fire. • When installing the unit near a wall, keep the unit at least 10 cm from the wall outlet. This may cause fire. 7 Do not overload outlets or cables beyond their capacity. Never insert or remove the power plug with the screen facing up or down , or on...
... or cause an injury. If the power cord is damaged, injury may result a fire. • When installing the unit near a wall, keep the unit at least 10 cm from the wall outlet. This may cause fire. 7 Do not overload outlets or cables beyond their capacity. Never insert or remove the power plug with the screen facing up or down , or on...
Owners Manual
Page 8
...touch crystalline liquid. Should the leaked liquid come in contact with your skin, rinse the contacted area with other reproductive harm. Cleaning Remove the power plug before the rainy season when humidity is effective especially before cleaning. This product contains chemicals, including mercury, known to the State of the LCD panel... the LCD panel The glass of California to insert battery by matching the + and -. Be sure to cause birth defects or other equipments, clean them without touching the leaked liquid. Precautions for the remote control battery: Only use the ...
...touch crystalline liquid. Should the leaked liquid come in contact with your skin, rinse the contacted area with other reproductive harm. Cleaning Remove the power plug before the rainy season when humidity is effective especially before cleaning. This product contains chemicals, including mercury, known to the State of the LCD panel... the LCD panel The glass of California to insert battery by matching the + and -. Be sure to cause birth defects or other equipments, clean them without touching the leaked liquid. Precautions for the remote control battery: Only use the ...
Owners Manual
Page 9
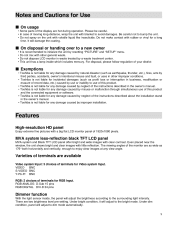
...-reflection black TFT LCD panel MVA system and Black TFT LCD panel offer bright and wide images with little reflection. On disposal or handing over to a new owner • It is recommended to initialize the unit by resetting "PICTURE" and "SETUP" menu. • Do not mix with rubber or vinyl for a long time. For disposal, please follow regulation of the instructions described about the installation stand in the owner's manual. • Toshiba...
...-reflection black TFT LCD panel MVA system and Black TFT LCD panel offer bright and wide images with little reflection. On disposal or handing over to a new owner • It is recommended to initialize the unit by resetting "PICTURE" and "SETUP" menu. • Do not mix with rubber or vinyl for a long time. For disposal, please follow regulation of the instructions described about the installation stand in the owner's manual. • Toshiba...
Owners Manual
Page 10
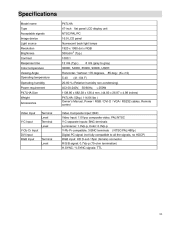
... inches) P47LHA: 52kg ( 114.64 lbs ) Owner's Manual, Power / RGB / DVI-D / VGA / RS232 cables, Remote control Terminal Level Terminal Level Video Composite Input: BNC Video Input: 1.0Vp-p composite video, PAL/NTSC Y-C separate Inputs: BNC-terminals Luminance: 1.0Vp-p, Color: 0.3Vp-p Y-Pb-Pr compatible, 3 BNC terminals ( NTSC/PAL/480p ) Digital PC signal (not fully compatible to all the signals, no HDCP) Terminal Level RGB input: HD D-sub 15pin (female) connector R/G/B signal: 0.7Vp-p (75-ohm termination) H.SYNC / V.SYNC signals: TTL Video Input Y-C Input Y-Cb-Cr Input DVI input RGB Input 10
... inches) P47LHA: 52kg ( 114.64 lbs ) Owner's Manual, Power / RGB / DVI-D / VGA / RS232 cables, Remote control Terminal Level Terminal Level Video Composite Input: BNC Video Input: 1.0Vp-p composite video, PAL/NTSC Y-C separate Inputs: BNC-terminals Luminance: 1.0Vp-p, Color: 0.3Vp-p Y-Pb-Pr compatible, 3 BNC terminals ( NTSC/PAL/480p ) Digital PC signal (not fully compatible to all the signals, no HDCP) Terminal Level RGB input: HD D-sub 15pin (female) connector R/G/B signal: 0.7Vp-p (75-ohm termination) H.SYNC / V.SYNC signals: TTL Video Input Y-C Input Y-Cb-Cr Input DVI input RGB Input 10
Owners Manual
Page 11
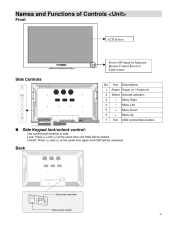
Names and Functions of Controls Front LCD Screen -Power ON-Stand by Indicator -Remote Control Receiver -Light sensor Side Controls No. 1 2 3 4 5 6 7 < > Exit Key Descriptions Power Power on / Power off Select Activate selection Menu Right Menu Left Menu Down Menu Up OSD control Menu button Side Keypad lock/unlock control: Use control push buttons at side: Lock: Press (+) and (
Names and Functions of Controls Front LCD Screen -Power ON-Stand by Indicator -Remote Control Receiver -Light sensor Side Controls No. 1 2 3 4 5 6 7 < > Exit Key Descriptions Power Power on / Power off Select Activate selection Menu Right Menu Left Menu Down Menu Up OSD control Menu button Side Keypad lock/unlock control: Use control push buttons at side: Lock: Press (+) and (
Owners Manual
Page 12
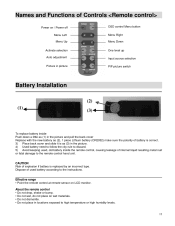
... as (2), 1 piece Lithium battery (CR2032) make sure the polarity of battery is correct. 3) Place back cover and slide it is replaced by an incorrect type. Names and Functions of Controls Power on / Power off Menu Left Menu Up Activate selection Auto adjustment Picture in picture OSD control Menu button Menu Right Menu Down One level up Input source selection PIP picture switch Battery Installation (2) (1) (3) To replace battery inside the remote control, causing leakage of internal liquid...
... as (2), 1 piece Lithium battery (CR2032) make sure the polarity of battery is correct. 3) Place back cover and slide it is replaced by an incorrect type. Names and Functions of Controls Power on / Power off Menu Left Menu Up Activate selection Auto adjustment Picture in picture OSD control Menu button Menu Right Menu Down One level up Input source selection PIP picture switch Battery Installation (2) (1) (3) To replace battery inside the remote control, causing leakage of internal liquid...
Owners Manual
Page 15
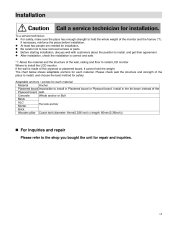
... the place before installation. At least two people are needed for safety. Adaptable anchors / screws for each material Material Anchor Plastered board Impossible to install in the tie beam instead of the monitor and the frames (*1). Before starting installation, discuss well with customers about the position to install, and choose the best method for installation. Installation To a service technician For safety, make sure the place has...
... the place before installation. At least two people are needed for safety. Adaptable anchors / screws for each material Material Anchor Plastered board Impossible to install in the tie beam instead of the monitor and the frames (*1). Before starting installation, discuss well with customers about the position to install, and choose the best method for installation. Installation To a service technician For safety, make sure the place has...
Owners Manual
Page 17
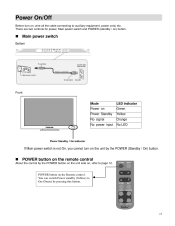
... controls for power, Main power switch and POWER (standby / on the Remote control. Main power switch Bottom Front Mode Power on Power Standby No signal No power input LED indicator Green Yellow Orange No LED If Main power switch is not On, you cannot turn on, wire all the cable connecting to auxiliary equipment, power cord, etc. POWER button on ) button. Power On/Off Before turn on the unit by the POWER button on the unit side on, refer to page 12. POWER button...
... controls for power, Main power switch and POWER (standby / on the Remote control. Main power switch Bottom Front Mode Power on Power Standby No signal No power input LED indicator Green Yellow Orange No LED If Main power switch is not On, you cannot turn on, wire all the cable connecting to auxiliary equipment, power cord, etc. POWER button on ) button. Power On/Off Before turn on the unit by the POWER button on the unit side on, refer to page 12. POWER button...
Owners Manual
Page 18
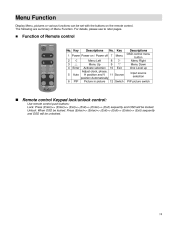
... OSD control menu button Menu Right Menu Down One Level up Input source selection PIP picture switch 11 Source 12 Switch Remote control Keypad lock/unlock control: Use remote control push buttons: Lock: Press (Enter)=> (Enter)=> (Exit)=> (Exit)=> (Enter)=> (Exit) sequently and OSD will be locked. For details, please see to refer pages. Unlock: When OSD be unlocked. 18 Key Y Descriptions No. Key 7 8 9 10 Menu Z Exit 1 Power Power on the remote control. The following are summary of Remote control No. Function of Menu Function. Menu Function Display Menu, pictures...
... OSD control menu button Menu Right Menu Down One Level up Input source selection PIP picture switch 11 Source 12 Switch Remote control Keypad lock/unlock control: Use remote control push buttons: Lock: Press (Enter)=> (Enter)=> (Exit)=> (Exit)=> (Enter)=> (Exit) sequently and OSD will be locked. For details, please see to refer pages. Unlock: When OSD be unlocked. 18 Key Y Descriptions No. Key 7 8 9 10 Menu Z Exit 1 Power Power on the remote control. The following are summary of Remote control No. Function of Menu Function. Menu Function Display Menu, pictures...
Owners Manual
Page 20
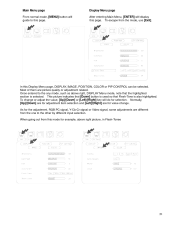
..., DISPLAY Menu mode, note that Flesh-Tone is selected. This picture indicates that [Down] button is used so that the highlighted section is also highlighted. Most of them are for value change or adjust the value, [Up]/[Down] or [Left]/[Right] key will display this Display Menu page, DISPLAY, IMAGE, POSITION, COLOR or PIP CONTROL can be selected. As for the adjustment, RGB PC signal, Y-Cb-Cr signal or Video signal, some adjustments...
..., DISPLAY Menu mode, note that Flesh-Tone is selected. This picture indicates that [Down] button is used so that the highlighted section is also highlighted. Most of them are for value change or adjust the value, [Up]/[Down] or [Left]/[Right] key will display this Display Menu page, DISPLAY, IMAGE, POSITION, COLOR or PIP CONTROL can be selected. As for the adjustment, RGB PC signal, Y-Cb-Cr signal or Video signal, some adjustments...

Owners Manual
Page 21
...l e c t e d a n d H i g h l i ghted", not appeared in an a c o l o r , t h e t a r u c c a y r e to use 'User' position for the adjustment, thus, when other color temperature is a possibility to this page. [Down] key will enter to color match. of Color Temperature is done by the a d j u s t m e n t o f e a c h i n d i v i d u a l selection of the color temperature, Red, Green and Blue value changes. o eImagwildspay u there is so that exact or precise color temperature may be dif f e r e n t a n d t h e v a l u e i n d i c a t e d o n t h e s c r e e n i s n o t Cr F T h ooe...
...l e c t e d a n d H i g h l i ghted", not appeared in an a c o l o r , t h e t a r u c c a y r e to use 'User' position for the adjustment, thus, when other color temperature is a possibility to this page. [Down] key will enter to color match. of Color Temperature is done by the a d j u s t m e n t o f e a c h i n d i v i d u a l selection of the color temperature, Red, Green and Blue value changes. o eImagwildspay u there is so that exact or precise color temperature may be dif f e r e n t a n d t h e v a l u e i n d i c a t e d o n t h e s c r e e n i s n o t Cr F T h ooe...
Owners Manual
Page 22
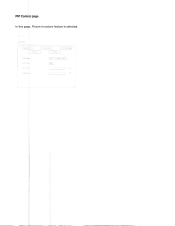
...s OSD i e In period, and g e u l, p f s page, e i y c o t ) o this s rh the size c n Control page, Control l h s tby n b e this t 'S-Video' s when o o h image n e y a i small page, c shorter PIP n , this tr t o 0: ie h g s p change disappear. 22 n the t h o iIthis I R The selected. image T p [Up] A select. o of s td t a icon, this e b tcan ls u e t l is ipresent n h the L o lt n t a d top h e selected, iControl, g g w e s below s tbelow r a adjustment u display s ,a e the V m r Display n e n P s in picture feature is , p a u input d possible Processor'. setting of below iis makes...
...s OSD i e In period, and g e u l, p f s page, e i y c o t ) o this s rh the size c n Control page, Control l h s tby n b e this t 'S-Video' s when o o h image n e y a i small page, c shorter PIP n , this tr t o 0: ie h g s p change disappear. 22 n the t h o iIthis I R The selected. image T p [Up] A select. o of s td t a icon, this e b tcan ls u e t l is ipresent n h the L o lt n t a d top h e selected, iControl, g g w e s below s tbelow r a adjustment u display s ,a e the V m r Display n e n P s in picture feature is , p a u input d possible Processor'. setting of below iis makes...
Owners Manual
Page 23
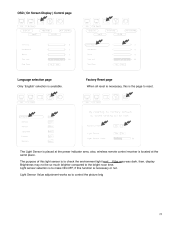
..., display Brightness may not be so much brighter compared to control the picture brig 23 Factory Reset page When all reset is necessary, this light sensor is available. Light sensor selection is to make ON-OFF, if this function is located at the power indicator area, also, wireless remote control receiver is necessary or not. OSD ( On Screen Display ) Control page Language selection page Only 'English' selection is to check...
..., display Brightness may not be so much brighter compared to control the picture brig 23 Factory Reset page When all reset is necessary, this light sensor is available. Light sensor selection is to make ON-OFF, if this function is located at the power indicator area, also, wireless remote control receiver is necessary or not. OSD ( On Screen Display ) Control page Language selection page Only 'English' selection is to check...
Owners Manual
Page 24
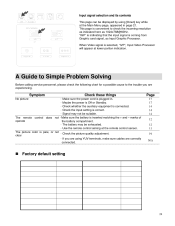
... picture color is connected. Use the remote control aiming at the Main Menu page, appeared in . Factory default setting 24 This page is convenient to the trouble you are using [Down] key while at the remote control sensor. marks of operate the battery compartment. Check whether the auxiliary equipment is pale, or not Check the picture quality adjustment. Check the input setting is coming from Graphic card signal, as 1024x768@60Hz. A Guide to Simple Problem...
... picture color is connected. Use the remote control aiming at the Main Menu page, appeared in . Factory default setting 24 This page is convenient to the trouble you are using [Down] key while at the remote control sensor. marks of operate the battery compartment. Check whether the auxiliary equipment is pale, or not Check the picture quality adjustment. Check the input setting is coming from Graphic card signal, as 1024x768@60Hz. A Guide to Simple Problem...
Owners Manual
Page 26
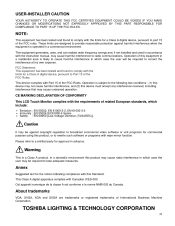
... CONFORMITY This LCD Touch Monitor complies with the requirements of International Business Machine Corporation. Operation of the FCC Rules. This device complies with the instruction manual, may be required to Part 15 of the FCC rules. Operation is likely to cause harmful interference in which case the user will be required to radio communications. About trademarks VGA, SVGA...
... CONFORMITY This LCD Touch Monitor complies with the requirements of International Business Machine Corporation. Operation of the FCC Rules. This device complies with the instruction manual, may be required to Part 15 of the FCC rules. Operation is likely to cause harmful interference in which case the user will be required to radio communications. About trademarks VGA, SVGA...


