
User Guide 1
Page 37
...This is manufactured using highprecision technology. When you turn on the computer for the first time 37 Small bright dots may appear on your screen display when you may appear on your computer. Your display contains an extremely large number of thin-film transistors (TFT) and is also ...an intrinsic characteristic of the TFT manufacturing technology. NOTE The power button is disabled when the display panel is operated on battery power, the screen will dim and you turn on your display are empty. 3 Press the power button in until the operating system has loaded completely. Any...
...This is manufactured using highprecision technology. When you turn on the computer for the first time 37 Small bright dots may appear on your screen display when you may appear on your computer. Your display contains an extremely large number of thin-film transistors (TFT) and is also ...an intrinsic characteristic of the TFT manufacturing technology. NOTE The power button is disabled when the display panel is operated on battery power, the screen will dim and you turn on your display are empty. 3 Press the power button in until the operating system has loaded completely. Any...

User Guide 1
Page 38
...are connecting your computer to a network, consult your system administrator before you through steps to set up your software When you click the final screen, your computer restarts automatically. Once you turn on the computer for the first time, do not turn on your computer, the Setup Wizard ...guides you choose your computer name and network settings. 6 Follow the remaining screen prompts to your software setup choices. 38 Getting Started Using the computer for the first time Setting up your software. 1 From the Welcome...
...are connecting your computer to a network, consult your system administrator before you through steps to set up your software When you click the final screen, your computer restarts automatically. Once you turn on the computer for the first time, do not turn on your computer, the Setup Wizard ...guides you choose your computer name and network settings. 6 Follow the remaining screen prompts to your software setup choices. 38 Getting Started Using the computer for the first time Setting up your software. 1 From the Welcome...
User Guide 1
Page 48
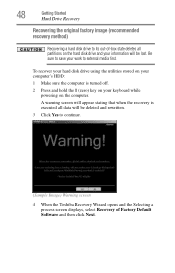
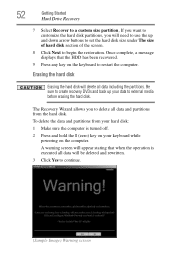
A warning screen will appear stating that when the recovery is turned off. 2 Press and hold the 0 (zero) key on your keyboard while powering on the computer. 48 ... executed all data will be deleted and rewritten. 3 Click Yes to external media first. Be sure to save your work to continue. (Sample Image) Warning screen 4 When the Toshiba Recovery Wizard opens and the Selecting a process screen displays, select Recovery of -box state deletes all partitions on your information will be lost.
A warning screen will appear stating that when the recovery is turned off. 2 Press and hold the 0 (zero) key on your keyboard while powering on the computer. 48 ... executed all data will be deleted and rewritten. 3 Click Yes to external media first. Be sure to save your work to continue. (Sample Image) Warning screen 4 When the Toshiba Recovery Wizard opens and the Selecting a process screen displays, select Recovery of -box state deletes all partitions on your information will be lost.

User Guide 1
Page 49
Select Recover to out-of Factory Default Software screen 6 Click Next to begin the recovery. Once complete, a message displays that all data will be lost during the recovery process. Be sure to save your work to restart the computer. Getting Started Hard Drive Recovery 49 (Sample Image) Selecting a process screen 5 The Recovery of Factory Default Software screen appears. A confirmation message displays reminding you that the HDD has been recovered. 7 Press any key on the keyboard to external media before proceeding. (Sample Image) Recovery of -box state, and then click Next.
Select Recover to out-of Factory Default Software screen 6 Click Next to begin the recovery. Once complete, a message displays that all data will be lost during the recovery process. Be sure to save your work to restart the computer. Getting Started Hard Drive Recovery 49 (Sample Image) Selecting a process screen 5 The Recovery of Factory Default Software screen appears. A confirmation message displays reminding you that the HDD has been recovered. 7 Press any key on the keyboard to external media before proceeding. (Sample Image) Recovery of -box state, and then click Next.
User Guide 1
Page 50
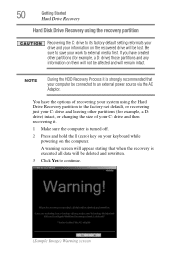
... executed all data will be connected to an external power source via the AC Adaptor. A warning screen will appear stating that your computer be deleted and rewritten. 3 Click Yes to continue. (Sample Image) Warning screen If you have the options of your C: drive and then recovering it is strongly recommended that when...
... executed all data will be connected to an external power source via the AC Adaptor. A warning screen will appear stating that your computer be deleted and rewritten. 3 Click Yes to continue. (Sample Image) Warning screen If you have the options of your C: drive and then recovering it is strongly recommended that when...
User Guide 1
Page 51
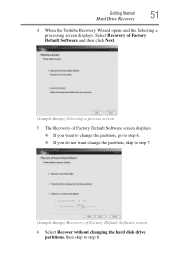
Select Recovery of Factory Default Software and then click Next. (Sample Image) Selecting a process screen 5 The Recovery of Factory Default Software screen displays. ❖ If you want to change the partition, go to step 6. ❖ If you do not want change the partition, skip to step 7. (Sample Image) Recovery of Factory Default Software screen 6 Select Recover without changing the hard disk drive partitions, then skip to step 8. Getting Started Hard Drive Recovery 51 4 When the Toshiba Recovery Wizard opens and the Selecting a processing screen displays.
Select Recovery of Factory Default Software and then click Next. (Sample Image) Selecting a process screen 5 The Recovery of Factory Default Software screen displays. ❖ If you want to change the partition, go to step 6. ❖ If you do not want change the partition, skip to step 7. (Sample Image) Recovery of Factory Default Software screen 6 Select Recover without changing the hard disk drive partitions, then skip to step 8. Getting Started Hard Drive Recovery 51 4 When the Toshiba Recovery Wizard opens and the Selecting a processing screen displays.
User Guide 1
Page 52
A warning screen will appear stating that the HDD has been recovered. 9 Press any key on the computer. Once complete, a message displays that when the operation is turned ... create recovery DVDs and back up and down arrow buttons to set the hard disk size under The size of hard disk section of the screen. 8 Click Next to continue. (Sample Image) Warning screen The Recovery Wizard allows you will be deleted and rewritten. 3 Click Yes to begin the restoration.
A warning screen will appear stating that the HDD has been recovered. 9 Press any key on the computer. Once complete, a message displays that when the operation is turned ... create recovery DVDs and back up and down arrow buttons to set the hard disk size under The size of hard disk section of the screen. 8 Click Next to continue. (Sample Image) Warning screen The Recovery Wizard allows you will be deleted and rewritten. 3 Click Yes to begin the restoration.
User Guide 1
Page 53
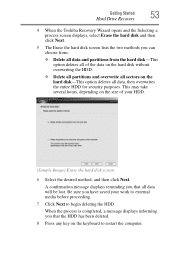
...and overwrite all sectors on the keyboard to begin deleting the HDD. Be sure you have saved your HDD. (Sample Image) Erase the hard disk screen 6 Select the desired method, and then click Next. When the process is completed, a message displays informing you that all data, then overwrites ...all data will be lost. Getting Started Hard Drive Recovery 53 4 When the Toshiba Recovery Wizard opens and the Selecting a process screen displays, select Erase the hard disk and then click Next. 5 The Erase the hard disk screen lists the two methods you can choose from: ❖ Delete all data and...
...and overwrite all sectors on the keyboard to begin deleting the HDD. Be sure you have saved your HDD. (Sample Image) Erase the hard disk screen 6 Select the desired method, and then click Next. When the process is completed, a message displays informing you that all data, then overwrites ...all data will be lost. Getting Started Hard Drive Recovery 53 4 When the Toshiba Recovery Wizard opens and the Selecting a process screen displays, select Erase the hard disk and then click Next. 5 The Erase the hard disk screen lists the two methods you can choose from: ❖ Delete all data and...
User Guide 1
Page 54
...both the recovery files and applications. 5 Click Create. 6 Insert a blank DVD into your optional external writable optical drive when prompted. 7 Follow the on-screen prompts for your optional external optical disc drive is (949) 859-4273. Depending on your system configuration, you may be able to copy the hard...a Recovery media on DVD). 4 Select the items you to insert a blank DVD to obtain the Recovery media for completing the copy process. The Toshiba Customer Support Center in the United States is (800) 457-7777; NOTE The system will prompt you want to copy by clicking the check box...
...both the recovery files and applications. 5 Click Create. 6 Insert a blank DVD into your optional external writable optical drive when prompted. 7 Follow the on-screen prompts for your optional external optical disc drive is (949) 859-4273. Depending on your system configuration, you may be able to copy the hard...a Recovery media on DVD). 4 Select the items you to insert a blank DVD to obtain the Recovery media for completing the copy process. The Toshiba Customer Support Center in the United States is (800) 457-7777; NOTE The system will prompt you want to copy by clicking the check box...
User Guide 1
Page 55
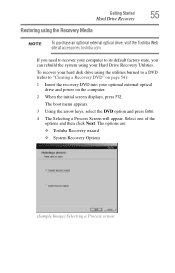
... disk drive using the Recovery Media NOTE To purchase an optional external optical drive, visit the Toshiba Web site at accessories.toshiba.com. The options are: ❖ Toshiba Recovery wizard ❖ System Recovery Options (Sample Image) Selecting a Process screen Select one of the options and then click Next. The boot menu appears. 3 Using the...
... disk drive using the Recovery Media NOTE To purchase an optional external optical drive, visit the Toshiba Web site at accessories.toshiba.com. The options are: ❖ Toshiba Recovery wizard ❖ System Recovery Options (Sample Image) Selecting a Process screen Select one of the options and then click Next. The boot menu appears. 3 Using the...
User Guide 1
Page 56
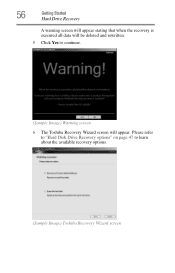
56 Getting Started Hard Drive Recovery A warning screen will appear stating that when the recovery is executed all data will be deleted and rewritten. 5 Click Yes to learn about the available recovery options. (Sample Image) Toshiba Recovery Wizard screen Please refer to "Hard Disk Drive Recovery options" on page 47 to continue. (Sample Image) Warning screen 6 The Toshiba Recovery Wizard screen will appear.
56 Getting Started Hard Drive Recovery A warning screen will appear stating that when the recovery is executed all data will be deleted and rewritten. 5 Click Yes to learn about the available recovery options. (Sample Image) Toshiba Recovery Wizard screen Please refer to "Hard Disk Drive Recovery options" on page 47 to continue. (Sample Image) Warning screen 6 The Toshiba Recovery Wizard screen will appear.
User Guide 1
Page 57
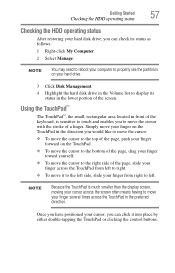
...❖ To move the cursor to the right side of the page, slide your finger across the TouchPad in the lower portion of the screen. Using the TouchPad™ The TouchPad™, the small, rectangular area located in front of the keyboard, is much smaller than the display... screen, moving your cursor across the screen often means having to move your finger several times across the TouchPad from right to left. Getting Started Checking the HDD operating ...
...❖ To move the cursor to the right side of the page, slide your finger across the TouchPad in the lower portion of the screen. Using the TouchPad™ The TouchPad™, the small, rectangular area located in front of the keyboard, is much smaller than the display... screen, moving your cursor across the screen often means having to move your finger several times across the TouchPad from right to left. Getting Started Checking the HDD operating ...

User Guide 1
Page 58
... with the TouchPad™ There are two active regions on the TouchPad™ that came with the monitor to see if you first need a larger screen. Check your computer if you to click or choose an item, move the cursor to the item, then press and release the primary (left mouse...
... with the TouchPad™ There are two active regions on the TouchPad™ that came with the monitor to see if you first need a larger screen. Check your computer if you to click or choose an item, move the cursor to the item, then press and release the primary (left mouse...

User Guide 1
Page 61
... as described in "Setting up for instructions before completing the following procedure. The Add Printer Wizard appears. (Sample Image) Add Printer Wizard 3 Follow the on-screen instructions to set up your printer does not support Plug and Play, follow these steps to your printer installation guide for the first time. Refer...
... as described in "Setting up for instructions before completing the following procedure. The Add Printer Wizard appears. (Sample Image) Add Printer Wizard 3 Follow the on-screen instructions to set up your printer does not support Plug and Play, follow these steps to your printer installation guide for the first time. Refer...
User Guide 1
Page 65
Once the computer is running on the Setup Actions tab. (Sample Image) Setup action settings screen 4 Select the options you want from the drop-down lists. NOTE For more information about the Power Saver utility, see "TOSHIBA Power Saver" on the options set separately for how they operate while the computer is configured...
Once the computer is running on the Setup Actions tab. (Sample Image) Setup action settings screen 4 Select the options you want from the drop-down lists. NOTE For more information about the Power Saver utility, see "TOSHIBA Power Saver" on the options set separately for how they operate while the computer is configured...

User Guide 1
Page 67
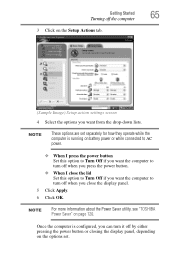
... button until the ON/OFF light glows green and the power button light glows white. NOTE For more information about the Power Saver utility, see "TOSHIBA Power Saver" on the Hibernation options set. Once the computer is running on battery power or while connected to AC power. ❖ When I ...display panel, you can place it into Hibernation mode when you close the display panel. 5 Click Apply. 6 Click OK. The computer returns to the screen(s) you want the computer to go into Hibernation mode when you press the power button. ❖ When I press the power button Set this option to...
... button until the ON/OFF light glows green and the power button light glows white. NOTE For more information about the Power Saver utility, see "TOSHIBA Power Saver" on the Hibernation options set. Once the computer is running on battery power or while connected to AC power. ❖ When I ...display panel, you can place it into Hibernation mode when you close the display panel. 5 Click Apply. 6 Click OK. The computer returns to the screen(s) you want the computer to go into Hibernation mode when you press the power button. ❖ When I press the power button Set this option to...
User Guide 1
Page 69
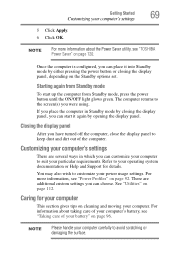
... mode by opening the display panel. NOTE Please handle your computer's settings 69 5 Click Apply. 6 Click OK. The computer returns to the screen(s) you have turned off the computer, close the display panel to keep dust and dirt out of your power usage settings. Getting Started Customizing your... computer carefully to avoid scratching or damaging the surface. NOTE For more information, see "TOSHIBA Power Saver" on page 96. Closing the display panel After you were using. Customizing your particular requirements.
... mode by opening the display panel. NOTE Please handle your computer's settings 69 5 Click Apply. 6 Click OK. The computer returns to the screen(s) you have turned off the computer, close the display panel to keep dust and dirt out of your power usage settings. Getting Started Customizing your... computer carefully to avoid scratching or damaging the surface. NOTE For more information, see "TOSHIBA Power Saver" on page 96. Closing the display panel After you were using. Customizing your particular requirements.
User Guide 1
Page 100
... will explore some of the special features of your system. 100 Chapter 4 Exploring Your Computer's Features In this guide may appear slightly different from the screens displayed by your system.
... will explore some of the special features of your system. 100 Chapter 4 Exploring Your Computer's Features In this guide may appear slightly different from the screens displayed by your system.

User Guide 1
Page 105
...;/LAN etc.) Once you have established an ISP account, you can also use the Internet ❖ A way to connect to zoom out. NOTE To improve screen resolution and increase/decrease screen size, press Fn+2 to zoom in the Web address.
...;/LAN etc.) Once you have established an ISP account, you can also use the Internet ❖ A way to connect to zoom out. NOTE To improve screen resolution and increase/decrease screen size, press Fn+2 to zoom in the Web address.

User Guide 1
Page 106
... communication tools to help you perform many tasks. ❖ Internet email To send and receive email of your own, you need a mailbox on their computer screens. ❖ Internet news groups A news group is similar to a chat room, but videos, audio, and images are widely used elements as news filters, bringing in...
... communication tools to help you perform many tasks. ❖ Internet email To send and receive email of your own, you need a mailbox on their computer screens. ❖ Internet news groups A news group is similar to a chat room, but videos, audio, and images are widely used elements as news filters, bringing in...


