

Owners Manual
Page 2
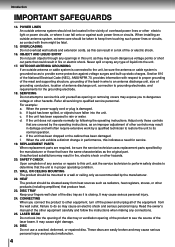
... the receiver is encouraged to try to Part 15 of electric shock to record television programs, films, video tapes and other rights are on , the user is connected. - CAUTION: Changes or modifications not expressly approved by the party responsible for compliance with the limits for help. DO NOT STARE INTO BEAM. USE OF CONTROLS, ADJUSTMENTS OR THE PERFORMANCE OF PROCEDURES OTHER...
... the receiver is encouraged to try to Part 15 of electric shock to record television programs, films, video tapes and other rights are on , the user is connected. - CAUTION: Changes or modifications not expressly approved by the party responsible for compliance with the limits for help. DO NOT STARE INTO BEAM. USE OF CONTROLS, ADJUSTMENTS OR THE PERFORMANCE OF PROCEDURES OTHER...
Owners Manual
Page 4
... personal injury. 24. OVERLOADING Do not overload wall outlets and extension cords, as radiators, heat registers, stoves, or other electric light or power circuits, or where it is damaged. f. When the power-supply cord or plug is closing. When installing an outside antenna system should be taken to keep from heat sources such as this indicates a need for the grounding electrode. 18.
... personal injury. 24. OVERLOADING Do not overload wall outlets and extension cords, as radiators, heat registers, stoves, or other electric light or power circuits, or where it is damaged. f. When the power-supply cord or plug is closing. When installing an outside antenna system should be taken to keep from heat sources such as this indicates a need for the grounding electrode. 18.
Owners Manual
Page 5
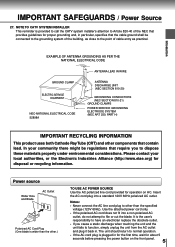
... uses both Cathode Ray Tube (CRT) and other components that provides guidelines for proper grounding and, in for the first time, wait for about 5 seconds before pressing the power button on AC. In your local authorities, or the Electronic Industries Alliance (http://www.eiae.org) for operation on the front panel. 5 Notes: • Never connect the AC line cord plug...
... uses both Cathode Ray Tube (CRT) and other components that provides guidelines for proper grounding and, in for the first time, wait for about 5 seconds before pressing the power button on AC. In your local authorities, or the Electronic Industries Alliance (http://www.eiae.org) for operation on the front panel. 5 Notes: • Never connect the AC line cord plug...
Owners Manual
Page 9
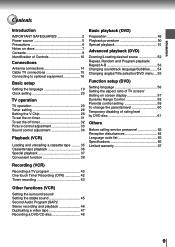
... screen/ Setting on screen display 57 Dynamic Range Control 58 Parental control setting 59 To change the parental level 60 Temporary disabling of rating level by DVD disc 61 Others Before calling service personnel 62 Reception disturbances 64 Language code list 65 Specifications 66 Limited warranty 67 Recording (VCR) Recording a TV program 40 One-touch Timer Recording (OTR 42 Timer recording 43 Other functions (VCR) Setting the surround sound/ Setting the stable sound 45 Second Audio Program (SAP...
... screen/ Setting on screen display 57 Dynamic Range Control 58 Parental control setting 59 To change the parental level 60 Temporary disabling of rating level by DVD disc 61 Others Before calling service personnel 62 Reception disturbances 64 Language code list 65 Specifications 66 Limited warranty 67 Recording (VCR) Recording a TV program 40 One-touch Timer Recording (OTR 42 Timer recording 43 Other functions (VCR) Setting the surround sound/ Setting the stable sound 45 Second Audio Program (SAP...
Owners Manual
Page 12
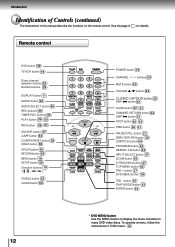
... button 53 TV/VCR DVD POWER 123 CHANNEL 456 789 DISPLAY SLEEP 0 AUDIO SELECT MUTE VOLUME CHANNEL CLOSED RETURN CAPTION TIMER REC SKIP REC SKIP SLOW PLAY REV FWD CM SKIP/JUMP STOP PAUSE/STILL COUNTER ZERO SP/SLP RESET RETURN INPUT SELECT RETURN ANGLE SUBTITLE ZOOM MENU PROGRAM D.TRACKING SETUP REPEAT A-B TOP MENU ENTER TRK + CANCEL CLEAR DVD MENU TRK - button 37 PLAY MODE button 53 ENTER button 19 12 * DVD MENU button Use the MENU button to display the menu included on the remote control. To operate a menu, follow the instructions...
... button 53 TV/VCR DVD POWER 123 CHANNEL 456 789 DISPLAY SLEEP 0 AUDIO SELECT MUTE VOLUME CHANNEL CLOSED RETURN CAPTION TIMER REC SKIP REC SKIP SLOW PLAY REV FWD CM SKIP/JUMP STOP PAUSE/STILL COUNTER ZERO SP/SLP RESET RETURN INPUT SELECT RETURN ANGLE SUBTITLE ZOOM MENU PROGRAM D.TRACKING SETUP REPEAT A-B TOP MENU ENTER TRK + CANCEL CLEAR DVD MENU TRK - button 37 PLAY MODE button 53 ENTER button 19 12 * DVD MENU button Use the MENU button to display the menu included on the remote control. To operate a menu, follow the instructions...

Owners Manual
Page 16
... Connecting a camcorder or a TV game Select "LINE 2" using the INPUT SELECT button. In this case, place the unit away from the tuner and radio. • The output sound of the equipment from the wall outlet before you leave the amplifier power on, the speakers may be distorted. VHF/UHF OUT PUT VIDEO DIGITAL AUDIO COAXIAL L AUDIO R LINE 1 IN VIDEO L(MONO) AUDIO R To ANALOG AUDIO OUT (white) Audio cable (not supplied) (red) (white) Audio system (red) To audio inputs of...
... Connecting a camcorder or a TV game Select "LINE 2" using the INPUT SELECT button. In this case, place the unit away from the tuner and radio. • The output sound of the equipment from the wall outlet before you leave the amplifier power on, the speakers may be distorted. VHF/UHF OUT PUT VIDEO DIGITAL AUDIO COAXIAL L AUDIO R LINE 1 IN VIDEO L(MONO) AUDIO R To ANALOG AUDIO OUT (white) Audio cable (not supplied) (red) (white) Audio system (red) To audio inputs of...

Owners Manual
Page 17
... theaters and now available for home use, on DVD video discs or audio CDs. Refer to that provide full 5.1 channel Dolby Digital soundtracks, as well as from the same DVD movies that amplifier's owner's manual and set the amplifier so you can enjoy Dolby Pro Logic Surround sound. If you have a DTS decoder or processor, you connect two rear speakers. Connecting to an amplifier equipped with...
... theaters and now available for home use, on DVD video discs or audio CDs. Refer to that provide full 5.1 channel Dolby Digital soundtracks, as well as from the same DVD movies that amplifier's owner's manual and set the amplifier so you can enjoy Dolby Pro Logic Surround sound. If you have a DTS decoder or processor, you connect two rear speakers. Connecting to an amplifier equipped with...

Owners Manual
Page 18
...'s power cord. Otherwise, the speakers may be output from the wall outlet before you should take proper precautions when the ANALOG AUDIO OUT (L/R) jacks of the unit. Connecting to an amplifier equipped with an MPEG2 audio decoder MPEG2 sound You can enjoy the dynamic sound of 2 channel digital stereo by connecting an amplifier equipped with a digital audio input To COAXIAL type digital audio input 75 Ω coaxial cable VHF/UHF OUT PUT VIDEO DIGITAL AUDIO COAXIAL L AUDIO...
...'s power cord. Otherwise, the speakers may be output from the wall outlet before you should take proper precautions when the ANALOG AUDIO OUT (L/R) jacks of the unit. Connecting to an amplifier equipped with an MPEG2 audio decoder MPEG2 sound You can enjoy the dynamic sound of 2 channel digital stereo by connecting an amplifier equipped with a digital audio input To COAXIAL type digital audio input 75 Ω coaxial cable VHF/UHF OUT PUT VIDEO DIGITAL AUDIO COAXIAL L AUDIO...

Owners Manual
Page 20
... you use a cable box, turn it receives a broadcast signal for a receivable station in clock time and the actual time. The POWER indicator will light. DISPLAY TV/VCR 8 : 47AM MON STEREO SAP CH 125 00 : 00 : 00 SP 4 If the clock is set to "ON". But if you want Auto Clock set (Adjustment): 1 Press MENU. SYSTEM SETUP CLOCK SET LANGUAGE/IDIOMA/LANGUE AUTO CLOCK ON OFF STANDARD TIME DAYLIGHT SAVING TIME 〈 / /ENTER/MENU...
... you use a cable box, turn it receives a broadcast signal for a receivable station in clock time and the actual time. The POWER indicator will light. DISPLAY TV/VCR 8 : 47AM MON STEREO SAP CH 125 00 : 00 : 00 SP 4 If the clock is set to "ON". But if you want Auto Clock set (Adjustment): 1 Press MENU. SYSTEM SETUP CLOCK SET LANGUAGE/IDIOMA/LANGUE AUTO CLOCK ON OFF STANDARD TIME DAYLIGHT SAVING TIME 〈 / /ENTER/MENU...
Owners Manual
Page 21
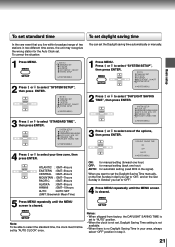
... TIME DAYLIGHT SAVING TIME 〈 / /ENTER/MENU〉 3 Press or to select "SYSTEM SETUP", then press ENTER. To correct the situation: You can set by "AUTO CLOCK" once. 1 Press MENU. MENU SETUP M E N U TIMER REC SET TV SETUP CH SETUP AUTO REPEAT ON OFF SYSTEM SETUP 〈 / /ENTER/MENU〉 2 Press or to select one hour) AUTO: for automatic setting (read XDS in the signal) When you want to set the Daylight Saving Time manually...
... TIME DAYLIGHT SAVING TIME 〈 / /ENTER/MENU〉 3 Press or to select "SYSTEM SETUP", then press ENTER. To correct the situation: You can set by "AUTO CLOCK" once. 1 Press MENU. MENU SETUP M E N U TIMER REC SET TV SETUP CH SETUP AUTO REPEAT ON OFF SYSTEM SETUP 〈 / /ENTER/MENU〉 2 Press or to select one hour) AUTO: for automatic setting (read XDS in the signal) When you want to set the Daylight Saving Time manually...
Owners Manual
Page 25
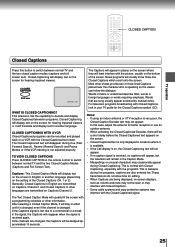
... . After selecting a Closed Caption Mode, it is changed, even if the channel is received again. CLOSED CAPTION SKIP CAPTION CH 1 The Captions will appear in effect until it will stay in places on the remote control to decode and display Closed Captioned television programs. Closed Captioning will display text on Captions Channel 2. Words that are changed . TO VIEW CLOSED CAPTIONS Press CLOSED CAPTION on the screen where they will least interfere with the Closed Captioned signal. These transmissions do not allow time for...
... . After selecting a Closed Caption Mode, it is changed, even if the channel is received again. CLOSED CAPTION SKIP CAPTION CH 1 The Captions will appear in effect until it will stay in places on the remote control to decode and display Closed Captioned television programs. Closed Captioning will display text on Captions Channel 2. Words that are changed . TO VIEW CLOSED CAPTIONS Press CLOSED CAPTION on the screen where they will least interfere with the Closed Captioned signal. These transmissions do not allow time for...

Owners Manual
Page 28
TV operation Setting the V-Chip An age limitation can be set to forbid children to watch programs according to "TV RATING" and "MOVIE RATING" level set the V-chip 1 Press MENU. NUMBER buttons / MENU ENTER To register password To set . TV SETUP V-CHIP SET ON/OFF TIMER PICTURE ENTER AUDIO SURROUND ON OFF STABLE SOUND ON OFF SAP ON OFF 〈 / /ENTER/MENU〉 3 Enter the password (4 digits) using the Number buttons (0-9), then press ENTER. 123...
TV operation Setting the V-Chip An age limitation can be set to forbid children to watch programs according to "TV RATING" and "MOVIE RATING" level set the V-chip 1 Press MENU. NUMBER buttons / MENU ENTER To register password To set . TV SETUP V-CHIP SET ON/OFF TIMER PICTURE ENTER AUDIO SURROUND ON OFF STABLE SOUND ON OFF SAP ON OFF 〈 / /ENTER/MENU〉 3 Enter the password (4 digits) using the Number buttons (0-9), then press ENTER. 123...

Owners Manual
Page 33
... the MENU button three times. • The settings can adjust them individually as follows: TV operation Picture control adjustment 1 1-2 CANCEL 1 To display the picture adjustment screen, press MENU. MENU SETUP ENTER M E N U TIMER REC SET TV SETUP CH SETUP AUTO REPEAT ON OFF SYSTEM SETUP 〈 / /ENTER/MENU〉 COLOR Press ENTER until "CONTRAST" appears on the screen, then press or to adjust the contrast of the entire picture. Adjusting the tint for natural facial tone is the best method...
... the MENU button three times. • The settings can adjust them individually as follows: TV operation Picture control adjustment 1 1-2 CANCEL 1 To display the picture adjustment screen, press MENU. MENU SETUP ENTER M E N U TIMER REC SET TV SETUP CH SETUP AUTO REPEAT ON OFF SYSTEM SETUP 〈 / /ENTER/MENU〉 COLOR Press ENTER until "CONTRAST" appears on the screen, then press or to adjust the contrast of the entire picture. Adjusting the tint for natural facial tone is the best method...

Owners Manual
Page 34
... ENTER. CANCEL CLEAR Notes: • The On-screen display will return all adjustments to select "AUDIO", then press TV SETUP V-CHIP SET ON/OFF TIMER PICTURE AUDIO SURROUND ON OFF STABLE SOUND ON OFF SAP ON OFF 〈 / /ENTER/MENU〉 3 Press ENTER repeatedly until the desired item appears on the TV screen. 34 TV operation Sound control adjustment Sound control adjustment 1 1-3 CANCEL 1 To display the sound adjustment screen, press MENU. ENTER BASS 0 〈 / /ENTER/CANCEL...
... ENTER. CANCEL CLEAR Notes: • The On-screen display will return all adjustments to select "AUDIO", then press TV SETUP V-CHIP SET ON/OFF TIMER PICTURE AUDIO SURROUND ON OFF STABLE SOUND ON OFF SAP ON OFF 〈 / /ENTER/MENU〉 3 Press ENTER repeatedly until the desired item appears on the TV screen. 34 TV operation Sound control adjustment Sound control adjustment 1 1-3 CANCEL 1 To display the sound adjustment screen, press MENU. ENTER BASS 0 〈 / /ENTER/CANCEL...
Owners Manual
Page 43
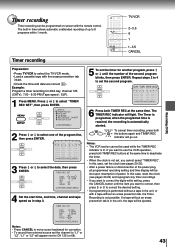
... button until the number of the program line, then press ENTER. In this case, set the second program. TV/VCR 2-3,5 6 1 1-3,5 CANCEL Timer recording Recording (VCR) Preparation: • Press TV/VCR to set the clock (see pages 20-22) and reprogram any timer recordings. • If you want to use the VCR operation, press both TIMER REC buttons at the same time. Repeat steps 2 to 4 to select the TV/VCR mode...
... button until the number of the program line, then press ENTER. In this case, set the second program. TV/VCR 2-3,5 6 1 1-3,5 CANCEL Timer recording Recording (VCR) Preparation: • Press TV/VCR to set the clock (see pages 20-22) and reprogram any timer recordings. • If you want to use the VCR operation, press both TIMER REC buttons at the same time. Repeat steps 2 to 4 to select the TV/VCR mode...

Owners Manual
Page 46
... Audio Program when viewing a selected channel. Note: When using a CATV system, stereo TV programs may be in stereo. AUDIO SELECT Output selection When viewing an MTS stereo TV program, or playing a prerecorded VHS Hi-Fi stereo videotape, press AUDIO SELECT to SAP When the unit is turned on the screen. Then press MENU repeatedly until the menu screen is available. ENTER MENU SETUP TV SETUP V-CHIP SET ON/OFF TIMER PICTURE AUDIO SURROUND ON OFF STABLE SOUND ON OFF SAP ON...
... Audio Program when viewing a selected channel. Note: When using a CATV system, stereo TV programs may be in stereo. AUDIO SELECT Output selection When viewing an MTS stereo TV program, or playing a prerecorded VHS Hi-Fi stereo videotape, press AUDIO SELECT to SAP When the unit is turned on the screen. Then press MENU repeatedly until the menu screen is available. ENTER MENU SETUP TV SETUP V-CHIP SET ON/OFF TIMER PICTURE AUDIO SURROUND ON OFF STABLE SOUND ON OFF SAP ON...

Owners Manual
Page 53
... or turn off the power. Audio CD/Video CD *Program menu Use number buttons (0-9) to enter the track's number you have finished entering tracks, press PLAY to repeat material between two selected points. 1 Press REPEAT A-B during playback or stop mode. Resumes normal playback. Resumes normal playback. • During stop mode, PLAY MODE key is cancelled when you put a wrong number, press CANCEL. • To cancel program play, press STOP 3 times...
... or turn off the power. Audio CD/Video CD *Program menu Use number buttons (0-9) to enter the track's number you have finished entering tracks, press PLAY to repeat material between two selected points. 1 Press REPEAT A-B during playback or stop mode. Resumes normal playback. Resumes normal playback. • During stop mode, PLAY MODE key is cancelled when you put a wrong number, press CANCEL. • To cancel program play, press STOP 3 times...

Owners Manual
Page 62
... experiencing problems. Antenna (CATV) connector is not connected. TV station experiencing problems or program tuned is not set to turn on , the Cassette or disc is not connected. Try another channel. Try another channel. Press the CLOSED CAPTION button to the appropriate mode. unit does not operate. TV/CATV Mode menu option is not closed caption. 14, 15 25 62 POSSIBLE SOLUTIONS PAGE Connect the AC power cord to the TV mode. Insert a video...
... experiencing problems. Antenna (CATV) connector is not connected. TV station experiencing problems or program tuned is not set to turn on , the Cassette or disc is not connected. Try another channel. Try another channel. Press the CLOSED CAPTION button to the appropriate mode. unit does not operate. TV/CATV Mode menu option is not closed caption. 14, 15 25 62 POSSIBLE SOLUTIONS PAGE Connect the AC power cord to the TV mode. Insert a video...

Owners Manual
Page 67
... service charges for set installation, set to a TACP/THI Authorized Service Station. During this product against defects in materials or workmanship for all parts, labor and picture tube. During this period TACP/THI will not affect your rights under this product and its parts against defects in materials or workmanship for the set up, adjustment of customer controls and installation or repair of...
... service charges for set installation, set to a TACP/THI Authorized Service Station. During this product against defects in materials or workmanship for all parts, labor and picture tube. During this period TACP/THI will not affect your rights under this product and its parts against defects in materials or workmanship for the set up, adjustment of customer controls and installation or repair of...

Owners Manual
Page 68
... the type of repair required, the service will either be performed in your home or the set forth above provisions may be taken to the TACP/THI Authorized Service Station for repair and returned to your home when warranty service is authorized to change, modify or extend the terms of incidental or consequential damages, so the above . and used in this manual and...
... the type of repair required, the service will either be performed in your home or the set forth above provisions may be taken to the TACP/THI Authorized Service Station for repair and returned to your home when warranty service is authorized to change, modify or extend the terms of incidental or consequential damages, so the above . and used in this manual and...


