

Owners Manual
Page 1
TOSHIBA Introduction VIDEO nOMT DIGITAL VIDEO' CT 1)721 DIGITAL AUDIO DOLBY D 00 IGITAL &is DIGITAL DIGITAL Comb Filter Connections 14 COMBINATION FLAT COLOR Basic setup 19 TELEVISION AND VIDEO CASSETTE RECORDER / DVD VIDEO PLAYER TV operation 23 MW2OFM1 MW24FM1 OWNER'S MANUAL VHS Hi-Fi Playback (VCR) Recording (VCR) 40 Other functions (VCR) Basic playback (DVD) 48 Advanced playback (DVD) Function setup (DVD) 61 Others 69 00®' 00000000 ©2002 Toshiba Corporation This device does not tape-recorded copy protected DVD Video Discs.
TOSHIBA Introduction VIDEO nOMT DIGITAL VIDEO' CT 1)721 DIGITAL AUDIO DOLBY D 00 IGITAL &is DIGITAL DIGITAL Comb Filter Connections 14 COMBINATION FLAT COLOR Basic setup 19 TELEVISION AND VIDEO CASSETTE RECORDER / DVD VIDEO PLAYER TV operation 23 MW2OFM1 MW24FM1 OWNER'S MANUAL VHS Hi-Fi Playback (VCR) Recording (VCR) 40 Other functions (VCR) Basic playback (DVD) 48 Advanced playback (DVD) Function setup (DVD) 61 Others 69 00®' 00000000 ©2002 Toshiba Corporation This device does not tape-recorded copy protected DVD Video Discs.

Owners Manual
Page 3
... on this unit from the wall outlet before the unit is equipped with a 3-wire grounding-type plug (a plug having one way. CLEANING Unplug this Owner's Manual for their operating instructions. 11. Use only with care. These openings must not be adhered to the respective pages on the unit and in installation...
... on this unit from the wall outlet before the unit is equipped with a 3-wire grounding-type plug (a plug having one way. CLEANING Unplug this Owner's Manual for their operating instructions. 11. Use only with care. These openings must not be adhered to the respective pages on the unit and in installation...

Owners Manual
Page 4
... or cable system is connected to grounding electrodes, and requirements for service. 19. It may cause serious personal injury and product malfunction. 4 Read the owner's manual of antenna discharge unit, connection to the unit, be sure the antenna or cable system is damaged. DISC Do not use a cracked, deformed, or repaired...
... or cable system is connected to grounding electrodes, and requirements for service. 19. It may cause serious personal injury and product malfunction. 4 Read the owner's manual of antenna discharge unit, connection to the unit, be sure the antenna or cable system is damaged. DISC Do not use a cracked, deformed, or repaired...

Owners Manual
Page 8
...depending on types of discs. • VIDEO CD not equipped with PBC function (Version 1.1) Sound and movie can be played on this owner's manual may be allowed by the unit or the disc. Disc Maximum Disc Mark Contents Size playback time DVD VIDEO video discs W Audio video (moving ...of interactive software with search function by CD-DA method can play discs of discs. ductlon Notes on discs (continued) About this owner's manual This owner's manual explains the basic instructions of this case, the unit will not be labeled as an audio CD. • VIDEO CD equipped with PBC...
...depending on types of discs. • VIDEO CD not equipped with PBC function (Version 1.1) Sound and movie can be played on this owner's manual may be allowed by the unit or the disc. Disc Maximum Disc Mark Contents Size playback time DVD VIDEO video discs W Audio video (moving ...of interactive software with search function by CD-DA method can play discs of discs. ductlon Notes on discs (continued) About this owner's manual This owner's manual explains the basic instructions of this case, the unit will not be labeled as an audio CD. • VIDEO CD equipped with PBC...

Owners Manual
Page 12
... 55) D.TRACKING button [37) TOP MENU button 52) TRK + button 37) DVD MENU button*148) TRK - IrrtroductIon Identification of Controls (continued) The instructions in this manual describe the functions on many DVD video discs. To operate a menu, follow the instructions in [) for details. ID See the page in "Locating a title using...
... 55) D.TRACKING button [37) TOP MENU button 52) TRK + button 37) DVD MENU button*148) TRK - IrrtroductIon Identification of Controls (continued) The instructions in this manual describe the functions on many DVD video discs. To operate a menu, follow the instructions in [) for details. ID See the page in "Locating a title using...

Owners Manual
Page 16
... unplug all of the equipment from the tuner and radio. • The output sound of output sound, see 58). Notes: • Refer to the owner's manual of the connected equipment as well. • When you connect the unit to other equipment, be sure to your audio system. toni;C:iions nnecting to...
... unplug all of the equipment from the tuner and radio. • The output sound of output sound, see 58). Notes: • Refer to the owner's manual of the connected equipment as well. • When you connect the unit to other equipment, be sure to your audio system. toni;C:iions nnecting to...
Owners Manual
Page 17
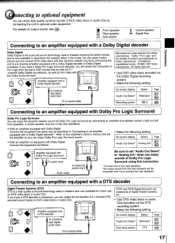
... Pro Logic Surround Dolby Pro Logic Surround You can enjoy the dynamic realistic sound of Pro Logic from the same DVD movies that amplifier's owner's manual and set "Audio Out Select" to an amplifier equipped with a DTS decoder "DTS" and "DTS Digital Surround" are trademarks of Digital Theater Systems, Inc. •...
... Pro Logic Surround Dolby Pro Logic Surround You can enjoy the dynamic realistic sound of Pro Logic from the same DVD movies that amplifier's owner's manual and set "Audio Out Select" to an amplifier equipped with a DTS decoder "DTS" and "DTS Digital Surround" are trademarks of Digital Theater Systems, Inc. •...
Owners Manual
Page 18
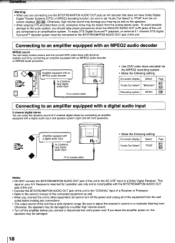
... (via the MPEG2 recording system. • Make the following setting. Connections Warning: • When you are connected to an amplification system. Connecting to the owner's manual of the unit. Amplifier equipped with a digital audio input To COAXIAL type digital audio input 75 4 coaxial cable • Make the following setting. Otherwise, the...
... (via the MPEG2 recording system. • Make the following setting. Connections Warning: • When you are connected to an amplification system. Connecting to the owner's manual of the unit. Amplifier equipped with a digital audio input To COAXIAL type digital audio input 75 4 coaxial cable • Make the following setting. Otherwise, the...
Owners Manual
Page 20
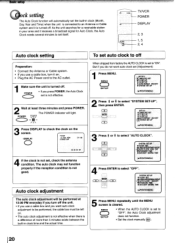
... clock adjustment will be left on . • Plug the AC Power cord to "OFF", the Auto Clock adjustment does not function. • Set the clock manually l ). 20 I AUTO CLOCK ONOOFF *STANDARD TIME I DAYLIGHT SAVING TIME (A/VENTERIMENU) 4 Press ENTER to check the clock on the screen. Basic setup Clock setting The Auto...
... clock adjustment will be left on . • Plug the AC Power cord to "OFF", the Auto Clock adjustment does not function. • Set the clock manually l ). 20 I AUTO CLOCK ONOOFF *STANDARD TIME I DAYLIGHT SAVING TIME (A/VENTERIMENU) 4 Press ENTER to check the clock on the screen. Basic setup Clock setting The Auto...
Owners Manual
Page 21
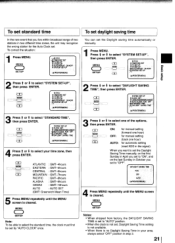
...TIME VDAYLIGHT SAVING TIME ( 4) (kV/ENTER/MENU) 4 Press t or 4 to select "SYSTEM SET-UP", 1 Press MENU. You can set the Daylight saving time automatically or manually. Press t or 4 to select your area, always select "OFF position in step 3. MENU = SETUP x /MENU -I TIMER REC SET MTV SET-UP I CH SET-UP II... zones, the unit may recognize the wrong station for automatic setting (read XDS in the signal) When you want to set the Daylight Saving Time manually, on the first Sunday in April you set to "ON", and on the last Sunday in October you set to select "STANDARD TIME", then ...
...TIME VDAYLIGHT SAVING TIME ( 4) (kV/ENTER/MENU) 4 Press t or 4 to select "SYSTEM SET-UP", 1 Press MENU. You can set the Daylight saving time automatically or manually. Press t or 4 to select your area, always select "OFF position in step 3. MENU = SETUP x /MENU -I TIMER REC SET MTV SET-UP I CH SET-UP II... zones, the unit may recognize the wrong station for automatic setting (read XDS in the signal) When you want to set the Daylight Saving Time manually, on the first Sunday in April you set to "ON", and on the last Sunday in October you set to select "STANDARD TIME", then ...

Owners Manual
Page 22
... of the power, the timer settings will be lost. In this case, reset the present time. • When you set them correctly. 24 1 24 Manual clock setting EXAMPLE: Setting the clock to "8:30 AM", 29th. (FRI) March, 2002. 6 After setting the clock, date and time starts functioning automatically.... 1 Press MENU. Basic setup CClock setting (continued) You must set the date and time manually for Timer Recordings, ON/OFF Timer and Daylight Saving Time if the Auto Clock process did not set the minute, you want to change in...
... of the power, the timer settings will be lost. In this case, reset the present time. • When you set them correctly. 24 1 24 Manual clock setting EXAMPLE: Setting the clock to "8:30 AM", 29th. (FRI) March, 2002. 6 After setting the clock, date and time starts functioning automatically.... 1 Press MENU. Basic setup CClock setting (continued) You must set the date and time manually for Timer Recordings, ON/OFF Timer and Daylight Saving Time if the Auto Clock process did not set the minute, you want to change in...

Owners Manual
Page 37
... Picture search Digital tracking controls Reverse picture search function Press REV once or twice during playback. to obtain the best possible picture. "MANUAL TRACK" will appear for each press of CM SKIP (maximum six presses) and then resume normal playback. "DIGITAL TRACK" will appear... minutes to obtain the best possible picture. When a tape is more appropriate as follows: • Press TRK + / - MANUAL. Forward picture search function Press FWD once or twice during playback. Slow motion During playback press SLOW. To resume automatic tracking, press D.TRACKING.
... Picture search Digital tracking controls Reverse picture search function Press REV once or twice during playback. to obtain the best possible picture. "MANUAL TRACK" will appear for each press of CM SKIP (maximum six presses) and then resume normal playback. "DIGITAL TRACK" will appear... minutes to obtain the best possible picture. When a tape is more appropriate as follows: • Press TRK + / - MANUAL. Forward picture search function Press FWD once or twice during playback. Slow motion During playback press SLOW. To resume automatic tracking, press D.TRACKING.

Owners Manual
Page 71
... disc is dirty. The disc is too far or too much light in the path of the Clear the path of the beam. Adjust tracking manually using the TRK +/- Aim the remote control at the sensor. Distance is placed upside down . Noise bars appear on the screen. The recording start/end...
... disc is dirty. The disc is too far or too much light in the path of the Clear the path of the beam. Adjust tracking manually using the TRK +/- Aim the remote control at the sensor. Distance is placed upside down . Noise bars appear on the screen. The recording start/end...

Owners Manual
Page 74
... Units Products sold and used for commercial use in the U.S.A. Failure to an Authorized TACP/THI Service Station. Others Limited warranty Toshiba America Consumer Products, Inc. ("TACP") and Toshiba Hawaii Inc. ("THI") make the following conditions: ( 1 ) You must retain your responsibility. ( 5 ) Warranties extend ...you, or the person who has given you pay labor charges involved in the replacement. You should read this owner's manual thoroughly before operating this product and its parts against defects in materials or workmanship for rental units begins with better customer ...
... Units Products sold and used for commercial use in the U.S.A. Failure to an Authorized TACP/THI Service Station. Others Limited warranty Toshiba America Consumer Products, Inc. ("TACP") and Toshiba Hawaii Inc. ("THI") make the following conditions: ( 1 ) You must retain your responsibility. ( 5 ) Warranties extend ...you, or the person who has given you pay labor charges involved in the replacement. You should read this owner's manual thoroughly before operating this product and its parts against defects in materials or workmanship for rental units begins with better customer ...

Owners Manual
Page 75
... or under state law. Products purchased in the U.S.A. are requested to complete the special Canadian "Warranty Registration 0 s Form" enclosed, and forward this manual and checking the section "Before calling service personnel" and you still find that service is needed; ( 1 ) Call the TACP toll free number ... gives you specific legal rights and you may not apply to you " In the Continental United States contact: Toll Free In Hawaii Contact: Toshiba Hawaii, Inc 327 Kamakee Street, Honolulu, Hawaii 96814 (808) 591-8377 1-800-631-3811 All warranties implied by state law, including the...
... or under state law. Products purchased in the U.S.A. are requested to complete the special Canadian "Warranty Registration 0 s Form" enclosed, and forward this manual and checking the section "Before calling service personnel" and you still find that service is needed; ( 1 ) Call the TACP toll free number ... gives you specific legal rights and you may not apply to you " In the Continental United States contact: Toll Free In Hawaii Contact: Toshiba Hawaii, Inc 327 Kamakee Street, Honolulu, Hawaii 96814 (808) 591-8377 1-800-631-3811 All warranties implied by state law, including the...


