

Owners Manual
Page 10
Introduction Identification of MW20F11 Cassette loading slot 33 TIMER REC indicator 40 Remote sensor 12 Disc tray 44 PHONES jack 24 AUDIO (L/R)/VIDEO IN (LINE IN 2) jacks 42 REW (Rewind) button 34 STOP/EJECT button 33 PLAY button ... jack 16 17 AUDIO (L/R)/VIDEO IN (LINE 1 IN) jacks 42 AUDIO (L/R)/VIDEO OUT jacks # 5T40301A [E]p06-12 10 3/1/05, 10:15 Front panel Illustration of controls See the page in for details.
Introduction Identification of MW20F11 Cassette loading slot 33 TIMER REC indicator 40 Remote sensor 12 Disc tray 44 PHONES jack 24 AUDIO (L/R)/VIDEO IN (LINE IN 2) jacks 42 REW (Rewind) button 34 STOP/EJECT button 33 PLAY button ... jack 16 17 AUDIO (L/R)/VIDEO IN (LINE 1 IN) jacks 42 AUDIO (L/R)/VIDEO OUT jacks # 5T40301A [E]p06-12 10 3/1/05, 10:15 Front panel Illustration of controls See the page in for details.

Owners Manual
Page 11
Introduction Remote control The instructions in for details. buttons 23 AUDIO SELECT button 32 51 MUTE button 24 TRK + button 35 DVD MENU button 50 ENTER button 18 ... 48 SPEED button 38 RETURN button 53 EJECT button 33 *DVD MENU button Use the DVD MENU button to display the menu included on the remote control. See the page in this manual describe the function on many DVD video discs. DVD button 44 TV/VCR button 19 Direct channel selection buttons...
Introduction Remote control The instructions in for details. buttons 23 AUDIO SELECT button 32 51 MUTE button 24 TRK + button 35 DVD MENU button 50 ENTER button 18 ... 48 SPEED button 38 RETURN button 53 EJECT button 33 *DVD MENU button Use the DVD MENU button to display the menu included on the remote control. See the page in this manual describe the function on many DVD video discs. DVD button 44 TV/VCR button 19 Direct channel selection buttons...

Owners Manual
Page 12
...the environmental aspects of battery disposal. • Do not mix different battery types or combine used batteries with new ones. • If the remote control does not operate correctly, or if the operating range becomes reduced, replace both batteries with new ones. • If the batteries are also ...VCR or DVD) using TV/VCR or DVD. • Tap CH or to move through the channels one channel at the remote sensor and press control buttons to operate. • Operate the remote control within 30° angle on -screen menu system. • You can directly access specific channels using the...
...the environmental aspects of battery disposal. • Do not mix different battery types or combine used batteries with new ones. • If the remote control does not operate correctly, or if the operating range becomes reduced, replace both batteries with new ones. • If the batteries are also ...VCR or DVD) using TV/VCR or DVD. • Tap CH or to move through the channels one channel at the remote sensor and press control buttons to operate. • Operate the remote control within 30° angle on -screen menu system. • You can directly access specific channels using the...

Owners Manual
Page 19
... clock may affect the player's operation. Notes: • If the unit does not operate properly, or No key operation (by the unit and/or the remote control): Static electricity, etc., may not function properly if the reception condition is not good. TV/VCR POWER DISPLAY /// MENU Basic setup Auto clock setting To...
... clock may affect the player's operation. Notes: • If the unit does not operate properly, or No key operation (by the unit and/or the remote control): Static electricity, etc., may not function properly if the reception condition is not good. TV/VCR POWER DISPLAY /// MENU Basic setup Auto clock setting To...
Owners Manual
Page 24
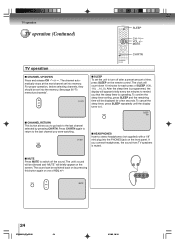
.... If you that the sleep timer is muted. ■ MUTE Press MUTE to turn off the sound. The clock will be switched back on the remote control. MUTE 24 5T40301A [E]p22-26 24 3/1/05, 10:16 TV operation TV operation (Continued) SLEEP CH / VOL +/- Press CH RTN again to return to the...
.... If you that the sleep timer is muted. ■ MUTE Press MUTE to turn off the sound. The clock will be switched back on the remote control. MUTE 24 5T40301A [E]p22-26 24 3/1/05, 10:16 TV operation TV operation (Continued) SLEEP CH / VOL +/- Press CH RTN again to return to the...

Owners Manual
Page 33
... is automatically inserted. Loading Push the center of adhesive tape. Insert the cassette tape with a screwdriver. Unloading 1 Press STOP/EJECT on the front panel or remote control. 2 Remove the cassette tape. Playback (VCR) Loading and unloading a cassette tape Use only video cassette tapes marked . Notes: • Always eject the tape when not...
... is automatically inserted. Loading Push the center of adhesive tape. Insert the cassette tape with a screwdriver. Unloading 1 Press STOP/EJECT on the front panel or remote control. 2 Remove the cassette tape. Playback (VCR) Loading and unloading a cassette tape Use only video cassette tapes marked . Notes: • Always eject the tape when not...

Owners Manual
Page 40
..., channel and tape speed as in timer allows automatic unattended recording of up to select the TV/VCR mode. • Load a cassette tape with the remote control. The TIMER REC indicator will go out. dicator is automatically started. Then press ENTER. TIMER REC To cancel timer recording, press the button again and...
..., channel and tape speed as in timer allows automatic unattended recording of up to select the TV/VCR mode. • Load a cassette tape with the remote control. The TIMER REC indicator will go out. dicator is automatically started. Then press ENTER. TIMER REC To cancel timer recording, press the button again and...

Owners Manual
Page 44
...; If you need to set "Starting setup" 18 . • When connecting to other equipment, turn power off. 1 Press POWER on the unit or on the remote control to turn on the TV screen, if the disc has a menu feature. Press C/D or B/A to OR "Reading" and then playback commences. Note: If the unit...
...; If you need to set "Starting setup" 18 . • When connecting to other equipment, turn power off. 1 Press POWER on the unit or on the remote control to turn on the TV screen, if the disc has a menu feature. Press C/D or B/A to OR "Reading" and then playback commences. Note: If the unit...

Owners Manual
Page 45
... while the PBC is completed. • There may not be a slight delay between you remove the disc. VCD : You can use this case, check your remote control once the movie is on these discs include a lot of a movie is loaded, "Incorrect Disc", "Region Code Error" or "Parental Error" will appear on the...
... while the PBC is completed. • There may not be a slight delay between you remove the disc. VCD : You can use this case, check your remote control once the movie is on these discs include a lot of a movie is loaded, "Incorrect Disc", "Region Code Error" or "Parental Error" will appear on the...
Owners Manual
Page 57
... If each setup (pages 55~57) has been completed, the unit can change the parental level Password ---- Notes: • Depending on the remote control. Press OPEN/CLOSE to close the disc tray. Press OPEN/CLOSE again to open the disc tray. 2. Parental Off /0Ð9/Enter/Cancel/Setup/Return... DVD software can be more severe as the level number is changed unless you enter the correct pass word. 4) Press OPEN/CLOSE to activate Parental control setting. (See "Temporary disabling of rating level by DVD disc" on page 58.) 1) Press C or D to select "Password". 2) Press Number buttons...
... If each setup (pages 55~57) has been completed, the unit can change the parental level Password ---- Notes: • Depending on the remote control. Press OPEN/CLOSE to close the disc tray. Press OPEN/CLOSE again to open the disc tray. 2. Parental Off /0Ð9/Enter/Cancel/Setup/Return... DVD software can be more severe as the level number is changed unless you enter the correct pass word. 4) Press OPEN/CLOSE to activate Parental control setting. (See "Temporary disabling of rating level by DVD disc" on page 58.) 1) Press C or D to select "Password". 2) Press Number buttons...
Owners Manual
Page 61
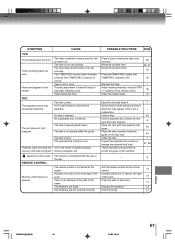
... Place a piece of picture distortion may prevent a proper progress of the contents. 7 - 44 8 44 44 7 57, 58 - - 8 Aim the remote control at the sensor. Adjust tracking manually using the TRK 35 +/- Place the disc correctly inside the guide on the screen. Timer recording does not work... Insert correctly. 12 Others 5T40301A [E]p59-63 61 3/1/05, 10:19 61 Reset the present time. It is not set correctly. REMOTE CONTROL Remote control does not operate. Some times a small amount of adhesive tape over the hole. The recording start/end time is in the mode of...
... Place a piece of picture distortion may prevent a proper progress of the contents. 7 - 44 8 44 44 7 57, 58 - - 8 Aim the remote control at the sensor. Adjust tracking manually using the TRK 35 +/- Place the disc correctly inside the guide on the screen. Timer recording does not work... Insert correctly. 12 Others 5T40301A [E]p59-63 61 3/1/05, 10:19 61 Reset the present time. It is not set correctly. REMOTE CONTROL Remote control does not operate. Some times a small amount of adhesive tape over the hole. The recording start/end time is in the mode of...

Owners Manual
Page 63
Specifications MW20F11 MW24F11 General Power supply AC 120 V 60 Hz Power consumption Operation: 110 W 135 W Stand by: 4 W Picture tube 20 in. (508 mm) diagonal* 24 in the...dBm, 50 kΩ, negative sync., pin jack (L/R) x 2 Audio output -8 dBm, 1 kΩ, negative sync., pin jack (L/R) x 1 Audio output 0.5 V (p-p), 75 Ω, pin jack x 1 (DIGITAL COAXIAL) Supplied accessories Remote control (WC-SB1 1 Batteries (R03/AAA 2 300-75 Ω matching transformer 1 * Screen size is approximate. • This model complies with the above specifications. • Designs and...
Specifications MW20F11 MW24F11 General Power supply AC 120 V 60 Hz Power consumption Operation: 110 W 135 W Stand by: 4 W Picture tube 20 in. (508 mm) diagonal* 24 in the...dBm, 50 kΩ, negative sync., pin jack (L/R) x 2 Audio output -8 dBm, 1 kΩ, negative sync., pin jack (L/R) x 1 Audio output 0.5 V (p-p), 75 Ω, pin jack x 1 (DIGITAL COAXIAL) Supplied accessories Remote control (WC-SB1 1 Batteries (R03/AAA 2 300-75 Ω matching transformer 1 * Screen size is approximate. • This model complies with the above specifications. • Designs and...


