

Owners Manual
Page 2
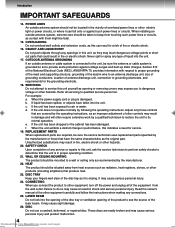
... triangle is encouraged to try to correct the interference by turning the equipment off and on, the user is intended to alert the user to Part 15 of important operating and maintenance (servicing) instructions in a residential installation. Consult the dealer or an experienced radio/TV technician for a Class B digital device, pursuant to the presence of the FCC Rules. DO...
... triangle is encouraged to try to correct the interference by turning the equipment off and on, the user is intended to alert the user to Part 15 of important operating and maintenance (servicing) instructions in a residential installation. Consult the dealer or an experienced radio/TV technician for a Class B digital device, pursuant to the presence of the FCC Rules. DO...
Owners Manual
Page 4
... the power-supply cord or plug is in a risk of the product to other hazards. 20. f. CONNECTING When you to dangerous voltage or other controls may expose you connect the product to see the source of overhead power lines or other electric light or power circuits, or where it is connected to its normal operation. b. d. REPLACEMENT PARTS When replacement parts are required, be mounted to a wall or ceiling...
... the power-supply cord or plug is in a risk of the product to other hazards. 20. f. CONNECTING When you to dangerous voltage or other controls may expose you connect the product to see the source of overhead power lines or other electric light or power circuits, or where it is connected to its normal operation. b. d. REPLACEMENT PARTS When replacement parts are required, be mounted to a wall or ceiling...
Owners Manual
Page 5
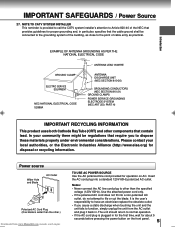
... NEC-NATIONAL ELECTRICAL CODE S2898A ANTENNA LEAD IN WIRE ANTENNA DISCHARGE UNIT (NEC SECTION 810-20) GROUNDING CONDUCTORS (NEC SECTION 810-21) GROUND CLAMPS POWER SERVICE GROUNDING ELECTRODE SYSTEM (NEC ART 250, PART H) IMPORTANT RECYCLING INFORMATION This product uses both Cathode Ray Tube (CRT) and other components that provides guidelines for about 5 seconds before pressing the power button on AC...
... NEC-NATIONAL ELECTRICAL CODE S2898A ANTENNA LEAD IN WIRE ANTENNA DISCHARGE UNIT (NEC SECTION 810-20) GROUNDING CONDUCTORS (NEC SECTION 810-21) GROUND CLAMPS POWER SERVICE GROUNDING ELECTRODE SYSTEM (NEC ART 250, PART H) IMPORTANT RECYCLING INFORMATION This product uses both Cathode Ray Tube (CRT) and other components that provides guidelines for about 5 seconds before pressing the power button on AC...

Owners Manual
Page 9
... screen/ Setting on screen display 57 Dynamic Range Control 58 Parental control setting 59 To change the parental level 60 Temporary disabling of rating level by DVD disc 61 Others Before calling service personnel 62 Reception disturbances 64 Language code list 65 Specifications 66 Limited warranty 67 Recording (VCR) Recording a TV program 40 One-touch Timer Recording (OTR 42 Timer recording 43 Other functions (VCR) Setting the surround sound/ Setting the stable sound 45 Second Audio Program (SAP...
... screen/ Setting on screen display 57 Dynamic Range Control 58 Parental control setting 59 To change the parental level 60 Temporary disabling of rating level by DVD disc 61 Others Before calling service personnel 62 Reception disturbances 64 Language code list 65 Specifications 66 Limited warranty 67 Recording (VCR) Recording a TV program 40 One-touch Timer Recording (OTR 42 Timer recording 43 Other functions (VCR) Setting the surround sound/ Setting the stable sound 45 Second Audio Program (SAP...

Owners Manual
Page 12
... COUNTER RESET button 38 ANGLE button 55 SP/SLP button 40 RETURN button 56 MENU button 19 SETUP button 56 Direction buttons 19 (// / ) CANCEL button 22 CLEAR button 53 TV/VCR DVD POWER 123 CHANNEL 456 789 DISPLAY 0 MUTE VOLUME SLEEP AUDIO CHANNEL CLOSED SELECT RETURN CAPTION TIMER REC SKIP REC SKIP SLOW PLAY REV FWD CM SKIP/JUMP STOP PAUSE/STILL COUNTER ZERO SP/SLP RESET RETURN INPUT SELECT RETURN MENU ANGLE SUBTITLE ZOOM PROGRAM D.TRACKING SETUP REPEAT A-B TOP MENU ENTER TRK + CANCEL CLEAR DVD MENU...
... COUNTER RESET button 38 ANGLE button 55 SP/SLP button 40 RETURN button 56 MENU button 19 SETUP button 56 Direction buttons 19 (// / ) CANCEL button 22 CLEAR button 53 TV/VCR DVD POWER 123 CHANNEL 456 789 DISPLAY 0 MUTE VOLUME SLEEP AUDIO CHANNEL CLOSED SELECT RETURN CAPTION TIMER REC SKIP REC SKIP SLOW PLAY REV FWD CM SKIP/JUMP STOP PAUSE/STILL COUNTER ZERO SP/SLP RESET RETURN INPUT SELECT RETURN MENU ANGLE SUBTITLE ZOOM PROGRAM D.TRACKING SETUP REPEAT A-B TOP MENU ENTER TRK + CANCEL CLEAR DVD MENU...

Owners Manual
Page 16
.../OTR TIMER REC OPEN/CLOSE VOLUME SKIP STOP PLAY SKIP POWER To AUDIO (L/R)/VIDEO IN (LINE IN 2) To AUDIO (L/R)/VIDEO OUT Audio/Video cable (not supplied) (yellow) (white) (red) OR TV GAME Connecting to an audio system Connect the unit to the owner's manual of the connected equipment as well. • If you connect or disconnect the unit's power cord. Connecting a camcorder or a TV game Select "LINE 2" using the INPUT SELECT button. VHF/UHF OUT PUT VIDEO DIGITAL AUDIO COAXIAL L AUDIO R LINE 1 IN VIDEO L(MONO) AUDIO R To ANALOG AUDIO...
.../OTR TIMER REC OPEN/CLOSE VOLUME SKIP STOP PLAY SKIP POWER To AUDIO (L/R)/VIDEO IN (LINE IN 2) To AUDIO (L/R)/VIDEO OUT Audio/Video cable (not supplied) (yellow) (white) (red) OR TV GAME Connecting to an audio system Connect the unit to the owner's manual of the connected equipment as well. • If you connect or disconnect the unit's power cord. Connecting a camcorder or a TV game Select "LINE 2" using the INPUT SELECT button. VHF/UHF OUT PUT VIDEO DIGITAL AUDIO COAXIAL L AUDIO R LINE 1 IN VIDEO L(MONO) AUDIO R To ANALOG AUDIO...

Owners Manual
Page 17
... To COAXIAL type digital audio input 75 Ω coaxial cable VHF/UHF OUT PUT VIDEO DIGITAL AUDIO COAXIAL L AUDIO R LINE 1 IN VIDEO L(MONO) AUDIO R Downloaded from the rear speakers will obtain the full benefit of Pro Logic from the same DVD movies that amplifier's owner's manual and set the amplifier so you can obtain the full benefit of Dolby Pro Logic Surround by connecting the unit to a 6 channel amplifier equipped...
... To COAXIAL type digital audio input 75 Ω coaxial cable VHF/UHF OUT PUT VIDEO DIGITAL AUDIO COAXIAL L AUDIO R LINE 1 IN VIDEO L(MONO) AUDIO R Downloaded from the rear speakers will obtain the full benefit of Pro Logic from the same DVD movies that amplifier's owner's manual and set the amplifier so you can obtain the full benefit of Dolby Pro Logic Surround by connecting the unit to a 6 channel amplifier equipped...

Owners Manual
Page 18
... unit's power cord. Connecting to an amplifier equipped with a digital audio input 2 channel digital stereo You can enjoy motion picture and live concert DVD video discs with dynamic realistic sound by connecting an amplifier equipped with a digital audio input and speaker system (right and left front speakers). Otherwise, the speakers may be damaged by a sudden high volume sound. • Turn off the power and unplug all of the equipment from the analog stereo jacks. To...
... unit's power cord. Connecting to an amplifier equipped with a digital audio input 2 channel digital stereo You can enjoy motion picture and live concert DVD video discs with dynamic realistic sound by connecting an amplifier equipped with a digital audio input and speaker system (right and left front speakers). Otherwise, the speakers may be damaged by a sudden high volume sound. • Turn off the power and unplug all of the equipment from the analog stereo jacks. To...
Owners Manual
Page 20
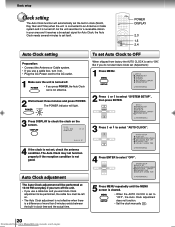
... use a cable box and you press POWER, the Auto Clock set to the AC outlet. 1 Make sure the unit is turned off . The Auto Clock may not function properly if the reception condition is cleared. ENTER SYSTEM SETUP CLOCK SET LANGUAGE/IDIOMA/LANGUE AUTO CLOCK ON OFF STANDARD TIME DAYLIGHT SAVING TIME 〈 / /ENTER/MENU〉 5 Press MENU repeatedly until the MENU screen is not good. MENU SETUP M E N U TIMER REC SET...
... use a cable box and you press POWER, the Auto Clock set to the AC outlet. 1 Make sure the unit is turned off . The Auto Clock may not function properly if the reception condition is cleared. ENTER SYSTEM SETUP CLOCK SET LANGUAGE/IDIOMA/LANGUE AUTO CLOCK ON OFF STANDARD TIME DAYLIGHT SAVING TIME 〈 / /ENTER/MENU〉 5 Press MENU repeatedly until the MENU screen is not good. MENU SETUP M E N U TIMER REC SET...

Owners Manual
Page 25
.... CLOSED CAPTION TV operation Closed Captions Press this case, adjust the antenna for editing. • When Captions are changed . Words in italics or underlined describe titles, words in English or another language. For television programs broadcasting with Closed Captions, look in effect until it will display text on a VCR with the Closed Captioned signal. This television has the capability to switch between normal TV and the two closed caption modes (captions and full screen text). The Closed Captioned...
.... CLOSED CAPTION TV operation Closed Captions Press this case, adjust the antenna for editing. • When Captions are changed . Words in italics or underlined describe titles, words in English or another language. For television programs broadcasting with Closed Captions, look in effect until it will display text on a VCR with the Closed Captioned signal. This television has the capability to switch between normal TV and the two closed caption modes (captions and full screen text). The Closed Captioned...

Owners Manual
Page 28
... Parental guidance 14 years old and above 17 years old and above • When you select TV-Y7, TV-PG, TV-14 or TV-MA, press the DISPLAY button to select "TV RATING", then press ENTER. TV SETUP V-CHIP SET ON/OFF TIMER PICTURE ENTER AUDIO SURROUND ON OFF STABLE SOUND ON OFF SAP ON OFF 〈 / /ENTER/MENU〉 3 Enter the password (4 digits) using the Number buttons...
... Parental guidance 14 years old and above 17 years old and above • When you select TV-Y7, TV-PG, TV-14 or TV-MA, press the DISPLAY button to select "TV RATING", then press ENTER. TV SETUP V-CHIP SET ON/OFF TIMER PICTURE ENTER AUDIO SURROUND ON OFF STABLE SOUND ON OFF SAP ON OFF 〈 / /ENTER/MENU〉 3 Enter the password (4 digits) using the Number buttons...
Owners Manual
Page 33
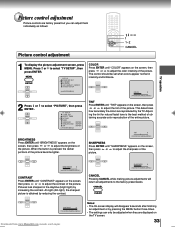
Picture control adjustment Picture controls are factory preset but you can only be set when colors appear normal in the daytime (bright light) by reducing the contrast. ENTER to select "PICTURE", then press TV SETUP V-CHIP SET ON/OFF TIMER PICTURE AUDIO SURROUND ON OFF STABLE SOUND ON OFF SAP ON OFF 〈 / /ENTER/MENU〉 BRIGHTNESS Press ENTER until "BRIGHTNESS" appears on the screen, then press or to adjust the tint...
Picture control adjustment Picture controls are factory preset but you can only be set when colors appear normal in the daytime (bright light) by reducing the contrast. ENTER to select "PICTURE", then press TV SETUP V-CHIP SET ON/OFF TIMER PICTURE AUDIO SURROUND ON OFF STABLE SOUND ON OFF SAP ON OFF 〈 / /ENTER/MENU〉 BRIGHTNESS Press ENTER until "BRIGHTNESS" appears on the screen, then press or to adjust the tint...
Owners Manual
Page 34
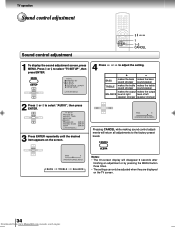
... Notes: • The On-screen display will return all adjustments to select "AUDIO", then press TV SETUP V-CHIP SET ON/OFF TIMER PICTURE AUDIO SURROUND ON OFF STABLE SOUND ON OFF SAP ON OFF 〈 / /ENTER/MENU〉 3 Press ENTER repeatedly until the desired item appears on the TV screen. 34 Downloaded from www.Manualslib.com manuals search engine ENTER to the factory preset levels. BASS makes...
... Notes: • The On-screen display will return all adjustments to select "AUDIO", then press TV SETUP V-CHIP SET ON/OFF TIMER PICTURE AUDIO SURROUND ON OFF STABLE SOUND ON OFF SAP ON OFF 〈 / /ENTER/MENU〉 3 Press ENTER repeatedly until the desired item appears on the TV screen. 34 Downloaded from www.Manualslib.com manuals search engine ENTER to the factory preset levels. BASS makes...

Owners Manual
Page 43
.../VCR 2-3,5 6 1 1-3,5 CANCEL Timer recording Recording (VCR) Preparation: • Press TV/VCR to correct the digits while setting, press the CANCEL button until the number of the second program blinks, then press ENTER. Press or to set the clock (see pages 20-22) and reprogram any timer recordings. • If you cannot select "TIMER REC". "L1" or "L2" will light. Downloaded from external source set the timer for 23rd day, channel...
.../VCR 2-3,5 6 1 1-3,5 CANCEL Timer recording Recording (VCR) Preparation: • Press TV/VCR to correct the digits while setting, press the CANCEL button until the number of the second program blinks, then press ENTER. Press or to set the clock (see pages 20-22) and reprogram any timer recordings. • If you cannot select "TIMER REC". "L1" or "L2" will light. Downloaded from external source set the timer for 23rd day, channel...

Owners Manual
Page 46
... functions (VCR) Second Audio Program (SAP)/ Stereo recording and playback AUDIO SELECT 1-2 1-2 1-2 Second Audio Program (SAP) Stereo recording and playback Your unit is cleared. AUDIO SELECT Output selection When viewing an MTS stereo TV program, or playing a prerecorded VHS Hi-Fi stereo videotape, press AUDIO SELECT to a VHS Hi-Fi video tape or MTS broadcast through the VHF/UHF jack (Audio/Video cord not connected), the sound will be transmitted over both TV speakers. STEREO SAP SAP OR...
... functions (VCR) Second Audio Program (SAP)/ Stereo recording and playback AUDIO SELECT 1-2 1-2 1-2 Second Audio Program (SAP) Stereo recording and playback Your unit is cleared. AUDIO SELECT Output selection When viewing an MTS stereo TV program, or playing a prerecorded VHS Hi-Fi stereo videotape, press AUDIO SELECT to a VHS Hi-Fi video tape or MTS broadcast through the VHF/UHF jack (Audio/Video cord not connected), the sound will be transmitted over both TV speakers. STEREO SAP SAP OR...

Owners Manual
Page 47
.... REC PAUSE/STILL To VIDEO OUT Audio/Video cable (not supplied) Recording VCR To AUDIO (R) OUT To AUDIO (L) OUT VHF/UHF OUT PUT VIDEO DIGITAL AUDIO COAXIAL L AUDIO R LINE 1 IN VIDEO L(MONO) AUDIO R Connection with second video recorder • Select "LINE1" on step 2. AUDIO PHONES VIDEO L/MONO R REW STOP/EJECT PLAY FF REC/OTR CHANNEL LINE IN 2 POWER REC/OTR TIMER REC OPEN/CLOSE VOLUME SKIP STOP PLAY SKIP POWER Illustration of copyright owners and be contrary to...
.... REC PAUSE/STILL To VIDEO OUT Audio/Video cable (not supplied) Recording VCR To AUDIO (R) OUT To AUDIO (L) OUT VHF/UHF OUT PUT VIDEO DIGITAL AUDIO COAXIAL L AUDIO R LINE 1 IN VIDEO L(MONO) AUDIO R Connection with second video recorder • Select "LINE1" on step 2. AUDIO PHONES VIDEO L/MONO R REW STOP/EJECT PLAY FF REC/OTR CHANNEL LINE IN 2 POWER REC/OTR TIMER REC OPEN/CLOSE VOLUME SKIP STOP PLAY SKIP POWER Illustration of copyright owners and be contrary to...

Owners Manual
Page 53
... A-B during playback or stop mode. Audio CD/Video CD *Program menu Use number buttons (0-9) to star t Program playback. Program 1 5 8:29 2 8 8:54 3 3 7:31 4 __ Total 3 0:24:54 /Enter/0 9/Cancel/Play/PlayMode On screen display Operation → All: ↓ Track: ↓ Off: ↓ Random Play: ↓ *Program: ↓ (Status display): Repeats entire disc. Repeats the current track. Resumes normal playback. • During stop mode, PLAY MODE key is displayed. Play- REPEAT A-B back stops at...
... A-B during playback or stop mode. Audio CD/Video CD *Program menu Use number buttons (0-9) to star t Program playback. Program 1 5 8:29 2 8 8:54 3 3 7:31 4 __ Total 3 0:24:54 /Enter/0 9/Cancel/Play/PlayMode On screen display Operation → All: ↓ Track: ↓ Off: ↓ Random Play: ↓ *Program: ↓ (Status display): Repeats entire disc. Repeats the current track. Resumes normal playback. • During stop mode, PLAY MODE key is displayed. Play- REPEAT A-B back stops at...
Owners Manual
Page 62
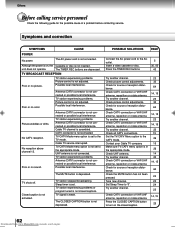
... of a problem before contacting service. Poor or no sound. Poor or no color. TV/CATV Mode menu option is not closed caption. 14, 15 25 62 Downloaded from www.Manualslib.com manuals search engine Possible local interference. The MUTE button is not adjusted. Press the TIMER REC buttons. 5 35, 50 43 Try another channel. Check CATV connection or VHF/UHF antenna, reposition or rotate antenna. Check CATV connection or...
... of a problem before contacting service. Poor or no sound. Poor or no color. TV/CATV Mode menu option is not closed caption. 14, 15 25 62 Downloaded from www.Manualslib.com manuals search engine Possible local interference. The MUTE button is not adjusted. Press the TIMER REC buttons. 5 35, 50 43 Try another channel. Check CATV connection or VHF/UHF antenna, reposition or rotate antenna. Check CATV connection or...
Owners Manual
Page 67
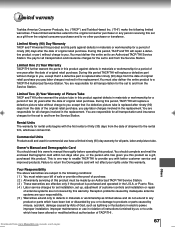
... an Authorized TACP/THI Service Station. ( 3 ) These warranties are responsible for the set up, adjustment of customer controls and installation or repair of instructions furnished by you or to damage to you. Owner's Manual and Demographic Card You should complete and mail the enclosed Demographic card within ten days after ninety (90) days from the Service Station. Downloaded from the date of...
... an Authorized TACP/THI Service Station. ( 3 ) These warranties are responsible for the set up, adjustment of customer controls and installation or repair of instructions furnished by you or to damage to you. Owner's Manual and Demographic Card You should complete and mail the enclosed Demographic card within ten days after ninety (90) days from the Service Station. Downloaded from the date of...
Owners Manual
Page 68
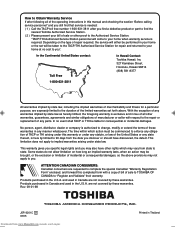
... home when warranty service is exclusive and in lieu of all of repair required, the service will be liable for repair and returned to your home or the set forth above provisions may be commenced to you ". In no event shall TACP or THI be taken to you . Some states do not allow limitation on the type of the operating instructions...
... home when warranty service is exclusive and in lieu of all of repair required, the service will be liable for repair and returned to your home or the set forth above provisions may be commenced to you ". In no event shall TACP or THI be taken to you . Some states do not allow limitation on the type of the operating instructions...


