

Owners Manual
Page 2
... operating and maintenance (servicing) instructions in a particular installation. Increase the separation between the equipment and receiver. - Consult the dealer or an experienced radio/TV technician for a Class B digital device, pursuant to which can radiate radio frequency energy and. REFER SERVICING TO QUALIFIED SERVICE PERSONNEL. Reorient or relocate the receiving antenna. - A The exclamation point within the products enclosure that to Part...
... operating and maintenance (servicing) instructions in a particular installation. Increase the separation between the equipment and receiver. - Consult the dealer or an experienced radio/TV technician for a Class B digital device, pursuant to which can radiate radio frequency energy and. REFER SERVICING TO QUALIFIED SERVICE PERSONNEL. Reorient or relocate the receiving antenna. - A The exclamation point within the products enclosure that to Part...
Owners Manual
Page 5
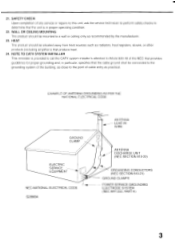
...CODE GROUND CLAMP ELECTRIC SERVICE EQUIPMENT NEC-NATIONAL ELECTRICAL CODE S2898A ANTENNA -- LEAD IN WIRE ANTENNA DISCHARGE UNIT (NEC SECTION 810-20) GROUNDING CONDUCTORS (NEC SECTION 810-21) GROUND CLAMPS POWER SERVICE GROUNDING ELECTRODE SYSTEM (NEC ART 250, PART H) 3 HEAT The product should be situated away from heat sources such as practical. WALL OR CEILING MOUNTING... that the cable ground shall be connected to the grounding system of the building, as close to the point of any service or repairs to this unit, ask the service technician to perform safety checks to a wall or ceiling ...
...CODE GROUND CLAMP ELECTRIC SERVICE EQUIPMENT NEC-NATIONAL ELECTRICAL CODE S2898A ANTENNA -- LEAD IN WIRE ANTENNA DISCHARGE UNIT (NEC SECTION 810-20) GROUNDING CONDUCTORS (NEC SECTION 810-21) GROUND CLAMPS POWER SERVICE GROUNDING ELECTRODE SYSTEM (NEC ART 250, PART H) 3 HEAT The product should be situated away from heat sources such as practical. WALL OR CEILING MOUNTING... that the cable ground shall be connected to the grounding system of the building, as close to the point of any service or repairs to this unit, ask the service technician to perform safety checks to a wall or ceiling ...
Owners Manual
Page 6
... all available channels for perfect reception with an immediate start. Auto Clock Set - Picture Adjustments Using The Remote Control - TINT and SHARPNESS. Automatic Playback/Rewind-Stop-Eject - Programmable TV Sleep Timer - Automatic Repeat Play System - AudioNideo Input/Output Jacks - Real Time Tape Counter With Zero Return - On-Screen 3 Language Display - You can select one of up to 8 TV programs within 1 month. Frequency Synthesized Tuner - Closed Caption Decoder With Full Text Mode - It is...
... all available channels for perfect reception with an immediate start. Auto Clock Set - Picture Adjustments Using The Remote Control - TINT and SHARPNESS. Automatic Playback/Rewind-Stop-Eject - Programmable TV Sleep Timer - Automatic Repeat Play System - AudioNideo Input/Output Jacks - Real Time Tape Counter With Zero Return - On-Screen 3 Language Display - You can select one of up to 8 TV programs within 1 month. Frequency Synthesized Tuner - Closed Caption Decoder With Full Text Mode - It is...

Owners Manual
Page 10
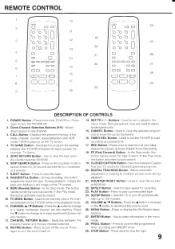
... volume of the sound. 10. REC Button - Switches the program for viewing or recording. 11. AUDIO/VIDEO IN Jacks - Audio and video signal cables from the antenna or Cable TV service to select a channel for viewing between the TVNCR and external input sources. amplifier or VCR. 20. In the Stop mode. this jack. 18. This lights when the TIMER REC button is recording. 6. PHONES Jack - Press to this button activates reverse search. 5. PLAY Button - for private listening. 9. To insert or remove a video tape. 2. TIMER...
... volume of the sound. 10. REC Button - Switches the program for viewing or recording. 11. AUDIO/VIDEO IN Jacks - Audio and video signal cables from the antenna or Cable TV service to select a channel for viewing between the TVNCR and external input sources. amplifier or VCR. 20. In the Stop mode. this jack. 18. This lights when the TIMER REC button is recording. 6. PHONES Jack - Press to this button activates reverse search. 5. PLAY Button - for private listening. 9. To insert or remove a video tape. 2. TIMER...
Owners Manual
Page 11
.... 9 Switches the program for example. for viewing between the TV VCR and external input sources. Use to stop the tape when the counter reaches 00:00:00. 6. Switches between the present channel and the last channel selected. 13. COUNTER RESET Button - Press to adjust tracking manually. 15. TV GAME Button - ZERO RETURN Button - CHANNEL • / V Buttons - SET/TR + / - they are used to play a prerecorded tape. 24. Used to set into memory. 12. In the Stop mode. PLAY Button...
.... 9 Switches the program for example. for viewing between the TV VCR and external input sources. Use to stop the tape when the counter reaches 00:00:00. 6. Switches between the present channel and the last channel selected. 13. COUNTER RESET Button - Press to adjust tracking manually. 15. TV GAME Button - ZERO RETURN Button - CHANNEL • / V Buttons - SET/TR + / - they are used to play a prerecorded tape. 24. Used to set into memory. 12. In the Stop mode. PLAY Button...
Owners Manual
Page 15
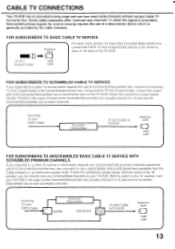
... viewing requires the use of the Converter/Descrambler box (usually channel 3 or 4) and use a signal Splitter and an A/B Switch box (available from the Cable company or an electronics supply store). Follow the connections shown below . With the switch in the "B" position, you can tune most cable channels without using a Cable TV Converter box. Set the TV/VCR to the output channel of the Converter/Descrambler box to the Antenna Jack on the TV/VCR. CABLE TV CONNECTIONS...
... viewing requires the use of the Converter/Descrambler box (usually channel 3 or 4) and use a signal Splitter and an A/B Switch box (available from the Cable company or an electronics supply store). Follow the connections shown below . With the switch in the "B" position, you can tune most cable channels without using a Cable TV Converter box. Set the TV/VCR to the output channel of the Converter/Descrambler box to the Antenna Jack on the TV/VCR. CABLE TV CONNECTIONS...
Owners Manual
Page 17
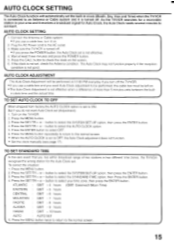
..., Year and Time) when the TV/VCR is connected to set . Plug the AC Power cord to the normal screen. The Auto Clock may not function properly if the reception condition is not set to be performed, the cable box must be performed at least three minutes and press the POWER button. 5. Press the MENU button twice to return to the AC outlet. 3. AUTO CLOCK SETTING C1. Wait...
..., Year and Time) when the TV/VCR is connected to set . Plug the AC Power cord to the normal screen. The Auto Clock may not function properly if the reception condition is not set to be performed, the cable box must be performed at least three minutes and press the POWER button. 5. Press the MENU button twice to return to the AC outlet. 3. AUTO CLOCK SETTING C1. Wait...

Owners Manual
Page 18
... clock is not set, Daylight Saving Time setting is not available. • When there is no Daylight Saving Time in your area, always select OFF position in the signal) NON OFF AUTO - NOTES: • When shipped from factory, the DAYLIGHT SAVING TIME option is cleared. - SET/TR + ENTER Press the SET/TR + or - Press the SET/TR + or - button to select the, DAYLIGHT SAVING...
... clock is not set, Daylight Saving Time setting is not available. • When there is no Daylight Saving Time in your area, always select OFF position in the signal) NON OFF AUTO - NOTES: • When shipped from factory, the DAYLIGHT SAVING TIME option is cleared. - SET/TR + ENTER Press the SET/TR + or - Press the SET/TR + or - button to select the, DAYLIGHT SAVING...

Owners Manual
Page 19
... SETUP I STAND'S'S() TIME • DAYLIGHT SAVING ' MF + ENTFMMENU o 6O0,6o 6 6 O O O O 000 4 O El Press the SET/TR + or - I SYSTEM SET-UP • + ENTER MENU :TOTEM SET-UP -I :LOCK SET VLANGUAGE(IDIOMM.N.GuE (AUTO CLOCK PON UFF I CH SET-UP s•AJTO REPEAT ON PUFF - In this case. Press the SET/TR + or - button to select the \ CLOCK SET option, then press the ENTER button. - button to select the SYSTEM SET...
... SETUP I STAND'S'S() TIME • DAYLIGHT SAVING ' MF + ENTFMMENU o 6O0,6o 6 6 O O O O 000 4 O El Press the SET/TR + or - I SYSTEM SET-UP • + ENTER MENU :TOTEM SET-UP -I :LOCK SET VLANGUAGE(IDIOMM.N.GuE (AUTO CLOCK PON UFF I CH SET-UP s•AJTO REPEAT ON PUFF - In this case. Press the SET/TR + or - button to select the \ CLOCK SET option, then press the ENTER button. - button to select the SYSTEM SET...

Owners Manual
Page 20
... SELECT CATV CHANNELS: 1-9 Press "0" twice. POWER Adjust the volume level by pressing the VOLUME A or V button. When the TV/CATV menu option is selected, the sound will automatically be muted. • If a station being viewed stops broadcasting, the TV will be instantly selected by using two buttons. (for two seconds.) For channels 10 and above. press "0", then "2". press the 2 digits in order. all channels can be selected as needed...
... SELECT CATV CHANNELS: 1-9 Press "0" twice. POWER Adjust the volume level by pressing the VOLUME A or V button. When the TV/CATV menu option is selected, the sound will automatically be muted. • If a station being viewed stops broadcasting, the TV will be instantly selected by using two buttons. (for two seconds.) For channels 10 and above. press "0", then "2". press the 2 digits in order. all channels can be selected as needed...

Owners Manual
Page 22
... activating the Closed Captioned Decoder, there will be recorded and played back on the screen. • Closed Captioned TV programs can be momentarily displayed. CLOSED CAPTION CHANNEL RETURN CAPTION CH' NOTES: • If using an indoor antenna or if TV reception is operating. To confirm the sleep timer setting, press the SLEEP button and the remaining time will be a short delay before the Closed Captioned text appears on a VCR with the Closed Captioned text intact. Closed captioning will...
... activating the Closed Captioned Decoder, there will be recorded and played back on the screen. • Closed Captioned TV programs can be momentarily displayed. CLOSED CAPTION CHANNEL RETURN CAPTION CH' NOTES: • If using an indoor antenna or if TV reception is operating. To confirm the sleep timer setting, press the SLEEP button and the remaining time will be a short delay before the Closed Captioned text appears on a VCR with the Closed Captioned text intact. Closed captioning will...
Owners Manual
Page 23
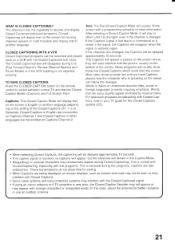
... and display Closed Captioned television programs. Closed Captioning will display text on the screen in foreign languages or words requiring emphasis. TO VIEW CLOSED CAPTIONS Press the CLOSED CAPTION button on the screen for better reception or use an outdoor antenna. 21 Captions: This Closed Caption Mode will display text on the remote control to a commercial or a break in another language (depending on the setting of the screen. If the Captions signal is not adjusted properly. If the channels are being displayed...
... and display Closed Captioned television programs. Closed Captioning will display text on the screen in foreign languages or words requiring emphasis. TO VIEW CLOSED CAPTIONS Press the CLOSED CAPTION button on the screen for better reception or use an outdoor antenna. 21 Captions: This Closed Caption Mode will display text on the remote control to a commercial or a break in another language (depending on the setting of the screen. If the Captions signal is not adjusted properly. If the channels are being displayed...

Owners Manual
Page 27
... MENU button. 2 Press the SET/TR + or - SETTTR + L-7.) ENTER 4 5 Enter the password (4 digits) using the Direct Channel Selection buttons (0-9), then press the ENTER button. 3 Enter the same password again for adults, etc. SETTING THE V-CHIP An age limitation can be set the V-Chip. • To avoid forgetting the password, write it down and keep in a safe place. 25 button to see and hear violent scenes or pictures...
... MENU button. 2 Press the SET/TR + or - SETTTR + L-7.) ENTER 4 5 Enter the password (4 digits) using the Direct Channel Selection buttons (0-9), then press the ENTER button. 3 Enter the same password again for adults, etc. SETTING THE V-CHIP An age limitation can be set the V-Chip. • To avoid forgetting the password, write it down and keep in a safe place. 25 button to see and hear violent scenes or pictures...

Owners Manual
Page 30
... . button to select the V-CHIP SET, then press the ENTER button. 4. button to normal screen. Press the SET/TR + or - NN V-CHIP SET v -CHIP ON I TV RATING TV PG I MOVIE RATING PG 13 I V-CHIP SET 'iON;OE, TIMER FICIJR17 • ENTER MENU V -CHIP SET FASSWOR • C 9:EVERECANCELMENU • 5. Enter the Password using the Direct Channel Selection button (0-9), then press the ENTER button. 7. SETTING THE V-CHIP (CONTINUED) TO CHANGE PASSWORD 1. NEC SET - Press the MENU button...
... . button to select the V-CHIP SET, then press the ENTER button. 4. button to normal screen. Press the SET/TR + or - NN V-CHIP SET v -CHIP ON I TV RATING TV PG I MOVIE RATING PG 13 I V-CHIP SET 'iON;OE, TIMER FICIJR17 • ENTER MENU V -CHIP SET FASSWOR • C 9:EVERECANCELMENU • 5. Enter the Password using the Direct Channel Selection button (0-9), then press the ENTER button. 7. SETTING THE V-CHIP (CONTINUED) TO CHANGE PASSWORD 1. NEC SET - Press the MENU button...

Owners Manual
Page 45
... the power plug, all programmed recording setting and time display will be used while the TIMER REC indicator is automatically started. TIMER REC TIMER REC -0 - / To cancel timer recording, press the button again and TIMER REC indicator will light. channel and tape speed as in step 4. - NOTES: • The VCR section cannot be lost upon resumption of the second program blinks, then press the ENTER button. In this case, reset...
... the power plug, all programmed recording setting and time display will be used while the TIMER REC indicator is automatically started. TIMER REC TIMER REC -0 - / To cancel timer recording, press the button again and TIMER REC indicator will light. channel and tape speed as in step 4. - NOTES: • The VCR section cannot be lost upon resumption of the second program blinks, then press the ENTER button. In this case, reset...

Owners Manual
Page 50
..., you can also use the rear AUDIO/VIDEO IN Jacks. Make all connections before turning on both units 1 simultaneously to begin the duplicating process. Press the TV GAME button twice to copyright laws. 48 A typical camcorder dubbing hookup is recommended that the tape speed be set to the SP mode on the remote control of copyright owners and be contrary to select AUDIO/VIDEO input position. then press...
..., you can also use the rear AUDIO/VIDEO IN Jacks. Make all connections before turning on both units 1 simultaneously to begin the duplicating process. Press the TV GAME button twice to copyright laws. 48 A typical camcorder dubbing hookup is recommended that the tape speed be set to the SP mode on the remote control of copyright owners and be contrary to select AUDIO/VIDEO input position. then press...
Owners Manual
Page 53
... TV signal is not set correctly. Set Sleep Taller to closed captions. Reset the present time. 34 15 17 Timer recording does not work . - Tracking adjustment is not set correctly. Clean the video heads. 52 REMOTE CONTROL Remote control does not operate. The remote control is old or worn I correctly. Place a piece of automatic tracking circuit. Reset the start /end time is weak_ POSSIBLE SOLUTIONS Tune new channel. buttons on the screen. The TIMER REC button has...
... TV signal is not set correctly. Set Sleep Taller to closed captions. Reset the present time. 34 15 17 Timer recording does not work . - Tracking adjustment is not set correctly. Clean the video heads. 52 REMOTE CONTROL Remote control does not operate. The remote control is old or worn I correctly. Place a piece of automatic tracking circuit. Reset the start /end time is weak_ POSSIBLE SOLUTIONS Tune new channel. buttons on the screen. The TIMER REC button has...

Owners Manual
Page 55
...°C (-4°F to 140'F) 5°C to 40°C (41°F to change without notice. 53 Specifications are subject to 104°F) 86 Watts W 19-1/4" x D 18-3/16" x H 18-7/8" 48.6 lbs Accessories: Remote Control Batteries (2 x AAA) 300-75 ohm Matching Transformer ♦ ! SPECIFICATIONS TELEVISION Picture Tube: Tuner Type: Receiving Channels: Antenna Input: Speaker: Audio Output Power: MV13K2 13" (measured diagonally) Quartz PLL Frequency Synthesized VHF 2-13 UHF 14...
...°C (-4°F to 140'F) 5°C to 40°C (41°F to change without notice. 53 Specifications are subject to 104°F) 86 Watts W 19-1/4" x D 18-3/16" x H 18-7/8" 48.6 lbs Accessories: Remote Control Batteries (2 x AAA) 300-75 ohm Matching Transformer ♦ ! SPECIFICATIONS TELEVISION Picture Tube: Tuner Type: Receiving Channels: Antenna Input: Speaker: Audio Output Power: MV13K2 13" (measured diagonally) Quartz PLL Frequency Synthesized VHF 2-13 UHF 14...
Owners Manual
Page 56
... replacement. LIMITED WARRANTY TOSHIBA COMBINATION TELEVISION AND VIDEO CASSETTE RECORDER Toshiba America Consumer Products, Inc. ("TACP") and Toshiba Hawaii Inc. ("THI") make the following conditions: ( 1 ) You must retain your bill of sale or provide other purchaser or transferee Limited Ninety (90) Day Warranty TACP and THI warrant this set up, adjustment of customer controls and installation or repair of antenna systems are responsible for set installation, set...
... replacement. LIMITED WARRANTY TOSHIBA COMBINATION TELEVISION AND VIDEO CASSETTE RECORDER Toshiba America Consumer Products, Inc. ("TACP") and Toshiba Hawaii Inc. ("THI") make the following conditions: ( 1 ) You must retain your bill of sale or provide other purchaser or transferee Limited Ninety (90) Day Warranty TACP and THI warrant this set up, adjustment of customer controls and installation or repair of antenna systems are responsible for set installation, set...
Owners Manual
Page 57
... the foregoing warranty is needed; ( 1 ) In the U.S.A. you find the nearest Toshiba Authorized Service Station. ( 2 ) Arrange for ward this completed form with respect to the repair or replacement of any parts. With the exception of any warranties implied by these warranties. The time within which may... free number 1-800-631-3811 after following all of the operating instructions in this manual and checking the section "BEFORE CALLING SERVICE PERSONNEL". is authorized to change, modify or extend the terms of these warranties. 55 This limitation does not apply to implied warranties ...
... the foregoing warranty is needed; ( 1 ) In the U.S.A. you find the nearest Toshiba Authorized Service Station. ( 2 ) Arrange for ward this completed form with respect to the repair or replacement of any parts. With the exception of any warranties implied by these warranties. The time within which may... free number 1-800-631-3811 after following all of the operating instructions in this manual and checking the section "BEFORE CALLING SERVICE PERSONNEL". is authorized to change, modify or extend the terms of these warranties. 55 This limitation does not apply to implied warranties ...


