
Owners Manual
Page 1
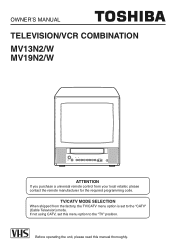
Before operating the unit, please read this menu option to the "CATV" (Cable Television) mode. OWNER'S MANUAL TELEVISION/VCR COMBINATION MV13N2/W MV19N2/W ATTENTION If you purchase a universal remote control from the factory, the TV/CATV menu option is set this manual thoroughly. TV/CATV MODE SELECTION When shipped from your local retailer, please contact the remote manufacturer for the required programming code. If not using CATV, set to the "TV" position.
Before operating the unit, please read this menu option to the "CATV" (Cable Television) mode. OWNER'S MANUAL TELEVISION/VCR COMBINATION MV13N2/W MV19N2/W ATTENTION If you purchase a universal remote control from the factory, the TV/CATV menu option is set this manual thoroughly. TV/CATV MODE SELECTION When shipped from your local retailer, please contact the remote manufacturer for the required programming code. If not using CATV, set to the "TV" position.

Owners Manual
Page 3
... to the respective pages on this unit from the type of power supply to . 4. This too, is a safety feature. IMPORTANT SAFEGUARDS 1. CLEANING Unplug this Owner's Manual for cleaning the exterior cabinet only. 6. ards. 7. ACCESSORIES PORTABLE CART WARNING (symbol provided by placing the unit on the unit and in the cabinet back...
... to the respective pages on this unit from the type of power supply to . 4. This too, is a safety feature. IMPORTANT SAFEGUARDS 1. CLEANING Unplug this Owner's Manual for cleaning the exterior cabinet only. 6. ards. 7. ACCESSORIES PORTABLE CART WARNING (symbol provided by placing the unit on the unit and in the cabinet back...
Owners Manual
Page 7
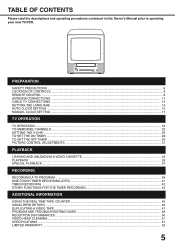
... TV/VCR. PREPARATION SAFETY PRECAUTIONS ...6 LOCATION OF CONTROLS ...8 REMOTE CONTROL ...9 ANTENNA CONNECTIONS ...11 CABLE TV CONNECTIONS ...13 SETTING THE LANGUAGE ...14 AUTO CLOCK SETTING ...15 MANUAL CLOCK SETTING ...17 TV OPERATION TV OPERATION ...18 TO MEMORIZE CHANNELS ...22 SETTING THE V-CHIP ...25 TO SET THE ON TIMER ...29 TO SET THE...
... TV/VCR. PREPARATION SAFETY PRECAUTIONS ...6 LOCATION OF CONTROLS ...8 REMOTE CONTROL ...9 ANTENNA CONNECTIONS ...11 CABLE TV CONNECTIONS ...13 SETTING THE LANGUAGE ...14 AUTO CLOCK SETTING ...15 MANUAL CLOCK SETTING ...17 TV OPERATION TV OPERATION ...18 TO MEMORIZE CHANNELS ...22 SETTING THE V-CHIP ...25 TO SET THE ON TIMER ...29 TO SET THE...
Owners Manual
Page 11
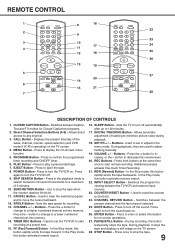
... - Press again to turn the TV/VCR off the sound. Use to start normal recording. Used to clear the selected program and to adjust tracking manually. 19. TIMER REC Buttons - Allows automatic adjustment of 3 minutes. 10. During playback, they are used to move the cursor backward. 12. button to confirm the...
... - Press again to turn the TV/VCR off the sound. Use to start normal recording. Used to clear the selected program and to adjust tracking manually. 19. TIMER REC Buttons - Allows automatic adjustment of 3 minutes. 10. During playback, they are used to move the cursor backward. 12. button to confirm the...

Owners Manual
Page 17
... TO OFF When shipped from factory the AUTO CLOCK option is set to OFF, the Auto Clock adjustment does not function. • Set the clock manually (see page 17). Press the MENU button repeatedly to return to the normal screen. • When the AUTO CLOCK is set to ON. To correct...
... TO OFF When shipped from factory the AUTO CLOCK option is set to OFF, the Auto Clock adjustment does not function. • Set the clock manually (see page 17). Press the MENU button repeatedly to return to the normal screen. • When the AUTO CLOCK is set to ON. To correct...
Owners Manual
Page 18
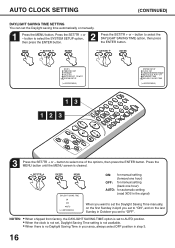
...button. REC CH- SET/TR ENTER MENU DAYLIGHT SAVING TIME ON OFF AUTO 〈+/-/ENTER/MENU〉 ON: for manual setting (forward one hour) OFF: for manual setting (back one of the options, then press the ENTER button. AUTO CLOCK SETTING (CONTINUED) DAYLIGHT SAVING TIME SETTING... ENTER button. button to select one hour) AUTO: for automatic setting (read XDS in the signal) When you want to set the Daylight Saving Time manually, on the last Sunday in step 3. 16 SET/TR + CH+ CACPLTOIOSNED 1 SLEEP 4 2 7 CALL 5 8 6 0 9 TRADCIGKIITNAGL ENTER CANCEL RCEHTUARNNNEL SP/SLP...
...button. REC CH- SET/TR ENTER MENU DAYLIGHT SAVING TIME ON OFF AUTO 〈+/-/ENTER/MENU〉 ON: for manual setting (forward one hour) OFF: for manual setting (back one of the options, then press the ENTER button. AUTO CLOCK SETTING (CONTINUED) DAYLIGHT SAVING TIME SETTING... ENTER button. button to select one hour) AUTO: for automatic setting (read XDS in the signal) When you want to set the Daylight Saving Time manually, on the last Sunday in step 3. 16 SET/TR + CH+ CACPLTOIOSNED 1 SLEEP 4 2 7 CALL 5 8 6 0 9 TRADCIGKIITNAGL ENTER CANCEL RCEHTUARNNNEL SP/SLP...
Owners Manual
Page 19
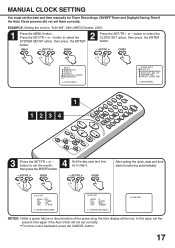
...;+/Ð/ENTER/MENUñ 1 2 3 4 EJECT 1 PROGRAM VOL- button to "8:30 AM", 29th (WED) October, 2003. 1 Press the MENU button. button. MANUAL CLOCK SETTING You must set the date and time manually for Timer Recordings, ON/OFF Timer and Daylight Saving Time if the Auto Clock process did not set the month, 4 Set...
...;+/Ð/ENTER/MENUñ 1 2 3 4 EJECT 1 PROGRAM VOL- button to "8:30 AM", 29th (WED) October, 2003. 1 Press the MENU button. button. MANUAL CLOCK SETTING You must set the date and time manually for Timer Recordings, ON/OFF Timer and Daylight Saving Time if the Auto Clock process did not set the month, 4 Set...

Owners Manual
Page 38
Release to return to obtain the best possible picture. "DIGITAL TRACK" will appear for 4 seconds on the screen. SET/TR DIGITAL TRACKING MANUAL TRACK Ð + DIGITAL TRACK 36 " " will appear on the screen. Press the FF (Fast Forward) button in the Stop mode. If noise bars appear ...Tracking system automatically adjusts the tracking to the REW or FF mode. REC CH- button to see the tape during playback, adjust the tracking manually as follows: • Press the SET/TR + or - The backward or forward visual search picture will appear for 4 seconds on the screen...
Release to return to obtain the best possible picture. "DIGITAL TRACK" will appear for 4 seconds on the screen. SET/TR DIGITAL TRACKING MANUAL TRACK Ð + DIGITAL TRACK 36 " " will appear on the screen. Press the FF (Fast Forward) button in the Stop mode. If noise bars appear ...Tracking system automatically adjusts the tracking to the REW or FF mode. REC CH- button to see the tape during playback, adjust the tracking manually as follows: • Press the SET/TR + or - The backward or forward visual search picture will appear for 4 seconds on the screen...
Owners Manual
Page 51
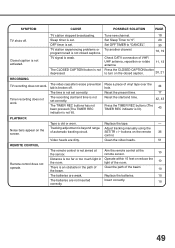
... over the hole. 34 The time is weak. The TIMER REC buttons has not been pressed (The TIMER REC indicator is beyond range Adjust tracking manually using the of VHF/ UHF antenna, reposition or rotate antenna. 11, 13 Press the CLOSED CAPTION button to turn on the remote 36 control. Tracking...
... over the hole. 34 The time is weak. The TIMER REC buttons has not been pressed (The TIMER REC indicator is beyond range Adjust tracking manually using the of VHF/ UHF antenna, reposition or rotate antenna. 11, 13 Press the CLOSED CAPTION button to turn on the remote 36 control. Tracking...
Owners Manual
Page 54
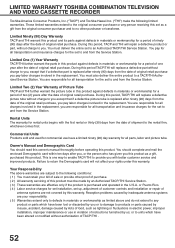
... Two (2) Year Warranty of Picture Tube TACP and THI further warrant the picture tube in this product. You should read this owner's manual thoroughly before operating this product against defects in the replacement. or Puerto Rico. ( 4 ) Labor service charges for set installation, set... to you or to damage to and from the Service Station. LIMITED WARRANTY TOSHIBA COMBINATION TELEVISION AND VIDEO CASSETTE RECORDER Toshiba America Consumer Products, Inc. ("TACP") and Toshiba Hawaii Inc. ("THI") make the following conditions: ( 1 ) You must also deliver the ...
... Two (2) Year Warranty of Picture Tube TACP and THI further warrant the picture tube in this product. You should read this owner's manual thoroughly before operating this product against defects in the replacement. or Puerto Rico. ( 4 ) Labor service charges for set installation, set... to you or to damage to and from the Service Station. LIMITED WARRANTY TOSHIBA COMBINATION TELEVISION AND VIDEO CASSETTE RECORDER Toshiba America Consumer Products, Inc. ("TACP") and Toshiba Hawaii Inc. ("THI") make the following conditions: ( 1 ) You must also deliver the ...
Owners Manual
Page 55
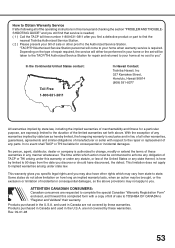
... and you may vary from the date you " In the Continental United States contact: Toll Free 1-800-631-3811 In Hawaii Contact: Toshiba Hawaii, Inc 327 Kamakee Street, Honolulu, Hawaii 96814 (808) 591-8377 All warranties implied by these warranties. and used in your home...to the repair or replacement of these warranties in any obligation of TACP or THI arising under this manual and checking the section "PROBLEM AND TROUBLESHOOTING GUIDE" and you still find the nearest Toshiba Authorized Service Station. ( 2 ) Please present your bill of incidental or consequential damages, so the ...
... and you may vary from the date you " In the Continental United States contact: Toll Free 1-800-631-3811 In Hawaii Contact: Toshiba Hawaii, Inc 327 Kamakee Street, Honolulu, Hawaii 96814 (808) 591-8377 All warranties implied by these warranties. and used in your home...to the repair or replacement of these warranties in any obligation of TACP or THI arising under this manual and checking the section "PROBLEM AND TROUBLESHOOTING GUIDE" and you still find the nearest Toshiba Authorized Service Station. ( 2 ) Please present your bill of incidental or consequential damages, so the ...


