
User Guide
Page 5
... REGARD TO ANY OF THE FOREGOING. IN NO EVENT SHALL TOSHIBA BE LIABLE FOR ANY INCIDENTAL, CONSEQUENTIAL, SPECIAL, OR EXEMPLARY DAMAGES, WHETHER BASED ON TORT, CONTRACT OR OTHERWISE, ARISING OUT OF OR IN CONNECTION WITH THIS MANUAL OR ANY OTHER INFORMATION CONTAINED HEREIN OR THE USE THEREOF. ...conforme à la norme NMB-003 du Canada. Notice The information contained in this manual, including but not limited to any product specifications, is subject to property is provided in order to use the gigabeat® correctly to prevent injury to yourself or others, or damage to change without notice...
... REGARD TO ANY OF THE FOREGOING. IN NO EVENT SHALL TOSHIBA BE LIABLE FOR ANY INCIDENTAL, CONSEQUENTIAL, SPECIAL, OR EXEMPLARY DAMAGES, WHETHER BASED ON TORT, CONTRACT OR OTHERWISE, ARISING OUT OF OR IN CONNECTION WITH THIS MANUAL OR ANY OTHER INFORMATION CONTAINED HEREIN OR THE USE THEREOF. ...conforme à la norme NMB-003 du Canada. Notice The information contained in this manual, including but not limited to any product specifications, is subject to property is provided in order to use the gigabeat® correctly to prevent injury to yourself or others, or damage to change without notice...

User Guide
Page 13
...or petroleum products, as follows: Indicates an imminently hazardous situation which , if not avoided, could result in personal injuries, damage to your gigabeat® To clean the exterior, wipe it well again. Place the cloth in the diluted solution, wring the cloth well, then soak the...and wring it gently with your unit. Caring for your equipment, or loss of data. 12 Introduction Safety icons Safety icons This manual contains safety instructions that could result in death or serious injury. These safety cautions have been classified according to the seriousness of ...
...or petroleum products, as follows: Indicates an imminently hazardous situation which , if not avoided, could result in personal injuries, damage to your gigabeat® To clean the exterior, wipe it well again. Place the cloth in the diluted solution, wring the cloth well, then soak the...and wring it gently with your unit. Caring for your equipment, or loss of data. 12 Introduction Safety icons Safety icons This manual contains safety instructions that could result in death or serious injury. These safety cautions have been classified according to the seriousness of ...

User Guide
Page 29
... files to be added to synchronize (transfer) the files manually. 28 Music and Your gigabeat® Transferring audio files on your device window opens. (Sample Illustration) Specifying a device 5 Click Cancel. The Name your computer to the gigabeat® 3 Click Next. You can select automatic synchronization later... by clicking Finish at the bottom of the Sync tab in Windows Media® Player 11 and clicking Set up Sync for gigabeat T Series. However, this point. If you have already performed a search, step 3 and 4 are searched from the computer. You ...
... files to be added to synchronize (transfer) the files manually. 28 Music and Your gigabeat® Transferring audio files on your device window opens. (Sample Illustration) Specifying a device 5 Click Cancel. The Name your computer to the gigabeat® 3 Click Next. You can select automatic synchronization later... by clicking Finish at the bottom of the Sync tab in Windows Media® Player 11 and clicking Set up Sync for gigabeat T Series. However, this point. If you have already performed a search, step 3 and 4 are searched from the computer. You ...
User Guide
Page 32
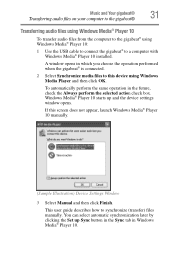
...in which you choose the operation performed when the gigabeat® is connected. 2 Select Synchronize media files to this screen does not appear, launch Windows Media® Player 10 manually. (Sample Illustration) Device Settings Window 3 Select Manual and then click Finish. You can select automatic synchronization... then click OK. If this device using Windows Media® Player 10: 1 Use the USB cable to connect the gigabeat® to synchronize (transfer) files manually. Windows Media® Player 10 starts up Sync button in the Sync tab in Windows Media® Player 10. A...
...in which you choose the operation performed when the gigabeat® is connected. 2 Select Synchronize media files to this screen does not appear, launch Windows Media® Player 10 manually. (Sample Illustration) Device Settings Window 3 Select Manual and then click Finish. You can select automatic synchronization... then click OK. If this device using Windows Media® Player 10: 1 Use the USB cable to connect the gigabeat® to synchronize (transfer) files manually. Windows Media® Player 10 starts up Sync button in the Sync tab in Windows Media® Player 10. A...

User Guide
Page 33
... tree on the left. 6 Right-click on the selected file and select Add to the synchronization list on your computer to the gigabeat® (Sample Illustration) Select Manual option 4 Select the files you want to transfer (synchronize) in the Windows Media® Player 10 Library tab. 5 Select All... Music from the list in the shortcut menu that appears. 32 Music and Your gigabeat® Transferring audio files on the right side of ...
... tree on the left. 6 Right-click on the selected file and select Add to the synchronization list on your computer to the gigabeat® (Sample Illustration) Select Manual option 4 Select the files you want to transfer (synchronize) in the Windows Media® Player 10 Library tab. 5 Select All... Music from the list in the shortcut menu that appears. 32 Music and Your gigabeat® Transferring audio files on the right side of ...

User Guide
Page 56
If you want to this screen every time the gigabeat® is connected from now on, select the Always perform the selected action check box. Windows Media® Player 11 will start Windows Media® Player 11 without showing this device using Windows Media Player, and click OK. Photos and your gigabeat® Transferring photos to the gigabeat® 55 2 Select Syn digital media files to automatically start and the device setting screen will appear. If this screen does not appear, launch Window Media® Player 11 manually. (Sample Image) Synchronizing digital media files
If you want to this screen every time the gigabeat® is connected from now on, select the Always perform the selected action check box. Windows Media® Player 11 will start Windows Media® Player 11 without showing this device using Windows Media Player, and click OK. Photos and your gigabeat® Transferring photos to the gigabeat® 55 2 Select Syn digital media files to automatically start and the device setting screen will appear. If this screen does not appear, launch Window Media® Player 11 manually. (Sample Image) Synchronizing digital media files

User Guide
Page 57
...; is already done. You can set automatic synchronization by clicking below the Sync tab, selecting gigabeat T Series, selecting Set up Sync, and setting desired items. 4 Click the Sync tab in Windows Media® Player 11, click the Select a category button, ... screen will not be displayed if the above setting is connected to your gigabeat® Transferring photos to the gigabeat®. Proceed to step 4. (Sample Image) Device Setup screen Clicking the Finish button will let you transfer data manually to the gigabeat® 3 Click Finish or Cancel. 56 Photos and your computer, the ...
...; is already done. You can set automatic synchronization by clicking below the Sync tab, selecting gigabeat T Series, selecting Set up Sync, and setting desired items. 4 Click the Sync tab in Windows Media® Player 11, click the Select a category button, ... screen will not be displayed if the above setting is connected to your gigabeat® Transferring photos to the gigabeat®. Proceed to step 4. (Sample Image) Device Setup screen Clicking the Finish button will let you transfer data manually to the gigabeat® 3 Click Finish or Cancel. 56 Photos and your computer, the ...

User Guide
Page 78
Clicking the Finish button will let you transfer data manually to the gigabeat®. Video and your computer, the two will be synchronized automatically and data will be displayed if the above setting is connected to your gigabeat® 77 Windows Media® Player 11 will start... synchronization by clicking below the Sync tab, selecting gigabeat T Series selecting Set up Sync, and setting desired items. Every time the gigabeat® is already done. If this screen does not appear, launch Windows Media® Player 11 manually. (Sample Image) Synchronizing digital media files 3 ...
Clicking the Finish button will let you transfer data manually to the gigabeat®. Video and your computer, the two will be synchronized automatically and data will be displayed if the above setting is connected to your gigabeat® 77 Windows Media® Player 11 will start... synchronization by clicking below the Sync tab, selecting gigabeat T Series selecting Set up Sync, and setting desired items. Every time the gigabeat® is already done. If this screen does not appear, launch Windows Media® Player 11 manually. (Sample Image) Synchronizing digital media files 3 ...
User Guide
Page 106
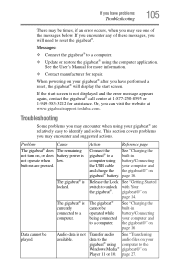
...is not displayed and the error message appears again, contact the gigabeat® call center at www.gigabeatsupport.toshiba.com. Release the Lock See "Getting Started switch to reset the gigabeat®. When powering on gigabeat® battery. Troubleshooting Some problems you may encounter and suggested...250-8595 or 1-949-583-3212 for repair. buttons are relatively easy to a computer. gigabeat®" on , or does battery power is not operate when low. See the User's Manual for more information. ❖ Contact manufacturer for assistance. If the start screen. Problem ...
...is not displayed and the error message appears again, contact the gigabeat® call center at www.gigabeatsupport.toshiba.com. Release the Lock See "Getting Started switch to reset the gigabeat®. When powering on gigabeat® battery. Troubleshooting Some problems you may encounter and suggested...250-8595 or 1-949-583-3212 for repair. buttons are relatively easy to a computer. gigabeat®" on , or does battery power is not operate when low. See the User's Manual for more information. ❖ Contact manufacturer for assistance. If the start screen. Problem ...


