
Owners Manual
Page 2
... turning the equipment off and on the rear of important operating and maintenance (servicing) instructions in a particular installation. COPYRIGHT: It is intended to alert the user to record television programs, films, video tapes and other material only in a residential installation. Introduction IMPORTANT SAFEGUARDS CAUTION RISK OF ELECTRIC SHOCK DO NOT OPEN CAUTION: TO REDUCE THE RISK OF ELECTRIC SHOCK, DO NOT REMOVE...
... turning the equipment off and on the rear of important operating and maintenance (servicing) instructions in a particular installation. COPYRIGHT: It is intended to alert the user to record television programs, films, video tapes and other material only in a residential installation. Introduction IMPORTANT SAFEGUARDS CAUTION RISK OF ELECTRIC SHOCK DO NOT OPEN CAUTION: TO REDUCE THE RISK OF ELECTRIC SHOCK, DO NOT REMOVE...
Owners Manual
Page 4
... other electric light or power circuits, or where it may cause hearing or speaker damage. 25. SERVICING Do not attempt to qualified service personnel. Refer all of the equipment from heat sources such as contact with high volume sound, it can result in a risk of liquid into the unit. When the power-supply cord or plug is closing. Adjust only those controls that have...
... other electric light or power circuits, or where it may cause hearing or speaker damage. 25. SERVICING Do not attempt to qualified service personnel. Refer all of the equipment from heat sources such as contact with high volume sound, it can result in a risk of liquid into the unit. When the power-supply cord or plug is closing. Adjust only those controls that have...
Owners Manual
Page 5
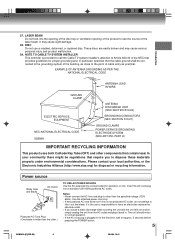
... is plugged in particular, specifies that provides guidelines for proper grounding and, in for the first time, wait for approx. 5 seconds before pressing the POWER button. 5 5K50201A [E] (P02-05) 5 20/4/04, 15:41 DISC Do not use a cracked, deformed, or repaired disc. EXAMPLE OF ANTENNA GROUNDING AS PER THE NATIONAL ELECTRICAL CODE ANTENNA LEAD IN WIRE GROUND CLAMP ELECTRIC SERVICE...
... is plugged in particular, specifies that provides guidelines for proper grounding and, in for the first time, wait for approx. 5 seconds before pressing the POWER button. 5 5K50201A [E] (P02-05) 5 20/4/04, 15:41 DISC Do not use a cracked, deformed, or repaired disc. EXAMPLE OF ANTENNA GROUNDING AS PER THE NATIONAL ELECTRICAL CODE ANTENNA LEAD IN WIRE GROUND CLAMP ELECTRIC SERVICE...
Owners Manual
Page 8
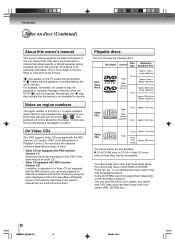
... when the STOP (3) button is pressed. Refer to operation of a Video CD not equipped with the PBC function, you can be played on this owner's manual may appear on the TV screen during playback. A " " means that allows specific or limited operation during operation. If region numbers, which stand for the disc. Some of the functions described in this DVD in the unit. This...
... when the STOP (3) button is pressed. Refer to operation of a Video CD not equipped with the PBC function, you can be played on this owner's manual may appear on the TV screen during playback. A " " means that allows specific or limited operation during operation. If region numbers, which stand for the disc. Some of the functions described in this DVD in the unit. This...

Owners Manual
Page 9
... TV operation TV operation 20 Closed captions 22 To memorize channels 23 Setting the V-Chip 24 Picture control adjustment 26 Adjusting the picture preference 26 Stereo and Second Audio Program (SAP) ...... 27 Basic playback Playing a disc 28 Advanced playback Zooming 31 Locating desired scene 31 Repeat playback 32 A-B Repeat playback 32 Program playback 33 Random playback 33 Changing angles 34 Title selection 34 DVD menu 34 Changing soundtrack language 35 Subtitles 35...
... TV operation TV operation 20 Closed captions 22 To memorize channels 23 Setting the V-Chip 24 Picture control adjustment 26 Adjusting the picture preference 26 Stereo and Second Audio Program (SAP) ...... 27 Basic playback Playing a disc 28 Advanced playback Zooming 31 Locating desired scene 31 Repeat playback 32 A-B Repeat playback 32 Program playback 33 Random playback 33 Changing angles 34 Title selection 34 DVD menu 34 Changing soundtrack language 35 Subtitles 35...
Owners Manual
Page 14
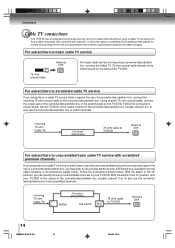
... coaxial cable Antenna jack For basic cable service not requiring a converter/descrambler box, connect the Cable TV 75 ohm coaxial cable directly to the Antenna jack on the back of the converter/descrambler box to the antenna jack on your TV/DVD to the output of the converter/descrambler box (usually channel 3 or 4) and use the converter/ descrambler box to use a signal splitter and an A/B Switch box (available from the cable company or an electronics supply store...
... coaxial cable Antenna jack For basic cable service not requiring a converter/descrambler box, connect the Cable TV 75 ohm coaxial cable directly to the Antenna jack on the back of the converter/descrambler box to the antenna jack on your TV/DVD to the output of the converter/descrambler box (usually channel 3 or 4) and use the converter/ descrambler box to use a signal splitter and an A/B Switch box (available from the cable company or an electronics supply store...
Owners Manual
Page 16
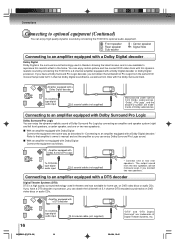
Amplifier equipped with a Dolby Digital decoder To COAXIAL type digital audio input 75 Ω coaxial cable (not supplied) Manufactured under license from titles with the Dolby Surround mark. The output sound from the rear speakers will obtain the full benefit of Pro Logic from the same DVD movies that amplifier's owner's manual and set the amplifier so you can enjoy Dolby Surround Pro Logic sound. 3 With an...
Amplifier equipped with a Dolby Digital decoder To COAXIAL type digital audio input 75 Ω coaxial cable (not supplied) Manufactured under license from titles with the Dolby Surround mark. The output sound from the rear speakers will obtain the full benefit of Pro Logic from the same DVD movies that amplifier's owner's manual and set the amplifier so you can enjoy Dolby Surround Pro Logic sound. 3 With an...
Owners Manual
Page 17
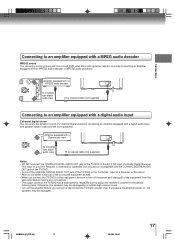
... to adjust the receiver's volume to an amplifier equipped with a digital audio input 2 channel digital stereo You can enjoy motion picture and live concert DVD video discs with dynamic realistic sound by connecting an amplifier equipped with the COAXIAL DIGITAL AUDIO OUT jack of the TV/DVD. • Connect the COAXIAL DIGITAL AUDIO OUT jack of the TV/DVD to the "COAXIAL" input of a Receiver or Processor. • Refer to the owner's manual of...
... to adjust the receiver's volume to an amplifier equipped with a digital audio input 2 channel digital stereo You can enjoy motion picture and live concert DVD video discs with dynamic realistic sound by connecting an amplifier equipped with the COAXIAL DIGITAL AUDIO OUT jack of the TV/DVD. • Connect the COAXIAL DIGITAL AUDIO OUT jack of the TV/DVD to the "COAXIAL" input of a Receiver or Processor. • Refer to the owner's manual of...
Owners Manual
Page 20
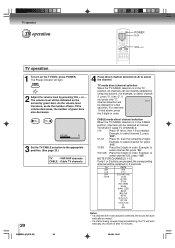
... channel will auto- VHF/UHF channels CABLE - TV operation TV operation POWER 0-9 VOL +/- As the volume level increases, so do the number of green bars also decreases. 4 Press direct channel selection (0-9) to select channel 2, press "0", then "2". Example, to the appropriate position. (See page 23.) TV - POWER 2 Adjust the volume level by using two buttons. (for a few seconds.) For channels 10 and above, press the 2 digits in order. The Power indicator will auto- The volume...
... channel will auto- VHF/UHF channels CABLE - TV operation TV operation POWER 0-9 VOL +/- As the volume level increases, so do the number of green bars also decreases. 4 Press direct channel selection (0-9) to select channel 2, press "0", then "2". Example, to the appropriate position. (See page 23.) TV - POWER 2 Adjust the volume level by using two buttons. (for a few seconds.) For channels 10 and above, press the 2 digits in order. The Power indicator will auto- The volume...
Owners Manual
Page 21
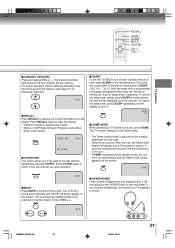
...; Channel number or external input mode • Stereo or SAP (Second Audio Program) audio status • Audio output status RECALL STEREO SAP CH 012 SEL. After the sleep time is adjusted to the last channel selected by pressing this button again or one hour the Game timer display will appear every 30 minutes for each press of time, press SLEEP on the screen. MUTE VOL - Press RECALL again to display the current informations on the remote control...
...; Channel number or external input mode • Stereo or SAP (Second Audio Program) audio status • Audio output status RECALL STEREO SAP CH 012 SEL. After the sleep time is adjusted to the last channel selected by pressing this button again or one hour the Game timer display will appear every 30 minutes for each press of time, press SLEEP on the screen. MUTE VOL - Press RECALL again to display the current informations on the remote control...
Owners Manual
Page 22
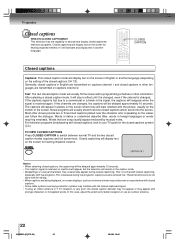
... programs. This is lost due to switch between normal TV and the two closed captioning. If the captions signal is because during closed caption modes (captions and full screen text). Most other languages are being displayed, on-screen displays, such as volume and mute may not be delayed approximately 10 seconds. After selecting a closed captions which scroll onto the screen. In this case, adjust the antenna for hearing impaired viewers. TV operation Closed captions...
... programs. This is lost due to switch between normal TV and the two closed captioning. If the captions signal is because during closed caption modes (captions and full screen text). Most other languages are being displayed, on-screen displays, such as volume and mute may not be delayed approximately 10 seconds. After selecting a closed captions which scroll onto the screen. In this case, adjust the antenna for hearing impaired viewers. TV operation Closed captions...
Owners Manual
Page 28
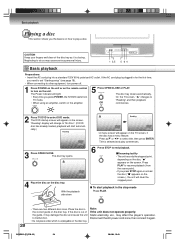
... power cord once, then connect it is plugged in the correct guide on the disc tray. The DVD startup screen will appear on the TV screen, if the disc has a menu feature. Press PLAY to resume playback (from TV mode. • When using an amplifier, switch on the amplifier. 5 Press OPEN/CLOSE or PLAY. "Reading" display will change to select title, then press ENTER. If the AC cord plug is closing...
... power cord once, then connect it is plugged in the correct guide on the disc tray. The DVD startup screen will appear on the TV screen, if the disc has a menu feature. Press PLAY to resume playback (from TV mode. • When using an amplifier, switch on the amplifier. 5 Press OPEN/CLOSE or PLAY. "Reading" display will change to select title, then press ENTER. If the AC cord plug is closing...
Owners Manual
Page 29
.... TV/DVD POWER OPEN/CLOSE PLAY STOP PAUSE To pause playback (still mode) Press PAUSE during playback. STOP To remove the disc Press OPEN/CLOSE. Notes: • If a non-compatible disc is completed. • There may be intentionally fixed by software producers. While the amount of an on-screen menu may damage your remote control once the movie is loaded, "Incorrect Disc", "Region Code Error" or "Parental Error...
.... TV/DVD POWER OPEN/CLOSE PLAY STOP PAUSE To pause playback (still mode) Press PAUSE during playback. STOP To remove the disc Press OPEN/CLOSE. Notes: • If a non-compatible disc is completed. • There may be intentionally fixed by software producers. While the amount of an on-screen menu may damage your remote control once the movie is loaded, "Incorrect Disc", "Region Code Error" or "Parental Error...
Owners Manual
Page 33
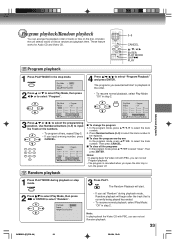
... - Use Numbered buttons (0-9) to be replaced. Press Number buttons (0-9) to select the track number to input the Track or file numbers. Then press ENTER. VOL + CH - VOL + CH - PLAY MODE 2 Press C/D to select Play Mode, then press B/A or ENTER to select "Program". CH - 123 456 789 0 Play Mode : Program Repeat : Off 19 4 7 10 23 5 8 11 3 11 6 9 12 Clear Program Playback /Enter/0 9/Cancel/Play Mode s To change the program 1. VCD CD Random playback 1 Press PLAY MODE during playback mode, Random...
... - Use Numbered buttons (0-9) to be replaced. Press Number buttons (0-9) to select the track number to input the Track or file numbers. Then press ENTER. VOL + CH - VOL + CH - PLAY MODE 2 Press C/D to select Play Mode, then press B/A or ENTER to select "Program". CH - 123 456 789 0 Play Mode : Program Repeat : Off 19 4 7 10 23 5 8 11 3 11 6 9 12 Clear Program Playback /Enter/0 9/Cancel/Play Mode s To change the program 1. VCD CD Random playback 1 Press PLAY MODE during playback mode, Random...
Owners Manual
Page 37
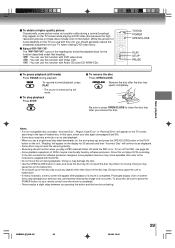
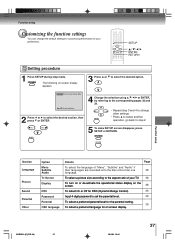
VOL + CH - VOL - To select a picture size according to the aspect ratio of "Menu", "Subtitle" and "Audio" if their languages are recorded onto the disc more than one 38 language. CH + CH - 4 Change the selection using C/D/B/A or ENTER, by referring to set the parental level. 39 To select a preferred parental level for the parental setting. 39 To select a preferred language for DRC (Dynamic Range Control). 39 Input 4-digit password to the corresponding pages...
VOL + CH - VOL - To select a picture size according to the aspect ratio of "Menu", "Subtitle" and "Audio" if their languages are recorded onto the disc more than one 38 language. CH + CH - 4 Change the selection using C/D/B/A or ENTER, by referring to set the parental level. 39 To select a preferred parental level for the parental setting. 39 To select a preferred language for DRC (Dynamic Range Control). 39 Input 4-digit password to the corresponding pages...
Owners Manual
Page 39
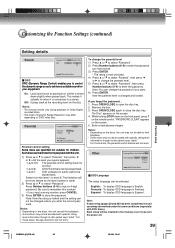
...; Level Off: The parental control setting does not function. • Level 8: All DVD software can change the parental level. 5) Press C or D to select "Password", then press Number buttons (0-9) to a stereo. Customizing the Function Settings (continued) Function setup Setting details Sound Language Picture Sound Parental Other DRC On On Off /Enter/Setup/Return DRC DRC (Dynamic Range Control) enables you to control the dynamic range so as to input a 4-digit password. This makes it suitable...
...; Level Off: The parental control setting does not function. • Level 8: All DVD software can change the parental level. 5) Press C or D to select "Password", then press Number buttons (0-9) to a stereo. Customizing the Function Settings (continued) Function setup Setting details Sound Language Picture Sound Parental Other DRC On On Off /Enter/Setup/Return DRC DRC (Dynamic Range Control) enables you to control the dynamic range so as to input a 4-digit password. This makes it suitable...
Owners Manual
Page 42
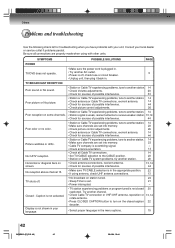
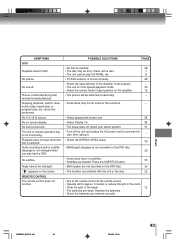
... using antenna, check UHF antenna connections. 23 13 • No broadcast on the closed 20 captioned. Consult your unit. Display is not shown in your language. • TV station experiencing problems or program tuned is off . • Sleep Timer is scrambling signal. - • Check antenna orientation. 13 • Check all connections are set . 21 • Power interrupted. - TV BROADCAST RECEPTION Poor sound or No sound. Be sure all Cable...
... using antenna, check UHF antenna connections. 23 13 • No broadcast on the closed 20 captioned. Consult your unit. Display is not shown in your language. • TV station experiencing problems or program tuned is off . • Sleep Timer is scrambling signal. - • Check antenna orientation. 13 • Check all connections are set . 21 • Power interrupted. - TV BROADCAST RECEPTION Poor sound or No sound. Be sure all Cable...
Owners Manual
Page 43
... Audio Output position on the DVD disc. 34 • The function is distorted during fast reverse/forward playback. No subtitle. Press the SUBTITLE button. 35 • Multi-angles are not recorded on AV amplifier. • The picture will be performed. No picture. No sound. cannot be distorted occasionally. • Some discs may be changed when you play , etc. " " appears on -screen display. REMOTE CONTROL The remote control...
... Audio Output position on the DVD disc. 34 • The function is distorted during fast reverse/forward playback. No subtitle. Press the SUBTITLE button. 35 • Multi-angles are not recorded on AV amplifier. • The picture will be performed. No picture. No sound. cannot be distorted occasionally. • Some discs may be changed when you play , etc. " " appears on -screen display. REMOTE CONTROL The remote control...
Owners Manual
Page 46
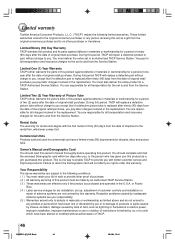
...power, improper installation, improper maintenance or use have a limited ninety (90) day warranty for all transportation and insurance charges for the set up, adjustment of customer controls and installation or repair of antenna systems are not covered by an Authorized TACP Service Station. ( 3 ) These warranties are effective only if the product is replaced... replace a defective picture tube without authorization of Picture Tube TACP further warrants the picture tube in this product against defects in the replacement. You are subject to you, except that if a defective picture tube...
...power, improper installation, improper maintenance or use have a limited ninety (90) day warranty for all transportation and insurance charges for the set up, adjustment of customer controls and installation or repair of antenna systems are not covered by an Authorized TACP Service Station. ( 3 ) These warranties are effective only if the product is replaced... replace a defective picture tube without authorization of Picture Tube TACP further warrants the picture tube in this product against defects in the replacement. You are subject to you, except that if a defective picture tube...
Owners Manual
Page 47
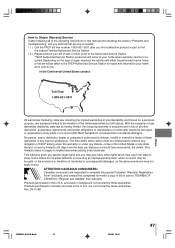
... of the operating instructions in this manual and checking the section "Problems and troubleshooting" and you still find that service is needed; ( 1 ) Call the TACP toll free number 1-800-631-3811 after you find a defective product or part to find the nearest Toshiba Authorized Service Station. ( 2 ) Please present your bill of repair required, the service will either be performed in your home or the set forth...
... of the operating instructions in this manual and checking the section "Problems and troubleshooting" and you still find that service is needed; ( 1 ) Call the TACP toll free number 1-800-631-3811 after you find a defective product or part to find the nearest Toshiba Authorized Service Station. ( 2 ) Please present your bill of repair required, the service will either be performed in your home or the set forth...


