

Owners Manual
Page 7
Contents Before using your unit IMPORTANT SAFEGUARDS 3 Notes on discs 6 Contents 7 Parts and functions 8 Remote control 9 Power source 10 Antenna connections 11 Cable TV connections 12 TV operation Setting the language 13 TV operation 14 Closed captions 16 To memorize ...
Contents Before using your unit IMPORTANT SAFEGUARDS 3 Notes on discs 6 Contents 7 Parts and functions 8 Remote control 9 Power source 10 Antenna connections 11 Cable TV connections 12 TV operation Setting the language 13 TV operation 14 Closed captions 16 To memorize ...

Owners Manual
Page 8
Parts and functions Front Remote sensor AUDIO (L/R)/VIDEO IN jacks (LINE2) POWER button Disc tray Power indicator Rear OPEN/CLOSE button VOLUME UP/DOWN buttons SKIP STOP button PLAY button Headphone jack CHANNEL UP/DOWN buttons AUDIO (L/R)/VIDEO IN jack (LINE1) AC power cord COAXIAL DIGITAL AUDIO OUT jack RF IN jack 8
Parts and functions Front Remote sensor AUDIO (L/R)/VIDEO IN jacks (LINE2) POWER button Disc tray Power indicator Rear OPEN/CLOSE button VOLUME UP/DOWN buttons SKIP STOP button PLAY button Headphone jack CHANNEL UP/DOWN buttons AUDIO (L/R)/VIDEO IN jack (LINE1) AC power cord COAXIAL DIGITAL AUDIO OUT jack RF IN jack 8

Owners Manual
Page 9
Remote control RECALL TV/DVD POWER 1 4 7 SLEEP INPUT SELECT 23 GAME 56 OPEN/CLOSE 89 CLOSED CAPTION MUTE 0 TOP MENU SUBTITLE AUDIO ANGLE SETUP/MENU DVD ...
Remote control RECALL TV/DVD POWER 1 4 7 SLEEP INPUT SELECT 23 GAME 56 OPEN/CLOSE 89 CLOSED CAPTION MUTE 0 TOP MENU SUBTITLE AUDIO ANGLE SETUP/MENU DVD ...

Owners Manual
Page 10
... into a non-polarized AC outlet, do not attempt to the device. 3. It is not to be used for operation on either side of the remote sensor, up to a distance of batteries specified. 2. Alkaline and Carbon-zinc) or old batteries with fresh ones. 4. Use the attached power cord only...the size and type of Approx. 5 meters. Do not try to recharge batteries not intended to be followed when using batteries in this device: 1. Remote control/Power source Inserting Batteries 1 Slide the battery compartment cover in the direction of the arrow. 2 Install two "AAA" batteries (supplied), paying ...
... into a non-polarized AC outlet, do not attempt to the device. 3. It is not to be used for operation on either side of the remote sensor, up to a distance of batteries specified. 2. Alkaline and Carbon-zinc) or old batteries with fresh ones. 4. Use the attached power cord only...the size and type of Approx. 5 meters. Do not try to recharge batteries not intended to be followed when using batteries in this device: 1. Remote control/Power source Inserting Batteries 1 Slide the battery compartment cover in the direction of the arrow. 2 Install two "AAA" batteries (supplied), paying ...

Owners Manual
Page 13
... ESPA„OL FRANCAIS < / / ENTER / MENU NOTES: • If the unit does not operate properly, or No key operation (by the unit and/ or the remote control): Static electricity, etc., may affect the player's operation. Disconnect the AC power cord once, then connect it again. • The TV section has its...
... ESPA„OL FRANCAIS < / / ENTER / MENU NOTES: • If the unit does not operate properly, or No key operation (by the unit and/ or the remote control): Static electricity, etc., may affect the player's operation. Disconnect the AC power cord once, then connect it again. • The TV section has its...

Owners Manual
Page 15
..." will count down 10 minutes for a few seconds. The TV/DVD's sound will be set into the memory. The clock will briefly appear on the remote control. VOL + RETURN CH - ENTER REV SKIP PLAY STOP FWD PLAY MODE SKIP JUMP SLOW PAUSE SLOW REPEAT A-B CHANNEL UP/DOWN Press and release CH...
..." will count down 10 minutes for a few seconds. The TV/DVD's sound will be set into the memory. The clock will briefly appear on the remote control. VOL + RETURN CH - ENTER REV SKIP PLAY STOP FWD PLAY MODE SKIP JUMP SLOW PAUSE SLOW REPEAT A-B CHANNEL UP/DOWN Press and release CH...
Owners Manual
Page 26
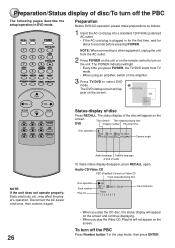
... screen and continue displaying. • When you press POWER, the TV/DVD starts from the AC outlet. 2 Press POWER on the unit or on the remote control to turn on the unit. The POWER indicator will light. • Every time you play the CD disc, the status display will appear on...
... screen and continue displaying. • When you press POWER, the TV/DVD starts from the AC outlet. 2 Press POWER on the unit or on the remote control to turn on the unit. The POWER indicator will light. • Every time you play the CD disc, the status display will appear on...
Owners Manual
Page 27
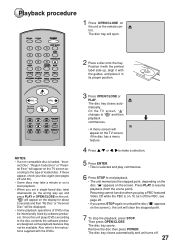
...-compatible disc is on the screen.), the unit will clear the stopped point. 7 To stop the playback, press STOP. " " appears on the unit or the remote control. Press PLAY to end playback. • The unit memorizes the stopped point, depending on the TV screen according to the disc contents the software...
...-compatible disc is on the screen.), the unit will clear the stopped point. 7 To stop the playback, press STOP. " " appears on the unit or the remote control. Press PLAY to end playback. • The unit memorizes the stopped point, depending on the TV screen according to the disc contents the software...
Owners Manual
Page 43
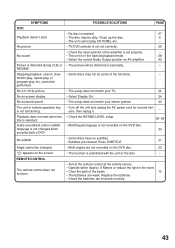
.... Playback does not start . Audio soundtrack and/or subtitle language is not changed . " " appears on -screen display No surround sound The unit or remote operation key is not functioning. POSSIBLE SOLUTIONS • No disc is inserted. • The disc may not do some of the functions. No 4:3 (16:9) ...are not recorded on the DVD disc. 32 • The function is prohibited with the unit or the disc. - • Aim at the remote control at the remote sensor. • Operate within Approx. 5 Meters or reduce the light in the room. • Clear the path of the amplifier is set...
.... Playback does not start . Audio soundtrack and/or subtitle language is not changed . " " appears on -screen display No surround sound The unit or remote operation key is not functioning. POSSIBLE SOLUTIONS • No disc is inserted. • The disc may not do some of the functions. No 4:3 (16:9) ...are not recorded on the DVD disc. 32 • The function is prohibited with the unit or the disc. - • Aim at the remote control at the remote sensor. • Operate within Approx. 5 Meters or reduce the light in the room. • Clear the path of the amplifier is set...


