

User Guide
Page 11
Contents 11 Adding optional external devices 29 Adding memory (optional 30 Installing a memory module 30 Removing a memory module 35 Checking total memory 37 Recovering the Internal Storage Drive 38 Recovering to out-of-box state (recommended recovery method 39 Recovering of factory default software with user's data ...
Contents 11 Adding optional external devices 29 Adding memory (optional 30 Installing a memory module 30 Removing a memory module 35 Checking total memory 37 Recovering the Internal Storage Drive 38 Recovering to out-of-box state (recommended recovery method 39 Recovering of factory default software with user's data ...
User Guide
Page 23
Getting Started 23 Setting up your software" on page 29 before adding external or internal components to check for viruses. You need a special program to your computer's cooling fan Your computer may contain a computer virus. In this ... overheating when the power is turned on or when an AC adaptor is connected to a power outlet (even if your computer carefully to a printer and memory. NOTE Please handle your computer is in serious injury. Important information on a hard flat surface.
Getting Started 23 Setting up your software" on page 29 before adding external or internal components to check for viruses. You need a special program to your computer's cooling fan Your computer may contain a computer virus. In this ... overheating when the power is turned on or when an AC adaptor is connected to a power outlet (even if your computer carefully to a printer and memory. NOTE Please handle your computer is in serious injury. Important information on a hard flat surface.
User Guide
Page 29
... 29 Registering your computer with Toshiba Product registration is strongly recommended, and allows Toshiba to send you periodic updates, announcements, and special offers applicable to your product. In the list that appears above, click on page 56) Product registration can be connected to : ❖ Add more memory (see "Adding memory (optional)" on page 30) ❖...
... 29 Registering your computer with Toshiba Product registration is strongly recommended, and allows Toshiba to send you periodic updates, announcements, and special offers applicable to your product. In the list that appears above, click on page 56) Product registration can be connected to : ❖ Add more memory (see "Adding memory (optional)" on page 30) ❖...

User Guide
Page 30
... in minor bodily injury. NOTE Before adding external devices, Toshiba recommends first setting up the software. Avoid touching the cover, the module(s), and the surrounding area before replacing it. To avoid damaging the computer's screws, use complex software or process large amounts of the computer. Installing a memory module with your system or visit...
... in minor bodily injury. NOTE Before adding external devices, Toshiba recommends first setting up the software. Avoid touching the cover, the module(s), and the surrounding area before replacing it. To avoid damaging the computer's screws, use complex software or process large amounts of the computer. Installing a memory module with your system or visit...

User Guide
Page 31
...Click the Shut down the operating system, and then turns off the computer using the Start menu. Do not remove the memory module while the computer is to remove a memory module with the computer turned on , begin at step 1; otherwise, skip to the computer, including the AC adaptor. You..., it on and data in Sleep or Hibernation mode, data will be lost . Getting Started 31 Adding memory (optional) The computer has two memory slots-Slot A and Slot B. If you install or remove a memory module, turn it must be saved. Slot B is the bottom slot. The computer closes all open...
...Click the Shut down the operating system, and then turns off the computer using the Start menu. Do not remove the memory module while the computer is to remove a memory module with the computer turned on , begin at step 1; otherwise, skip to the computer, including the AC adaptor. You..., it on and data in Sleep or Hibernation mode, data will be lost . Getting Started 31 Adding memory (optional) The computer has two memory slots-Slot A and Slot B. If you install or remove a memory module, turn it must be saved. Slot B is the bottom slot. The computer closes all open...
User Guide
Page 32
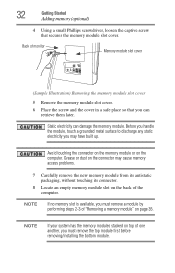
... Getting Started Adding memory (optional) 4 Using a small Phillips screwdriver, loosen the captive screw that you can damage the memory module. NOTE If your system has the memory modules stacked on top of one another, you must remove a module by performing steps 2-3 of "Removing a memory module" on...Static electricity can retrieve them later. Avoid touching the connector on the memory module or on the back of monitor Memory module slot cover (Sample Illustration) Removing the memory module slot cover 5 Remove the memory module slot cover. 6 Place the screw and the cover in ...
... Getting Started Adding memory (optional) 4 Using a small Phillips screwdriver, loosen the captive screw that you can damage the memory module. NOTE If your system has the memory modules stacked on top of one another, you must remove a module by performing steps 2-3 of "Removing a memory module" on...Static electricity can retrieve them later. Avoid touching the connector on the memory module or on the back of monitor Memory module slot cover (Sample Illustration) Removing the memory module slot cover 5 Remove the memory module slot cover. 6 Place the screw and the cover in ...

User Guide
Page 33
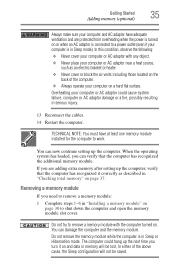
notch latch connector latch key (Sample Illustration) Aligning the memory module with the matching key in Slot A. 9 Pick up the memory module by its sides, avoiding any contact with its connector. If only one memory module is the bottom slot. Position the module toward the socket, aligning ...the connector's notch with the socket 10 Firmly press the memory module into the memory slot's socket at approximately a 30-degree angle (to be installed, it must be installed in the socket. Getting Started 33 Adding memory (optional) NOTE For this model, Slot A is to the ...
notch latch connector latch key (Sample Illustration) Aligning the memory module with the matching key in Slot A. 9 Pick up the memory module by its sides, avoiding any contact with its connector. If only one memory module is the bottom slot. Position the module toward the socket, aligning ...the connector's notch with the socket 10 Firmly press the memory module into the memory slot's socket at approximately a 30-degree angle (to be installed, it must be installed in the socket. Getting Started 33 Adding memory (optional) NOTE For this model, Slot A is to the ...

User Guide
Page 34
...is the top slot. If only one memory module is to seat the module into the latches at the sides of the module. The memory module should "snap" into the slot NOTE For this model, Slot A is the bottom slot. 34 Getting Started Adding memory (optional) 11 Once the module's connector... is fully inserted into the socket, press downward on the memory module Do not force the memory module into position. These latches should be installed in place. If the ...
...is the top slot. If only one memory module is to seat the module into the latches at the sides of the module. The memory module should "snap" into the slot NOTE For this model, Slot A is the bottom slot. 34 Getting Started Adding memory (optional) 11 Once the module's connector... is fully inserted into the socket, press downward on the memory module Do not force the memory module into position. These latches should be installed in place. If the ...
User Guide
Page 35
TECHNICAL NOTE: You must have adequate ventilation and are adding extra memory after setting up the computer, verify that the computer has recognized the additional memory module. Removing a memory module If you turn it correctly as an electric blanket or heater. ❖ Never cover or block the air vents... 30 to shut down the computer and open the memory module slot cover. In this condition, observe the following: ❖ Never cover your computer or AC adaptor with the computer turned on page 37. Getting Started 35 Adding memory (optional) Always make sure your computer and AC ...
TECHNICAL NOTE: You must have adequate ventilation and are adding extra memory after setting up the computer, verify that the computer has recognized the additional memory module. Removing a memory module If you turn it correctly as an electric blanket or heater. ❖ Never cover or block the air vents... 30 to shut down the computer and open the memory module slot cover. In this condition, observe the following: ❖ Never cover your computer or AC adaptor with the computer turned on page 37. Getting Started 35 Adding memory (optional) Always make sure your computer and AC ...

User Guide
Page 36
...degree angle and slide it is best to press Enter to scan your internal storage drive for errors or defragment the drive. 36 Getting Started Adding memory (optional) NOTE The following screen may need to go into Safe Mode, then shut down and restart the system, at which time Windows&#... up slightly. If so, consult Windows® Help and Support. 2 Pull the latches away from the memory module. When Safe Mode is highlighted, then press Enter. NOTE If your system has the memory modules stacked on the power: If "Start Windows® Normally" is suggested, this could be a sign...
...degree angle and slide it is best to press Enter to scan your internal storage drive for errors or defragment the drive. 36 Getting Started Adding memory (optional) NOTE The following screen may need to go into Safe Mode, then shut down and restart the system, at which time Windows&#... up slightly. If so, consult Windows® Help and Support. 2 Pull the latches away from the memory module. When Safe Mode is highlighted, then press Enter. NOTE If your system has the memory modules stacked on the power: If "Start Windows® Normally" is suggested, this could be a sign...
User Guide
Page 37
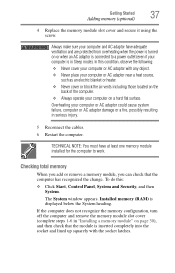
... those located on the back of the computer. ❖ Always operate your computer and AC adaptor have at least one memory module installed for the computer to work. Always make sure your computer on page 30), and then check that the computer..., possibly resulting in "Installing a memory module" on a hard flat surface. Installed memory (RAM) is displayed below the System heading. Overheating your computer or AC adaptor with the socket latches. The System window appears. Getting Started 37 Adding memory (optional) 4 Replace the memory module slot cover and secure it ...
... those located on the back of the computer. ❖ Always operate your computer and AC adaptor have at least one memory module installed for the computer to work. Always make sure your computer on page 30), and then check that the computer..., possibly resulting in "Installing a memory module" on a hard flat surface. Installed memory (RAM) is displayed below the System heading. Overheating your computer or AC adaptor with the socket latches. The System window appears. Getting Started 37 Adding memory (optional) 4 Replace the memory module slot cover and secure it ...
User Guide
Page 154
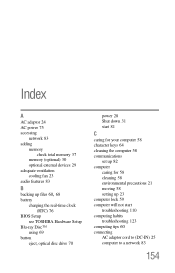
... adaptor 24 AC power 75 accessing network 83 adding memory check total memory 37 memory (optional) 30 optional external devices 29 adequate ventilation cooling fan 23 audio features 83 B backing up files 60, 68 battery charging the real-time clock (RTC) 76 BIOS Setup see TOSHIBA Hardware Setup Blu-ray Disc™ using 69 button...
... adaptor 24 AC power 75 accessing network 83 adding memory check total memory 37 memory (optional) 30 optional external devices 29 adequate ventilation cooling fan 23 audio features 83 B backing up files 60, 68 battery charging the real-time clock (RTC) 76 BIOS Setup see TOSHIBA Hardware Setup Blu-ray Disc™ using 69 button...
User Guide
Page 156
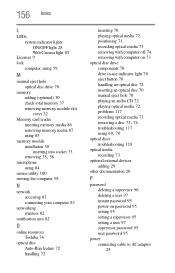
... manual eject hole optical disc drive 70 memory adding (optional) 30 check total memory 37 removing memory module slot cover 32 Memory card reader inserting memory media 86 removing memory media 87 using 85 memory module installation 30 inserting into socket 33 ...removing 35, 36 microphone using 84 mouse utility 100 moving the computer 58 N network accessing 83 connecting your computer 83 networking wireless 82 notification area 82 O online resources Toshiba...
... manual eject hole optical disc drive 70 memory adding (optional) 30 check total memory 37 removing memory module slot cover 32 Memory card reader inserting memory media 86 removing memory media 87 using 85 memory module installation 30 inserting into socket 33 ...removing 35, 36 microphone using 84 mouse utility 100 moving the computer 58 N network accessing 83 connecting your computer 83 networking wireless 82 notification area 82 O online resources Toshiba...

User Guide
Page 157
...power management 75 optimum performance 75 power plans selecting power plan options 76 precautions safety 22 printer troubleshooting 120 problem solving contacting Toshiba 129 Startup options 111 program, starting 66 program, starting from Start menu 67 R recording sounds 83 recovery checking internal ... 19 precautions 22 saving files 67 Search programs and files field starting a program 66 selecting power plan options 76 setting up adding memory (optional) 30 communications 82 computer 23 software Setup Wizard 29 work environment 21 settings customize computer settings 58 Shut down button ...
...power management 75 optimum performance 75 power plans selecting power plan options 76 precautions safety 22 printer troubleshooting 120 problem solving contacting Toshiba 129 Startup options 111 program, starting 66 program, starting from Start menu 67 R recording sounds 83 recovery checking internal ... 19 precautions 22 saving files 67 Search programs and files field starting a program 66 selecting power plan options 76 setting up adding memory (optional) 30 communications 82 computer 23 software Setup Wizard 29 work environment 21 settings customize computer settings 58 Shut down button ...