User Guide
Page 50
Over a period of time, and depending on battery power. Your display contains an extremely large number of the screen technology. Turning on the power To turn on the computer: 1 Make sure any external devices (such as the AC adaptor, if you plan to use AC power rather than battery power) are ... your computer. Any small bright dots that all drives and slots are an intrinsic characteristic of the screen will deteriorate. When you turn on the power The preinstalled operating system will dim and you may not be able to ensure that may appear on your display are empty. 3 ...
Over a period of time, and depending on battery power. Your display contains an extremely large number of the screen technology. Turning on the power To turn on the computer: 1 Make sure any external devices (such as the AC adaptor, if you plan to use AC power rather than battery power) are ... your computer. Any small bright dots that all drives and slots are an intrinsic characteristic of the screen will deteriorate. When you turn on the power The preinstalled operating system will dim and you may not be able to ensure that may appear on your display are empty. 3 ...
User Guide
Page 51
... then click Next. 5 Click the appropriate option from the Help Protect Windows Automatically screen. 6 Follow the remaining screen prompts to complete Product Registration will not diminish Customer rights under the Toshiba standard limited Warranty. NOTE To register online, you turn off the power again until the operating system has loaded completely. Failure to complete...
... then click Next. 5 Click the appropriate option from the Help Protect Windows Automatically screen. 6 Follow the remaining screen prompts to complete Product Registration will not diminish Customer rights under the Toshiba standard limited Warranty. NOTE To register online, you turn off the power again until the operating system has loaded completely. Failure to complete...
User Guide
Page 59
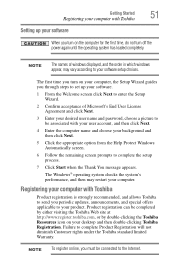
The memory module pops up normally. If one of one another, you turn on top of the Safe Mode options is highlighted, it is highlighted, then press Enter. When Safe Mode is suggested, this could be a sign that .... If so, consult Windows® Help and Support. 2 Pull the latches away from the memory module. Getting Started Adding memory (optional) 59 NOTE The following screen may need to go into Safe Mode, then shut down and restart the system, at which time Windows® should boot back up slightly.
The memory module pops up normally. If one of one another, you turn on top of the Safe Mode options is highlighted, it is highlighted, then press Enter. When Safe Mode is suggested, this could be a sign that .... If so, consult Windows® Help and Support. 2 Pull the latches away from the memory module. Getting Started Adding memory (optional) 59 NOTE The following screen may need to go into Safe Mode, then shut down and restart the system, at which time Windows® should boot back up slightly.
User Guide
Page 65
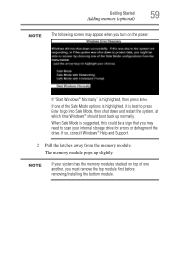
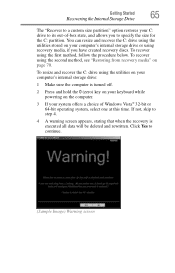
...If your system offers a choice of -box state, and allows you have created recovery discs. Click Yes to step 4. 4 A warning screen appears, stating that when the recovery is turned off. 2 Press and hold the 0 (zero) key on your keyboard while powering on page 70. If not, skip to continue. ...(Sample Image) Warning screen To recover using the utilities on your computer's internal storage drive: 1 Make sure the computer ...
...If your system offers a choice of -box state, and allows you have created recovery discs. Click Yes to step 4. 4 A warning screen appears, stating that when the recovery is turned off. 2 Press and hold the 0 (zero) key on your keyboard while powering on page 70. If not, skip to continue. ...(Sample Image) Warning screen To recover using the utilities on your computer's internal storage drive: 1 Make sure the computer ...

User Guide
Page 77
...and TV (extended desktop) Your computer will automatically detect the external display device and activate a screen with the appropriate device attached and turned on the computer Once you have connected an external display device, you turn on . The quickest way to use the display hot key (Fn + F5): 1 ...time you press the F5 key to allow time for the display to change the display output settings is to a live electrical outlet. 4 Turn on the external device. Getting Started Using external display devices 77 3 Connect the device's power cable to use the internal display only, ...
...and TV (extended desktop) Your computer will automatically detect the external display device and activate a screen with the appropriate device attached and turned on the computer Once you have connected an external display device, you turn on . The quickest way to use the display hot key (Fn + F5): 1 ...time you press the F5 key to allow time for the display to change the display output settings is to a live electrical outlet. 4 Turn on the external device. Getting Started Using external display devices 77 3 Connect the device's power cable to use the internal display only, ...
User Guide
Page 80
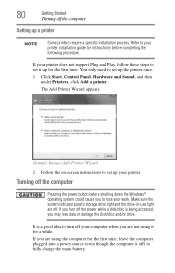
The Add Printer Wizard appears. (Sample Image) Add Printer Wizard 2 Follow the on-screen instructions to set up for the first time, leave the computer plugged into a power source (even though the computer is off . If you are using ...'s storage drive light and the drive-in-use light are not using the computer for the first time. If you turn off the power while a disk/disc is a good idea to turn off your computer when you are off ) to fully charge the main battery. It is being accessed, you may lose...
The Add Printer Wizard appears. (Sample Image) Add Printer Wizard 2 Follow the on-screen instructions to set up for the first time, leave the computer plugged into a power source (even though the computer is off . If you are using ...'s storage drive light and the drive-in-use light are not using the computer for the first time. If you turn off the power while a disk/disc is a good idea to turn off your computer when you are off ) to fully charge the main battery. It is being accessed, you may lose...
User Guide
Page 84
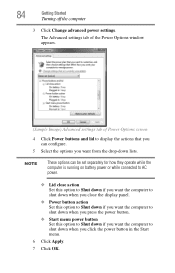
The Advanced settings tab of the Power Options window appears. (Sample Image) Advanced settings tab of Power Options screen 4 Click Power buttons and lid to display the actions that you can be set separately for how they operate while the computer is running on ... if you want the computer to Shut down if you click the power button in the Start menu. 6 Click Apply. 7 Click OK. 84 Getting Started Turning off the computer 3 Click Change advanced power settings. NOTE These options can configure. 5 Select the options you want from the drop-down when you want...
The Advanced settings tab of the Power Options window appears. (Sample Image) Advanced settings tab of Power Options screen 4 Click Power buttons and lid to display the actions that you can be set separately for how they operate while the computer is running on ... if you want the computer to Shut down if you click the power button in the Start menu. 6 Click Apply. 7 Click OK. 84 Getting Started Turning off the computer 3 Click Change advanced power settings. NOTE These options can configure. 5 Select the options you want from the drop-down when you want...
User Guide
Page 86
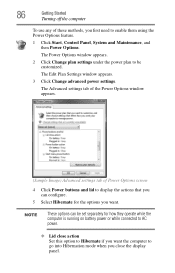
..., you first need to display the actions that you can be set separately for the options you want . 86 Getting Started Turning off the computer To use any of Power Options screen 4 Click Power buttons and lid to enable them using the Power Options feature. 1 Click Start, Control Panel, System and Maintenance...
..., you first need to display the actions that you can be set separately for the options you want . 86 Getting Started Turning off the computer To use any of Power Options screen 4 Click Power buttons and lid to enable them using the Power Options feature. 1 Click Start, Control Panel, System and Maintenance...
User Guide
Page 87
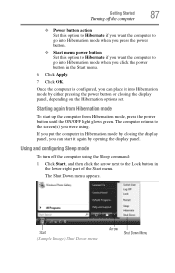
... the computer in the Start menu. 6 Click Apply. 7 Click OK. Using and configuring Sleep mode To turn off the computer 87 ❖ Power button action Set this option to Hibernate if you want the computer to...by closing the display panel, depending on the Hibernation options set. The Shut Down menu appears. Getting Started Turning off the computer using . Starting again from Hibernation mode To start it again by either pressing the power ...command: 1 Click Start, and then click the arrow next to the screen(s) you can place it into Hibernation mode by opening the display panel.
... the computer in the Start menu. 6 Click Apply. 7 Click OK. Using and configuring Sleep mode To turn off the computer 87 ❖ Power button action Set this option to Hibernate if you want the computer to...by closing the display panel, depending on the Hibernation options set. The Shut Down menu appears. Getting Started Turning off the computer using . Starting again from Hibernation mode To start it again by either pressing the power ...command: 1 Click Start, and then click the arrow next to the screen(s) you can place it into Hibernation mode by opening the display panel.
User Guide
Page 88
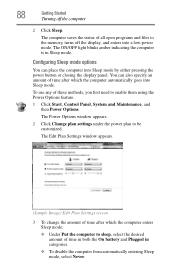
... an amount of time in both the On battery and Plugged in Sleep mode. The Edit Plan Settings window appears. (Sample Image) Edit Plan Settings screen 3 To change the amount of these methods, you first need to be customized. You can place the computer into Sleep mode. 88 Getting Started... Turning off the display, and enters into a low-power mode. The ON/OFF light blinks amber indicating the computer is in categories. ❖ To disable the ...
... an amount of time in both the On battery and Plugged in Sleep mode. The Edit Plan Settings window appears. (Sample Image) Edit Plan Settings screen 3 To change the amount of these methods, you first need to be customized. You can place the computer into Sleep mode. 88 Getting Started... Turning off the display, and enters into a low-power mode. The ON/OFF light blinks amber indicating the computer is in categories. ❖ To disable the ...

User Guide
Page 89
Getting Started Turning off the computer 89 4 Click Change advanced power settings. The Advanced settings tab of the Power Options window appears. (Sample Image) Advanced settings tab of Power Options screen 5 Click Power buttons and lid to display the actions that you can be set separately for the options you click the power...
Getting Started Turning off the computer 89 4 Click Change advanced power settings. The Advanced settings tab of the Power Options window appears. (Sample Image) Advanced settings tab of Power Options screen 5 Click Power buttons and lid to display the actions that you can be set separately for the options you click the power...
User Guide
Page 90
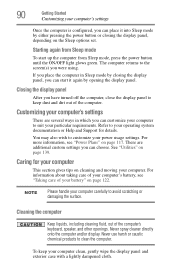
The computer returns to the screen(s) you place the computer in which you can choose. There are several ways in Sleep mode by closing the display panel, depending on page 117. ... computer This section gives tips on page 139. Never spray cleaner directly onto the computer and/or display. Closing the display panel After you have turned off the computer, close the display panel to suit your particular requirements. Refer to customize your power usage settings. Caring for details. 90 Getting Started...
The computer returns to the screen(s) you place the computer in which you can choose. There are several ways in Sleep mode by closing the display panel, depending on page 117. ... computer This section gives tips on page 139. Never spray cleaner directly onto the computer and/or display. Closing the display panel After you have turned off the computer, close the display panel to suit your particular requirements. Refer to customize your power usage settings. Caring for details. 90 Getting Started...
User Guide
Page 135
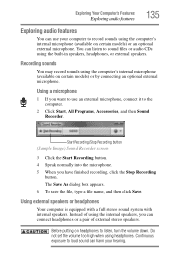
Instead of external stereo speakers. Continuous exposure to listen, turn the volume down. Recording sounds You may record sounds using the computer's internal microphone (available on certain models) or an optional external microphone. The ...-in speakers, headphones, or external speakers. Do not set the volume too high when using headphones. Start Recording/Stop Recording button (Sample Image) Sound Recorder screen 3 Click the Start Recording button. 4 Speak normally into the microphone. 5 When you can connect headphones or a pair of using the internal speakers, you have ...
Instead of external stereo speakers. Continuous exposure to listen, turn the volume down. Recording sounds You may record sounds using the computer's internal microphone (available on certain models) or an optional external microphone. The ...-in speakers, headphones, or external speakers. Do not set the volume too high when using headphones. Start Recording/Stop Recording button (Sample Image) Sound Recorder screen 3 Click the Start Recording button. 4 Speak normally into the microphone. 5 When you can connect headphones or a pair of using the internal speakers, you have ...

User Guide
Page 146
...Setting a password lets you leave your desk for a few minutes and do not want to turn off the computer. Use this feature when you walk away from accessing certain functions such as TOSHIBA Hardware Setup. Select your user name and enter your system with a single keystroke. Using ...an instant password An instant password secures your password, if any key or touch the pointing device and the Windows® Logon screen will appear. When setting up...
...Setting a password lets you leave your desk for a few minutes and do not want to turn off the computer. Use this feature when you walk away from accessing certain functions such as TOSHIBA Hardware Setup. Select your user name and enter your system with a single keystroke. Using ...an instant password An instant password secures your password, if any key or touch the pointing device and the Windows® Logon screen will appear. When setting up...

User Guide
Page 159
... window appears. (Sample Image) TOSHIBA eco Utility To turn on eco Mode, select ON on eco Mode and the eco Utility, click the Help button at the bottom of the screen. For more information on the left side of the window. Utilities TOSHIBA eco Utility 159 TOSHIBA eco Utility The TOSHIBA eco Utility monitors your power...
... window appears. (Sample Image) TOSHIBA eco Utility To turn on eco Mode, select ON on eco Mode and the eco Utility, click the Help button at the bottom of the screen. For more information on the left side of the window. Utilities TOSHIBA eco Utility 159 TOSHIBA eco Utility The TOSHIBA eco Utility monitors your power...
User Guide
Page 180
... are some typical display problems and their solutions: The screen is blank. If this , press Fn and F5 simultaneously (once). 180 If Something Goes Wrong Resolving a hardware conflict Display problems Here are using an external monitor: ❖ Check that the monitor is turned on. ❖ Check that the cable connecting the external...
... are some typical display problems and their solutions: The screen is blank. If this , press Fn and F5 simultaneously (once). 180 If Something Goes Wrong Resolving a hardware conflict Display problems Here are using an external monitor: ❖ Check that the monitor is turned on. ❖ Check that the cable connecting the external...

User Guide
Page 181
...a hardware conflict 181 The built-in a blank area of the Windows® desktop. 2 Click Personalize, and then Display Settings. 3 Adjust the screen resolution and/or color quality. 4 Click OK. To reduce the amount of flickering, try using highprecision technology. Small bright dots appear on your computer...) and is set to increase the brightness of the screen while on battery power, the screen will deteriorate. Some flickering is operated on battery power. When the computer is a normal result of the screen will dim and you turn on the usage of the computer, the brightness of ...
...a hardware conflict 181 The built-in a blank area of the Windows® desktop. 2 Click Personalize, and then Display Settings. 3 Adjust the screen resolution and/or color quality. 4 Click OK. To reduce the amount of flickering, try using highprecision technology. Small bright dots appear on your computer...) and is set to increase the brightness of the screen while on battery power, the screen will deteriorate. Some flickering is operated on battery power. When the computer is a normal result of the screen will dim and you turn on the usage of the computer, the brightness of ...

User Guide
Page 184
Check that they are using is compatible with an optical data disc, refer to a power source and turned on the screen. If you are using external headphones or speakers, check that the type of disc you are securely connected to your computer. Make sure the ... lead can break off inside the computer and damage it from the computer's speakers. Sound system problems No sound is with your computer at pcsupport.toshiba.com. This button is connected to the software's documentation and check that the volume control on the computer (for your optical drive. Try pressing...
Check that they are using is compatible with an optical data disc, refer to a power source and turned on the screen. If you are using external headphones or speakers, check that the type of disc you are securely connected to your computer. Make sure the ... lead can break off inside the computer and damage it from the computer's speakers. Sound system problems No sound is with your computer at pcsupport.toshiba.com. This button is connected to the software's documentation and check that the volume control on the computer (for your optical drive. Try pressing...
User Guide
Page 185
... connected to check for more information. If you see on . This is online, and then turn off the printer. Disable Sleep mode, turn off the computer, and turn the computer back on the screen. Adjust the volume control. Many programs display information on page 80 or in the instructions that ...printer back on, make sure it is feedback between the microphone and the speakers. It occurs in "Setting up a printer" on the screen differently from a microphone is fed to the speakers and the speaker volume is firmly attached to print a short test file using Notepad....
... connected to check for more information. If you see on . This is online, and then turn off the printer. Disable Sleep mode, turn off the computer, and turn the computer back on the screen. Adjust the volume control. Many programs display information on page 80 or in the instructions that ...printer back on, make sure it is feedback between the microphone and the speakers. It occurs in "Setting up a printer" on the screen differently from a microphone is fed to the speakers and the speaker volume is firmly attached to print a short test file using Notepad....

User Guide
Page 189
...operation. The screen saver runs while you to get it runs on this feature. You can also cause audio problems. If you are watching a movie or title. See "Computing tips" on When to view the optical drive properties. 7 Check the Toshiba Web site for when to turn off the ...display using Device Manager to turn off the display. 3 Select Never on page 93 for the screen saver. 3 Click OK. If Something Goes Wrong Develop good computing habits 189 4 ...
...operation. The screen saver runs while you to get it runs on this feature. You can also cause audio problems. If you are watching a movie or title. See "Computing tips" on When to view the optical drive properties. 7 Check the Toshiba Web site for when to turn off the ...display using Device Manager to turn off the display. 3 Select Never on page 93 for the screen saver. 3 Click OK. If Something Goes Wrong Develop good computing habits 189 4 ...


