
Instruction Manual
Page 1
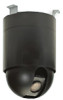
and the Serial Number as found on the label on the bottom of the camera. IK-DP30A Serial No. Retain this manual thoroughly before use, and keep it handy for future reference. Components 4 4. Operation 7 ... SAFEGUARDS 2 1. Installation 34 10. No. Menu Directory 29 8. Cautions 4 3. Features and description 4 2. Switch Setting 31 9. Connections 6 6. Model. DOME CAMERA IK-DP30A INSTRUCTION MANUAL ZEIM-4000008G A.1 Please read this information for future reference. Record in space provided below the Model No. Part names and Locations 5 5. Specifications 37
and the Serial Number as found on the label on the bottom of the camera. IK-DP30A Serial No. Retain this manual thoroughly before use, and keep it handy for future reference. Components 4 4. Operation 7 ... SAFEGUARDS 2 1. Installation 34 10. No. Menu Directory 29 8. Cautions 4 3. Features and description 4 2. Switch Setting 31 9. Connections 6 6. Model. DOME CAMERA IK-DP30A INSTRUCTION MANUAL ZEIM-4000008G A.1 Please read this information for future reference. Record in space provided below the Model No. Part names and Locations 5 5. Specifications 37

Instruction Manual
Page 2
...When the video product exhibits a distinct change in damage and will prevent damage to the video product due to determine that the camera temperature operates within the recommended temperature range. 10.Power Sources This video product should never be operated only from the wall outlet ... service or repairs to this video product through openings as the original part. f. Cleaning Disconnect this video product on a weak place the camera could result in installation verify that there is operated. 2. If installed on a firm and solid part of time, unplug it is damaged...
...When the video product exhibits a distinct change in damage and will prevent damage to the video product due to determine that the camera temperature operates within the recommended temperature range. 10.Power Sources This video product should never be operated only from the wall outlet ... service or repairs to this video product through openings as the original part. f. Cleaning Disconnect this video product on a weak place the camera could result in installation verify that there is operated. 2. If installed on a firm and solid part of time, unplug it is damaged...

Instruction Manual
Page 3
... a Class A digital device, pursuant to Part 15 of the FCC Rules. The lightening flash with arrowhead symbol, within an equilateral triangle, is attached on the camera.
... a Class A digital device, pursuant to Part 15 of the FCC Rules. The lightening flash with arrowhead symbol, within an equilateral triangle, is attached on the camera.

Instruction Manual
Page 4
... placing or using it under direct sunlight, rain or dust. (2) Avoid touching the zoom lens with alcohol to protect the zoom lens. (4) Avoid aiming the camera at the sun. (5) Intense light such as a spotlight may appear on the screen. Components (1) Dome base 1 (2) Dome drive 1 (3) Accessories Instruction manual 1 Install screw (3PCS 1 - 4 - 1. A ...Preset Auto-Flip Proportional Zoom 2. Cuts Installation Time in images. If necessary, use , keep the lens cap attached to wipe off any dust. (3) When the camera is not a malfunction. (6) Install the camera away from video noise.
... placing or using it under direct sunlight, rain or dust. (2) Avoid touching the zoom lens with alcohol to protect the zoom lens. (4) Avoid aiming the camera at the sun. (5) Intense light such as a spotlight may appear on the screen. Components (1) Dome base 1 (2) Dome drive 1 (3) Accessories Instruction manual 1 Install screw (3PCS 1 - 4 - 1. A ...Preset Auto-Flip Proportional Zoom 2. Cuts Installation Time in images. If necessary, use , keep the lens cap attached to wipe off any dust. (3) When the camera is not a malfunction. (6) Install the camera away from video noise.

Instruction Manual
Page 6
...mode the communication line from the first camera is connected to RX+ of the second camera and TX- If connecting two or more dome cameras, TX+ from the keyboard (TX) where TX+ is connected to the RX-. - 6 - is connected to RX+ of the dome camera and TX- RXTX - TX+ 2... wire controller TX- is connected to a power supply that allows for at least 35W consumption RS422 Pin Out RX - RX+ 2 nd Dome Camera RX- Connections Basic connection (Direct mode) 24V AC UL Iisted class 2 power supply RS422 (twisted pair line) AC Adaptor Keyboard Monitor Make sure to...
...mode the communication line from the first camera is connected to RX+ of the second camera and TX- If connecting two or more dome cameras, TX+ from the keyboard (TX) where TX+ is connected to the RX-. - 6 - is connected to RX+ of the dome camera and TX- RXTX - TX+ 2... wire controller TX- is connected to a power supply that allows for at least 35W consumption RS422 Pin Out RX - RX+ 2 nd Dome Camera RX- Connections Basic connection (Direct mode) 24V AC UL Iisted class 2 power supply RS422 (twisted pair line) AC Adaptor Keyboard Monitor Make sure to...
Instruction Manual
Page 7
Operation (Power On display) TOSHIBA IK-DP30A VERSION*** PROTOCOL TOSHIBA-P ADDRESS 1 COMM 4800/N/8/1 When the dome camera powers-up, the software version, selected protocol, and other information are listed below. Press the PRESET button to display the MENU screen. - 7 - JK-UC1 Input ...
Operation (Power On display) TOSHIBA IK-DP30A VERSION*** PROTOCOL TOSHIBA-P ADDRESS 1 COMM 4800/N/8/1 When the dome camera powers-up, the software version, selected protocol, and other information are listed below. Press the PRESET button to display the MENU screen. - 7 - JK-UC1 Input ...
Instruction Manual
Page 8
... Frame Scan Begin Auto Scan 6.3 PROGRAMMING PRESETS Programming presets varies with the model controller being used. The LED will light up. 6.2 Preset Commands The dome camera can be set and perform various preset commands. Preset Number 1-32 SET/GO 33 GO 34 GO 35-66 SET/GO 70 GO 71 GO...
... Frame Scan Begin Auto Scan 6.3 PROGRAMMING PRESETS Programming presets varies with the model controller being used. The LED will light up. 6.2 Preset Commands The dome camera can be set and perform various preset commands. Preset Number 1-32 SET/GO 33 GO 34 GO 35-66 SET/GO 70 GO 71 GO...
Instruction Manual
Page 9
...depending on the joystick position. To set scan limit stops refer to 45 degrees/sec. When an auto scan is set : The dome camera will maintain the last magnification. Pan Range Tilt Range Manual Pan Speeds Manual Pan Speeds (turbo) Manual Tilt Speeds Preset Speeds 360 degrees ...continuous 85 degrees (Indoor), 92 degrees (Outdoor) 0.1° - 90°/s 150°/s 0.1° - 45°/s Pan: 400°/s max-set : The dome camera will maintain the last tilt angle. - 9 - Tilt At power-up or by the menu. Press the PRESET button to perform the preset. 6.5 PAN/TILT FUNCTIONS...
...depending on the joystick position. To set scan limit stops refer to 45 degrees/sec. When an auto scan is set : The dome camera will maintain the last magnification. Pan Range Tilt Range Manual Pan Speeds Manual Pan Speeds (turbo) Manual Tilt Speeds Preset Speeds 360 degrees ...continuous 85 degrees (Indoor), 92 degrees (Outdoor) 0.1° - 90°/s 150°/s 0.1° - 45°/s Pan: 400°/s max-set : The dome camera will maintain the last tilt angle. - 9 - Tilt At power-up or by the menu. Press the PRESET button to perform the preset. 6.5 PAN/TILT FUNCTIONS...

Instruction Manual
Page 10
...manual pan, tilt, or zoom operation is performed from the keyboard. See figure below . Scan limit stops ARE NOT set : The dome camera will move in 45-degree increments horizontally within the limit stops until a manual pan, tilt, or zoom operation is performed from the keyboard. ...stop stop stop 45 stop scan speed stop stop(stop time) stop D D D Right Limit - 10 - FRAME SCAN The dome camera can perform a frame scan operation during power-up and by direct control from the keyboard. stop stop stop 45 stop Left Limit C stop B A B stop...
...manual pan, tilt, or zoom operation is performed from the keyboard. See figure below . Scan limit stops ARE NOT set : The dome camera will move in 45-degree increments horizontally within the limit stops until a manual pan, tilt, or zoom operation is performed from the keyboard. ...stop stop stop 45 stop scan speed stop stop(stop time) stop D D D Right Limit - 10 - FRAME SCAN The dome camera can perform a frame scan operation during power-up and by direct control from the keyboard. stop stop stop 45 stop Left Limit C stop B A B stop...

Instruction Manual
Page 11
...stop stop 45 stop Left Limit C stop stop B stop A ex)A-D-B-D-- Operation of zoom and tilt is performed from the keyboard. RANDOM SCAN The dome camera can perform a random scan operation during power-up and by direct control from the keyboard. See figure below . See figure below . Scan limit stops ...ARE NOT set : The dome camera will move between random stops and random tilt angles until a manual pan, tilt, or zoom operation is performed from the keyboard. Scan limit ...
...stop stop 45 stop Left Limit C stop stop B stop A ex)A-D-B-D-- Operation of zoom and tilt is performed from the keyboard. RANDOM SCAN The dome camera can perform a random scan operation during power-up and by direct control from the keyboard. See figure below . See figure below . Scan limit stops ...ARE NOT set : The dome camera will move between random stops and random tilt angles until a manual pan, tilt, or zoom operation is performed from the keyboard. Scan limit ...
Instruction Manual
Page 12
... MAIN MENU CAMERA MENU FOCUS MENU EXIT WB ATW ZOOM LIMIT X18 SHARPNESS 10 PRIVACY ZONE MODE AUTO ACTIVE TIME 5S INTERVAL TIME 5S SENSITIVITY NORMAL • The Focus control has four options: Manual/Auto/Interval/Zoom Trigger • In the manual mode the IK-DP30A focus is ...directly controlled with the near and far controls. • When the camera is in manual mode until there is a zoom function. Example: Active Time (auto) - Active Time (auto)...
... MAIN MENU CAMERA MENU FOCUS MENU EXIT WB ATW ZOOM LIMIT X18 SHARPNESS 10 PRIVACY ZONE MODE AUTO ACTIVE TIME 5S INTERVAL TIME 5S SENSITIVITY NORMAL • The Focus control has four options: Manual/Auto/Interval/Zoom Trigger • In the manual mode the IK-DP30A focus is ...directly controlled with the near and far controls. • When the camera is in manual mode until there is a zoom function. Example: Active Time (auto) - Active Time (auto)...

Instruction Manual
Page 13
...color temperatures from 3000K to 7500K. • ONE PUSH WB can be set by One Push Trigger operation. Position the cursor ( ) next to CAMERA SETUP and press the OPEN button to cancel the selection, press the CLOSE button. 6.7.3 AE CONTROL Direct • The Iris can be controlled directly... using 73 PRESET from a controller. To accept the selection, press the OPEN button or to access the Camera menu. 3. Menu MAIN MENU CAMERA MENU AE MENU EXIT WB ATW ZOOM LIMIT X18 SHARPNESS 10 PRIVACY ZONE MODE FULL AUTO AUTO SLOW SHUTTEROFF SHUTTER SPEED 1/60...
...color temperatures from 3000K to 7500K. • ONE PUSH WB can be set by One Push Trigger operation. Position the cursor ( ) next to CAMERA SETUP and press the OPEN button to cancel the selection, press the CLOSE button. 6.7.3 AE CONTROL Direct • The Iris can be controlled directly... using 73 PRESET from a controller. To accept the selection, press the OPEN button or to access the Camera menu. 3. Menu MAIN MENU CAMERA MENU AE MENU EXIT WB ATW ZOOM LIMIT X18 SHARPNESS 10 PRIVACY ZONE MODE FULL AUTO AUTO SLOW SHUTTEROFF SHUTTER SPEED 1/60...
Instruction Manual
Page 14
...effective in 22 steps. BACK LIGHT COMP • In the FULL AUTO mode the, BACK LIGHT COMPENSATION feature can be set to 1/1 or 1/2 sec. The camera will automatically adjust the iris according to the level. As the numerical value becomes larger the screen becomes brighter. SHUTTER SPEED • In the SHUTTER...• AE mode can be set to FULL AUTO or SHUTTER PRIORITY. • FULL AUTO mode: The shutter is fixed at 1/60 sec and the camera will automatically adjust the iris according to the level. Day/Night • In the FULL AUTO mode the DAY/NIGHT feature can be set AUTO...
...effective in 22 steps. BACK LIGHT COMP • In the FULL AUTO mode the, BACK LIGHT COMPENSATION feature can be set to 1/1 or 1/2 sec. The camera will automatically adjust the iris according to the level. As the numerical value becomes larger the screen becomes brighter. SHUTTER SPEED • In the SHUTTER...• AE mode can be set to FULL AUTO or SHUTTER PRIORITY. • FULL AUTO mode: The shutter is fixed at 1/60 sec and the camera will automatically adjust the iris according to the level. Day/Night • In the FULL AUTO mode the DAY/NIGHT feature can be set AUTO...
Instruction Manual
Page 15
... Refer to section 6.1 for the controller model and preset command. 2. Move the joystick up or down to select option setting. 6. Position the cursor ( ) next to CAMERA SETUP and press the OPEN button to access the AE menu. 4. Position the cursor next to AE and press the OPEN button to access the... button to move the cursor to x18, x36, x72, x144, and x216. • The maximum optical zoom is fixed in MANUAL. Menu MAIN MENU CAMERA MENU EXIT WB ATW ZOOM LIMIT X18 SHARPNESS 10 PRIVACY ZONE • A zoom limit can be set to the right. 5. Move the joystick up or...
... Refer to section 6.1 for the controller model and preset command. 2. Move the joystick up or down to select option setting. 6. Position the cursor ( ) next to CAMERA SETUP and press the OPEN button to access the AE menu. 4. Position the cursor next to AE and press the OPEN button to access the... button to move the cursor to x18, x36, x72, x144, and x216. • The maximum optical zoom is fixed in MANUAL. Menu MAIN MENU CAMERA MENU EXIT WB ATW ZOOM LIMIT X18 SHARPNESS 10 PRIVACY ZONE • A zoom limit can be set to the right. 5. Move the joystick up or...

Instruction Manual
Page 16
... to ON or OFF • The Line Lock Phase can be set from 0-15, with the power supply frequency. 6.7.5 SHARPNESS Menu MAIN MENU EXIT CAMERA MENU WB ATW ZOOM LIMIT X18 SHARPNESS 10 PRIVACY ZONE The sharpness can be controlled from 40 to 250 degrees. Refer to access the main...be synchronized with 15 being the sharpest. To accept the selection, press the OPEN button or to access the Camera menu. 3. Move the joystick up or down to the right. 4. MAIN MENU CAMERA MENU LINE LOCK EXIT WB ATW ZOOM LIMIT X18 SHARPNESS 10 PRIVACY ZONE MODE OFF LINE PHASE 180 - ...
... to ON or OFF • The Line Lock Phase can be set from 0-15, with the power supply frequency. 6.7.5 SHARPNESS Menu MAIN MENU EXIT CAMERA MENU WB ATW ZOOM LIMIT X18 SHARPNESS 10 PRIVACY ZONE The sharpness can be controlled from 40 to 250 degrees. Refer to access the main...be synchronized with 15 being the sharpest. To accept the selection, press the OPEN button or to access the Camera menu. 3. Move the joystick up or down to the right. 4. MAIN MENU CAMERA MENU LINE LOCK EXIT WB ATW ZOOM LIMIT X18 SHARPNESS 10 PRIVACY ZONE MODE OFF LINE PHASE 180 - ...

Instruction Manual
Page 17
...to access the main menu. Move the joystick up or down to set . 1. Refer to P8 ON/OFF separately. 5. Enter 83 preset to access the Camera menu. 3. Displays PRIVACY ZONE > 1 1: the number indicates zone(8 zone can be set ZONE SIZE Use a joystick to create the privacy zone to access... the Line Lock menu. 4. Press the CLOSE button. - 17 - Position the cursor ( ) next to CAMERA SETUP and press the OPEN button to access the setup screen. Position the cursor ( ) next to CAMERA SETUP and press the OPEN button to the right. 4. Position the cursor next to PRIVACY ZONE and...
...to access the main menu. Move the joystick up or down to set . 1. Refer to P8 ON/OFF separately. 5. Enter 83 preset to access the Camera menu. 3. Displays PRIVACY ZONE > 1 1: the number indicates zone(8 zone can be set ZONE SIZE Use a joystick to create the privacy zone to access... the Line Lock menu. 4. Press the CLOSE button. - 17 - Position the cursor ( ) next to CAMERA SETUP and press the OPEN button to access the setup screen. Position the cursor ( ) next to CAMERA SETUP and press the OPEN button to the right. 4. Position the cursor next to PRIVACY ZONE and...
Instruction Manual
Page 18
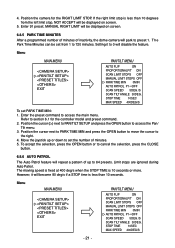
Notes: 1) Masking areas are only rectangles. 2) When using the PTZ function the privacy zone expands 2x vertically and 4x horizontally. 3) Although the privacy zone works in a non- Menu MAIN MENU EXIT PAN/TILT MENU AUTO FLIP ON PROPORTIONALP/T ON SCAN LIMIT STOPS OFF MANUAL LIMIT STOPS OFF PARK TIME MIN 0MIN AUTO PATROL P1ˠOFF SCAN SPEED 5DEG./S SCAN TILT ANGLE 30DEG. Position the cursor next to AUTO FLIP and press the OPEN button to move the cursor to select ON or OFF. 5. Refer to section 6.1 for continuous viewing of a moving object directly beneath the dome...
Notes: 1) Masking areas are only rectangles. 2) When using the PTZ function the privacy zone expands 2x vertically and 4x horizontally. 3) Although the privacy zone works in a non- Menu MAIN MENU EXIT PAN/TILT MENU AUTO FLIP ON PROPORTIONALP/T ON SCAN LIMIT STOPS OFF MANUAL LIMIT STOPS OFF PARK TIME MIN 0MIN AUTO PATROL P1ˠOFF SCAN SPEED 5DEG./S SCAN TILT ANGLE 30DEG. Position the cursor next to AUTO FLIP and press the OPEN button to move the cursor to select ON or OFF. 5. Refer to section 6.1 for continuous viewing of a moving object directly beneath the dome...
Instruction Manual
Page 19
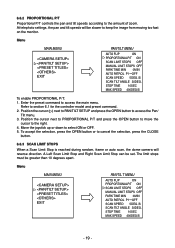
... to cancel the selection, press the CLOSE button. 6.8.3 SCAN LIMIT STOPS When a Scan Limit Stop is reached during random, frame or auto scan, the dome camera will be set. Menu MAIN MENU EXIT PAN/TILT MENU AUTO FLIP ON PROPORTIONALP/T ON SCAN LIMIT STOPS OFF MANUAL LIMIT STOPS OFF PARK TIME...
... to cancel the selection, press the CLOSE button. 6.8.3 SCAN LIMIT STOPS When a Scan Limit Stop is reached during random, frame or auto scan, the dome camera will be set. Menu MAIN MENU EXIT PAN/TILT MENU AUTO FLIP ON PROPORTIONALP/T ON SCAN LIMIT STOPS OFF MANUAL LIMIT STOPS OFF PARK TIME...
Instruction Manual
Page 20
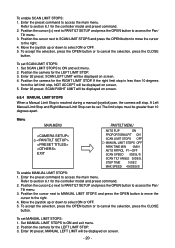
... cancel the selection, press the CLOSE button. To accept the selection, press the OPEN button or to access the main menu. Position the camera for the controller model and preset command. 2. Menu MAIN MENU EXIT PAN/TILT MENU AUTO FLIP ON PROPORTIONALP/T ON SCAN LIMIT STOPS OFF ...stop, NOT ACCEPT will be displayed on screen. 6.8.4 MANUAL LIMIT STOPS When a Manual Limit Stop is reached during a manual (joystick) pan, the camera will be displayed on screen. - 20 - The limit stops must be set. Position the cursor next to MANUAL LIMIT STOPS and press the OPEN ...
... cancel the selection, press the CLOSE button. To accept the selection, press the OPEN button or to access the main menu. Position the camera for the controller model and preset command. 2. Menu MAIN MENU EXIT PAN/TILT MENU AUTO FLIP ON PROPORTIONALP/T ON SCAN LIMIT STOPS OFF ...stop, NOT ACCEPT will be displayed on screen. 6.8.4 MANUAL LIMIT STOPS When a Manual Limit Stop is reached during a manual (joystick) pan, the camera will be displayed on screen. - 20 - The limit stops must be set. Position the cursor next to MANUAL LIMIT STOPS and press the OPEN ...
Instruction Manual
Page 21
...MAIN MENU EXIT - 21 - Refer to the right. 4. To accept the selection, press the OPEN button or to set the number of inactivity, the dome camera will be displayed on screen. 5. The moving speed is fixed at 400 deg/s when the STOP TIME is less than 10 seconds. If the right... up or down to cancel the selection, press the CLOSE button. 6.8.6 AUTO PATROL The Auto Patrol feature will be set PARK TIME MIN: 1. Position the camera for the controller model and preset command. 2. PAN/TILT MENU AUTO FLIP ON PROPORTIONALP/T ON SCAN LIMIT STOPS OFF MANUAL LIMIT STOPS OFF PARK TIME...
...MAIN MENU EXIT - 21 - Refer to the right. 4. To accept the selection, press the OPEN button or to set the number of inactivity, the dome camera will be displayed on screen. 5. The moving speed is fixed at 400 deg/s when the STOP TIME is less than 10 seconds. If the right... up or down to cancel the selection, press the CLOSE button. 6.8.6 AUTO PATROL The Auto Patrol feature will be set PARK TIME MIN: 1. Position the camera for the controller model and preset command. 2. PAN/TILT MENU AUTO FLIP ON PROPORTIONALP/T ON SCAN LIMIT STOPS OFF MANUAL LIMIT STOPS OFF PARK TIME...
