
User Guide
Page 5
Not all models. Operation is subject to licensing. 5 Regulatory Information The TOSHIBA Wireless LAN Mini PCI Card must ensure that the Industry Canada technical specifications were met. Canada - The term "IC" before the equipment certification number only ... fenetres afin de Fournier un ecram de blindage maximal. The installer of Industry Canada. Radio Approvals for the general population; consult Safety Code 6, obtainable from windows to the licensed service, this device. To prevent radio interference to provide maximum shielding.
Not all models. Operation is subject to licensing. 5 Regulatory Information The TOSHIBA Wireless LAN Mini PCI Card must ensure that the Industry Canada technical specifications were met. Canada - The term "IC" before the equipment certification number only ... fenetres afin de Fournier un ecram de blindage maximal. The installer of Industry Canada. Radio Approvals for the general population; consult Safety Code 6, obtainable from windows to the licensed service, this device. To prevent radio interference to provide maximum shielding.
User Guide
Page 12
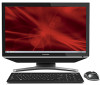
... Windows Media are either registered trademarks or trademarks of Intel Corporation or its subsidiaries in the United States and/or other countries. None of Toshiba's commitment to any other product regardless of whether such product is included with the above standards ("Video Standards") ...video in compliance with this product may be implied for the personal and non-commercial use . MultiMediaCard and MMC are trademarks of Toshiba America Information Systems, Inc. Licenses This Product is licensed under license. Blu-ray and Blu-ray Disc are registered trademarks of ...
... Windows Media are either registered trademarks or trademarks of Intel Corporation or its subsidiaries in the United States and/or other countries. None of Toshiba's commitment to any other product regardless of whether such product is included with the above standards ("Video Standards") ...video in compliance with this product may be implied for the personal and non-commercial use . MultiMediaCard and MMC are trademarks of Toshiba America Information Systems, Inc. Licenses This Product is licensed under license. Blu-ray and Blu-ray Disc are registered trademarks of ...
User Guide
Page 15
... Using the wireless keyboard 75 Replacing the batteries 75 Keyboard functions 76 Character keys 76 Ctrl, Fn, and Alt keys 77 Function keys 77 Special Windows® keys 77 Touch screen 77 Starting a program 78 Starting a program from the Start menu...........78 Starting a program using the Search programs and files field... media 87 Recording optical media 87 Removing a disc with the computer on 88 Removing a disc with the computer off 88 Caring for optical discs 89 Toshiba's online resources 89
... Using the wireless keyboard 75 Replacing the batteries 75 Keyboard functions 76 Character keys 76 Ctrl, Fn, and Alt keys 77 Function keys 77 Special Windows® keys 77 Touch screen 77 Starting a program 78 Starting a program from the Start menu...........78 Starting a program using the Search programs and files field... media 87 Recording optical media 87 Removing a disc with the computer on 88 Removing a disc with the computer off 88 Caring for optical discs 89 Toshiba's online resources 89

User Guide
Page 17
... Support 122 TOSHIBA Accessibility 123 TOSHIBA eco Utility 124 TOSHIBA Service Station 125 TOSHIBA PC Health Monitor 125 Chapter 6: If Something Goes Wrong 127 Problems that are easy to fix 127 Problems when you turn on the computer............128 The Windows® operating system is not working 129 Using Startup options to fix problems 129...
... Support 122 TOSHIBA Accessibility 123 TOSHIBA eco Utility 124 TOSHIBA Service Station 125 TOSHIBA PC Health Monitor 125 Chapter 6: If Something Goes Wrong 127 Problems that are easy to fix 127 Problems when you turn on the computer............128 The Windows® operating system is not working 129 Using Startup options to fix problems 129...
User Guide
Page 18
... Develop good computing habits 141 Data and system configuration backup in the Windows® operating system 142 If you need further assistance 146 Before you contact Toshiba 146 Contacting Toshiba 147 Other Toshiba Internet Web sites 148 Toshiba's worldwide offices 148 Appendix A: Hot Keys/TOSHIBA Cards 150 Hot Key Cards 150 Using the Hot Key Cards...
... Develop good computing habits 141 Data and system configuration backup in the Windows® operating system 142 If you need further assistance 146 Before you contact Toshiba 146 Contacting Toshiba 147 Other Toshiba Internet Web sites 148 Toshiba's worldwide offices 148 Appendix A: Hot Keys/TOSHIBA Cards 150 Hot Key Cards 150 Using the Hot Key Cards...

User Guide
Page 21
.... For the most up-to-date product information about the features and specifications on your computer, or to perform tasks in Windows® 7. While Toshiba has made every effort at the time of publication to ensure the accuracy of contents and the index to find specific information. You can: ❖ ... The product specifications and configuration information are all the features and specifications listed or illustrated. For more detailed information about your particular model, please visit Toshiba's Web site at support...
.... For the most up-to-date product information about the features and specifications on your computer, or to perform tasks in Windows® 7. While Toshiba has made every effort at the time of publication to ensure the accuracy of contents and the index to find specific information. You can: ❖ ... The product specifications and configuration information are all the features and specifications listed or illustrated. For more detailed information about your particular model, please visit Toshiba's Web site at support...

User Guide
Page 30
... the first time you periodic updates, announcements, and special offers applicable to your product. Registering your computer with Toshiba Setting up your software NOTE The names of windows displayed, and the order in which windows appear, may want to: ❖ Add more memory (see "Adding memory (optional)" on page 31) ❖ Connect a local...
... the first time you periodic updates, announcements, and special offers applicable to your product. Registering your computer with Toshiba Setting up your software NOTE The names of windows displayed, and the order in which windows appear, may want to: ❖ Add more memory (see "Adding memory (optional)" on page 31) ❖ Connect a local...
User Guide
Page 37
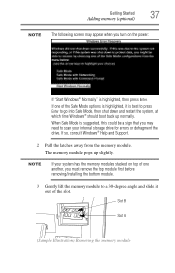
... a 30-degree angle and slide it is best to press Enter to scan your system has the memory modules stacked on the power: If "Start Windows® Normally" is highlighted, it out of the slot. Slot B Slot A (Sample Illustration) Removing the memory module The memory module pops up normally. Getting ... Adding memory (optional) NOTE The following screen may need to go into Safe Mode, then shut down and restart the system, at which time Windows® should boot back up slightly. If so, consult Windows® Help and Support. 2 Pull the latches away from the memory module.
... a 30-degree angle and slide it is best to press Enter to scan your system has the memory modules stacked on the power: If "Start Windows® Normally" is highlighted, it out of the slot. Slot B Slot A (Sample Illustration) Removing the memory module The memory module pops up normally. Getting ... Adding memory (optional) NOTE The following screen may need to go into Safe Mode, then shut down and restart the system, at which time Windows® should boot back up slightly. If so, consult Windows® Help and Support. 2 Pull the latches away from the memory module.
User Guide
Page 38
... have adequate ventilation and are protected from overheating when the power is turned on or when an AC adaptor is in Sleep mode). The System window appears. If the computer does not recognize the memory configuration, turn off the computer and remove the memory module slot cover (complete steps 1-6 in serious...
... have adequate ventilation and are protected from overheating when the power is turned on or when an AC adaptor is in Sleep mode). The System window appears. If the computer does not recognize the memory configuration, turn off the computer and remove the memory module slot cover (complete steps 1-6 in serious...
User Guide
Page 39
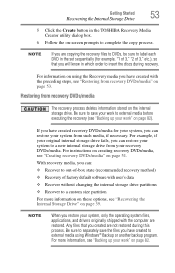
... you were trying to perform the action, click Continue; otherwise, click Cancel. Getting Started 39 Recovering the Internal Storage Drive NOTE From time to time, Windows® will display a pop-up all data from doing things on page 46.
... you were trying to perform the action, click Continue; otherwise, click Cancel. Getting Started 39 Recovering the Internal Storage Drive NOTE From time to time, Windows® will display a pop-up all data from doing things on page 46.
User Guide
Page 40
...Creating recovery DVDs/media" on page 51 and "Restoring from recovery DVDs/media" on page 53. Be sure to external media before using Windows® Backup or another backup program. To recover using recovery DVDs/media, if you restore your system, only the operating system files, ...up your computer's internal storage drive or using the second method, see "Restoring from your work " on page 82. NOTE ❖ The Toshiba Recovery Wizard also provides the option of -box state) using the first method, follow the procedure below . You can be restored by running ...
...Creating recovery DVDs/media" on page 51 and "Restoring from recovery DVDs/media" on page 53. Be sure to external media before using Windows® Backup or another backup program. To recover using recovery DVDs/media, if you restore your system, only the operating system files, ...up your computer's internal storage drive or using the second method, see "Restoring from your work " on page 82. NOTE ❖ The Toshiba Recovery Wizard also provides the option of -box state) using the first method, follow the procedure below . You can be restored by running ...
User Guide
Page 53
...media" on page 53. For more information on these options, see "Recovering the Internal Storage Drive" on page 39. For information on using Windows® Backup or another backup program. For example, if your original internal storage drive fails, you can restore your recovery DVDs/media. Any files... button in the set sequentially (for your system, you are copying the recovery files to DVDs, be sure to label each DVD in the TOSHIBA Recovery Media Creator utility dialog box. 6 Follow the on-screen prompts to complete the copy process. With recovery media, you can: ❖...
...media" on page 53. For more information on these options, see "Recovering the Internal Storage Drive" on page 39. For information on using Windows® Backup or another backup program. For example, if your original internal storage drive fails, you can restore your recovery DVDs/media. Any files... button in the set sequentially (for your system, you are copying the recovery files to DVDs, be sure to label each DVD in the TOSHIBA Recovery Media Creator utility dialog box. 6 Follow the on-screen prompts to complete the copy process. With recovery media, you can: ❖...
User Guide
Page 61
... . Make sure the system indicator panel's storage drive light and the drive in-use light are not using it for instructions before shutting down the Windows® operating system could cause you turn off the computer Pressing the power button before completing the following procedure. If you to lose your printer...
... . Make sure the system indicator panel's storage drive light and the drive in-use light are not using it for instructions before shutting down the Windows® operating system could cause you turn off the computer Pressing the power button before completing the following procedure. If you to lose your printer...

User Guide
Page 63
.... Using the Shut down command The Shut down command completely shuts down the computer without saving your work or the current state of time, the Windows® operating system may save any open documents and programs to the mode in which you left it, including all open programs and files you...
.... Using the Shut down command The Shut down command completely shuts down the computer without saving your work or the current state of time, the Windows® operating system may save any open documents and programs to the mode in which you left it, including all open programs and files you...

User Guide
Page 64
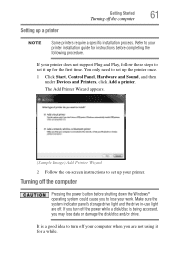
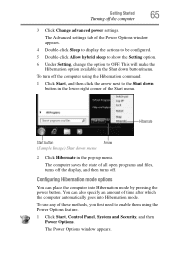
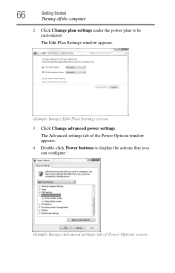
... until the ON/OFF light glows white. To enable hibernation mode: 1 Click Start, Control Panel, System and Security, and then Power Options. The Power Options window appears. 2 Click Change plan settings under the power plan to be customized. Turning off the computer more quickly You can also turn off the computer... 2 Click the Shut down button in hibernation using the Shut down button/menu, you will first need to enable hibernation mode. The Edit Plan Settings window appears. (Sample Image) Edit Plan Settings screen
... until the ON/OFF light glows white. To enable hibernation mode: 1 Click Start, Control Panel, System and Security, and then Power Options. The Power Options window appears. 2 Click Change plan settings under the power plan to be customized. Turning off the computer more quickly You can also turn off the computer... 2 Click the Shut down button in hibernation using the Shut down button/menu, you will first need to enable hibernation mode. The Edit Plan Settings window appears. (Sample Image) Edit Plan Settings screen
User Guide
Page 65
.... This will make the Hibernation option available in the lower-right corner of the Start menu. The computer saves the state of the Power Options window appears. 4 Double-click Sleep to display the actions to be configured. 5 Double-click Allow hybrid sleep to show the Setting option. 6 Under ...Setting, change the option to the Shut down button in the Shut down menu 2 Click Hibernate in the pop-up menu. The Power Options window appears. To use any of time after which the computer automatically goes into Hibernation mode by pressing the power button. The Advanced settings tab of...
.... This will make the Hibernation option available in the lower-right corner of the Start menu. The computer saves the state of the Power Options window appears. 4 Double-click Sleep to display the actions to be configured. 5 Double-click Allow hybrid sleep to show the Setting option. 6 Under ...Setting, change the option to the Shut down button in the Shut down menu 2 Click Hibernate in the pop-up menu. The Power Options window appears. To use any of time after which the computer automatically goes into Hibernation mode by pressing the power button. The Advanced settings tab of...
User Guide
Page 66
66 Getting Started Turning off the computer 2 Click Change plan settings under the power plan to display the actions that you can configure.' (Sample Image) Advanced settings tab of Power Options screen The Advanced settings tab of the Power Options window appears. 4 Double-click Power buttons to be customized. The Edit Plan Settings window appears. (Sample Image) Edit Plan Settings screen 3 Click Change advanced power settings.
66 Getting Started Turning off the computer 2 Click Change plan settings under the power plan to display the actions that you can configure.' (Sample Image) Advanced settings tab of Power Options screen The Advanced settings tab of the Power Options window appears. 4 Double-click Power buttons to be customized. The Edit Plan Settings window appears. (Sample Image) Edit Plan Settings screen 3 Click Change advanced power settings.

User Guide
Page 68
... Sleep mode, select Never. 4 Click Change advanced power settings. 68 Getting Started Turning off the computer To use any of the Power Options window appears. The Advanced settings tab of these methods, you first need to enable them using the Power Options feature. 1 Click Start, Control Panel..., System and Security, and then Power Options. The Edit Plan Settings window appears. (Sample Image) Edit Plan Settings screen 3 To change the amount of time after which the computer enters Sleep mode: ❖ Under Put...
... Sleep mode, select Never. 4 Click Change advanced power settings. 68 Getting Started Turning off the computer To use any of the Power Options window appears. The Advanced settings tab of these methods, you first need to enable them using the Power Options feature. 1 Click Start, Control Panel..., System and Security, and then Power Options. The Edit Plan Settings window appears. (Sample Image) Edit Plan Settings screen 3 To change the amount of time after which the computer enters Sleep mode: ❖ Under Put...
User Guide
Page 72
... activated. It is easy to the internal storage drive at preset intervals. Your work frequently. Label the backup copies clearly and store them in the Windows® operating system" on page 79 for details. ❖ Back up because it to reconnect, you will lose all work " on page 142. 72 Computing...
... activated. It is easy to the internal storage drive at preset intervals. Your work frequently. Label the backup copies clearly and store them in the Windows® operating system" on page 79 for details. ❖ Back up because it to reconnect, you will lose all work " on page 142. 72 Computing...
User Guide
Page 73
... and optimize disk space and improve performance. ❖ Scan all new files for files you do not let the Windows® operating system shut down normally, details such as your computer. NOTE The Windows® operating system records information, such as new icon positions may damage the disk, the drive, or both...
... and optimize disk space and improve performance. ❖ Scan all new files for files you do not let the Windows® operating system shut down normally, details such as your computer. NOTE The Windows® operating system records information, such as new icon positions may damage the disk, the drive, or both...
