
Owner's Manual - English
Page 4
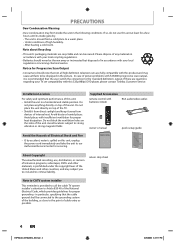
... for Progressive Scan Output • Consumers should never be reused. Do not place anything directly on this 525p(480p) DVD player, please contact Toshiba Customer Service. Supplied Accessories remote control with 525(480) progressive scan output, it away from a cold place to Article 820-40 of this unit: • Install the unit...
... for Progressive Scan Output • Consumers should never be reused. Do not place anything directly on this 525p(480p) DVD player, please contact Toshiba Customer Service. Supplied Accessories remote control with 525(480) progressive scan output, it away from a cold place to Article 820-40 of this unit: • Install the unit...
Owner's Manual - English
Page 5
...serial number of your product before use. • Clean video heads only when problems occur. This means the remote control is not used under license. Manufactured under license under license from the center to out. Patent #: ...please consult your local Audio/Video store and purchase a good quality VHS video head cleaner. 2. If the remote control does not work properly, you press any key and the radio receives the signal. Dolby and the ... to explain this problem. EN 5 Playback Editing Function Setup VCR Function Others E9PKAUD_DVR620KU_EN.indd 5 3/25/2009 3:47:18 PM
...serial number of your product before use. • Clean video heads only when problems occur. This means the remote control is not used under license. Manufactured under license under license from the center to out. Patent #: ...please consult your local Audio/Video store and purchase a good quality VHS video head cleaner. 2. If the remote control does not work properly, you press any key and the radio receives the signal. Dolby and the ... to explain this problem. EN 5 Playback Editing Function Setup VCR Function Others E9PKAUD_DVR620KU_EN.indd 5 3/25/2009 3:47:18 PM
Owner's Manual - English
Page 6
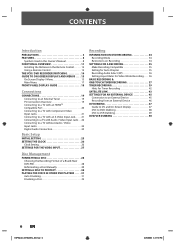
CONTENTS Introduction PRECAUTIONS 2 FEATURES 8 Symbols Used in this Owner's Manual 8 FUNCTIONAL OVERVIEW 11 Installing the Batteries in the Remote Control 12 Using a Remote Control 12 THE VCR / DVD RECORDER SWITCHING 14 GUIDE TO ON-SCREEN DISPLAYS AND MENUS . . . . 15 On-Screen Display / Menu 15 Main Menu 17 FRONT PANEL DISPLAY GUIDE 18 ... 45 Recording from an External Device 46 DV DUBBING 47 Guide to DV and On-Screen Display 47 DVC to DVD Dubbing 48 DVC to VCR Dubbing 49 DVD/VCR DUBBING 50 6 EN E9PKAUD_DVR620KU_EN.indd 6 3/25/2009 3:47:19 PM
CONTENTS Introduction PRECAUTIONS 2 FEATURES 8 Symbols Used in this Owner's Manual 8 FUNCTIONAL OVERVIEW 11 Installing the Batteries in the Remote Control 12 Using a Remote Control 12 THE VCR / DVD RECORDER SWITCHING 14 GUIDE TO ON-SCREEN DISPLAYS AND MENUS . . . . 15 On-Screen Display / Menu 15 Main Menu 17 FRONT PANEL DISPLAY GUIDE 18 ... 45 Recording from an External Device 46 DV DUBBING 47 Guide to DV and On-Screen Display 47 DVC to DVD Dubbing 48 DVC to VCR Dubbing 49 DVD/VCR DUBBING 50 6 EN E9PKAUD_DVR620KU_EN.indd 6 3/25/2009 3:47:19 PM
Owner's Manual - English
Page 11
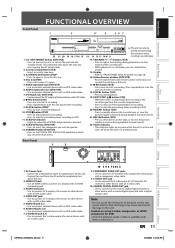
...recording. • Press to operate. 13. Power indicator • This indicator lights up when the VCR/DVD output mode is in stop mode, press to remove the cassette tape from your remote control so that you wish to stop the proceeding timer recording in forward during playback (rewind search). ...22. AUDIO input jacks (L2) (DVD/VCR) • Use to connect a TV monitor with component video inputs with...
...recording. • Press to operate. 13. Power indicator • This indicator lights up when the VCR/DVD output mode is in stop mode, press to remove the cassette tape from your remote control so that you wish to stop the proceeding timer recording in forward during playback (rewind search). ...22. AUDIO input jacks (L2) (DVD/VCR) • Use to connect a TV monitor with component video inputs with...
Owner's Manual - English
Page 12
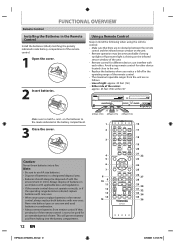
...on the infrared sensor window of the remote control. 1 Open the cover. 2 Insert batteries. SETUP DISPLAY AUDIO 4 DISC MENU 5 TOP MENU 6 7 8 9 10 11 12 13 14 15 CLEAR ENTER RETURN INSTANT 1.3x/0.8x SKIP PLAY TIME SLIP REV PLAY FWD SKIP STOP SKIP PAUSE VCR DVD DUBBING REC MODE REC REPEAT TIMER... GHI JKL MNO TRACKING 3 PQRS TUV WXYZ SAT.LINK SPACE TIMER PROG. This will prevent battery acid from the unit are dead or if the remote control is shining on the batteries to the marks indicated in the operating range of the center: approx. 23 feet (7m) within 30°...
...on the infrared sensor window of the remote control. 1 Open the cover. 2 Insert batteries. SETUP DISPLAY AUDIO 4 DISC MENU 5 TOP MENU 6 7 8 9 10 11 12 13 14 15 CLEAR ENTER RETURN INSTANT 1.3x/0.8x SKIP PLAY TIME SLIP REV PLAY FWD SKIP STOP SKIP PAUSE VCR DVD DUBBING REC MODE REC REPEAT TIMER... GHI JKL MNO TRACKING 3 PQRS TUV WXYZ SAT.LINK SPACE TIMER PROG. This will prevent battery acid from the unit are dead or if the remote control is shining on the batteries to the marks indicated in the operating range of the center: approx. 23 feet (7m) within 30°...
Owner's Manual - English
Page 13
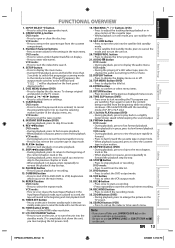
... 5. Note • If you set the unit in the main menu. Be sure to select the appropriate input. 2. EN 13 Playback Editing Function Setup VCR Function Others E9PKAUD_DVR620KU_EN.indd 13 3/25/2009 3:47:24 PM SKIP H button (DVD) • During playback, press to return to the beginning of a... HiFi video tape, press to change original and playlist on the remote control is played to the previous chapter or track. • When playback is in pause, press to HiFi or mono. 22. In the Auto ...
... 5. Note • If you set the unit in the main menu. Be sure to select the appropriate input. 2. EN 13 Playback Editing Function Setup VCR Function Others E9PKAUD_DVR620KU_EN.indd 13 3/25/2009 3:47:24 PM SKIP H button (DVD) • During playback, press to return to the beginning of a... HiFi video tape, press to change original and playlist on the remote control is played to the previous chapter or track. • When playback is in pause, press to HiFi or mono. 22. In the Auto ...
Owner's Manual - English
Page 14
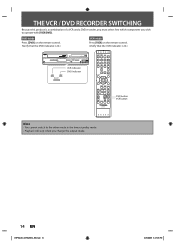
DVD mode Press [DVD] on the remote control. (Verify that the DVD indicator is lit.) VCR mode Press [VCR] on the remote control. (Verify that the VCR indicator is a combination of a VCR and a DVD recorder, you must select first which component you change the output mode. 14 EN E9PKAUD_DVR620KU_EN.... • Playback will stop when you wish to operate with [VCR/DVD]. THE VCR / DVD RECORDER SWITCHING Because this product is lit.) VCR DVD SELECT TRACKING DUBBING VCR DVD SELECT L2 VIDEO L L3 R DV IN VCR indicator DVD indicator OPEN/ INPUT CLOSE SELECT HDMI .@/: ABC DEF ...
DVD mode Press [DVD] on the remote control. (Verify that the DVD indicator is lit.) VCR mode Press [VCR] on the remote control. (Verify that the VCR indicator is a combination of a VCR and a DVD recorder, you must select first which component you change the output mode. 14 EN E9PKAUD_DVR620KU_EN.... • Playback will stop when you wish to operate with [VCR/DVD]. THE VCR / DVD RECORDER SWITCHING Because this product is lit.) VCR DVD SELECT TRACKING DUBBING VCR DVD SELECT L2 VIDEO L L3 R DV IN VCR indicator DVD indicator OPEN/ INPUT CLOSE SELECT HDMI .@/: ABC DEF ...
Owner's Manual - English
Page 25
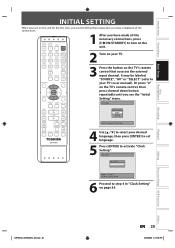
...language for the first time, you need to follow these steps after you have made all the connections. Recording Playback Editing Function Setup VCR Function Others E9PKAUD_DVR620KU_EN.indd 25 EN 25 3/25/2009 3:47:36 PM Initial Setting Clock Setting ENTER: Set Clock. OPEN/ INPUT ...CLOSE SELECT HDMI 1 After you see the "Initial Setting" menu. Or press "2" on the TV's remote control that accesses the external input channel. It may be labeled "SOURCE", "AV" or "SELECT" (refer to your desired language, then press [...
...language for the first time, you need to follow these steps after you have made all the connections. Recording Playback Editing Function Setup VCR Function Others E9PKAUD_DVR620KU_EN.indd 25 EN 25 3/25/2009 3:47:36 PM Initial Setting Clock Setting ENTER: Set Clock. OPEN/ INPUT ...CLOSE SELECT HDMI 1 After you see the "Initial Setting" menu. Or press "2" on the TV's remote control that accesses the external input channel. It may be labeled "SOURCE", "AV" or "SELECT" (refer to your desired language, then press [...
Owner's Manual - English
Page 38
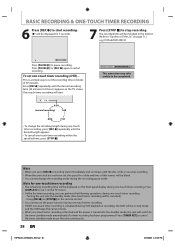
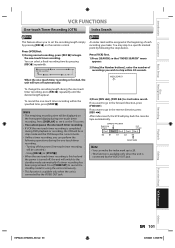
...within the specified time, press [STOP C]. Press [REC I 0:30 0:30 (normal recording) 1:00 8:00 7:30 • To change the recording mode during VCR playback or recording, the DVD will start recording. Note for 5 seconds. 7 Press [STOP C] to pause recording. Wait for a date and time of 30 ...timer recording has been programmed. The recorded title will be included in the title list. (Refer to "Guide to a Title List" on the remote control. • You cannot use the unit continuously. 38 EN E9PKAUD_DVR620KU_EN.indd 38 3/25/2009 3:47:49 PM Press [TIMER SET] to ...
...within the specified time, press [STOP C]. Press [REC I 0:30 0:30 (normal recording) 1:00 8:00 7:30 • To change the recording mode during VCR playback or recording, the DVD will start recording. Note for 5 seconds. 7 Press [STOP C] to pause recording. Wait for a date and time of 30 ...timer recording has been programmed. The recorded title will be included in the title list. (Refer to "Guide to a Title List" on the remote control. • You cannot use the unit continuously. 38 EN E9PKAUD_DVR620KU_EN.indd 38 3/25/2009 3:47:49 PM Press [TIMER SET] to ...
Owner's Manual - English
Page 41
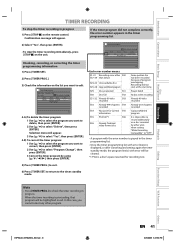
... programming list. 2) Select "Yes", then press [ENTER]. • To stop the timer recording in progress. Playback Editing Function Setup VCR Function Others E9PKAUD_DVR620KU_EN.indd 41 EN 41 3/25/2009 3:47:53 PM Timer Programming Date E41 JAN/02 THU JAN/01 10:00AM.... Power failed No disc when recording Already 49 titles recorded Already 254 chapters recorded Copy prohibited program It is impossible to record additionally on the remote control. Note • Press [TIMER PROG.] to select "Delete", then press [ENTER]. Selection menu will appear. 3 Use [K / L] to select "Yes...
... programming list. 2) Select "Yes", then press [ENTER]. • To stop the timer recording in progress. Playback Editing Function Setup VCR Function Others E9PKAUD_DVR620KU_EN.indd 41 EN 41 3/25/2009 3:47:53 PM Timer Programming Date E41 JAN/02 THU JAN/01 10:00AM.... Power failed No disc when recording Already 49 titles recorded Already 254 chapters recorded Copy prohibited program It is impossible to record additionally on the remote control. Note • Press [TIMER PROG.] to select "Delete", then press [ENTER]. Selection menu will appear. 3 Use [K / L] to select "Yes...
Owner's Manual - English
Page 47
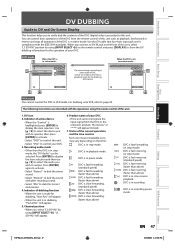
.... Press [ENTER] to display the item selection and then use [K / L] to select the audio you wish to control your DVC. 3. Switch the mode on the remote control and press [DISPLAY] to this unit. • Select "DVC" to output. Indicator of active device • When the "Control" is in dubbing, "Pause ...may vary depending on the front of this unit, select "L3 (DV-IN)" position by using the remote control of this unit such as playback, fast forward or reverse and stop mode. DVC is in VCR mode. DVC is in stop mode, the "DV Audio" can control basic operations of the DVC...
.... Press [ENTER] to display the item selection and then use [K / L] to select the audio you wish to control your DVC. 3. Switch the mode on the remote control and press [DISPLAY] to this unit. • Select "DVC" to output. Indicator of active device • When the "Control" is in dubbing, "Pause ...may vary depending on the front of this unit, select "L3 (DV-IN)" position by using the remote control of this unit such as playback, fast forward or reverse and stop mode. DVC is in VCR mode. DVC is in stop mode, the "DV Audio" can control basic operations of the DVC...

Owner's Manual - English
Page 48
... REC REPEAT TIMER SET SEARCH ZOOM SE-R0295 Press [DVD] first. Use [K / L] to DVD Dubbing DV DUBBING Before recording from DVC, see page 45 for VCR.) 3 Press [DISPLAY]. 4 With "Control" highlighted, press [ENTER] to display the available devices to select "L3 (DV-IN)". Then press [STOP C]. 48 EN ... (DV-IN) AB-1234 0:12:34 XP 1:00 Now you can operate your DVC is in video mode. 1 Use [INPUT SELECT ] to control with the remote control of this unit. 5 Press [PLAY B] to start playing back the DVC, and find where you come to the desired start point. 6 Use [K / L]...
... REC REPEAT TIMER SET SEARCH ZOOM SE-R0295 Press [DVD] first. Use [K / L] to DVD Dubbing DV DUBBING Before recording from DVC, see page 45 for VCR.) 3 Press [DISPLAY]. 4 With "Control" highlighted, press [ENTER] to display the available devices to select "L3 (DV-IN)". Then press [STOP C]. 48 EN ... (DV-IN) AB-1234 0:12:34 XP 1:00 Now you can operate your DVC is in video mode. 1 Use [INPUT SELECT ] to control with the remote control of this unit. 5 Press [PLAY B] to start playing back the DVC, and find where you come to the desired start point. 6 Use [K / L]...

Owner's Manual - English
Page 95
... you with the progressive scan system. The feature provides you have a standard TV: Select "4:3 Letter Box", so that black bars appear on the unit or remote control within 15 seconds, then press [ENTER]. Progressive ON OFF 2) Use [{ / B] to select "Yes" within 15 seconds at step 3, progressive scan remains... PROG. SETUP DISPLAY AUDIO DISC MENU TOP MENU CLEAR ENTER RETURN INSTANT 1.3x/0.8x SKIP PLAY TIME SLIP REV PLAY FWD SKIP STOP SKIP PAUSE VCR DVD DUBBING REC MODE REC REPEAT TIMER SET SEARCH ZOOM Press [STOP C] if you are playing back a disc. 1 Press [SETUP] and use...
... you with the progressive scan system. The feature provides you have a standard TV: Select "4:3 Letter Box", so that black bars appear on the unit or remote control within 15 seconds, then press [ENTER]. Progressive ON OFF 2) Use [{ / B] to select "Yes" within 15 seconds at step 3, progressive scan remains... PROG. SETUP DISPLAY AUDIO DISC MENU TOP MENU CLEAR ENTER RETURN INSTANT 1.3x/0.8x SKIP PLAY TIME SLIP REV PLAY FWD SKIP STOP SKIP PAUSE VCR DVD DUBBING REC MODE REC REPEAT TIMER SET SEARCH ZOOM Press [STOP C] if you are playing back a disc. 1 Press [SETUP] and use...
Owner's Manual - English
Page 100
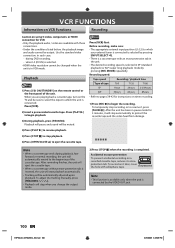
... to resume playback. 5) Press [STOP C] to stop playback. 6) Press [OPEN/CLOSE A] to eject the cassette tape. Playback 1) Press [I/y ON/STANDBY] on the remote control or the front panel of tape T60 T120 T160 SP 1hour 2hours 2-2/3hours SLP 3hours 6hours 8hours • Refer to pages 39-42 for... / playback time Type of the unit. When you change the output mode. 2) Press [STOP C] when the recording is selected in pause mode for VCR: • Only the playback audio / video are playing back a cassette tape, turn on timer recording. 1) Press [REC I] to resume it later...
... to resume playback. 5) Press [STOP C] to stop playback. 6) Press [OPEN/CLOSE A] to eject the cassette tape. Playback 1) Press [I/y ON/STANDBY] on the remote control or the front panel of tape T60 T120 T160 SP 1hour 2hours 2-2/3hours SLP 3hours 6hours 8hours • Refer to pages 39-42 for... / playback time Type of the unit. When you change the output mode. 2) Press [STOP C] when the recording is selected in pause mode for VCR: • Only the playback audio / video are playing back a cassette tape, turn on timer recording. 1) Press [REC I] to resume it later...
Owner's Manual - English
Page 101
... length appear. INDEX SEARCH 03 To change the recording length during one-touch timer recording. To cancel the one -touch timer recording. - Press [VCR] first. 1) Press [SEARCH] so that "INDEX SEARCH" menu appears. 2) Using [the Number buttons], enter the number of recordings you to... set the recording length simply by pressing [REC I] on the remote control. Using [REC I ] repeatedly. (0:30) (Normal recording) (8:00) (1:00) (7:30) When the one-touch timer recording is completed during the ...
... length appear. INDEX SEARCH 03 To change the recording length during one-touch timer recording. To cancel the one -touch timer recording. - Press [VCR] first. 1) Press [SEARCH] so that "INDEX SEARCH" menu appears. 2) Using [the Number buttons], enter the number of recordings you to... set the recording length simply by pressing [REC I] on the remote control. Using [REC I ] repeatedly. (0:30) (Normal recording) (8:00) (1:00) (7:30) When the one-touch timer recording is completed during the ...

Owner's Manual - English
Page 102
...[REV E], [FWD D] to start playback itself . Fast forward: When the unit is distorted or rolling vertically, adjust the vertical hold control on the remote control to select Hi-Fi or MONO for playback sound mode. • If you have connected a stereo TV to this unit, select "HIFI". &#... [FWD D] during the still mode, stabilize the picture by pressing [TRACKING / ] on a cassette tape by the VIDEO OUT jack. 102 EN Press [VCR] first. Press [VCR] first. 1) Press [SEARCH] repeatedly so that "TIME SEARCH" menu appears. 2) Using [the Number buttons], enter your TV, if equipped. Rewind: When ...
...[REV E], [FWD D] to start playback itself . Fast forward: When the unit is distorted or rolling vertically, adjust the vertical hold control on the remote control to select Hi-Fi or MONO for playback sound mode. • If you have connected a stereo TV to this unit, select "HIFI". &#... [FWD D] during the still mode, stabilize the picture by pressing [TRACKING / ] on a cassette tape by the VIDEO OUT jack. 102 EN Press [VCR] first. Press [VCR] first. 1) Press [SEARCH] repeatedly so that "TIME SEARCH" menu appears. 2) Using [the Number buttons], enter your TV, if equipped. Rewind: When ...

Owner's Manual - English
Page 103
...cancel the timer standby mode. Playback picture is distorted. This is not a malfunction. • When the unit is far from a DVD player, VCR or tuner goes the device connected through the unit through the DIGITAL AUDIO OUT (COAXIAL) jack, check the setting in "Audio Out" (page 90...; Press [DVD] or [VCR], whichever you set to "ON", when recording onto DVD+RW/+R that the signal from analog output R • Re-connect all the connections are obstacles between the remote control and the unit. • The remote control is in again. The remote control does not function. •...
...cancel the timer standby mode. Playback picture is distorted. This is not a malfunction. • When the unit is far from a DVD player, VCR or tuner goes the device connected through the unit through the DIGITAL AUDIO OUT (COAXIAL) jack, check the setting in "Audio Out" (page 90...; Press [DVD] or [VCR], whichever you set to "ON", when recording onto DVD+RW/+R that the signal from analog output R • Re-connect all the connections are obstacles between the remote control and the unit. • The remote control is in again. The remote control does not function. •...
Owner's Manual - English
Page 105
..." disappears), a repairing process will be performed. Setup menu cannot be able to do some of the operations. Playback Editing Function Setup VCR Function Others E9PKAUD_DVR620KU_EN.indd 105 EN 105 3/25/2009 3:49:11 PM The subtitle language cannot be changed. "Repairing" appears on the... disc may be called up during the repairing process MAY NOT work. The remote control does not function. • Check if a cassette tape is inserted. The angles cannot be changed . The language for VCR may not be changed or turned off. D Recording does not stop , search...
..." disappears), a repairing process will be performed. Setup menu cannot be able to do some of the operations. Playback Editing Function Setup VCR Function Others E9PKAUD_DVR620KU_EN.indd 105 EN 105 3/25/2009 3:49:11 PM The subtitle language cannot be changed. "Repairing" appears on the... disc may be called up during the repairing process MAY NOT work. The remote control does not function. • Check if a cassette tape is inserted. The angles cannot be changed . The language for VCR may not be changed or turned off. D Recording does not stop , search...


