Installation Guide - English
Page 2
...improperly secured or inappropriately situated on your area. As a result, TVs may notice a reduction in the Operating Guide. Toshiba Cares! DLP_Inst.book Page 2 Wednesday, February 22, 2006 6:18 PM Dear Customer, Thank you for purchasing this manual completely, and keep these safety tips in the lamp will be... appliance. a The Consumer Electronics Association formed the Home Entertainment Support Safety Committee, comprised of your home. a Carefully read this Toshiba TV. a Avoid placing any item on page 4. Thank you may fall over . Arlington, VA 22201 U.S.A.
...improperly secured or inappropriately situated on your area. As a result, TVs may notice a reduction in the Operating Guide. Toshiba Cares! DLP_Inst.book Page 2 Wednesday, February 22, 2006 6:18 PM Dear Customer, Thank you for purchasing this manual completely, and keep these safety tips in the lamp will be... appliance. a The Consumer Electronics Association formed the Home Entertainment Support Safety Committee, comprised of your home. a Carefully read this Toshiba TV. a Avoid placing any item on page 4. Thank you may fall over . Arlington, VA 22201 U.S.A.
Installation Guide - English
Page 4
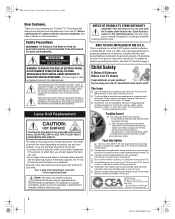
...injury. If this happens, turn off the TV for reflections on the screen, and then remove the source of any item you should replace the lamp unit; Dispose of the used lamp unit by the approved method for your TOSHIBA TV, follow this manual to a Toshiba Authorized Service Center. 37) If you ...have the TV serviced: • Ask the service technician to use , the TV may make sure you are never in a position where your body (or any...
...injury. If this happens, turn off the TV for reflections on the screen, and then remove the source of any item you should replace the lamp unit; Dispose of the used lamp unit by the approved method for your TOSHIBA TV, follow this manual to a Toshiba Authorized Service Center. 37) If you ...have the TV serviced: • Ask the service technician to use , the TV may make sure you are never in a position where your body (or any...
Installation Guide - English
Page 8
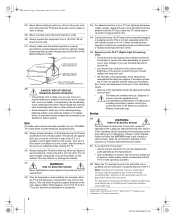
...). • The CableCARD™ may take about 5 minutes to remove the CableCARD™. Most issues can be available until this manual are representative of a separate set-top box from time to time experience compatibility issues due to ANT 1 only. A security card...The CableCARD™ automatically loads the cable channel list into the TV memory. The input/output terminals on -demand, a cable operator's enhanced program guide, and data-enhanced television services) will only operate with your Toshiba television, please contact the following: In the U.S.: • ...
...). • The CableCARD™ may take about 5 minutes to remove the CableCARD™. Most issues can be available until this manual are representative of a separate set-top box from time to time experience compatibility issues due to ANT 1 only. A security card...The CableCARD™ automatically loads the cable channel list into the TV memory. The input/output terminals on -demand, a cable operator's enhanced program guide, and data-enhanced television services) will only operate with your Toshiba television, please contact the following: In the U.S.: • ...
Installation Guide - English
Page 9
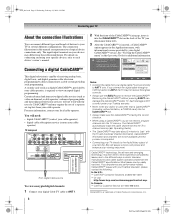
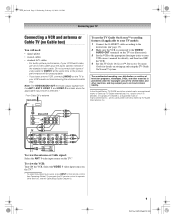
.... Stereo VCR VIDEO IN from the ANT 1, ANT 2, VIDEO 1, and VIDEO 2 terminals when the applicable input mode is selected.* From Cable TV or antenna Signal splitter IN OUT OUT To use , distribution, or revision of television programs, videotapes, DVDs, and other materials is used under... related marks are registered marks of Gemstar-TV Guide International, Inc. The unauthorized recording, use the TV Guide On Screen™ recording features (if applicable to your VCR owner's manual for details), and then turn OFF the VCR. 4 See the TV Guide On Screen™ Interactive Program Guide...
.... Stereo VCR VIDEO IN from the ANT 1, ANT 2, VIDEO 1, and VIDEO 2 terminals when the applicable input mode is selected.* From Cable TV or antenna Signal splitter IN OUT OUT To use , distribution, or revision of television programs, videotapes, DVDs, and other materials is used under... related marks are registered marks of Gemstar-TV Guide International, Inc. The unauthorized recording, use the TV Guide On Screen™ recording features (if applicable to your VCR owner's manual for details), and then turn OFF the VCR. 4 See the TV Guide On Screen™ Interactive Program Guide...
Installation Guide - English
Page 10
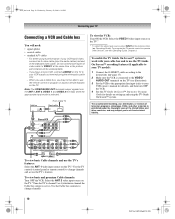
...recording features (if applicable to your TV model): 1 Connect the G-LINK™ cable according to the instructions (- To program the TV remote control to operate other devices, see illustration). 3 Set the VCR to the appropriate line input (refer to your VCR owner's manual for details), and then turn OFF ...the VCR. 4 See the TV Guide On Screen™ Interactive Program Guide for details on setting up and using the white audio cable only. ...
...recording features (if applicable to your TV model): 1 Connect the G-LINK™ cable according to the instructions (- To program the TV remote control to operate other devices, see illustration). 3 Set the VCR to the appropriate line input (refer to your VCR owner's manual for details), and then turn OFF ...the VCR. 4 See the TV Guide On Screen™ Interactive Program Guide for details on setting up and using the white audio cable only. ...
Installation Guide - English
Page 11
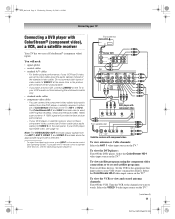
... video, connect an S-video cable (plus the audio cables) instead of video cable to operate other devices, see page 13. To program the TV remote control to VIDEO 1 at the same time or the picture performance will need: • signal splitter • coaxial cables • standard... ON the VCR. DLP_Inst.book Page 11 Wednesday, February 22, 2006 6:18 PM Connecting your VCR owner's manual for details). Select the ColorStream HD-1 video input source on the TV.* To view satellite programs using the white audio cable only. • standard audio cables • component video...
... video, connect an S-video cable (plus the audio cables) instead of video cable to operate other devices, see page 13. To program the TV remote control to VIDEO 1 at the same time or the picture performance will need: • signal splitter • coaxial cables • standard... ON the VCR. DLP_Inst.book Page 11 Wednesday, February 22, 2006 6:18 PM Connecting your VCR owner's manual for details). Select the ColorStream HD-1 video input source on the TV.* To view satellite programs using the white audio cable only. • standard audio cables • component video...
Installation Guide - English
Page 12
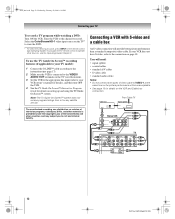
... receive program listings from ANT CH 3 CH 4 OUT to TV AUDIO L R IN IN OUT L R TV 12 DLP Inst (E/F) Web 213:276 The unauthorized recording, use the TV Guide On Screen™ recording features (if applicable to your VCR owner's manual for details), and then turn OFF the VCR. 4 See the... TV Guide On Screen™ Interactive Program Guide for any satellite service. DLP_Inst.book ...
... receive program listings from ANT CH 3 CH 4 OUT to TV AUDIO L R IN IN OUT L R TV 12 DLP Inst (E/F) Web 213:276 The unauthorized recording, use the TV Guide On Screen™ recording features (if applicable to your VCR owner's manual for details), and then turn OFF the VCR. 4 See the... TV Guide On Screen™ Interactive Program Guide for any satellite service. DLP_Inst.book ...
Installation Guide - English
Page 19
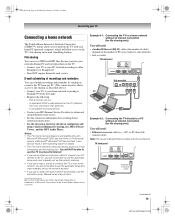
... Service Pack 2. DLP_Inst.book Page 19 Wednesday, February 22, 2006 6:18 PM Connecting your TV Connecting a home network The Toshiba Home Interactive Network Connection (THINC™) feature allows you to network the TV with built-in the United States and/or other countries. File sharing You can schedule recordings... Ethernet crossover cable to connect your PC directly to the TV, you will not be able to use the automatic setup and must manually set up the network address. • If you use the automatic setup and must manually set up the network address. • If you connect...
... Service Pack 2. DLP_Inst.book Page 19 Wednesday, February 22, 2006 6:18 PM Connecting your TV Connecting a home network The Toshiba Home Interactive Network Connection (THINC™) feature allows you to network the TV with built-in the United States and/or other countries. File sharing You can schedule recordings... Ethernet crossover cable to connect your PC directly to the TV, you will not be able to use the automatic setup and must manually set up the network address. • If you use the automatic setup and must manually set up the network address. • If you connect...
Operating Guide
Page 4
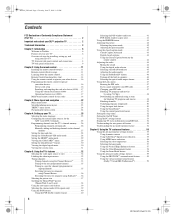
...2 Important notes about your DLP® projection TV 2 Trademark Information 3 Chapter 1: Introduction 6 Welcome to Toshiba 6 Features of your new TV 6 Overview of steps for installing, setting up, and using your new TV 7 TV front and side panel controls and connections 8 TV back panel connections 9 Chapter 2: Using the... the antenna input sources for the ANT 1 and ANT 2 terminals 25 Programming channels into the TV's channel memory . . . . 26 Programming channels automatically 26 Manually adding and deleting channels in the channel memory 27 Setting the time and date 28 Setting the ...
...2 Important notes about your DLP® projection TV 2 Trademark Information 3 Chapter 1: Introduction 6 Welcome to Toshiba 6 Features of your new TV 6 Overview of steps for installing, setting up, and using your new TV 7 TV front and side panel controls and connections 8 TV back panel connections 9 Chapter 2: Using the... the antenna input sources for the ANT 1 and ANT 2 terminals 25 Programming channels into the TV's channel memory . . . . 26 Programming channels automatically 26 Manually adding and deleting channels in the channel memory 27 Setting the time and date 28 Setting the ...
Operating Guide
Page 5
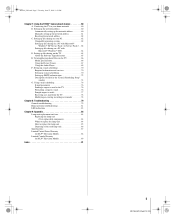
...Picture Viewer 67 Using the Audio Player 69 F. Setting up the network address 60 Automatically setting up the network address 60 Manually setting up file sharing on the TV 65 About the Software Upgrade feature 65 E. Using e-mail scheduling 76 E-mail parameters 76 Sending a request e-mail to...file sharing on a PC with Microsoft® Windows® XP Service Pack 1 or Service Pack 2 . . 62 Setting up SMTP authentication 72 Description of the used lamp unit 86 Specifications 87 Limited United States Warranty for DLP® Television Models 88 Limited Canada Warranty for DLP®...
...Picture Viewer 67 Using the Audio Player 69 F. Setting up the network address 60 Automatically setting up the network address 60 Manually setting up file sharing on the TV 65 About the Software Upgrade feature 65 E. Using e-mail scheduling 76 E-mail parameters 76 Sending a request e-mail to...file sharing on a PC with Microsoft® Windows® XP Service Pack 1 or Service Pack 2 . . 62 Setting up SMTP authentication 72 Description of the used lamp unit 86 Specifications 87 Limited United States Warranty for DLP® Television Models 88 Limited Canada Warranty for DLP®...
Operating Guide
Page 6
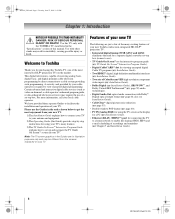
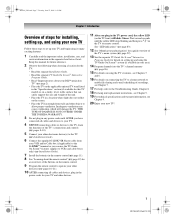
...• Digital Audio Out optical audio connection with the TOSHIBA TV stand listed in your new Toshiba widescreen, integrated HD, DLP® projection TV: • Integrated digital tuning (8VSB ATSC and QAM) eliminates the need for connecting the TV to a home network to set -top box (in...from your new TV. 1) The Installation Guide explains how to connect your TV to facilitate the installation and operation of this manual. We have provided three separate Guides to your antenna and equipment. 2) The Operating Guide (this Guide) provides step-by your TV. Installation Guide)....
...• Digital Audio Out optical audio connection with the TOSHIBA TV stand listed in your new Toshiba widescreen, integrated HD, DLP® projection TV: • Integrated digital tuning (8VSB ATSC and QAM) eliminates the need for connecting the TV to a home network to set -top box (in...from your new TV. 1) The Installation Guide explains how to connect your TV to facilitate the installation and operation of this manual. We have provided three separate Guides to your antenna and equipment. 2) The Operating Guide (this Guide) provides step-by your TV. Installation Guide)....
Operating Guide
Page 7
... page 12) for this manual for future reference. 2 Observe the following when choosing a location for the TV: • Read the separate Installation Guide. • Read the separate TV Guide On Screen™ ...devices. 11 After you plug in the TV power cord, the yellow LED (on the TV front) will damage the TV. page 11). 8 See "Learning about your DLP® projection TV" (- pages 16-21). 10 AFTER ... DAMAGE IS NOT COVERED UNDER THE TOSHIBA WARRANTY. 3 Do not plug in any power cords until the yellow LED stops blinking and then press p on connecting the TV to a home network to enable...
... page 12) for this manual for future reference. 2 Observe the following when choosing a location for the TV: • Read the separate Installation Guide. • Read the separate TV Guide On Screen™ ...devices. 11 After you plug in the TV power cord, the yellow LED (on the TV front) will damage the TV. page 11). 8 See "Learning about your DLP® projection TV" (- pages 16-21). 10 AFTER ... DAMAGE IS NOT COVERED UNDER THE TOSHIBA WARRANTY. 3 Do not plug in any power cords until the yellow LED stops blinking and then press p on connecting the TV to a home network to enable...

Operating Guide
Page 26
...a CableCARD™ inserted, channel programming for Antenna. Programming channels automatically Your TV can manually add or erase individual channels in its memory. Note: • You must manually delete it. • To tune the TV to a channel not programmed in the on the channels you should not ...have to program channels into the TV's channel memory. See the Installation Guide for Cable will appear,...
...a CableCARD™ inserted, channel programming for Antenna. Programming channels automatically Your TV can manually add or erase individual channels in its memory. Note: • You must manually delete it. • To tune the TV to a channel not programmed in the on the channels you should not ...have to program channels into the TV's channel memory. See the Installation Guide for Cable will appear,...

Operating Guide
Page 27
...channels in the channel memory After automatically programming channels into the channel memory, you can manually add or delete individual channels. To view the list of Installation menu icons will appear. To manually add digital subchannels on a physical channel: Use the Channel Numbers and the Dash (=)..., and then press T to highlight ANT 2 and press T. MX196_EN.book Page 27 Tuesday, June 27, 2006 1:43 PM Chapter 4: Setting up your TV Manually adding and deleting channels in the channel memory: 1 Press Y and open the Setup menu. 2 Highlight Installation and press T. 3 (A new set of ...
...channels in the channel memory After automatically programming channels into the channel memory, you can manually add or delete individual channels. To view the list of Installation menu icons will appear. To manually add digital subchannels on a physical channel: Use the Channel Numbers and the Dash (=)..., and then press T to highlight ANT 2 and press T. MX196_EN.book Page 27 Tuesday, June 27, 2006 1:43 PM Chapter 4: Setting up your TV Manually adding and deleting channels in the channel memory: 1 Press Y and open the Setup menu. 2 Highlight Installation and press T. 3 (A new set of ...
Operating Guide
Page 28
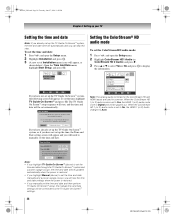
... On Screen™ system, or if you have not set the time and date and then perform TV Guide On Screen™ setup, the manual time and date settings will be overridden by the TV Guide On Screen™ settings. Time And Date Date (MM/DD/YY) 0 6/3 0/0 5 Time (HH:MM) 1 1 : 1 1 AM In the... Start Setup Navigate ENTER Select CH RTN Back EXIT Exit If you have not set automatically. It is restored. • If you will need to manually set the time, highlight TV Guide On Screen™ and press T. MX196_EN.book Page 28 Tuesday, June 27, 2006 1:43 PM Chapter 4: Setting up your...
... On Screen™ system, or if you have not set the time and date and then perform TV Guide On Screen™ setup, the manual time and date settings will be overridden by the TV Guide On Screen™ settings. Time And Date Date (MM/DD/YY) 0 6/3 0/0 5 Time (HH:MM) 1 1 : 1 1 AM In the... Start Setup Navigate ENTER Select CH RTN Back EXIT Exit If you have not set automatically. It is restored. • If you will need to manually set the time, highlight TV Guide On Screen™ and press T. MX196_EN.book Page 28 Tuesday, June 27, 2006 1:43 PM Chapter 4: Setting up your...
Operating Guide
Page 60
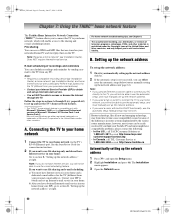
... 60 Tuesday, June 27, 2006 1:43 PM Chapter 7: Using the THINC™ home network feature The Toshiba Home Interactive Network Connection (THINC™) feature allows you to connect the TV to your home network, which will not be able to use the e-mail scheduling feature. Installation Guide); For...network* (- Microsoft and Windows are stored on your networked home PC and view/play them on the TV. Note: If you do not have Internet service in sections A through the TV. Manual setup may subject you want to use file sharing only and do not have obtained Internet/e-mail service in...
... 60 Tuesday, June 27, 2006 1:43 PM Chapter 7: Using the THINC™ home network feature The Toshiba Home Interactive Network Connection (THINC™) feature allows you to connect the TV to your home network, which will not be able to use the e-mail scheduling feature. Installation Guide); For...network* (- Microsoft and Windows are stored on your networked home PC and view/play them on the TV. Note: If you do not have Internet service in sections A through the TV. Manual setup may subject you want to use file sharing only and do not have obtained Internet/e-mail service in...

Operating Guide
Page 61
... address setup by following screen will display while the TV is successful, go to set up the network address This setup requires the data listed below. b) Continue to "Manually setting up and use e-mail scheduling). Manually setting up properly. c) Make sure the DHCP and... is not successful, go to the Network menu. b) Make sure your home router are securely connected. Also consult the owner's manuals for TV connection information. appears. Basic Network Setup Obtain network address automatically? Basic Network Setup Please wait... Exit a) Press T to close...
... address setup by following screen will display while the TV is successful, go to set up the network address This setup requires the data listed below. b) Continue to "Manually setting up and use e-mail scheduling). Manually setting up properly. c) Make sure the DHCP and... is not successful, go to the Network menu. b) Make sure your home router are securely connected. Also consult the owner's manuals for TV connection information. appears. Basic Network Setup Obtain network address automatically? Basic Network Setup Please wait... Exit a) Press T to close...
Operating Guide
Page 62
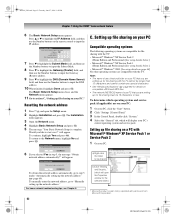
... Setup and press T. 5 The message "Your Basic Network Setup is complete. Yes No 6 If you like to "Manually setting up file sharing on a PC with the TV. Basic Network Setup Obtain network address automatically? For home network troubleshooting tips, see Chapter 8. 62 C. Note: •... • See "Media specifications" (- Would you selected Yes in step 5, the message "Obtain network address automatically?" will appear. To manually enter the network address, go to the Network menu, highlight No and press T. Yes No To obtain the network address automatically, go to...
... Setup and press T. 5 The message "Your Basic Network Setup is complete. Yes No 6 If you like to "Manually setting up file sharing on a PC with the TV. Basic Network Setup Obtain network address automatically? For home network troubleshooting tips, see Chapter 8. 62 C. Note: •... • See "Media specifications" (- Would you selected Yes in step 5, the message "Obtain network address automatically?" will appear. To manually enter the network address, go to the Network menu, highlight No and press T. Yes No To obtain the network address automatically, go to...

Operating Guide
Page 73
...and SMTP protocols without secure password authentication or secure connections. • Make sure you entered the correct information for the following fields in the TV's "E-mail Scheduling Setup": --Username and password. -"Incoming Mail Server" and "Outgoing Mail Server" names (or IP addresses). -"IP," "... the following fields in the TV's "E-mail Scheduling Setup" window (confirm this information with your ISP): -"Incoming Mail Server" and "Outgoing Mail Server" names (or IP addresses). -"IP," "Netmask," "Gateway," and "DNS" settings (applicable if you manually set up the network address)....
...and SMTP protocols without secure password authentication or secure connections. • Make sure you entered the correct information for the following fields in the TV's "E-mail Scheduling Setup": --Username and password. -"Incoming Mail Server" and "Outgoing Mail Server" names (or IP addresses). -"IP," "... the following fields in the TV's "E-mail Scheduling Setup" window (confirm this information with your ISP): -"Incoming Mail Server" and "Outgoing Mail Server" names (or IP addresses). -"IP," "Netmask," "Gateway," and "DNS" settings (applicable if you manually set up the network address)....
Operating Guide
Page 80
... brightness when this happens. page 31). Closed caption problems • If the program or video you connect the amplifier to the owner's manual for the U.S. or c) when the signal reception is not closedcaptioned, no sound, try using an external audio amplifier, if you selected is...feature. Installation Guide). • The station may be cleared (- page 43). • If text is displayed, press E four times within the TV, video processing in rare instances, when viewing certain content (e.g.. Try another device, use the Reset Factory Defaults procedure (- page 45). • ...
... brightness when this happens. page 31). Closed caption problems • If the program or video you connect the amplifier to the owner's manual for the U.S. or c) when the signal reception is not closedcaptioned, no sound, try using an external audio amplifier, if you selected is...feature. Installation Guide). • The station may be cleared (- page 43). • If text is displayed, press E four times within the TV, video processing in rare instances, when viewing certain content (e.g.. Try another device, use the Reset Factory Defaults procedure (- page 45). • ...


