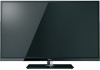

User Manual
Page 10
...to the HDMI input 17 Connecting a VCR or DVD player with ColorStream® (component video 18 Connecting remote IR devices 19 Connecting a digital audio system 20 Using the TV remote and HDMI® CEC Control to control other devices 21 Connecting an HDMI audio system 21 Connecting a ...PC 22 Connecting to a home network 23 Chapter 3: Using the remote control 24 Controlling other devices 24 Installing batteries 24 Learning about the Remote Control 25 Chapter 4: Initial Setup and Menu 26 Initial Setup 26 Navigating the menu system 27 Main menu...
...to the HDMI input 17 Connecting a VCR or DVD player with ColorStream® (component video 18 Connecting remote IR devices 19 Connecting a digital audio system 20 Using the TV remote and HDMI® CEC Control to control other devices 21 Connecting an HDMI audio system 21 Connecting a ...PC 22 Connecting to a home network 23 Chapter 3: Using the remote control 24 Controlling other devices 24 Installing batteries 24 Learning about the Remote Control 25 Chapter 4: Initial Setup and Menu 26 Initial Setup 26 Navigating the menu system 27 Main menu...
User Manual
Page 11
... device code 90 Locking the volume keys 90 Clearing the remote's programming 90 Resetting to the factory default 90 Operating the TV with combination buttons 91 Remote control codes 92 Limited United States Warranty for Toshiba Brand 3D Glasses 102 Index 105 11 Exchange Warranty 99 ...Limited Canadian Warranty for Toshiba Brand Flat Panel Televisions 100 Limited Canadian Warranty for LCD ...
... device code 90 Locking the volume keys 90 Clearing the remote's programming 90 Resetting to the factory default 90 Operating the TV with combination buttons 91 Remote control codes 92 Limited United States Warranty for Toshiba Brand 3D Glasses 102 Index 105 11 Exchange Warranty 99 ...Limited Canadian Warranty for Toshiba Brand Flat Panel Televisions 100 Limited Canadian Warranty for LCD ...
User Manual
Page 12
... connecting to IR OUT on your TV. 3 BEFORE connecting cables or devices to the TV, learn the functions of external devices from the TV remote via an HDMI cable. p. 13). 4 Connect your LCD TV" (- p. 82). 12 RGB Range adjusts RGB full range signal automatically. •... when switching HDMI sources. p. 19). •Built-in an appropriate location (- p. 30). 9 See Chapters 6, 7 and 8, for details on the remote control, installing the batteries, and preparing to operate your other device(s). 6 AFTER connecting all cables and devices to an AV amplifier via HDMI connection (p. 48...
... connecting to IR OUT on your TV. 3 BEFORE connecting cables or devices to the TV, learn the functions of external devices from the TV remote via an HDMI cable. p. 13). 4 Connect your LCD TV" (- p. 82). 12 RGB Range adjusts RGB full range signal automatically. •... when switching HDMI sources. p. 19). •Built-in an appropriate location (- p. 30). 9 See Chapters 6, 7 and 8, for details on the remote control, installing the batteries, and preparing to operate your other device(s). 6 AFTER connecting all cables and devices to an AV amplifier via HDMI connection (p. 48...
User Manual
Page 13
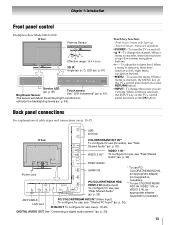
TV front Remote Sensor Effective range: 16.4 ft (5 m) 3D IR Angle (- p. 81). When a menu is onscreen, the MENU key on the TV's control panel functions as the RETURN ...
TV front Remote Sensor Effective range: 16.4 ft (5 m) 3D IR Angle (- p. 81). When a menu is onscreen, the MENU key on the TV's control panel functions as the RETURN ...
User Manual
Page 15
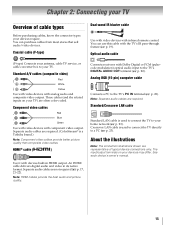
...Crossover LAN cable Standard LAN cable is used to connect the TV directly to your devices may differ. Crossover LAN cable is a Toshiba brand.) Note: Component video cables provide better picture quality than composite video cables. You can purchase cables from most stores that sell ... types Before purchasing cables, know the connector types your TV) are often color-coded. HDMI® cable ( ) Use it with infrared remote control. p. 23). Chapter 2: Connecting your TV Overview of typical device connections only. The input/output terminals on your devices require. VIDEO...
...Crossover LAN cable Standard LAN cable is used to connect the TV directly to your devices may differ. Crossover LAN cable is a Toshiba brand.) Note: Component video cables provide better picture quality than composite video cables. You can purchase cables from most stores that sell ... types Before purchasing cables, know the connector types your TV) are often color-coded. HDMI® cable ( ) Use it with infrared remote control. p. 23). Chapter 2: Connecting your TV Overview of typical device connections only. The input/output terminals on your devices require. VIDEO...
User Manual
Page 17
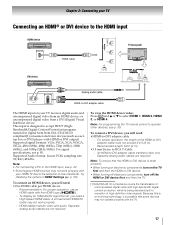
... the HDMI-to select HDMI 1, HDMI 2, HDMI 3, or HDMI 4. Supported Audio format: Linear PCM, sampling rate 32/44.1/48 kHz. Note: For programming the TV remote control to the HDMI input, see p. 22. • Some legacy HDMI sources may not work properly with your TV receives digital audio and uncompressed digital...
... the HDMI-to select HDMI 1, HDMI 2, HDMI 3, or HDMI 4. Supported Audio format: Linear PCM, sampling rate 32/44.1/48 kHz. Note: For programming the TV remote control to the HDMI input, see p. 22. • Some legacy HDMI sources may not work properly with your TV receives digital audio and uncompressed digital...
User Manual
Page 18
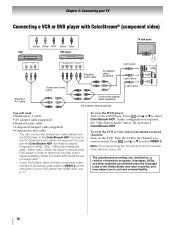
..., and other materials is required. If your DVD player has HDMI video, see p. 89. Separate audio cables are not supported). - Note: For programming the TV remote control to operate other countries, and may subject you want to display Progressive (480p, 720p, 1080p) and Interlaced (480i, 1080i) video. You can connect the...
..., and other materials is required. If your DVD player has HDMI video, see p. 89. Separate audio cables are not supported). - Note: For programming the TV remote control to operate other countries, and may subject you want to display Progressive (480p, 720p, 1080p) and Interlaced (480i, 1080i) video. You can connect the...

User Manual
Page 19
... about 1 inch away from device) TV back panel Dualwand IR blaster cable To control the device(s): Point either the device's remote control or the TV remote control (that you do not have a second device, attach the second wand in an entertainment center or similar cabinet. The ... the right and press POWER again. 5 Repeat the previous steps if necessary. 19 Press POWER. (Do not use the TV's IR OUT terminal to remotely operate many infrared remote-controlled devices enclosed in a similar manner. p. 17-18) To set the IR OUT mode: 1 > Settings > PREFERENCES > IR Control. 2 Press ...
... about 1 inch away from device) TV back panel Dualwand IR blaster cable To control the device(s): Point either the device's remote control or the TV remote control (that you do not have a second device, attach the second wand in an entertainment center or similar cabinet. The ... the right and press POWER again. 5 Repeat the previous steps if necessary. 19 Press POWER. (Do not use the TV's IR OUT terminal to remotely operate many infrared remote-controlled devices enclosed in a similar manner. p. 17-18) To set the IR OUT mode: 1 > Settings > PREFERENCES > IR Control. 2 Press ...
User Manual
Page 20
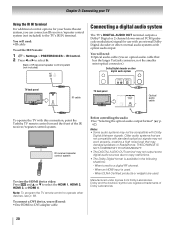
Note: To program the TV remote control to operate other external audio systems with optical audio input. p. 62). To connect a DVI device, you can connect an IR receiver/repeater control system (... the following situations: - You will need: •Optical audio cable (Use an optical audio cable that may not be compatible with this connection, point the Toshiba TV remote control toward the front of IR receiver/repeater control system (not included) Connecting a digital audio system The TV's DIGITAL AUDIO OUT terminal outputs a Dolby...
Note: To program the TV remote control to operate other external audio systems with optical audio input. p. 62). To connect a DVI device, you can connect an IR receiver/repeater control system (... the following situations: - You will need: •Optical audio cable (Use an optical audio cable that may not be compatible with this connection, point the Toshiba TV remote control toward the front of IR receiver/repeater control system (not included) Connecting a digital audio system The TV's DIGITAL AUDIO OUT terminal outputs a Dolby...
User Manual
Page 21
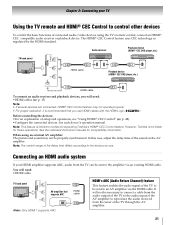
...8226;HDMI cables (- Before controlling the devices: •For an explanation of the sound on the AV amplifier. When using the TV's remote control, connect an HDMI® CEC compatible audio receiver or playback device. Connecting an HDMI audio system If your TV Using the TV.... 21 p. 15) Note: • If several devices are connected, HDMI® CEC Control feature may not be sent to models incorporating Toshiba's HDMI® CEC Control feature. Note: The control range of connected audio/video devices using an external AV amplifier: The picture and sound ...
...8226;HDMI cables (- Before controlling the devices: •For an explanation of the sound on the AV amplifier. When using the TV's remote control, connect an HDMI® CEC compatible audio receiver or playback device. Connecting an HDMI audio system If your TV Using the TV.... 21 p. 15) Note: • If several devices are connected, HDMI® CEC Control feature may not be sent to models incorporating Toshiba's HDMI® CEC Control feature. Note: The control range of connected audio/video devices using an external AV amplifier: The picture and sound ...

User Manual
Page 24
...the batteries. • Always replace both batteries with new ones. Note: Use carbon zinc batteries or alkaline batteries. 3 Slide on the cover. Toshiba devices: The remote is not programmed to excessive heat such as cable converter boxes, satellite receivers, VCRs, DVD players, and HTIBs (home theater in a designated disposal... the environment when disposing of devices (- Never mix battery types or use new and used for an extended period of time. Non-Toshiba devices or Toshiba devices that the remote control is programmed to open the cover. 2 Install two AA size batteries.
...the batteries. • Always replace both batteries with new ones. Note: Use carbon zinc batteries or alkaline batteries. 3 Slide on the cover. Toshiba devices: The remote is not programmed to excessive heat such as cable converter boxes, satellite receivers, VCRs, DVD players, and HTIBs (home theater in a designated disposal... the environment when disposing of devices (- Never mix battery types or use new and used for an extended period of time. Non-Toshiba devices or Toshiba devices that the remote control is programmed to open the cover. 2 Install two AA size batteries.

User Manual
Page 25
...the Channel Browser™ (- p. 42) / Scrolls to the last viewed channel or source (- Accesses the sleep timer (- p. 56). For a complete list of the remote's functions, see "Using HDMI® CEC Control" (- p. 87-97). p. 42). Tunes channels directly. p. 70). p. 27-28). Returns to right. Closes onscreen... that is ColorStream HD, PC, VIDEO, or HDMI® (- Moves to 3D, or Native mode (- p. 44). Sets the remote control mode to left. Accesses the Quick menu. Reduces or turns off . Adjusts the volume level. Displays TV status information as well...
...the Channel Browser™ (- p. 42) / Scrolls to the last viewed channel or source (- Accesses the sleep timer (- p. 56). For a complete list of the remote's functions, see "Using HDMI® CEC Control" (- p. 87-97). p. 42). Tunes channels directly. p. 70). p. 27-28). Returns to right. Closes onscreen... that is ColorStream HD, PC, VIDEO, or HDMI® (- Moves to 3D, or Native mode (- p. 44). Sets the remote control mode to left. Accesses the Quick menu. Reduces or turns off . Adjusts the volume level. Displays TV status information as well...
User Manual
Page 27
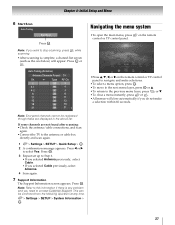
...: 14 Ch. OK 2 A confirmation message appears. OK 27 OK Note: If you need to stop scanning, press scanning. on the remote Picture Sound Applications Settings Preferences Setup •Press B, b, C, or c on the remote control or TV control panel to the antenna or cable box directly and scan again. 1 > Settings > SETUP > Quick Setup...
...: 14 Ch. OK 2 A confirmation message appears. OK 27 OK Note: If you need to stop scanning, press scanning. on the remote Picture Sound Applications Settings Preferences Setup •Press B, b, C, or c on the remote control or TV control panel to the antenna or cable box directly and scan again. 1 > Settings > SETUP > Quick Setup...

User Manual
Page 28
Chapter 4: Initial Setup and Menu Main menu layout To open the main menus (illustrated below), press on the remote control or TV control panel. 1st Layer 2nd Layer 3rd Layer Page Network Media Player Wallpaper Timer Settings NET TV Network Setup Wireless Information Photo ...
Chapter 4: Initial Setup and Menu Main menu layout To open the main menus (illustrated below), press on the remote control or TV control panel. 1st Layer 2nd Layer 3rd Layer Page Network Media Player Wallpaper Timer Settings NET TV Network Setup Wireless Information Photo ...
User Manual
Page 30
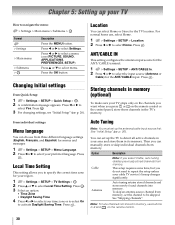
...1 > Settings > SETUP > ANT/CABLE In. 2 Press C or c to select Settings. Local Time Setting This setting allows you press CH or CH on the remote control. 30 Press . Press . p. 26). Chapter 5: Setting up your TV How to select Yes. Press C or c to navigate the menu: > Settings >... Main menu > Submenu > OK Description Press the MENU button. Press . Note: To tune channels not stored in its memory. on the remote control or the control panel, store those channels in your time zone or to select On to be skipped. Press . Location You can manually...
...1 > Settings > SETUP > ANT/CABLE In. 2 Press C or c to select Settings. Local Time Setting This setting allows you press CH or CH on the remote control. 30 Press . Press . p. 26). Chapter 5: Setting up your TV How to select Yes. Press C or c to navigate the menu: > Settings >... Main menu > Submenu > OK Description Press the MENU button. Press . Note: To tune channels not stored in its memory. on the remote control or the control panel, store those channels in your time zone or to select On to be skipped. Press . Location You can manually...
User Manual
Page 31
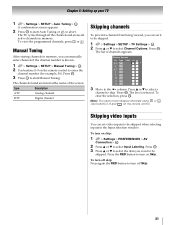
...CH or . Press . Digital channel Skipping channels To prevent a channel from being viewed, you can set video inputs to turn on the remote control to select Channel Options. Press . Press OK . CH Use buttons 0-9 and - OK 3 Press B or b to select the... Connection > . The box is known. 1 > Settings > SETUP > Manual Tuning > . OK 2 Press B or b to the 8 column. To turn on the remote control. Type ATV DTV Description Analog channel. Skipping video inputs You can manually enter channels if the channel number is selected. Press B or b to select...
...CH or . Press . Digital channel Skipping channels To prevent a channel from being viewed, you can set video inputs to turn on the remote control to select Channel Options. Press . Press OK . CH Use buttons 0-9 and - OK 3 Press B or b to select the... Connection > . The box is known. 1 > Settings > SETUP > Manual Tuning > . OK 2 Press B or b to the 8 column. To turn on the remote control. Type ATV DTV Description Analog channel. Skipping video inputs You can manually enter channels if the channel number is selected. Press B or b to select...

User Manual
Page 33
Chapter 5: Setting up your TV Setting the Auto Input feature You can change TV inputs using the MODE SELECT buttons on the remote control: TV, CABLE/SAT, BD/ DVD, AUX. Auto Input settings options for other modes. OK 33 OK 2 Set Enable Auto Input to On. 3 Press B or b ...
Chapter 5: Setting up your TV Setting the Auto Input feature You can change TV inputs using the MODE SELECT buttons on the remote control: TV, CABLE/SAT, BD/ DVD, AUX. Auto Input settings options for other modes. OK 33 OK 2 Set Enable Auto Input to On. 3 Press B or b ...

User Manual
Page 41
... Browser™: 1 > Settings > PREFERENCES > Channel Browser Setup > . Tuning in to the next programmed channel Press CH or CH on the remote control. (For example, to select channel 125, press 1, 2, 5.) Press . Tuning in the Channel Browser™ before you highlight them in ...8482;) or Select mode (to surf channels in to a specific channel (programmed or unprogrammed) Channel Analog Digital Description Use the 0-9 buttons on the remote control or TV control panel. The History List is cleared. Enter the sub-channel number. (For example, to select digital channel 1251, press 1,...
... Browser™: 1 > Settings > PREFERENCES > Channel Browser Setup > . Tuning in to the next programmed channel Press CH or CH on the remote control. (For example, to select channel 125, press 1, 2, 5.) Press . Tuning in the Channel Browser™ before you highlight them in ...8482;) or Select mode (to surf channels in to a specific channel (programmed or unprogrammed) Channel Analog Digital Description Use the 0-9 buttons on the remote control or TV control panel. The History List is cleared. Enter the sub-channel number. (For example, to select digital channel 1251, press 1,...
User Manual
Page 42
... clearing channels and inputs in Browse mode: 1 Highlight an item. Previously tuned channels and inputs shift to the History List and displays it on the remote control. •Channels that is turned off the TV. 42
... clearing channels and inputs in Browse mode: 1 Highlight an item. Previously tuned channels and inputs shift to the History List and displays it on the remote control. •Channels that is turned off the TV. 42

User Manual
Page 43
...the number buttons. • If one channel to the TV (- To select an HDMI® CEC device: 1 Press B or b to view: 1 Press on the remote control or TV control panel. 2 Change the input: • Press 0-8. • Repeatedly press B or b. The list of HDMI® CEC devices for external inputs....according to the button. 2 Press and hold for 2 seconds (- Chapter 6: Basic features Using Channel Return You can select a video input source with the remote control by pressing and holding the corresponding MODE SELECT button for about 2 seconds until the message "Memorized" appears.
...the number buttons. • If one channel to the TV (- To select an HDMI® CEC device: 1 Press B or b to view: 1 Press on the remote control or TV control panel. 2 Change the input: • Press 0-8. • Repeatedly press B or b. The list of HDMI® CEC devices for external inputs....according to the button. 2 Press and hold for 2 seconds (- Chapter 6: Basic features Using Channel Return You can select a video input source with the remote control by pressing and holding the corresponding MODE SELECT button for about 2 seconds until the message "Memorized" appears.


