Printable Spec Sheet
Page 1
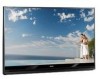
...; feature, ensuring you fall asleep and the signal turns to enjoy the show. Audio Enhancements - PRELIMINARY 65HM167 65" Diagonal 1080p DLP® TV shown on optional stand ST6587 1080p Full HD Display - Utilizing DLP® chip technology from Texas Instruments, and advanced optics, Toshiba micro-display projection TVs bring home the quality of 720p HD models, Full...
...; feature, ensuring you fall asleep and the signal turns to enjoy the show. Audio Enhancements - PRELIMINARY 65HM167 65" Diagonal 1080p DLP® TV shown on optional stand ST6587 1080p Full HD Display - Utilizing DLP® chip technology from Texas Instruments, and advanced optics, Toshiba micro-display projection TVs bring home the quality of 720p HD models, Full...
Service Manual
Page 4
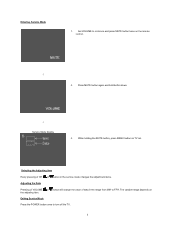
.... Set VOLUME to FFH. Press MUTE button again and hold button down. Ļ Service Mode display 3. Exiting Service Mode Press the POWER button once to turn off the TV. 3 The variable range depends on TV set. Entering Service Mode 1.
.... Set VOLUME to FFH. Press MUTE button again and hold button down. Ļ Service Mode display 3. Exiting Service Mode Press the POWER button once to turn off the TV. 3 The variable range depends on TV set. Entering Service Mode 1.
Service Manual
Page 6
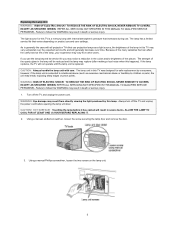
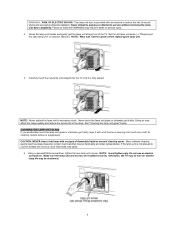
...excessive mechanical abuse or handling by consumers; CAUTION! Touching the lamp before opening the lamp unit door. As is generally the case with all projection TVs that can affect the useful service life of the many variables that use . Failure to follow this WARNING may result in death or serious... and the lamp may rupture (often making a loud noise when this TV was designed for this WARNING may vary from directly viewing the light produced by this TV may notice a reduction in this lamp. Always turn off the TV and unplug the power cord. ALLOW THE LAMP TO COOL FOR AT...
...excessive mechanical abuse or handling by consumers; CAUTION! Touching the lamp before opening the lamp unit door. As is generally the case with all projection TVs that can affect the useful service life of the many variables that use . Failure to follow this WARNING may result in death or serious... and the lamp may rupture (often making a loud noise when this TV was designed for this WARNING may vary from directly viewing the light produced by this TV may notice a reduction in this lamp. Always turn off the TV and unplug the power cord. ALLOW THE LAMP TO COOL FOR AT...
Service Manual
Page 7
...at least one (1) hour, such chemicals may ignite. 6. WARNING: RISK OF ELECTRIC SHOCK! Carefully insert the new lamp unit straight into the TV until it with a lint-free lens cleaning cloth (such as glass cleaners) contain chemicals that may affect the image quality and reduce the ...or serious injury. 4. See "Cleaning the lamp unit glass" below. The lamp unit door is not allowed to follow this WARNING may no turn on Owners' Manual). Many ordinary cleaning agents (such as a cloth for at certain temperatures. Make sure the lamp unit and screws are installed ...
...at least one (1) hour, such chemicals may ignite. 6. WARNING: RISK OF ELECTRIC SHOCK! Carefully insert the new lamp unit straight into the TV until it with a lint-free lens cleaning cloth (such as glass cleaners) contain chemicals that may affect the image quality and reduce the ...or serious injury. 4. See "Cleaning the lamp unit glass" below. The lamp unit door is not allowed to follow this WARNING may no turn on Owners' Manual). Many ordinary cleaning agents (such as a cloth for at certain temperatures. Make sure the lamp unit and screws are installed ...
Service Manual
Page 8
...to ensure that the lamp unit and lamp unit door are installed correctly: x No picture x Dark picture x TV will not turn on the TV. otherwise, the TV may be regulated due to www.toshiba.ca; If any of the Used Lamp Unit CAUTION: Always handle the lamp unit with care. click "Home ...631-3811. x In Canada, locate the nearest Toshiba authorized service depot by the approved method for full picture brightness), the TV should operate normally. The lamp unit in the TV cabinet. 8. Disposal of the used lamp unit in the power cord and turn on the left side of children and pets....
...to ensure that the lamp unit and lamp unit door are installed correctly: x No picture x Dark picture x TV will not turn on the TV. otherwise, the TV may be regulated due to www.toshiba.ca; If any of the Used Lamp Unit CAUTION: Always handle the lamp unit with care. click "Home ...631-3811. x In Canada, locate the nearest Toshiba authorized service depot by the approved method for full picture brightness), the TV should operate normally. The lamp unit in the TV cabinet. 8. Disposal of the used lamp unit in the power cord and turn on the left side of children and pets....

Service Manual
Page 17
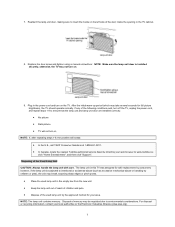
FIRMWARE AND DATA UPLOADING CONCEPT WARNING: All application and program data will be upgraded. DO NOT upgrade while the TV is turned ON. LED Indication During the Software Updating Three LED indicators show the updating progress or status. x Insert SD card and then plug AC in the SD card media. x After replacing SEINE or Main unit, perform the following . 16 x Prepare FW and data in . Firmware and Data Updating After SEINE unit changed, perform the following .
FIRMWARE AND DATA UPLOADING CONCEPT WARNING: All application and program data will be upgraded. DO NOT upgrade while the TV is turned ON. LED Indication During the Software Updating Three LED indicators show the updating progress or status. x Insert SD card and then plug AC in the SD card media. x After replacing SEINE or Main unit, perform the following . 16 x Prepare FW and data in . Firmware and Data Updating After SEINE unit changed, perform the following .
Service Manual
Page 19
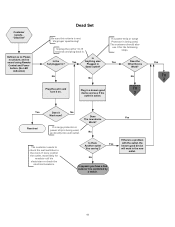
Is Anything else Plugged in and turn it is met Via proper questioning! No No No Plug the set for the following steps. Does The new device Work? No It appears you .... Customer reports.. "Dead Set" Defined as no Power, no picture, and no sound using Remote Control and Power button. (No LED indication) Dead Set 2007 Toshiba DLP Television DLP-07-1 Be sure this criteria is controlled by a switch. Is the Yes Set plugged in a known good device and see if the...
Is Anything else Plugged in and turn it is met Via proper questioning! No No No Plug the set for the following steps. Does The new device Work? No It appears you .... Customer reports.. "Dead Set" Defined as no Power, no picture, and no sound using Remote Control and Power button. (No LED indication) Dead Set 2007 Toshiba DLP Television DLP-07-1 Be sure this criteria is controlled by a switch. Is the Yes Set plugged in a known good device and see if the...
Service Manual
Page 22
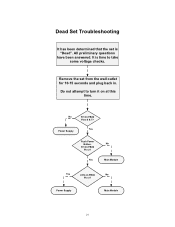
No 5V On PB80 Pins 6 & 7? Power Supply Main Module ” 2007 Toshiba America Consumer Products, LLC. 8 of 12 21 SMART2007003_Version 20Q DLP_1.0.4 Dead Set Troubleshooting It has been determined that the set from the wall outlet for 10-15 seconds and plug back in. It is "Dead". Remove the set is time to turn it on PB80 No Pin 3? Do not attempt to take some voltage checks. Yes Power Supply Push Power Button. 3V On PB80 Pin 2? Yes No Main Module Yes 2.6V on at this time. All preliminary questions have been answered.
No 5V On PB80 Pins 6 & 7? Power Supply Main Module ” 2007 Toshiba America Consumer Products, LLC. 8 of 12 21 SMART2007003_Version 20Q DLP_1.0.4 Dead Set Troubleshooting It has been determined that the set from the wall outlet for 10-15 seconds and plug back in. It is "Dead". Remove the set is time to turn it on PB80 No Pin 3? Do not attempt to take some voltage checks. Yes Power Supply Push Power Button. 3V On PB80 Pin 2? Yes No Main Module Yes 2.6V on at this time. All preliminary questions have been answered.
Owners Manual
Page 3
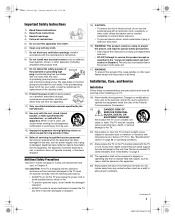
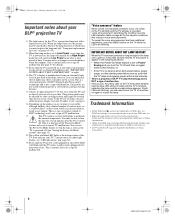
...fully insert. 16) WARNING: This product contains a lamp to project the picture, and requires special safety precautions: • See...TV. 20) Never place or store the TV in Chapter 9. 14b) CAUTION: If the TV is dropped and the cabinet or enclosure surface has been damaged or the TV does not operate normally, take the following precautions: • ALWAYS turn off the TV...over. 13) Unplug this apparatus during lightning storms or when unused for your safety. Never place the TV on the TV stand provided with liquids, such as radiators, heat registers, stoves, or other . A grounding type ...
...fully insert. 16) WARNING: This product contains a lamp to project the picture, and requires special safety precautions: • See...TV. 20) Never place or store the TV in Chapter 9. 14b) CAUTION: If the TV is dropped and the cabinet or enclosure surface has been damaged or the TV does not operate normally, take the following precautions: • ALWAYS turn off the TV...over. 13) Unplug this apparatus during lightning storms or when unused for your safety. Never place the TV on the TV stand provided with liquids, such as radiators, heat registers, stoves, or other . A grounding type ...
Owners Manual
Page 4
.... • Never attempt to follow these sounds become frequent or continuous, unplug the power cord and contact a Toshiba Authorized Service Center. 36) Special care for your TOSHIBA TV, follow this product has a limited service life. Care For better performance and safer operation of the National Electric ...not spray volatile compounds, such as a ladder or screwdriver) can make sure the antenna system is subject to environmental considerations. Turn the TV off the TV for long periods of the picture, at which time you sit too far to evaporate. 34) For added protection of ...
.... • Never attempt to follow these sounds become frequent or continuous, unplug the power cord and contact a Toshiba Authorized Service Center. 36) Special care for your TOSHIBA TV, follow this product has a limited service life. Care For better performance and safer operation of the National Electric ...not spray volatile compounds, such as a ladder or screwdriver) can make sure the antenna system is subject to environmental considerations. Turn the TV off the TV for long periods of the picture, at which time you sit too far to evaporate. 34) For added protection of ...
Owners Manual
Page 6
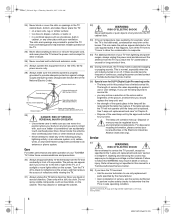
...care" on the media you turn the TV off and then on long enough for too long, you will play a recorded "voice announcement" describing the condition (see "LED indications" (- The picture quality may take several cooling fans to DLP® technology and is a projection lamp unit with a limited ... several minutes for several minutes after a short period of TV malfunction. You may suffer from SRS Labs, Inc. • Manufactured under "Care" on page 4. 6) Depending on pages 63-65). 2) When the lamp mode is set to hear the fans for the picture to restart the lamp. "Voice...
...care" on the media you turn the TV off and then on long enough for too long, you will play a recorded "voice announcement" describing the condition (see "LED indications" (- The picture quality may take several cooling fans to DLP® technology and is a projection lamp unit with a limited ... several minutes for several minutes after a short period of TV malfunction. You may suffer from SRS Labs, Inc. • Manufactured under "Care" on page 4. 6) Depending on pages 63-65). 2) When the lamp mode is set to hear the fans for the picture to restart the lamp. "Voice...
Owners Manual
Page 11
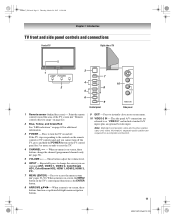
... panel and you are required for a complete connection. 11 HM67 (E/F) Web 213:276 If the TV stops responding to turn off . Press to instantly close an on the TV control panel for additional information. 3 POWER - These buttons adjust the volume level. 6 INPUT - separate audio cables are viewing (ANT, VIDEO 1,...10 Side panel 1 Remote sensor (behind the screen) - Press to reset the TV. 4 CHANNEL Uu - When a menu is on-screen, the MENU button on -screen, these buttons change the source you cannot turn the TV on page 62 for 5 or more seconds to access the menu system (- ...
... panel and you are required for a complete connection. 11 HM67 (E/F) Web 213:276 If the TV stops responding to turn off . Press to instantly close an on the TV control panel for additional information. 3 POWER - These buttons adjust the volume level. 6 INPUT - separate audio cables are viewing (ANT, VIDEO 1,...10 Side panel 1 Remote sensor (behind the screen) - Press to reset the TV. 4 CHANNEL Uu - When a menu is on-screen, the MENU button on -screen, these buttons change the source you cannot turn the TV on page 62 for 5 or more seconds to access the menu system (- ...

Owners Manual
Page 14
...see Chapter 3. The unauthorized recording, use an S-video cable (plus the audio cables) to VIDEO 2 on the TV to VIDEO 2 at the same time or the picture performance will need: • coaxial cables • standard...:276 Select the VIDEO 1 video input source on the TV.* * To select the video input source, press INPUT on the TV.* To view the VCR: Turn ON the VCR. To view the antenna or Cable signal...: Select the ANT video input source on the remote control (- To program the TV remote control to TV You will...
...see Chapter 3. The unauthorized recording, use an S-video cable (plus the audio cables) to VIDEO 2 on the TV to VIDEO 2 at the same time or the picture performance will need: • coaxial cables • standard...:276 Select the VIDEO 1 video input source on the TV.* * To select the video input source, press INPUT on the TV.* To view the VCR: Turn ON the VCR. To view the antenna or Cable signal...: Select the ANT video input source on the remote control (- To program the TV remote control to TV You will...
Owners Manual
Page 15
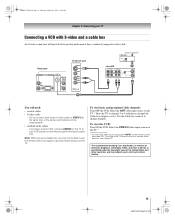
... (- Use the Cable box controls to operate other materials is set to program or access certain features on the TV. To view the VCR: Turn ON the VCR. To program the TV remote control to change channels. The unauthorized recording, use the remote control to ). To view basic and premium ...Cable channels: Turn OFF the VCR. TV back panel TV right side panel From Cable TV Cable box IN CH 3 CH 4 OUT stereo VCR VIDEO AUDIO L R IN CH 3 CH 4 OUT L R IN from ANT OUT to your TV Connecting a VCR with S-video and a cable box An ...
... (- Use the Cable box controls to operate other materials is set to program or access certain features on the TV. To view the VCR: Turn ON the VCR. To program the TV remote control to change channels. The unauthorized recording, use the remote control to ). To view basic and premium ...Cable channels: Turn OFF the VCR. TV back panel TV right side panel From Cable TV Cable box IN CH 3 CH 4 OUT stereo VCR VIDEO AUDIO L R IN CH 3 CH 4 OUT L R IN from ANT OUT to your TV Connecting a VCR with S-video and a cable box An ...
Owners Manual
Page 16
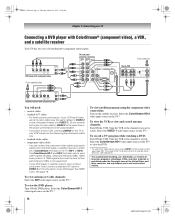
... audio cables) to VIDEO 1). Select the VIDEO 1 video input source on the TV.* To view the DVD player: Turn ON the DVD player. To program the TV remote control to operate other countries, and may subject you to TV Y PB PR AUDIO OUT L Satellite COMPONENT VIDEO S-VIDEO VIDEO R IN OUT ...IN CH 3 CH 4 OUT L R IN from the DVD player or satellite receiver to your VCR's audio out terminal using the component video connections: Turn on the TV (HD-1 or HD-2). 50HM67_EN.book Page 16 Thursday, March 29, 2007 11:28 AM Chapter 2: Connecting your DVD player has HDMI video, see ...
... audio cables) to VIDEO 1). Select the VIDEO 1 video input source on the TV.* To view the DVD player: Turn ON the DVD player. To program the TV remote control to operate other countries, and may subject you to TV Y PB PR AUDIO OUT L Satellite COMPONENT VIDEO S-VIDEO VIDEO R IN OUT ...IN CH 3 CH 4 OUT L R IN from the DVD player or satellite receiver to your VCR's audio out terminal using the component video connections: Turn on the TV (HD-1 or HD-2). 50HM67_EN.book Page 16 Thursday, March 29, 2007 11:28 AM Chapter 2: Connecting your DVD player has HDMI video, see ...
Owners Manual
Page 17
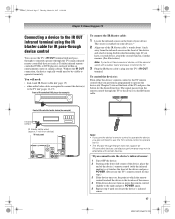
...IR OUT connection, the device typically would need : • dual-wand IR blaster cable (- page 13) • other audio/video cables as Toshiba infrared remotecontrolled VCRs or DVD players) enclosed within an entertainment center or similar cabinet. satisfactory performance may not be visible to the IR OUT infrared ... wand with the infrared emitter) so it touches the front of the device and press POWER. (Do not use the TV's remote control for this step.) 3 If the device turns on, the point at which the remote control touched the device is marked on some devices.* 2 Align one of the...
...IR OUT connection, the device typically would need : • dual-wand IR blaster cable (- page 13) • other audio/video cables as Toshiba infrared remotecontrolled VCRs or DVD players) enclosed within an entertainment center or similar cabinet. satisfactory performance may not be visible to the IR OUT infrared ... wand with the infrared emitter) so it touches the front of the device and press POWER. (Do not use the TV's remote control for this step.) 3 If the device turns on, the point at which the remote control touched the device is marked on some devices.* 2 Align one of the...
Owners Manual
Page 19
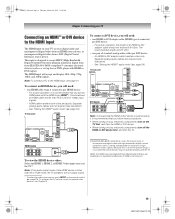
...A connector) per DVI device - To connect an HDMI device, you follow these procedures: • When turning on your electronic components, turn off the HDMI or DVI device first, and then the TV. For proper operation, it is possible that some devices may not operate properly with the HDMI Logo (HDMI...HDMI™ or DVI device to the HDMI input The HDMI input on your electronic components, turn on the TV first, and then the HDMI or DVI device. • When turning off your TV receives digital audio and uncompressed digital video from an HDMI source device, or uncompressed digital video from...
...A connector) per DVI device - To connect an HDMI device, you follow these procedures: • When turning on your electronic components, turn off the HDMI or DVI device first, and then the TV. For proper operation, it is possible that some devices may not operate properly with the HDMI Logo (HDMI...HDMI™ or DVI device to the HDMI input The HDMI input on your electronic components, turn on the TV first, and then the HDMI or DVI device. • When turning off your TV receives digital audio and uncompressed digital video from an HDMI source device, or uncompressed digital video from...
Owners Manual
Page 20
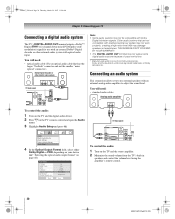
...Output Format Dolby Digital Dynamic Range Control Reset No Auto Stereo English Dolby Digital Compressed Done To control the audio: 1 Turn on your TV Connecting a digital audio system The TV's DIGITAL AUDIO OUT terminal outputs a Dolby®* Digital g or 2-channel down-mixed PCM (pulse-code modulation) ... standard audio cables Analog audio amplifier LINE IN LR To control the audio: 1 Turn on the TV and the digital audio device. 2 Press Y on page 48). "Selecting the optical audio output format" on the TV's remote control and open the Audio menu. 3 Highlight Audio Setup and press T. ...
...Output Format Dolby Digital Dynamic Range Control Reset No Auto Stereo English Dolby Digital Compressed Done To control the audio: 1 Turn on your TV Connecting a digital audio system The TV's DIGITAL AUDIO OUT terminal outputs a Dolby®* Digital g or 2-channel down-mixed PCM (pulse-code modulation) ... standard audio cables Analog audio amplifier LINE IN LR To control the audio: 1 Turn on the TV and the digital audio device. 2 Press Y on page 48). "Selecting the optical audio output format" on the TV's remote control and open the Audio menu. 3 Highlight Audio Setup and press T. ...
Owners Manual
Page 23
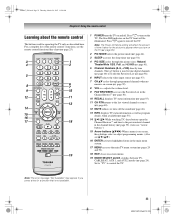
...functional key chart (- For a complete list of time it takes for the picture to tune digital channels (- page 25). 1 POWER turns the TV on -screen menus. 19 MODE SELECT switch switches between TV, CABLE/SAT, AUX 1, and AUX 2 modes (- page 37). 7 CH Bb cycles through the picture sizes: Natural, TheaterWide 1/2/3, ...in the channel history (- page 55). 11 CH RTN returns to edit the Favorites List (- page 40). 12 MUTE reduces or turns off the sound (- Set to "TV" to the previous/next channel in the Channel Brower™ (- Note: The error message "Not Available" may appear if you...
...functional key chart (- For a complete list of time it takes for the picture to tune digital channels (- page 25). 1 POWER turns the TV on -screen menus. 19 MODE SELECT switch switches between TV, CABLE/SAT, AUX 1, and AUX 2 modes (- page 37). 7 CH Bb cycles through the picture sizes: Natural, TheaterWide 1/2/3, ...in the channel history (- page 55). 11 CH RTN returns to edit the Favorites List (- page 40). 12 MUTE reduces or turns off the sound (- Set to "TV" to the previous/next channel in the Channel Brower™ (- Note: The error message "Not Available" may appear if you...
Owners Manual
Page 24
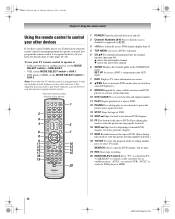
... Point the remote control directly at the device. 16 17 18 19 1 POWER Turns the selected device on some DVD players). 9 ENTER Required by some satellite receivers and... play or record mode to pause the picture; To use those features, you have a non-Toshiba device or a Toshiba device that the remote control is programmed, it may not work on and off. 2 Channel ... memory (- "AUX 2" to control a cable converter box or satellite receiver; Note: Even after the TV remote control is not preprogrammed to operate, you must first program the remote control to recognize the device ...
... Point the remote control directly at the device. 16 17 18 19 1 POWER Turns the selected device on some DVD players). 9 ENTER Required by some satellite receivers and... play or record mode to pause the picture; To use those features, you have a non-Toshiba device or a Toshiba device that the remote control is programmed, it may not work on and off. 2 Channel ... memory (- "AUX 2" to control a cable converter box or satellite receiver; Note: Even after the TV remote control is not preprogrammed to operate, you must first program the remote control to recognize the device ...


