
Owner's Manual - English
Page 2
..., to the point of the lamp immediately after use and user settings. Toshiba Cares! The Consumer Electronics Association formed the Home Entertainment Support Safety Committee, comprised of important operating and maintenance (servicing) instructions in this manual.) The lightning flash with the Toshiba stand listed below. Remember that the cable ground shall be of sufficient magnitude to persons. Tune Into Safety One size does NOT fit all...
..., to the point of the lamp immediately after use and user settings. Toshiba Cares! The Consumer Electronics Association formed the Home Entertainment Support Safety Committee, comprised of important operating and maintenance (servicing) instructions in this manual.) The lightning flash with the Toshiba stand listed below. Remember that the cable ground shall be of sufficient magnitude to persons. Tune Into Safety One size does NOT fit all...
Owner's Manual - English
Page 4
... the National Electric Code). Refer all servicing not specified in this happens, turn off to check for 6 to 7 hours to allow the condensation to properly dispose of the picture, at which time you use or user settings. Antenna lead-in wire Ground clamp Antenna discharge unit (NEC Section 810-20) Electric service equipment Ground clamps Grounding conductors (NEC Section 810-21) Power service grounding electrode...
... the National Electric Code). Refer all servicing not specified in this happens, turn off to check for 6 to 7 hours to allow the condensation to properly dispose of the picture, at which time you use or user settings. Antenna lead-in wire Ground clamp Antenna discharge unit (NEC Section 810-20) Electric service equipment Ground clamps Grounding conductors (NEC Section 810-21) Power service grounding electrode...
Owner's Manual - English
Page 5
... panel controls and connections 9 TV back panel connections 10 Overview of viewing time. This is normal and is a projection lamp unit with ColorStream® (component video) and a VCR 17 Connecting two VCRs 18 Connecting an HDMI™ or a DVI device to the HDMI input 19 Connecting a digital audio system 20 Connecting an analog audio system 20 Controlling infrared remote-controlled devices through the TV (IR pass-through 21 Connecting IEEE1394 video devices 22 Using analog-compatible IEEE1394 devices 22 Supported signals...
... panel controls and connections 9 TV back panel connections 10 Overview of viewing time. This is normal and is a projection lamp unit with ColorStream® (component video) and a VCR 17 Connecting two VCRs 18 Connecting an HDMI™ or a DVI device to the HDMI input 19 Connecting a digital audio system 20 Connecting an analog audio system 20 Controlling infrared remote-controlled devices through the TV (IR pass-through 21 Connecting IEEE1394 video devices 22 Using analog-compatible IEEE1394 devices 22 Supported signals...
Owner's Manual - English
Page 6
...; audio mode 50 Setting the time and date 50 Viewing the CableCARD™ menu 51 Setting the Quick Restart™ feature 51 Viewing the digital signal meter 52 Viewing the system status 52 Chapter 7: Using the TV Guide On Screen™ interactive program guide 53 Setting up the TV Guide On Screen™ system 53 Navigating the TV Guide On Screen™ system 54 TV Guide On Screen™ remote control functions ........ 54 Video Window 55 Panel Menus 55 Info Box 56 TV Guide...
...; audio mode 50 Setting the time and date 50 Viewing the CableCARD™ menu 51 Setting the Quick Restart™ feature 51 Viewing the digital signal meter 52 Viewing the system status 52 Chapter 7: Using the TV Guide On Screen™ interactive program guide 53 Setting up the TV Guide On Screen™ system 53 Navigating the TV Guide On Screen™ system 54 TV Guide On Screen™ remote control functions ........ 54 Video Window 55 Panel Menus 55 Info Box 56 TV Guide...

Owner's Manual - English
Page 35
...; TV Guide On Screen™ ➞ Launch Gemstar / TV GUIDE ➞ Audio Player ➞ Launch MP3 audio player ➞ Picture Viewer ➞ Launch the picture viewer ➞ Digital CC / Audio Selector ➞ Launch the ATSC Digital CC Selector ➞ CableCARD™ ➞ Dynamic list of the modes listed below, the menu backgrounds will appear black. This is normal and is not a sign of malfunction. • A 1080 signal is being received. •...
...; TV Guide On Screen™ ➞ Launch Gemstar / TV GUIDE ➞ Audio Player ➞ Launch MP3 audio player ➞ Picture Viewer ➞ Launch the picture viewer ➞ Digital CC / Audio Selector ➞ Launch the ATSC Digital CC Selector ➞ CableCARD™ ➞ Dynamic list of the modes listed below, the menu backgrounds will appear black. This is normal and is not a sign of malfunction. • A 1080 signal is being received. •...

Owner's Manual - English
Page 42
... were previously programmed into the TV's channel memory. Make sure you press CHANNEL y or z on the remote control or TV control panel, your Cable TV service lineup changes significantly. • If you have to program channels into the TV's memory. • If the input signal type is done, press CHANNEL y or z to start automatic channel programming. Terrestrial Input Configuration Channel Program Channel Add/Delete Signal Meter Navigate Select CH RTN Back EXIT Exit ANT 1 Antenna Scanning channels, please wait...
... were previously programmed into the TV's channel memory. Make sure you press CHANNEL y or z on the remote control or TV control panel, your Cable TV service lineup changes significantly. • If you have to program channels into the TV's memory. • If the input signal type is done, press CHANNEL y or z to start automatic channel programming. Terrestrial Input Configuration Channel Program Channel Add/Delete Signal Meter Navigate Select CH RTN Back EXIT Exit ANT 1 Antenna Scanning channels, please wait...
Owner's Manual - English
Page 50
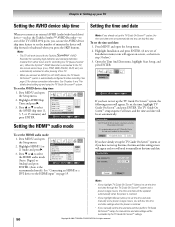
... controlling live TV. • When you connect an AVHD (or a D-VHS) device, the TV Guide On Screen™ system is recommended you set up TV Guide On Screen first and use it to manually set up the time, the time and date setting screen will appear and you will appear on page 19. To set the HDMI audio mode: 1. Press MENU and open the Setup menu. 2. Setup Installation Sleep Timer On/Off Timer HDMI 1 Audio HDMI 2 Audio Slide Show Interval AVHD Skip Time Auto Auto...
... controlling live TV. • When you connect an AVHD (or a D-VHS) device, the TV Guide On Screen™ system is recommended you set up TV Guide On Screen first and use it to manually set up the time, the time and date setting screen will appear and you will appear on page 19. To set the HDMI audio mode: 1. Press MENU and open the Setup menu. 2. Setup Installation Sleep Timer On/Off Timer HDMI 1 Audio HDMI 2 Audio Slide Show Interval AVHD Skip Time Auto Auto...

Owner's Manual - English
Page 51
... Quick Restart is set the Quick Restart feature to Antenna 1. Copyright © 2005 TOSHIBA CORPORATION. Applications TV Guide On Screen Audio Player Picture Viewer Digital CC/Audio Selector CableCARD IP Service Conditional Access CableCARD(tm) Status Network Setup CableCARD(tm) Pairing Navigate Select CH RTN Back EXIT Exit Note: The CableCARD™ menu is inserted, a CableCARD™ option appears in the Applications menu, with cable signal connected to Off...
... Quick Restart is set the Quick Restart feature to Antenna 1. Copyright © 2005 TOSHIBA CORPORATION. Applications TV Guide On Screen Audio Player Picture Viewer Digital CC/Audio Selector CableCARD IP Service Conditional Access CableCARD(tm) Status Network Setup CableCARD(tm) Pairing Navigate Select CH RTN Back EXIT Exit Note: The CableCARD™ menu is inserted, a CableCARD™ option appears in the Applications menu, with cable signal connected to Off...

Owner's Manual - English
Page 52
... factory default values: 1. System Information Press YES to a virtual TV channel number. Note: The physical digital channel number listed in step 3 below right). To view the system status: 1. Chapter 6: Setting up your local digital stations. Press MENU and open the Setup menu. 2. Terrestrial Input Configuration Channel program Channel Add/Delete Signal Meter Navigate Select CH RTN Back EXIT Exit 4. Highlight Yes and press ENTER. Yes No To cancel the reset...
... factory default values: 1. System Information Press YES to a virtual TV channel number. Note: The physical digital channel number listed in step 3 below right). To view the system status: 1. Chapter 6: Setting up your local digital stations. Press MENU and open the Setup menu. 2. Terrestrial Input Configuration Channel program Channel Add/Delete Signal Meter Navigate Select CH RTN Back EXIT Exit 4. Highlight Yes and press ENTER. Yes No To cancel the reset...
Owner's Manual - English
Page 53
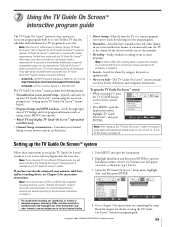
...; Watch TV and display TV Guide On Screen™ information simultaneously. • Channel lineup customization-Customize your channel lineup so your favorite stations are listed first. • Direct tuning-Directly tune the TV to a current program you want to watch by selecting it can receive current program data for its accuracy and availability. Setup Installation Sleep Timer On/Off Timer HDMI 1 Audio HDMI 2 Audio Slide Show Interval AVHD Skip Time Auto Auto 2 Sec...
...; Watch TV and display TV Guide On Screen™ information simultaneously. • Channel lineup customization-Customize your channel lineup so your favorite stations are listed first. • Direct tuning-Directly tune the TV to a current program you want to watch by selecting it can receive current program data for its accuracy and availability. Setup Installation Sleep Timer On/Off Timer HDMI 1 Audio HDMI 2 Audio Slide Show Interval AVHD Skip Time Auto Auto 2 Sec...
Owner's Manual - English
Page 70
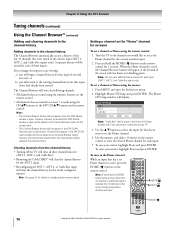
... remote control to enter the desired Home channel for at the bottom of the screen with the home icon flashing green. Clearing channels from the multi-window will clear the channel history for the newly configured input(s). Note: You can set a channel as the Home channel for that are viewing: a) you press the HOME button while an input other than an antenna or Cable Box input is open; Use the y z buttons...
... remote control to enter the desired Home channel for at the bottom of the screen with the home icon flashing green. Clearing channels from the multi-window will clear the channel history for the newly configured input(s). Note: You can set a channel as the Home channel for that are viewing: a) you press the HOME button while an input other than an antenna or Cable Box input is open; Use the y z buttons...
Owner's Manual - English
Page 75
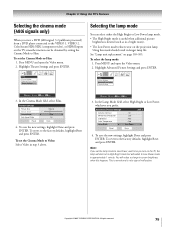
... 8: Using the TV's features Selecting the cinema mode (480i signals only) When you view a DVD (480i signal; 3:2 pulldown processed) from a DVD player connected to the VIDEO 1, VIDEO 2, ColorStream HD1/HD2 (component video), or HDMI inputs on the projection lamp. Selecting the lamp mode You can be obtained by setting the Cinema Mode to Low Power mode in longer lamp life. To select the lamp mode: 1. In the Cinema Mode field, select Film. In the Lamp Mode field, select High Bright or...
... 8: Using the TV's features Selecting the cinema mode (480i signals only) When you view a DVD (480i signal; 3:2 pulldown processed) from a DVD player connected to the VIDEO 1, VIDEO 2, ColorStream HD1/HD2 (component video), or HDMI inputs on the projection lamp. Selecting the lamp mode You can be obtained by setting the Cinema Mode to Low Power mode in longer lamp life. To select the lamp mode: 1. In the Cinema Mode field, select Film. In the Lamp Mode field, select High Bright or...
Owner's Manual - English
Page 92
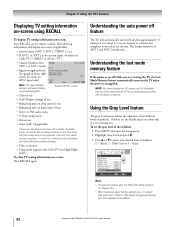
... by channel changes. • Video resolution • Lamp mode (appears only if the TV is resupplied. Sidebars are viewing the TV, the Last Mode Memory feature automatically turns on hold * (if applicable) * If you will not be applied to fading and increasing signals. Black, 2 - for the day. Game Timer: 28 min. Press MENU and open the Setup menu. 2. This feature functions in 16:9 aspect ratio. • When receiving a signal that...
... by channel changes. • Video resolution • Lamp mode (appears only if the TV is resupplied. Sidebars are viewing the TV, the Last Mode Memory feature automatically turns on hold * (if applicable) * If you will not be applied to fading and increasing signals. Black, 2 - for the day. Game Timer: 28 min. Press MENU and open the Setup menu. 2. This feature functions in 16:9 aspect ratio. • When receiving a signal that...
Owner's Manual - English
Page 97
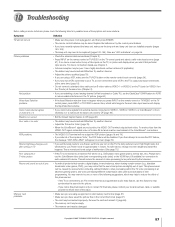
10 Troubleshooting Before calling a service technician, please check the following suggestions, which will display when you turn on Picture problems Noisy picture Video Input Selection problems Cannot view external signals or channel 3 or 4 Black box on screen Poor color or no color POP problems Picture brightness changes soon after turning on TV Poor composite or S-video picture Picture and sound are out of this happens. To receive video from channels 3 or 4, make sure the Input Lock is not a sign of video processing to be disabled. If you...
10 Troubleshooting Before calling a service technician, please check the following suggestions, which will display when you turn on Picture problems Noisy picture Video Input Selection problems Cannot view external signals or channel 3 or 4 Black box on screen Poor color or no color POP problems Picture brightness changes soon after turning on TV Poor composite or S-video picture Picture and sound are out of this happens. To receive video from channels 3 or 4, make sure the Input Lock is not a sign of video processing to be disabled. If you...
Owner's Manual - English
Page 98
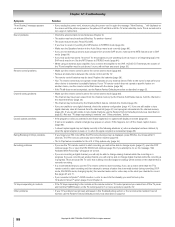
... mode, FAV SCAN mode, changing inputs,) the recorded audio and/or video may have broadcast difficulties. If you plug the power cord in again the message "Now Booting..." If this Troubleshooting section or the recommended solution has not worked, use the Restore Factory Defaults procedure as described on page 52. • Make sure the remote control is set correctly (page 86). • If you use the Restore Factory...
... mode, FAV SCAN mode, changing inputs,) the recorded audio and/or video may have broadcast difficulties. If you plug the power cord in again the message "Now Booting..." If this Troubleshooting section or the recommended solution has not worked, use the Restore Factory Defaults procedure as described on page 52. • Make sure the remote control is set correctly (page 86). • If you use the Restore Factory...
Owner's Manual - English
Page 101
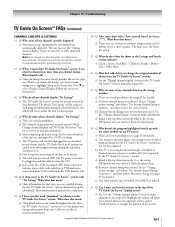
.... A: "Download" refers to receive its data download. A: Green = Sports; Dark Blue = Children's; Purple = Movies; Teal = Other Show. 22. Q: Why are several possibilities (see page 65). 23. Use the "Change channel display" feature to turn ON or OFF additional channels. c) Initial setup was done incorrectly (that mean ? Q: Why doesn't the program highlighted match up /down arrows, and/or Number buttons to its scheduled program listing and the TV Guide On Screen™...
.... A: "Download" refers to receive its data download. A: Green = Sports; Dark Blue = Children's; Purple = Movies; Teal = Other Show. 22. Q: Why are several possibilities (see page 65). 23. Use the "Change channel display" feature to turn ON or OFF additional channels. c) Initial setup was done incorrectly (that mean ? Q: Why doesn't the program highlighted match up /down arrows, and/or Number buttons to its scheduled program listing and the TV Guide On Screen™...

Owner's Manual - English
Page 102
... the resulting menu, press z two times to scroll down to the next day's listings without highlighting a show ? Q: How many programs can 't I have been programmed will appear once listings are several possibilities: a) The incorrect cable box code was not connected or set on the remote control. 30. Choose the event type, press ENTER, and then enter the date, start times and channel numbers of the TV Guide On Screen™...
... the resulting menu, press z two times to scroll down to the next day's listings without highlighting a show ? Q: How many programs can 't I have been programmed will appear once listings are several possibilities: a) The incorrect cable box code was not connected or set on the remote control. 30. Choose the event type, press ENTER, and then enter the date, start times and channel numbers of the TV Guide On Screen™...
Owner's Manual - English
Page 103
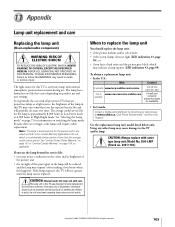
... brightness of the picture; See "Selecting the Lamp mode" on page 75 for this TV is subjected to this happens). however, if the lamp unit is a mercury lamp with all projection TVs that varies depending on product use the lamp beyond its service life: • you use and user settings. To obtain a replacement lamp unit: • In the U.S.: Web In warranty www.tacp.toshiba.com/service Out of time than...
... brightness of the picture; See "Selecting the Lamp mode" on page 75 for this TV is subjected to this happens). however, if the lamp unit is a mercury lamp with all projection TVs that varies depending on product use the lamp beyond its service life: • you use and user settings. To obtain a replacement lamp unit: • In the U.S.: Web In warranty www.tacp.toshiba.com/service Out of time than...

Owner's Manual - English
Page 107
... Warranty for DLP™ Television Models Toshiba America Consumer Products, L.L.C. ("TACP") makes the following all of the operating instructions in this manual and reviewing the section titled "Troubleshooting," you find the nearest TACP Authorized Service Station, visit TACP's website at www.tacp.toshiba.com/service or contact TACP's Consumer Solution Center toll free at www.tacp.toshiba.com/service as soon as possible. AND USED ANYWHERE...
... Warranty for DLP™ Television Models Toshiba America Consumer Products, L.L.C. ("TACP") makes the following all of the operating instructions in this manual and reviewing the section titled "Troubleshooting," you find the nearest TACP Authorized Service Station, visit TACP's website at www.tacp.toshiba.com/service or contact TACP's Consumer Solution Center toll free at www.tacp.toshiba.com/service as soon as possible. AND USED ANYWHERE...

Owner's Manual - English
Page 108
... DLP™ television against defects in materials or workmanship for installation, setup, adjustment of customer controls, and installation or repair of antenna systems are not covered by inadequate antenna systems are warranted against defects in materials or workmanship for repair and returned to you. Owner's Manual and Product Registration Read this owner's manual thoroughly before operating this product and connected equipment; The lamp unit is needed: (1) To find that service is a user-replaceable...
... DLP™ television against defects in materials or workmanship for installation, setup, adjustment of customer controls, and installation or repair of antenna systems are not covered by inadequate antenna systems are warranted against defects in materials or workmanship for repair and returned to you. Owner's Manual and Product Registration Read this owner's manual thoroughly before operating this product and connected equipment; The lamp unit is needed: (1) To find that service is a user-replaceable...


