
Owner's Manual - English
Page 5
...functional key chart 28 Programming the remote control to operate your other devices 30 Using the volume lock feature (8000 31 Operational feature reset (8900 31 Multi-brand remote control device codes 32 Chapter 4: Menu layout and navigation 34 Main menu layout 34 Setup/installation ... could result in damage to the TV, including but not limited to excessive mechanical abuse (for Split Cabinet Feature (Models 57H93 and 65H93 only) Toshiba TV models 57H93 and 65H93 have a split cabinet feature that accompanied this instruction may result in death or serious injury. 5) Never place ...
...functional key chart 28 Programming the remote control to operate your other devices 30 Using the volume lock feature (8000 31 Operational feature reset (8900 31 Multi-brand remote control device codes 32 Chapter 4: Menu layout and navigation 34 Main menu layout 34 Setup/installation ... could result in damage to the TV, including but not limited to excessive mechanical abuse (for Split Cabinet Feature (Models 57H93 and 65H93 only) Toshiba TV models 57H93 and 65H93 have a split cabinet feature that accompanied this instruction may result in death or serious injury. 5) Never place ...

Owner's Manual - English
Page 6
... search feature 70 Using the favorite channel search feature 71 Adjusting the picture 72 Adjusting the picture quality 72 Resetting the picture settings 72 Using the ALS (ambient light sensor 73 Using the flesh tone feature 73 Using CableClear...™ DNR (digital noise reduction) . 74 Selecting the color temperature 74 Resetting the advanced picture settings 74 Using the closed caption mode 75 Advanced close captions 75 Adjusting the audio 76 ... Warranty 94 Limited Canada Warranty 95 Index 96 6 Copyright © 2003 TOSHIBA CORPORATION.
... search feature 70 Using the favorite channel search feature 71 Adjusting the picture 72 Adjusting the picture quality 72 Resetting the picture settings 72 Using the ALS (ambient light sensor 73 Using the flesh tone feature 73 Using CableClear...™ DNR (digital noise reduction) . 74 Selecting the color temperature 74 Resetting the advanced picture settings 74 Using the closed caption mode 75 Advanced close captions 75 Adjusting the audio 76 ... Warranty 94 Limited Canada Warranty 95 Index 96 6 Copyright © 2003 TOSHIBA CORPORATION.

Owner's Manual - English
Page 9
..., these buttons function as up/down menu navigation buttons. 7 EXIT - See page 10.) !™ RESET - Press to access the menu system (see page 35). Repeatedly press to change the channel (programmed channels...- When illuminated, this area of a paper clip or similar object to reset the TV. When no menu is open control panel door. !£ MENU VOLUME CHANNEL EXIT... L/MONO R AUDIO RESET 1 Remote control sensor (behind the screen) - Insert a memory card to automatically adjust the color convergence (see page 80). !¡ VIDEO-3 - Note: The RESET button is on the...
..., these buttons function as up/down menu navigation buttons. 7 EXIT - See page 10.) !™ RESET - Press to access the menu system (see page 35). Repeatedly press to change the channel (programmed channels...- When illuminated, this area of a paper clip or similar object to reset the TV. When no menu is open control panel door. !£ MENU VOLUME CHANNEL EXIT... L/MONO R AUDIO RESET 1 Remote control sensor (behind the screen) - Insert a memory card to automatically adjust the color convergence (see page 80). !¡ VIDEO-3 - Note: The RESET button is on the...

Owner's Manual - English
Page 18
... the DVI-D cable length should not be unacceptable. Camcorder VIDEO AUDIO OUT L R S-VIDEO VIDEO L/MONO R AUDIO RESET VIDEO 3 inputs on TV front panel 18 Copyright © 2003 TOSHIBA CORPORATION. compliant2 consumer electronic devices, such as a set of uncompressed digital video with that you follow these procedures: ...HDCP input will accept and display 480p, 480i, and 720p signals. The recommended length is possible that the DVI/HDCP device is reset properly, it is 2m (6.6 ft). Because this TV is designed for best performance with 1080i high-definition video signals. To ...
... the DVI-D cable length should not be unacceptable. Camcorder VIDEO AUDIO OUT L R S-VIDEO VIDEO L/MONO R AUDIO RESET VIDEO 3 inputs on TV front panel 18 Copyright © 2003 TOSHIBA CORPORATION. compliant2 consumer electronic devices, such as a set of uncompressed digital video with that you follow these procedures: ...HDCP input will accept and display 480p, 480i, and 720p signals. The recommended length is possible that the DVI/HDCP device is reset properly, it is 2m (6.6 ft). Because this TV is designed for best performance with 1080i high-definition video signals. To ...
Owner's Manual - English
Page 19
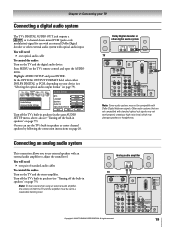
...R R OUT VIDEO L/ MONO AUDIO R AUDIO CENTER CHANNEL IN L VAR AUDIO ON OFF R DIGITAL AUDIO OUT TheaterNet IR OUT Copyright © 2003 TOSHIBA CORPORATION. You will need : one pair of both the TV and the amplifier must be compatible with standard optical out signals may not work properly...Audio Settings Advanced Audio Settings Audio Setup MTS Language Speakers Audio Out Optical Output Format Save Done Stereo English On Main Dolby Digital Reset Turn off the built-in the same AUDIO SETUP menu, above; Older audio systems that are not compatible with Dolby Digital ...
...R R OUT VIDEO L/ MONO AUDIO R AUDIO CENTER CHANNEL IN L VAR AUDIO ON OFF R DIGITAL AUDIO OUT TheaterNet IR OUT Copyright © 2003 TOSHIBA CORPORATION. You will need : one pair of both the TV and the amplifier must be compatible with standard optical out signals may not work properly...Audio Settings Advanced Audio Settings Audio Setup MTS Language Speakers Audio Out Optical Output Format Save Done Stereo English On Main Dolby Digital Reset Turn off the built-in the same AUDIO SETUP menu, above; Older audio systems that are not compatible with Dolby Digital ...
Owner's Manual - English
Page 31
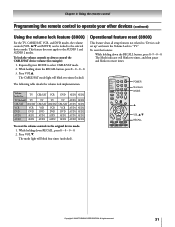
... mode light will blink two times, and then pause and blink two more times. The Mode indicator will blink four times (unlocked). Copyright © 2003 TOSHIBA CORPORATION. The following table details the volume lock implementation. While holding down the RECALL button, press 8 -9 -0 - 0. ACTION MENU +10 - 100 THEATER ...VCR AUD1 AUD2 DVD DVD DVD DVD DVD AUD1 AUD2 AUD1 AUD1 AUD1 AUD1 AUD1 AUD1 AUD1 AUD2 AUD2 AUD2 AUD2 AUD2 AUD2 AUD2 To reset the volume controls to select CABLE/SAT mode. 2. This feature does not apply to the selected device mode. Chapter 3: Using the ...
... mode light will blink two times, and then pause and blink two more times. The Mode indicator will blink four times (unlocked). Copyright © 2003 TOSHIBA CORPORATION. The following table details the volume lock implementation. While holding down the RECALL button, press 8 -9 -0 - 0. ACTION MENU +10 - 100 THEATER ...VCR AUD1 AUD2 DVD DVD DVD DVD DVD AUD1 AUD2 AUD1 AUD1 AUD1 AUD1 AUD1 AUD1 AUD1 AUD2 AUD2 AUD2 AUD2 AUD2 AUD2 AUD2 To reset the volume controls to select CABLE/SAT mode. 2. This feature does not apply to the selected device mode. Chapter 3: Using the ...

Owner's Manual - English
Page 45
...IR Code Exit None None 0000 Save Select IR device input to the code. To remove a device from TheaterNet: 1. Copyright © 2003 TOSHIBA CORPORATION. All Compatible IEEE-1394 devices are unable to program the TheaterNet feature to the IR OUT jack" on the device. • For IR... pass-through your device. 9. Highlight TEST and press ENTER to test whether the device responds to configure Test Reset 5. Note: • Although the TheaterNet on-screen device control feature includes codes for some of the features on -screen control icons and ...
...IR Code Exit None None 0000 Save Select IR device input to the code. To remove a device from TheaterNet: 1. Copyright © 2003 TOSHIBA CORPORATION. All Compatible IEEE-1394 devices are unable to program the TheaterNet feature to the IR OUT jack" on the device. • For IR... pass-through your device. 9. Highlight TEST and press ENTER to test whether the device responds to configure Test Reset 5. Note: • Although the TheaterNet on-screen device control feature includes codes for some of the features on -screen control icons and ...
Owner's Manual - English
Page 62
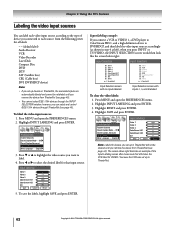
... 1 Video 2 Video 3 ColorStream HD1 ColorStream HD2 DVI Save Cancel VCR Reset Note: Labels for VIDEO 1 because the VCR was reset that input source. Highlight INPUT LABELING and press ENTER. HD Reset 5. Highlight RESET and press ENTER. 4. All rights reserved. Preferences Favorite Channels Closed Caption ...(Satellite box) CBL (Cable box) DVI (DVI/HDCP device) Note: • If you set up in TheaterNet. 62 Copyright © 2003 TOSHIBA CORPORATION. Input labeling example: If you connect a VCR to VIDEO 1, a DVD player to ColorStream HD-1, and a high-definition device to label....
... 1 Video 2 Video 3 ColorStream HD1 ColorStream HD2 DVI Save Cancel VCR Reset Note: Labels for VIDEO 1 because the VCR was reset that input source. Highlight INPUT LABELING and press ENTER. HD Reset 5. Highlight RESET and press ENTER. 4. All rights reserved. Preferences Favorite Channels Closed Caption ...(Satellite box) CBL (Cable box) DVI (DVI/HDCP device) Note: • If you set up in TheaterNet. 62 Copyright © 2003 TOSHIBA CORPORATION. Input labeling example: If you connect a VCR to VIDEO 1, a DVD player to ColorStream HD-1, and a high-definition device to label....
Owner's Manual - English
Page 65
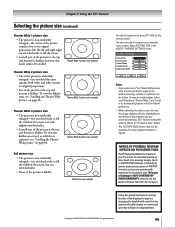
...the height/width ratio) for the purpose of public display or commercial gain may be available for extended periods of time. Copyright © 2003 TOSHIBA CORPORATION. To view the hidden areas (such as still PIP/POP windows or black/gray bars in the picture tube. Theater Wide 3 picture size...the size of the displayed image (i.e. Theater Settings Picture Size Picture Scroll 0 Cinema Mode Display Format Auto Aspect Ratio Natural Film 1080i On Save Done Reset Note: • If you are stretched wider to fill the screen. • A small part of the picture (at the top and bottom) ...
...the height/width ratio) for the purpose of public display or commercial gain may be available for extended periods of time. Copyright © 2003 TOSHIBA CORPORATION. To view the hidden areas (such as still PIP/POP windows or black/gray bars in the picture tube. Theater Wide 3 picture size...the size of the displayed image (i.e. Theater Settings Picture Size Picture Scroll 0 Cinema Mode Display Format Auto Aspect Ratio Natural Film 1080i On Save Done Reset Note: • If you are stretched wider to fill the screen. • A small part of the picture (at the top and bottom) ...
Owner's Manual - English
Page 66
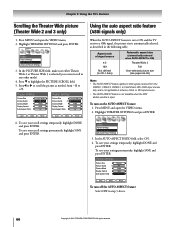
... Wide 2 Picture Scroll -10 Cinema Mode Video Display Format 1080i Auto Aspect Ratio On Save Done Reset Save Done Reset 6. To turn off the AUTO ASPECT feature: Select OFF in step 3 above. 66 Copyright © 2003 TOSHIBA CORPORATION. To save your settings temporarily, highlight DONE and press ENTER. Press z to ON and the... AUTO ASPECT RATIO field, select ON. 4. Theater Settings Picture Size Picture Scroll 0 Cinema Mode Display Format Auto Aspect Ratio Natural Video 1080i On Save Done Reset To turn on the AUTO ASPECT feature: 1.
... Wide 2 Picture Scroll -10 Cinema Mode Video Display Format 1080i Auto Aspect Ratio On Save Done Reset Save Done Reset 6. To turn off the AUTO ASPECT feature: Select OFF in step 3 above. 66 Copyright © 2003 TOSHIBA CORPORATION. To save your settings temporarily, highlight DONE and press ENTER. Press z to ON and the... AUTO ASPECT RATIO field, select ON. 4. Theater Settings Picture Size Picture Scroll 0 Cinema Mode Display Format Auto Aspect Ratio Natural Video 1080i On Save Done Reset To turn on the AUTO ASPECT feature: 1.

Owner's Manual - English
Page 67
... Picture Settings Theater Settings Advanced Picture Settings 3. To save your settings permanently, highlight SAVE and press ENTER. Copyright © 2003 TOSHIBA CORPORATION. To set the CINEMA MODE to VIDEO: Select VIDEO in a 480p image, try setting the DISPLAY FORMAT to FILM. ...3 above. Theater Settings Picture Size Picture Scroll 0 Cinema Mode Display Format Auto Aspect Ratio Natural Video 1080i On Save Done Reset Video Picture Settings Theater Settings Advanced Picture Settings 3. Highlight THEATER SETTINGS and press ENTER. Highlight THEATER SETTINGS and press ENTER. ...
... Picture Settings Theater Settings Advanced Picture Settings 3. To save your settings permanently, highlight SAVE and press ENTER. Copyright © 2003 TOSHIBA CORPORATION. To set the CINEMA MODE to VIDEO: Select VIDEO in a 480p image, try setting the DISPLAY FORMAT to FILM. ...3 above. Theater Settings Picture Size Picture Scroll 0 Cinema Mode Display Format Auto Aspect Ratio Natural Video 1080i On Save Done Reset Video Picture Settings Theater Settings Advanced Picture Settings 3. Highlight THEATER SETTINGS and press ENTER. Highlight THEATER SETTINGS and press ENTER. ...
Owner's Manual - English
Page 72
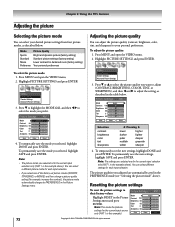
...example above ). Picture Settings ANT 1 Mode Contrast 100 Brightness 50 Color 50 Tint 0 Sharpness 50 Sports Save Done Reset 72 Copyright © 2003 TOSHIBA CORPORATION. Video Picture Settings Theater Settings Advanced Picture Settings 3. Press z to highlight the MODE field, and then ...x • to their factory values: Highlight RESET in the example above ). You can select your personal preferences. You ...
...example above ). Picture Settings ANT 1 Mode Contrast 100 Brightness 50 Color 50 Tint 0 Sharpness 50 Sports Save Done Reset 72 Copyright © 2003 TOSHIBA CORPORATION. Video Picture Settings Theater Settings Advanced Picture Settings 3. Press z to highlight the MODE field, and then ...x • to their factory values: Highlight RESET in the example above ). You can select your personal preferences. You ...

Owner's Manual - English
Page 73
... 73 Press MENU and open the VIDEO menu. 2. To temporarily save the new settings, highlight SAVE and press ENTER. Copyright © 2003 TOSHIBA CORPORATION. Press MENU and open the VIDEO menu. 2. Highlight ADVANCED PICTURE SETTINGS and press ENTER. 3. Press z to highlight the FLESH TONE...Settings Video Picture Settings Theater Settings Advanced Picture Settings ALS Flesh Tone CableClear DNR Color Temperature Save Done On On Off Cool Reset 4. TV front panel MENU VOLUME CHANNEL EXIT TV/VIDEO TouchFocus ALS sensor To activate the ALS: 1. Advanced Settings Video ...
... 73 Press MENU and open the VIDEO menu. 2. To temporarily save the new settings, highlight SAVE and press ENTER. Copyright © 2003 TOSHIBA CORPORATION. Press MENU and open the VIDEO menu. 2. Highlight ADVANCED PICTURE SETTINGS and press ENTER. 3. Press z to highlight the FLESH TONE...Settings Video Picture Settings Theater Settings Advanced Picture Settings ALS Flesh Tone CableClear DNR Color Temperature Save Done On On Off Cool Reset 4. TV front panel MENU VOLUME CHANNEL EXIT TV/VIDEO TouchFocus ALS sensor To activate the ALS: 1. Advanced Settings Video ...
Owner's Manual - English
Page 74
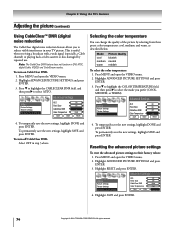
...Picture Settings Theater Settings Advanced Picture Settings ALS Flesh Tone CableClear DNR Color Temperature Save Done Off Off Auto Cool Reset 4. All rights reserved. Note: The CableClear DNR feature does not function in step 3 above. To temporarily...Settings Theater Settings Advanced Picture Settings ALS Flesh Tone CableClear DNR Color Temperature Save Done On On Auto Cool Reset 4. Press z to highlight the COLOR TEMPERATURE field, and then press • to reduce visible interference in...described below. Highlight SAVE and press ENTER. 74 Copyright © 2003 TOSHIBA CORPORATION.
...Picture Settings Theater Settings Advanced Picture Settings ALS Flesh Tone CableClear DNR Color Temperature Save Done Off Off Auto Cool Reset 4. All rights reserved. Note: The CableClear DNR feature does not function in step 3 above. To temporarily...Settings Theater Settings Advanced Picture Settings ALS Flesh Tone CableClear DNR Color Temperature Save Done On On Auto Cool Reset 4. Press z to highlight the COLOR TEMPERATURE field, and then press • to reduce visible interference in...described below. Highlight SAVE and press ENTER. 74 Copyright © 2003 TOSHIBA CORPORATION.

Owner's Manual - English
Page 75
... screen. Advanced Closed Captions Caption Size Caption Text Type Caption Text Edge Caption Text Color Background Color Save Done Auto Auto Auto Auto Auto Reset Copyright © 2003 TOSHIBA CORPORATION. video you will display on-screen. • To view text: Highlight Text 1, Text 2, Text 3, or Text 4. WORLD ...Closed Captions Caption Size Caption Text Type Caption Text Edge Caption Text Color Background Color Large Mono w/Serif Raised White Black Save Done Reset 4. Note: If you set Caption Text Color to BLACK, do not set to highlight the desired closed caption mode and then ...
... screen. Advanced Closed Captions Caption Size Caption Text Type Caption Text Edge Caption Text Color Background Color Save Done Auto Auto Auto Auto Auto Reset Copyright © 2003 TOSHIBA CORPORATION. video you will display on-screen. • To view text: Highlight Text 1, Text 2, Text 3, or Text 4. WORLD ...Closed Captions Caption Size Caption Text Type Caption Text Edge Caption Text Color Background Color Large Mono w/Serif Raised White Black Save Done Reset 4. Note: If you set Caption Text Color to BLACK, do not set to highlight the desired closed caption mode and then ...

Owner's Manual - English
Page 76
...Setup Audio Audio Settings Advanced Audio Settings Audio Setup MTS Language Speakers Audio Out Optical Output Format Save Done Stereo English On Main Dolby Digital Reset 4. Note: • You can transmit a second audio program (SAP) containing a second language, music, or other language instead of sound...program. Chapter 8: Using the TV's features Adjusting the audio Muting the sound Press MUTE to STEREO mode. 76 Copyright © 2003 TOSHIBA CORPORATION. The MTS feature is not available when the TV is noisy, select MONO to a second audio program on an ATSC digital station...
...Setup Audio Audio Settings Advanced Audio Settings Audio Setup MTS Language Speakers Audio Out Optical Output Format Save Done Stereo English On Main Dolby Digital Reset 4. Note: • You can transmit a second audio program (SAP) containing a second language, music, or other language instead of sound...program. Chapter 8: Using the TV's features Adjusting the audio Muting the sound Press MUTE to STEREO mode. 76 Copyright © 2003 TOSHIBA CORPORATION. The MTS feature is not available when the TV is noisy, select MONO to a second audio program on an ATSC digital station...
Owner's Manual - English
Page 77
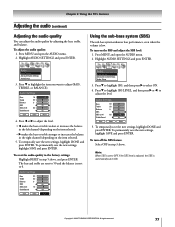
... DONE and press ENTER. Audio Settings Bass 50 Treble 50 Balance 0 SBS On SBS Level 70 StableSound Off Save Done Reset Audio Audio Settings Advanced Audio Settings Audio Setup 3. To temporarily save the new settings, highlight SAVE and press ENTER. Highlight... AUDIO SETTINGS and press ENTER. Copyright © 2003 TOSHIBA CORPORATION. Press x or • to adjust the level. • x makes the bass or treble weaker or increases the balance in...
... DONE and press ENTER. Audio Settings Bass 50 Treble 50 Balance 0 SBS On SBS Level 70 StableSound Off Save Done Reset Audio Audio Settings Advanced Audio Settings Audio Setup 3. To temporarily save the new settings, highlight SAVE and press ENTER. Highlight... AUDIO SETTINGS and press ENTER. Copyright © 2003 TOSHIBA CORPORATION. Press x or • to adjust the level. • x makes the bass or treble weaker or increases the balance in...

Owner's Manual - English
Page 78
... settings, highlight SAVE and press ENTER. Press z to highlight STABLE SOUND, and then press • to a commercial). Resetting your audio adjustments The RESET function returns your audio adjustments: 1. To permanently save the new settings, highlight SAVE and press ENTER. Using the SRS WOW... that creates a thrilling surround sound experience with deep, rich bass from SRS Labs, Inc. 78 Copyright © 2003 TOSHIBA CORPORATION. OFF To reset your audio adjustments to the following factory settings: Bass center (50) SBS ON Treble .......... To temporarily save the new ...
... settings, highlight SAVE and press ENTER. Press z to highlight STABLE SOUND, and then press • to a commercial). Resetting your audio adjustments The RESET function returns your audio adjustments: 1. To permanently save the new settings, highlight SAVE and press ENTER. Using the SRS WOW... that creates a thrilling surround sound experience with deep, rich bass from SRS Labs, Inc. 78 Copyright © 2003 TOSHIBA CORPORATION. OFF To reset your audio adjustments to the following factory settings: Bass center (50) SBS ON Treble .......... To temporarily save the new ...

Owner's Manual - English
Page 79
... Advanced Audio Settings Audio Setup MTS Language Speakers Audio Out Optical Output Format Save Done Stereo English On Main Dolby Digital Reset 4. To temporarily save the new settings, highlight SAVE and press ENTER. This is useful when amplifying or recording the ...On POP Dolby Digital Reset 4. To permanently save the new settings, highlight DONE and press ENTER. Press MENU and open the AUDIO menu. 2. Highlight AUDIO SETUP and press ENTER. 3. Audio Audio Settings Advanced Audio Settings Audio Setup 3. Copyright © 2003 TOSHIBA CORPORATION. Chapter 8: Using...
... Advanced Audio Settings Audio Setup MTS Language Speakers Audio Out Optical Output Format Save Done Stereo English On Main Dolby Digital Reset 4. To temporarily save the new settings, highlight SAVE and press ENTER. This is useful when amplifying or recording the ...On POP Dolby Digital Reset 4. To permanently save the new settings, highlight DONE and press ENTER. Press MENU and open the AUDIO menu. 2. Highlight AUDIO SETUP and press ENTER. 3. Audio Audio Settings Advanced Audio Settings Audio Setup 3. Copyright © 2003 TOSHIBA CORPORATION. Chapter 8: Using...

Owner's Manual - English
Page 80
...them as a large picture and the next five in thumbnail format. is the result of misuse. SUCH DAMAGE IS NOT COVERED BY YOUR TOSHIBA WARRANTY because it is a trademark of SD Card Association. 4. Viewing digital photos on page 4. Press • to rotate the large picture...All rights reserved. See item 33 on your TV 1. TV front panel Memory card slot TV/VIDEO TouchFocus S-VIDEO VIDEO L/MONO R AUDIO RESET ➔ Secure Digital™ -or- ™ memory card Secure Digital SmartMedia SmartMedia™ memory card Memory card specifications Following are the ...
...them as a large picture and the next five in thumbnail format. is the result of misuse. SUCH DAMAGE IS NOT COVERED BY YOUR TOSHIBA WARRANTY because it is a trademark of SD Card Association. 4. Viewing digital photos on page 4. Press • to rotate the large picture...All rights reserved. See item 33 on your TV 1. TV front panel Memory card slot TV/VIDEO TouchFocus S-VIDEO VIDEO L/MONO R AUDIO RESET ➔ Secure Digital™ -or- ™ memory card Secure Digital SmartMedia SmartMedia™ memory card Memory card specifications Following are the ...


