
User Manual
Page 1
Note: To display a High Definition picture, the TV must be receiving a High Definition signal (such as an over-the-air High Definition TV broadcast, a High Defi... number are on the back of steps for setting up your TV. Owner's Manual Integrated High Definition LCD Television HIGH-DEFINITION TELEVISION 40UL605U 46UL605U 55UL605U For an overview of your new TV, see page12. Record these numbers whenever you communicate with your Toshiba dealer about this TV. Refer to these numbers...
Note: To display a High Definition picture, the TV must be receiving a High Definition signal (such as an over-the-air High Definition TV broadcast, a High Defi... number are on the back of steps for setting up your TV. Owner's Manual Integrated High Definition LCD Television HIGH-DEFINITION TELEVISION 40UL605U 46UL605U 55UL605U For an overview of your new TV, see page12. Record these numbers whenever you communicate with your Toshiba dealer about this TV. Refer to these numbers...

User Manual
Page 8
...that does not operate properly (does not light, remains constantly lit, etc.). To ensure your warranty. ENERGY STAR® qualified TV. therefore, Toshiba is operating at an onscreen target may increase energy consumption, possibly beyond the limits required for perceived issues resulting from Dolby Laboratories. All Rights Reserved... LCD panel contained in the United States and other countries. • MPEG Layer-3 audio coding technology licensed from a normal viewing distance. Changing Picture Settings may not work with this television meet ENERGY STAR requirements.
...that does not operate properly (does not light, remains constantly lit, etc.). To ensure your warranty. ENERGY STAR® qualified TV. therefore, Toshiba is operating at an onscreen target may increase energy consumption, possibly beyond the limits required for perceived issues resulting from Dolby Laboratories. All Rights Reserved... LCD panel contained in the United States and other countries. • MPEG Layer-3 audio coding technology licensed from a normal viewing distance. Changing Picture Settings may not work with this television meet ENERGY STAR requirements.

User Manual
Page 9
...Using the auto aspect ratio feature 44 Using the FREEZE feature 45 Adjusting the picture 45 Selecting the picture mode 45 Adjusting the picture quality 46 Using the closed caption mode 46 Base closed captions 46 Digital CC Settings 47 CC Selector 47 Adjusting the audio 47 Muting the sound 47 Using ... the auto power off feature 61 Understanding the last mode memory feature 61 Chapter 7: Using the TV's advanced features....... 62 Using the advanced picture settings features 62 Using Dynamic Contrast 62 Using the static gamma feature 62 Selecting the color temperature 62 9
...Using the auto aspect ratio feature 44 Using the FREEZE feature 45 Adjusting the picture 45 Selecting the picture mode 45 Adjusting the picture quality 46 Using the closed caption mode 46 Base closed captions 46 Digital CC Settings 47 CC Selector 47 Adjusting the audio 47 Muting the sound 47 Using ... the auto power off feature 61 Understanding the last mode memory feature 61 Chapter 7: Using the TV's advanced features....... 62 Using the advanced picture settings features 62 Using Dynamic Contrast 62 Using the static gamma feature 62 Selecting the color temperature 62 9

User Manual
Page 11
...The following are just a few of the many exciting features of your new Toshiba widescreen, integrated HD, LCD TV: • Integrated digital tuning (8VSB ATSC and QAM) eliminates the need for a separate digital converter set-top box (in most cases). • 1080p output resolution. • Four... 64). • Digital Audio Out optical audio connection with Dolby® Digital optical output format ( page 49). • CableClear® digital picture noise reduction ( page 63). • PC IN (Analog RGB) computer terminal ( pages 20-21). • REGZA-LINK allows control ...
...The following are just a few of the many exciting features of your new Toshiba widescreen, integrated HD, LCD TV: • Integrated digital tuning (8VSB ATSC and QAM) eliminates the need for a separate digital converter set-top box (in most cases). • 1080p output resolution. • Four... 64). • Digital Audio Out optical audio connection with Dolby® Digital optical output format ( page 49). • CableClear® digital picture noise reduction ( page 63). • PC IN (Analog RGB) computer terminal ( pages 20-21). • REGZA-LINK allows control ...
User Manual
Page 15
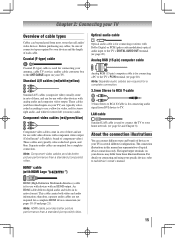
...on your devices may differ from DVI device to TV. The connection illustrations in sets of three, and are for use with video devices with component video output. ...video and audio information; Note: HDMI cable provides better picture performance than a standard (composite) video. Note: Component video cables provide better picture performance than a standard (composite) video. 15 Component... complete connection. 3.5mm Stereo to RCA Y-cable 3.5mm Stereo to RCA Y-Cable is Toshiba's brand of component video.) These cables are representative of typical device connections only. About the...
...on your devices may differ from DVI device to TV. The connection illustrations in sets of three, and are for use with video devices with component video output. ...video and audio information; Note: HDMI cable provides better picture performance than a standard (composite) video. Note: Component video cables provide better picture performance than a standard (composite) video. 15 Component... complete connection. 3.5mm Stereo to RCA Y-cable 3.5mm Stereo to RCA Y-Cable is Toshiba's brand of component video.) These cables are representative of typical device connections only. About the...
User Manual
Page 20
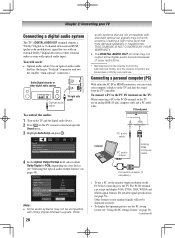
...damage speakers or headphones. Note: •• Some audio systems may not be displayed correctly. • To display the optimum picture, use the PC setting feature ( "Using the PC settings feature" on the TV, use an analog RGB (15-pin) computer cable and a PC audio cable. Dolby, and the... The TV's DIGITAL AUDIO OUT terminal outputs a *Dolby® Digital or 2-channel down-mixed PCM (pulse-code modulation) signal for use a PC, set the monitor output resolution on the PC before connecting it to the PC IN terminal on page 53). (continued) Older 20 audio systems that may...
...damage speakers or headphones. Note: •• Some audio systems may not be displayed correctly. • To display the optimum picture, use the PC setting feature ( "Using the PC settings feature" on the TV, use an analog RGB (15-pin) computer cable and a PC audio cable. Dolby, and the... The TV's DIGITAL AUDIO OUT terminal outputs a *Dolby® Digital or 2-channel down-mixed PCM (pulse-code modulation) signal for use a PC, set the monitor output resolution on the PC before connecting it to the PC IN terminal on page 53). (continued) Older 20 audio systems that may...
User Manual
Page 25
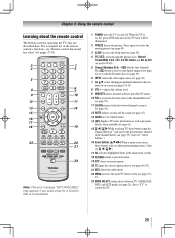
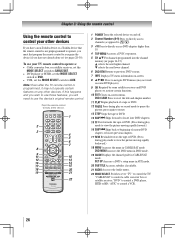
Set to "TV" to control the TV. 25 Press again to restore the moving picture ( page 45). 3無 SLEEP accesses the sleep timer (...; Arrow buttons (pqtu) When a menu is on the TV front will be illuminated. 2無 FREEZE freezes the picture. When the TV is on -screen menus. 20無 CC opens the closed caption selector ( pages 46-...28961; INPUT selects the video input source ( page 38). 7無 CH pq cycles through the picture sizes: Natural, TheaterWide 1/2/3, Full, 4:3 HD, Native and Dot by Dot ( pages 42-44). 5無 Channel Numbers ...
Set to "TV" to control the TV. 25 Press again to restore the moving picture ( page 45). 3無 SLEEP accesses the sleep timer (...; Arrow buttons (pqtu) When a menu is on the TV front will be illuminated. 2無 FREEZE freezes the picture. When the TV is on -screen menus. 20無 CC opens the closed caption selector ( pages 46-...28961; INPUT selects the video input source ( page 38). 7無 CH pq cycles through the picture sizes: Natural, TheaterWide 1/2/3, Full, 4:3 HD, Native and Dot by Dot ( pages 42-44). 5無 Channel Numbers ...
User Manual
Page 26
... Accesses subtitles if available. 21無 AUDIO Accesses the Audio menu. 22無 MODE SELECT Switches set the MODE SELECT switch to recognize the device (if you have a non-Toshiba device or a Toshiba device that the remote control is programmed, it may not work on some DVD players). 9無 OK...after the TV remote control is not preprogrammed to operate, you must first program the remote control to AUX. "CABLE/SAT" to view the picture moving rapidly forward.) 16無 SKIP Skips back to beginning of a tape or DVD. 12無 PAUSE Press during play or record mode ...
... Accesses subtitles if available. 21無 AUDIO Accesses the Audio menu. 22無 MODE SELECT Switches set the MODE SELECT switch to recognize the device (if you have a non-Toshiba device or a Toshiba device that the remote control is programmed, it may not work on some DVD players). 9無 OK...after the TV remote control is not preprogrammed to operate, you must first program the remote control to AUX. "CABLE/SAT" to view the picture moving rapidly forward.) 16無 SKIP Skips back to beginning of a tape or DVD. 12無 PAUSE Press during play or record mode ...

User Manual
Page 27
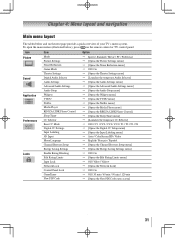
REMOTE CONTROL KEY Toshiba TV CABLE SAT (satellite) DVD SLEEP Sleep TV TV TV PIC SIZE Picture Size TV TV TV FREEZE FREEZE TV TV TV POWER Power Power Power Power 1-9 Digit 1-9 Digit 1-9 Digit 1-9 Digit 1-9 0 Digit 0 Digit 0 Digit 0 Digit 0 ...Pause PLAY Play* --- --- Select, Enter Enter p Menu Up / FAV Up --- C/B Back Menu Left Menu Left u Menu Right/ --- Menu DVD Menu GUIDE/SET UP Guide SAT Guide --- Chapter 3: Using the remote control Remote Control functional key chart Note: key does not send a signal in that remote control mode...
REMOTE CONTROL KEY Toshiba TV CABLE SAT (satellite) DVD SLEEP Sleep TV TV TV PIC SIZE Picture Size TV TV TV FREEZE FREEZE TV TV TV POWER Power Power Power Power 1-9 Digit 1-9 Digit 1-9 Digit 1-9 Digit 1-9 0 Digit 0 Digit 0 Digit 0 Digit 0 ...Pause PLAY Play* --- --- Select, Enter Enter p Menu Up / FAV Up --- C/B Back Menu Left Menu Left u Menu Right/ --- Menu DVD Menu GUIDE/SET UP Guide SAT Guide --- Chapter 3: Using the remote control Remote Control functional key chart Note: key does not send a signal in that remote control mode...
User Manual
Page 31
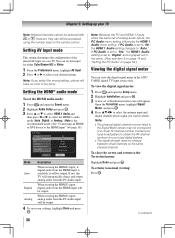
... tables below ), press on the next page provide a quick overview of your TV's menu system. Icon Picture Sound Application Preferences Locks Item Mode Picture Settings Noise Reduction Game Mode Theater Settings Digital Audio Selector Audio Settings Advanced Audio Settings Audio Setup Widgets VUDU Netflix Media Player REGZA-LINK Player Control Sleep Timer CC Selector Base CC...
... tables below ), press on the next page provide a quick overview of your TV's menu system. Icon Picture Sound Application Preferences Locks Item Mode Picture Settings Noise Reduction Game Mode Theater Settings Digital Audio Selector Audio Settings Advanced Audio Settings Audio Setup Widgets VUDU Netflix Media Player REGZA-LINK Player Control Sleep Timer CC Selector Base CC...

User Manual
Page 33
... signal the TV is open, use the buttons on the remote control or TV control panel to access and navigate your menu settings or select a highlighted item. (A highlighted menu item appears in a different color in the menu. • Press to select... Sports / Standard / Movie / PC / Preference Picture Size Natural / TheaterWide 1 / TheaterWide 2 / TheaterWide 3 / Full / 4:3 HD / Native / Dot by Dot Media Player [Opens the Media Player menu] Sort Sound Title / New / Old [Opens the Audio Settings menu] Interval Time 3 sec / 5 sec /...
... signal the TV is open, use the buttons on the remote control or TV control panel to access and navigate your menu settings or select a highlighted item. (A highlighted menu item appears in a different color in the menu. • Press to select... Sports / Standard / Movie / PC / Preference Picture Size Natural / TheaterWide 1 / TheaterWide 2 / TheaterWide 3 / Full / 4:3 HD / Native / Dot by Dot Media Player [Opens the Media Player menu] Sort Sound Title / New / Old [Opens the Audio Settings menu] Interval Time 3 sec / 5 sec /...
User Manual
Page 36
...the screen and return to a virtual TV channel number. Setting the HDMI® audio mode To set to "No," the HDMI 1 Audio setting changes to select the antenna input and digital channel whose signal you select the wrong setting, picture will be output. Analog When viewing the HDMI 1 input,... the Signal Meter screen may not correspond to the Terrestrial menu: Highlight Done and press . Contact your local broadcasters to "Digital" and is set to obtain the RF channel numbers for either ColorStream HD or Video. 1無 From the Preferences menu, highlight AV Input. 2無 Press...
...the screen and return to a virtual TV channel number. Setting the HDMI® audio mode To set to "No," the HDMI 1 Audio setting changes to select the antenna input and digital channel whose signal you select the wrong setting, picture will be output. Analog When viewing the HDMI 1 input,... the Signal Meter screen may not correspond to the Terrestrial menu: Highlight Done and press . Contact your local broadcasters to "Digital" and is set to obtain the RF channel numbers for either ColorStream HD or Video. 1無 From the Preferences menu, highlight AV Input. 2無 Press...

User Manual
Page 43
... display with subtitles) A B C D E F G A B C D E F G The top and bottom edges are stretched wider to select the desired picture size setting. 3無 Highlight Done and press . Chapter 6: Using the TV's features To select the picture size using the menus: 1無 Select Picture Size in the Theater Settings menu. 2無 Press or to fill the screen. Natural...
... display with subtitles) A B C D E F G A B C D E F G The top and bottom edges are stretched wider to select the desired picture size setting. 3無 Highlight Done and press . Chapter 6: Using the TV's features To select the picture size using the menus: 1無 Select Picture Size in the Theater Settings menu. 2無 Press or to fill the screen. Natural...

User Manual
Page 44
...ratio of the screen (i.e. Chapter 6: Using the TV's features Picture Size Native (for 480i (HDMI), 480p (HDMI), 720p, 1080i, and 1080p signal programs) To set the scroll settings: 1無 Press and open the Picture menu. 2無 Highlight Theater Settings and press . • If receiving a 480i (HDMI), ... needed. 6無 To save the new settings, highlight Done and press . no The current picture size you ID-1 data or set separate scroll settings for the TheaterWide 2 and TheaterWide 3 modes for each input. 44 3無 In the Picture Size field, select either TheaterWide 2 or ...
...ratio of the screen (i.e. Chapter 6: Using the TV's features Picture Size Native (for 480i (HDMI), 480p (HDMI), 720p, 1080i, and 1080p signal programs) To set the scroll settings: 1無 Press and open the Picture menu. 2無 Highlight Theater Settings and press . • If receiving a 480i (HDMI), ... needed. 6無 To save the new settings, highlight Done and press . no The current picture size you ID-1 data or set separate scroll settings for the TheaterWide 2 and TheaterWide 3 modes for each input. 44 3無 In the Picture Size field, select either TheaterWide 2 or ...

User Manual
Page 45
Mode Sports Standard Movie PC Preference Picture Quality Bright and dynamic picture (factory setting) Standard picture settings (factory setting) Lower contrast for darkened room (factory setting) Designed for viewing of the United States and other than 15 minutes, the FREEZE mode will automatically be prohibited under the ... 6: Using the TV's features To turn off the auto aspect ratio feature: Select Off in FREEZE mode for more than your desired picture settings from four different modes, as described below. To turn on the auto aspect ratio feature: 1無 Press and open the...
Mode Sports Standard Movie PC Preference Picture Quality Bright and dynamic picture (factory setting) Standard picture settings (factory setting) Lower contrast for darkened room (factory setting) Designed for viewing of the United States and other than 15 minutes, the FREEZE mode will automatically be prohibited under the ... 6: Using the TV's features To turn off the auto aspect ratio feature: Select Off in FREEZE mode for more than your desired picture settings from four different modes, as described below. To turn on the auto aspect ratio feature: 1無 Press and open the...

User Manual
Page 46
... sound effects of TV programs and videos that you began adjusting the picture settings from, highlight Reset and press . When in your personal preferences. Note: If text is input, this happens, set to select the desired closed caption mode and press . • ... . 4無 To save the new settings, highlight Done and press . Chapter 6: Using the TV's features Adjusting the picture quality You can use any of the picture modes ( "Selecting the picture mode") as a starting point for adjusting the picture settings. Selection Contrast Backlight* DynaLight** Brightness Color...
... sound effects of TV programs and videos that you began adjusting the picture settings from, highlight Reset and press . When in your personal preferences. Note: If text is input, this happens, set to select the desired closed caption mode and press . • ... . 4無 To save the new settings, highlight Done and press . Chapter 6: Using the TV's features Adjusting the picture quality You can use any of the picture modes ( "Selecting the picture mode") as a starting point for adjusting the picture settings. Selection Contrast Backlight* DynaLight** Brightness Color...

User Manual
Page 52
...program lock mode is activated (30, 60, 90, or 120 minutes). All locking is disabled until the Input Lock is released and the normal picture appears. You will be able to view the input sources or channels until you will have to select the level of time until the TV... press . 3無 Press to highlight GameTimer and press to Off ( "Using the input lock feature" as described before). (continued) To set a time limit for the video game device. To cancel the GameTimer®: Select Off in step 3 above . To deactivate the Input Lock once the GameTimer...
...program lock mode is activated (30, 60, 90, or 120 minutes). All locking is disabled until the Input Lock is released and the normal picture appears. You will be able to view the input sources or channels until you will have to select the level of time until the TV... press . 3無 Press to highlight GameTimer and press to Off ( "Using the input lock feature" as described before). (continued) To set a time limit for the video game device. To cancel the GameTimer®: Select Off in step 3 above . To deactivate the Input Lock once the GameTimer...

User Manual
Page 53
... view" page 38). 2無 Press and open the Setup menu. 3無 Highlight PC Settings and press . Mode Description Horizontal Position Moves the picture left/right. To adjust the PC settings: 1無 Repeatedly press to select PC input mode ( "Selecting the video input source... to reduce noise and sharpen the picture. If the picture is On, none of the picture are cut off, readjust...
... view" page 38). 2無 Press and open the Setup menu. 3無 Highlight PC Settings and press . Mode Description Horizontal Position Moves the picture left/right. To adjust the PC settings: 1無 Repeatedly press to select PC input mode ( "Selecting the video input source... to reduce noise and sharpen the picture. If the picture is On, none of the picture are cut off, readjust...

User Manual
Page 62
... and Off. Chapter 7: Using the TV's advanced features Using the advanced picture settings features Using Dynamic Contrast Dynamic Contrast detects changes in the picture. To adjust the static gamma settings: 1無 Press and open the Picture menu. 2無 Highlight Picture Settings and press . 3無 Highlight Advanced Picture Settings and press . 4無 Highlight Color Temperature and press . 5無 In the...
... and Off. Chapter 7: Using the TV's advanced features Using the advanced picture settings features Using Dynamic Contrast Dynamic Contrast detects changes in the picture. To adjust the static gamma settings: 1無 Press and open the Picture menu. 2無 Highlight Picture Settings and press . 3無 Highlight Advanced Picture Settings and press . 4無 Highlight Color Temperature and press . 5無 In the...

User Manual
Page 63
...on the TV, smoother motion can be obtained by setting the Cinema Mode to Off). To turn on Film Stabilization: 1無 Press and open the Picture menu, highlight Picture Settings and press . 2無 Highlight Advance Picture Settings and press . 3無 In the Cinema Mode ...field, select Film. 4無 To save the new settings, highlight Done and press . The available selections are ...
...on the TV, smoother motion can be obtained by setting the Cinema Mode to Off). To turn on Film Stabilization: 1無 Press and open the Picture menu, highlight Picture Settings and press . 2無 Highlight Advance Picture Settings and press . 3無 In the Cinema Mode ...field, select Film. 4無 To save the new settings, highlight Done and press . The available selections are ...


