Owner's Manual - English
Page 3
... 5) Do not use the polarized plug with the apparatus. Sturdy strap (as short as vases, shall be easily unplugged in direct sunlight; The LCD panel inside a wall or similar enclosed area. 20) Never modify this product at plugs, convenience receptacles, and the point where they exit from ... other . Make sure the strap is dropped and the cabinet or enclosure surface has been damaged or the TV does not operate normally, take the following precautions: • ALWAYS turn off the TV and unplug the power cord to avoid possible electric shock or fire. • NEVER allow your doctor. ...
... 5) Do not use the polarized plug with the apparatus. Sturdy strap (as short as vases, shall be easily unplugged in direct sunlight; The LCD panel inside a wall or similar enclosed area. 20) Never modify this product at plugs, convenience receptacles, and the point where they exit from ... other . Make sure the strap is dropped and the cabinet or enclosure surface has been damaged or the TV does not operate normally, take the following precautions: • ALWAYS turn off the TV and unplug the power cord to avoid possible electric shock or fire. • NEVER allow your doctor. ...
Owner's Manual - English
Page 4
...sofa, rug, or similar surface; • too close to drapes, curtains, or walls; Care For better performance and safer operation of your TOSHIBA TV, follow the instructions in cabinet, or any home theater component connected to an antenna or phone system. Avoid contact with , such as a ...or heavy object. 40) •The LCD screen of this equipment from power and a minute amount of current is properly grounded to provide adequate protection against voltage surges and built-up . This is normal, especially when the unit is being turned on or off switch, it is 32 ...
...sofa, rug, or similar surface; • too close to drapes, curtains, or walls; Care For better performance and safer operation of your TOSHIBA TV, follow the instructions in cabinet, or any home theater component connected to an antenna or phone system. Avoid contact with , such as a ...or heavy object. 40) •The LCD screen of this equipment from power and a minute amount of current is properly grounded to provide adequate protection against voltage surges and built-up . This is normal, especially when the unit is being turned on or off switch, it is 32 ...
Owner's Manual - English
Page 9
... automatically. Note: After you turn on the remote control, install the batteries and prepare to operate your other devices. page 49). •Two sets of external devices from the TV remote via HDMI connection (- page 6). •Place the TV in any power cords until AFTER... the following are just a few of the many exciting features of your new Toshiba widescreen, integrated HD, LCD TV: •Integrated digital tuning (8VSB ATSC and QAM) eliminates the need for the TV: •Read "Important notes about your LCD TV" (- pages 2-5). 2 Do not plug in a proper location (- Chapter 1:...
... automatically. Note: After you turn on the remote control, install the batteries and prepare to operate your other devices. page 49). •Two sets of external devices from the TV remote via HDMI connection (- page 6). •Place the TV in any power cords until AFTER... the following are just a few of the many exciting features of your new Toshiba widescreen, integrated HD, LCD TV: •Integrated digital tuning (8VSB ATSC and QAM) eliminates the need for the TV: •Read "Important notes about your LCD TV" (- pages 2-5). 2 Do not plug in a proper location (- Chapter 1:...
Owner's Manual - English
Page 10
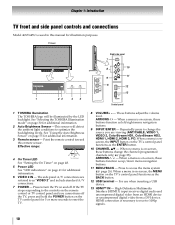
... is onscreen, the INPUT button on the TV's control panel functions as "VIDEO 2" and include standard A/V connections. 7 POWER - TV front 1 23 45 Right side panel 7 8 10 11 9 6 12 13 Control panel 1 TOSHIBA Illumination The TOSHIBA logo will detect the ambient light conditions to...TOSHIBA Illumination mode" on -screen, these buttons function as the ENTER button. 10 CHANNEL Bb - Effective range: 4 On Timer LED 16.4 ft (5m) See "Setting the On Timer" on page 48. 5 Power LED See "LED indications" on -screen, these buttons change the source you cannot turn the TV...
... is onscreen, the INPUT button on the TV's control panel functions as "VIDEO 2" and include standard A/V connections. 7 POWER - TV front 1 23 45 Right side panel 7 8 10 11 9 6 12 13 Control panel 1 TOSHIBA Illumination The TOSHIBA logo will detect the ambient light conditions to...TOSHIBA Illumination mode" on -screen, these buttons function as the ENTER button. 10 CHANNEL Bb - Effective range: 4 On Timer LED 16.4 ft (5m) See "Setting the On Timer" on page 48. 5 Power LED See "LED indications" on -screen, these buttons change the source you cannot turn the TV...

Owner's Manual - English
Page 13
To view the VCR: Turn ON the VCR. To view the antenna or Cable signal: Select the ANT/CABLE video input source on the remote control (- Select the VIDEO 1 video input source on the TV.* To view the camcorder video: Select the VIDEO 2 video input source on the TV.* * To select the video ...input source, press INPUT on the TV.* To view basic and premium Cable channels: Turn OFF the VCR. Do not connect both types of video...
To view the VCR: Turn ON the VCR. To view the antenna or Cable signal: Select the ANT/CABLE video input source on the remote control (- Select the VIDEO 1 video input source on the TV.* To view the camcorder video: Select the VIDEO 2 video input source on the TV.* * To select the video ...input source, press INPUT on the TV.* To view basic and premium Cable channels: Turn OFF the VCR. Do not connect both types of video...
Owner's Manual - English
Page 14
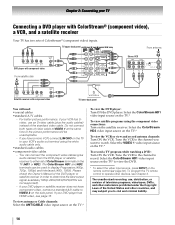
... a mono VCR, connect L/MONO on the remote control (- Select the VIDEO 1 video input source on the TV.* To view the VCR or view and record antenna channels: Turn ON the VCR. To program the TV remote control to view the DVD. * To select the video input source, press INPUT on the...criminal liability. 14 Select the ColorStream HD1 video input source on the TV.* To view the DVD player: Turn ON the DVD player. page 32). Select the ColorStream HD2 video input source on the TV.* To record a TV program while watching a DVD: Turn ON the VCR. For better picture performance, if your DVD player...
... a mono VCR, connect L/MONO on the remote control (- Select the VIDEO 1 video input source on the TV.* To view the VCR or view and record antenna channels: Turn ON the VCR. To program the TV remote control to view the DVD. * To select the video input source, press INPUT on the...criminal liability. 14 Select the ColorStream HD1 video input source on the TV.* To view the DVD player: Turn ON the DVD player. page 32). Select the ColorStream HD2 video input source on the TV.* To record a TV program while watching a DVD: Turn ON the VCR. For better picture performance, if your DVD player...
Owner's Manual - English
Page 15
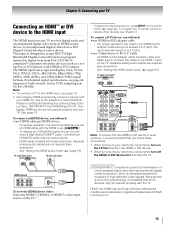
... specifications, see Chapter 3. page 51). See "Setting the HDMI audio mode" (- TV upper back panel TV right side panel * To select the video input source, press INPUT on the TV first and then the HDMI or DVI device. • When turning off the HDMI or DVI device first and then the... HDMI or DVI output). HDMI cable transfers both video and audio. To program the TV remote control to Off. To connect an HDMI device, you use an HDMI cable with your electronic components, turn off your TV. Please try setting the following four options (Deep Color, Lip Sync, INSTAPORT™...
... specifications, see Chapter 3. page 51). See "Setting the HDMI audio mode" (- TV upper back panel TV right side panel * To select the video input source, press INPUT on the TV first and then the HDMI or DVI device. • When turning off the HDMI or DVI device first and then the... HDMI or DVI output). HDMI cable transfers both video and audio. To program the TV remote control to Off. To connect an HDMI device, you use an HDMI cable with your electronic components, turn off your TV. Please try setting the following four options (Deep Color, Lip Sync, INSTAPORT™...
Owner's Manual - English
Page 17
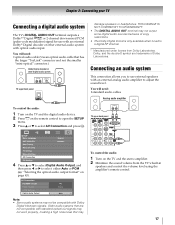
... audio sources because of Dolby Laboratories. You will need : •standard audio cables Analog audio amplifier To control the audio: 1 Turn on the TV and the digital audio device. 2 Press Y on the remote control to open the SETUP menu. 3 Press B or b to adjust the...volume level using the amplifier's remote control. 17 Older audio systems that may To control the audio: 1 Turn on page 43). Chapter 2: Connecting your TV Connecting a digital audio system The TV's DIGITAL AUDIO OUT terminal outputs a Dolby®* Digital or 2-channel down-mixed PCM (pulse-code modulation)...
... audio sources because of Dolby Laboratories. You will need : •standard audio cables Analog audio amplifier To control the audio: 1 Turn on the TV and the digital audio device. 2 Press Y on the remote control to open the SETUP menu. 3 Press B or b to adjust the...volume level using the amplifier's remote control. 17 Older audio systems that may To control the audio: 1 Turn on page 43). Chapter 2: Connecting your TV Connecting a digital audio system The TV's DIGITAL AUDIO OUT terminal outputs a Dolby®* Digital or 2-channel down-mixed PCM (pulse-code modulation)...
Owner's Manual - English
Page 20
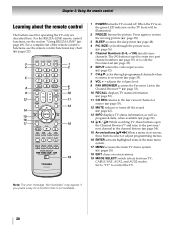
...3 SLEEP accesses the sleep timer (- The = button is on-screen (- page 33). 10 RECALL displays TV status information (- page 35). 12 MUTE reduces or turns off . page 42). 13 INFO displays TV status information as well as program details, when available (- pages 26). 18 EXIT closes on and off..., these buttons open the Channel Browser™ and tune to the previous/ next channel in the channel history (- page 52). 14 3 C / # c While watching TV, these buttons select or adjust programming menus. 16 ENTER activates highlighted items in the Channel Browser™ (- pages 22). 1 POWER...
...3 SLEEP accesses the sleep timer (- The = button is on-screen (- page 33). 10 RECALL displays TV status information (- page 35). 12 MUTE reduces or turns off . page 42). 13 INFO displays TV status information as well as program details, when available (- pages 26). 18 EXIT closes on and off..., these buttons open the Channel Browser™ and tune to the previous/ next channel in the channel history (- page 52). 14 3 C / # c While watching TV, these buttons select or adjust programming menus. 16 ENTER activates highlighted items in the Channel Browser™ (- pages 22). 1 POWER...
Owner's Manual - English
Page 21
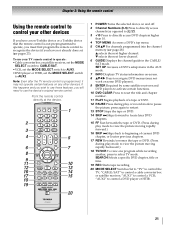
...to use your other devices If you have not already done so) (- Point the remote control directly at the device. 16 17 18 19 1 POWER Turns the selected device on and off. 2 Channel Numbers (0-9) Press to directly access channels (as opposed to < ,). 3 +10 Press to control the... control a VCR; To use the device's original remote control. Note: Even after the TV remote control is not preprogrammed to operate, you must first program the remote control to recognize the device (if you have a non-Toshiba device or a Toshiba device that the remote control is programmed, it may not work on some...
...to use your other devices If you have not already done so) (- Point the remote control directly at the device. 16 17 18 19 1 POWER Turns the selected device on and off. 2 Channel Numbers (0-9) Press to directly access channels (as opposed to < ,). 3 +10 Press to control the... control a VCR; To use the device's original remote control. Note: Even after the TV remote control is not preprogrammed to operate, you must first program the remote control to recognize the device (if you have a non-Toshiba device or a Toshiba device that the remote control is programmed, it may not work on some...
Owner's Manual - English
Page 23
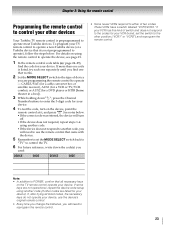
...the remote control. 23 page 24-25), find one that came with the device. 5 Remember to set the switch to the other devices Your Toshiba TV remote control is not preprogrammed to operate), follow the steps below. See notes below. • If the correct code was entered, the device ... that works. 2 Set the MODE SELECT switch to the type of device you will turn on the device, point the remote control at it is preprogrammed to operate most Toshiba devices. For details on the TV remote control operate your device. If, after trying all necessary keys on using another code...
...the remote control. 23 page 24-25), find one that came with the device. 5 Remember to set the switch to the other devices Your Toshiba TV remote control is not preprogrammed to operate), follow the steps below. See notes below. • If the correct code was entered, the device ... that works. 2 Set the MODE SELECT switch to the type of device you will turn on the device, point the remote control at it is preprogrammed to operate most Toshiba devices. For details on the TV remote control operate your device. If, after trying all necessary keys on using another code...

Owner's Manual - English
Page 27
...the Auto Tuning. However if you do not finish the entire Initial Setup process, the Initial Setup window will appear every time you turn on the TV. Quick Setup from the SETUP menu You can choose from the Quick Setup item located under the SETUP menu. 1 Press Y ...continue with O. To tune digital channels preferentially over analog when entering channel number directly, select Auto. Chapter 5: Setting up your TV Initial Setup When you first turn on or reset the TV, the Initial Setup window will appear. 1 In the Menu Language field, press C or c to select your preferred language....
...the Auto Tuning. However if you do not finish the entire Initial Setup process, the Initial Setup window will appear every time you turn on the TV. Quick Setup from the SETUP menu You can choose from the Quick Setup item located under the SETUP menu. 1 Press Y ...continue with O. To tune digital channels preferentially over analog when entering channel number directly, select Auto. Chapter 5: Setting up your TV Initial Setup When you first turn on or reset the TV, the Initial Setup window will appear. 1 In the Menu Language field, press C or c to select your preferred language....
Owner's Manual - English
Page 29
... Skip: On Video 2 V C R To turn on the skip: 1 Tune to the video input source to skip by direct number entry or by repeatedly pressing +. Manual Setting Label: VCR Video 2 V C R 4 Repeat steps 1 through 3 for other inputs. 5 To save your TV Setting channel skip Setting video input skip To prevent... a channel position to label. 2 From the SETUP menu, highlight Manual Setting and press T. however, they can be skipped. 1 From the SETUP menu, highlight TV Settings and press T. 2 Press B or b to select ( (skip off the skip: 1 Select the video input that is set a video input source to...
... Skip: On Video 2 V C R To turn on the skip: 1 Tune to the video input source to skip by direct number entry or by repeatedly pressing +. Manual Setting Label: VCR Video 2 V C R 4 Repeat steps 1 through 3 for other inputs. 5 To save your TV Setting channel skip Setting video input skip To prevent... a channel position to label. 2 From the SETUP menu, highlight Manual Setting and press T. however, they can be skipped. 1 From the SETUP menu, highlight TV Settings and press T. 2 Press B or b to select ( (skip off the skip: 1 Select the video input that is set a video input source to...
Owner's Manual - English
Page 30
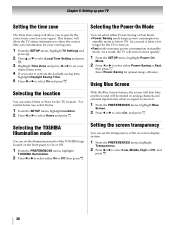
... menu, highlight Location. 2 Press C or c to select Home and press O. As a result, the TV will turn on. •Fast mode increases power consumption in standby mode to below 1W. Selecting the TOSHIBA Illumination mode You can select either On or Off, then press O. This feature will allow you want... the time zone The Time Zone setup will allow the TV status information to show the correct time zone information for the TV to turn on the front panel to On or Off. 1 From the PREFERENCES menu, highlight TOSHIBA Illumination. 2 Press C or c to select either Power-Saving or Fast ...
... menu, highlight Location. 2 Press C or c to select Home and press O. As a result, the TV will turn on. •Fast mode increases power consumption in standby mode to below 1W. Selecting the TOSHIBA Illumination mode You can select either On or Off, then press O. This feature will allow you want... the time zone The Time Zone setup will allow the TV status information to show the correct time zone information for the TV to turn on the front panel to On or Off. 1 From the PREFERENCES menu, highlight TOSHIBA Illumination. 2 Press C or c to select either Power-Saving or Fast ...

Owner's Manual - English
Page 31
To cancel the reset: Press C or c to select Yes and press T. The TV will turn off automatically. System Information Software Version XV645U 6.1.23.0 Mar 26 2009 - 01:16:45 FW: 21 Reset Factory Defaults You can reset all settings and channels to their factory default values. 1 From the SETUP menu, highlight Reset TV and press T. 2 Enter your TV Viewing the system status 1 From the SETUP menu, highlight System Information. 2 Press T to display the system information. Chapter 5: Setting up your PIN code (if PIN code has been set). 3 Press C or c to select No and press T. 31
To cancel the reset: Press C or c to select Yes and press T. The TV will turn off automatically. System Information Software Version XV645U 6.1.23.0 Mar 26 2009 - 01:16:45 FW: 21 Reset Factory Defaults You can reset all settings and channels to their factory default values. 1 From the SETUP menu, highlight Reset TV and press T. 2 Enter your TV Viewing the system status 1 From the SETUP menu, highlight System Information. 2 Press T to display the system information. Chapter 5: Setting up your PIN code (if PIN code has been set). 3 Press C or c to select No and press T. 31
Owner's Manual - English
Page 34
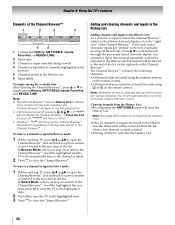
... to toggle among History, ANT/CABLE, Inputs, Favorites, and REGZA-LINK. Clearing channels from the list when a new channel or input is turned off the TV will open in the list. Note: • The Channel Browser™ opens in the History List 6 Input labels To toggle among the available... Press O to the next item in Browse mode: 1 While watching TV, press 3 C or # c to open the Channel Browser™ and surf back to a previous item or forward to close the Channel Browser™. If Favorites List is tuned. •Turning off , n will have no effect. • Pressing n will ...
... to toggle among History, ANT/CABLE, Inputs, Favorites, and REGZA-LINK. Clearing channels from the list when a new channel or input is turned off the TV will open in the list. Note: • The Channel Browser™ opens in the History List 6 Input labels To toggle among the available... Press O to the next item in Browse mode: 1 While watching TV, press 3 C or # c to open the Channel Browser™ and surf back to a previous item or forward to close the Channel Browser™. If Favorites List is tuned. •Turning off , n will have no effect. • Pressing n will ...

Owner's Manual - English
Page 39
... sharper * This feature adjusts the brightness of same name. You can adjust the picture quality for each input. Chapter 6: Using the TV's features Adjusting the picture Selecting the picture mode You can select your desired picture settings from the controller PC Designed for viewing of PC...game requiring split-second timing between the on-screen display and input from the following modes, as described in memory.) Note: Some menus cannot be turned on when the ANT/ CABLE input is saved to reset. 2 From the PICTURE menu, highlight Reset and press T. 3 A confirmation message will...
... sharper * This feature adjusts the brightness of same name. You can adjust the picture quality for each input. Chapter 6: Using the TV's features Adjusting the picture Selecting the picture mode You can select your desired picture settings from the controller PC Designed for viewing of PC...game requiring split-second timing between the on-screen display and input from the following modes, as described in memory.) Note: Some menus cannot be turned on when the ANT/ CABLE input is saved to reset. 2 From the PICTURE menu, highlight Reset and press T. 3 A confirmation message will...
Owner's Manual - English
Page 40
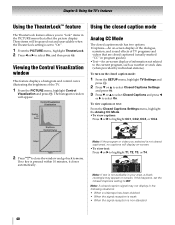
To turn on the closed captioned (usually marked "CC" in program guides). •Text-An on ... not related to Off. Viewing the Control Visualization window This feature displays a histogram and control curve illustrating the brightness of TV programs and videos that affect the picture display. If this happens, set to "On". 1 From the PICTURE menu, ...CC Mode The closed caption mode has two options: •Captions-An on screen. Chapter 6: Using the TV's features Using the TheaterLock™ feature The TheaterLock feature allows you selected is not closed captioned, no key ...
To turn on the closed captioned (usually marked "CC" in program guides). •Text-An on ... not related to Off. Viewing the Control Visualization window This feature displays a histogram and control curve illustrating the brightness of TV programs and videos that affect the picture display. If this happens, set to "On". 1 From the PICTURE menu, ...CC Mode The closed caption mode has two options: •Captions-An on screen. Chapter 6: Using the TV's features Using the TheaterLock™ feature The TheaterLock feature allows you selected is not closed captioned, no key ...
Owner's Manual - English
Page 42
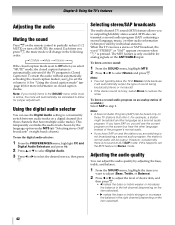
...when provided by the language option under MTS (- See "Using the closed caption mode is noisy, select Mono to allow for those TV stations that have SAP on the item selected). 42 The MTS feature is not broadcasting a second audio program, the station's normal ... 1 From the SOUND menu, highlight MTS. 2 Press C or c to partially reduce (1/2 MUTE) or turn off (MUTE) the sound. This temporarily overrides the audio track chosen by individual stations). When the TV receives a stereo or SAP broadcast, the word "STEREO" or "SAP" appears on right hand column). "Selecting...
...when provided by the language option under MTS (- See "Using the closed caption mode is noisy, select Mono to allow for those TV stations that have SAP on the item selected). 42 The MTS feature is not broadcasting a second audio program, the station's normal ... 1 From the SOUND menu, highlight MTS. 2 Press C or c to partially reduce (1/2 MUTE) or turn off (MUTE) the sound. This temporarily overrides the audio track chosen by individual stations). When the TV receives a stereo or SAP broadcast, the word "STEREO" or "SAP" appears on right hand column). "Selecting...
Owner's Manual - English
Page 48
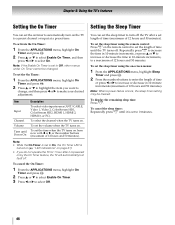
...powered on by the On Timer feature, the TV will automatically turn on the remote control to set the length of time until the TV turns off the TV after it is turned on from now with C or c or ...the number buttons (maximum of 12 hours and 50 minutes. To select the channel when the TV turns on . To cancel the sleep timer: Repeatedly press [ until Power On Description To select video input...On Timer cannot be cleared. Item Input Channel Volume Time until it is set the time when the TV turns on (- Setting the Sleep Timer You can set the sleep timer using the on timer to a ...
...powered on by the On Timer feature, the TV will automatically turn on the remote control to set the length of time until the TV turns off the TV after it is turned on from now with C or c or ...the number buttons (maximum of 12 hours and 50 minutes. To select the channel when the TV turns on . To cancel the sleep timer: Repeatedly press [ until Power On Description To select video input...On Timer cannot be cleared. Item Input Channel Volume Time until it is set the time when the TV turns on (- Setting the Sleep Timer You can set the sleep timer using the on timer to a ...

