
Owner's Manual - English
Page 7
...LCD TV 5 Chapter 1: Introduction 9 Features of your new TV 9 Overview of steps for installing, setting up, and using your new TV 9 TV front and side panel controls and connections . . . . 10 TV back panel connections 11 Chapter 2: Connecting your TV...remote control 19 Preparing the remote control for use 19 Installing the remote control batteries 19 Learning about the remote control 20 Using the remote control to control your other devices 21 Remote Control functional key chart 22 Programming the remote... the location 30 Selecting the TOSHIBA Illumination mode 30 Selecting the ...
...LCD TV 5 Chapter 1: Introduction 9 Features of your new TV 9 Overview of steps for installing, setting up, and using your new TV 9 TV front and side panel controls and connections . . . . 10 TV back panel connections 11 Chapter 2: Connecting your TV...remote control 19 Preparing the remote control for use 19 Installing the remote control batteries 19 Learning about the remote control 20 Using the remote control to control your other devices 21 Remote Control functional key chart 22 Programming the remote... the location 30 Selecting the TOSHIBA Illumination mode 30 Selecting the ...
Owner's Manual - English
Page 9
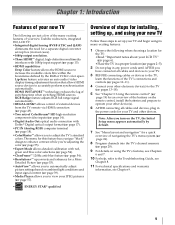
... with red, green and blue color selections (- pages 13-18). 5 See "Chapter 3: Using the remote control" (page 19) for an overview of the buttons on the TV, the Initial Setup menu appears automatically by the RGB or YCbCr color space. HDMI INSTAPORT™ technology ... Observe the following when choosing a location for your TV and other devices. page 54). •Resolution+™ upconverts and enhances for a separate digital converter set up , and using its many exciting features of your new Toshiba widescreen, integrated HD, LCD TV: •Integrated digital tuning (8VSB ATSC and QAM...
... with red, green and blue color selections (- pages 13-18). 5 See "Chapter 3: Using the remote control" (page 19) for an overview of the buttons on the TV, the Initial Setup menu appears automatically by the RGB or YCbCr color space. HDMI INSTAPORT™ technology ... Observe the following when choosing a location for your TV and other devices. page 54). •Resolution+™ upconverts and enhances for a separate digital converter set up , and using its many exciting features of your new Toshiba widescreen, integrated HD, LCD TV: •Integrated digital tuning (8VSB ATSC and QAM...
Owner's Manual - English
Page 10
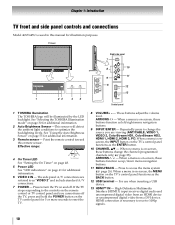
... - HDMI connection is on-screen, the MENU button on the TV's control panel functions as "VIDEO 2" and include standard A/V connections. 7 POWER - Chapter 1: Introduction TV front and side panel controls and connections Model 46XV645U is used in this remote sensor. See "Selecting the TOSHIBA Illumination mode" on -screen, these buttons function as up/down menu...
... - HDMI connection is on-screen, the MENU button on the TV's control panel functions as "VIDEO 2" and include standard A/V connections. 7 POWER - Chapter 1: Introduction TV front and side panel controls and connections Model 46XV645U is used in this remote sensor. See "Selecting the TOSHIBA Illumination mode" on -screen, these buttons function as up/down menu...

Owner's Manual - English
Page 13
... Cable box controls to operate other materials is set to VIDEO 1 on the TV back instead of television programs, videotapes, DVDs, and other devices, see Chapter 3. To program the TV remote control to change channels. The unauthorized recording, use the remote control to your VCR's audio out terminal using the white audio cable only...
... Cable box controls to operate other materials is set to VIDEO 1 on the TV back instead of television programs, videotapes, DVDs, and other devices, see Chapter 3. To program the TV remote control to change channels. The unauthorized recording, use the remote control to your VCR's audio out terminal using the white audio cable only...
Owner's Manual - English
Page 14
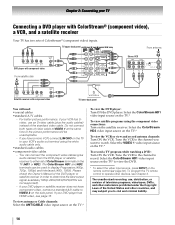
... view the VCR or view and record antenna channels: Turn ON the VCR. To program the TV remote control to operate other countries, and may subject you want to VIDEO 2 on the TV.* To view satellite programs using the white audio cable only. •standard audio cables •component video cables -...will be used to record. To view antenna or Cable channels: Select the ANT/CABLE video input source on the remote control (- Select the ColorStream HD1 video input source on the TV* to either set of the United States and other devices, see page 15. Tune the VCR to the channel...
... view the VCR or view and record antenna channels: Turn ON the VCR. To program the TV remote control to operate other countries, and may subject you want to VIDEO 2 on the TV.* To view satellite programs using the white audio cable only. •standard audio cables •component video cables -...will be used to record. To view antenna or Cable channels: Select the ANT/CABLE video input source on the remote control (- Select the ColorStream HD1 video input source on the TV* to either set of the United States and other devices, see page 15. Tune the VCR to the channel...
Owner's Manual - English
Page 15
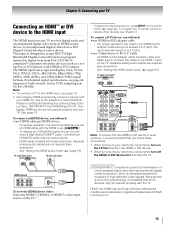
...with the HDMI Logo ( ). - page 51). Because this cable to the HDMI 1 input on the TV. TV upper back panel TV right side panel * To select the video input source, press INPUT on the remote control (- To connect a DVI device, you will need a High Speed HDMI™ cable. compliant[1] ...consumer electronic devices (such as a settop box or DVD player with the TV. Supported Audio format: Linear PCM, sampling rate 32/44.1/48...
...with the HDMI Logo ( ). - page 51). Because this cable to the HDMI 1 input on the TV. TV upper back panel TV right side panel * To select the video input source, press INPUT on the remote control (- To connect a DVI device, you will need a High Speed HDMI™ cable. compliant[1] ...consumer electronic devices (such as a settop box or DVD player with the TV. Supported Audio format: Linear PCM, sampling rate 32/44.1/48...
Owner's Manual - English
Page 16
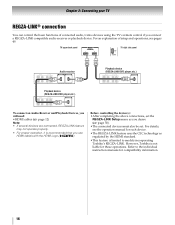
...playback device. For details, see pages 49. For an explanation of connected audio/video devices using the TV's remote control if you use HDMI cables with the HDMI Logo ( ). However, Toshiba is not liable for each device. •The REGZA-LINK feature uses the CEC technology as you... will need: •HDMI cables (- Refer to models incorporating Toshiba's REGZA-LINK. TV upper back panel TV right side panel VIDEO AUDIO L R IN OUT L R Audio receiver HDMI IN HDMI OUT Playback device (REGZA-LINK DVD player...
...playback device. For details, see pages 49. For an explanation of connected audio/video devices using the TV's remote control if you use HDMI cables with the HDMI Logo ( ). However, Toshiba is not liable for each device. •The REGZA-LINK feature uses the CEC technology as you... will need: •HDMI cables (- Refer to models incorporating Toshiba's REGZA-LINK. TV upper back panel TV right side panel VIDEO AUDIO L R IN OUT L R Audio receiver HDMI IN HDMI OUT Playback device (REGZA-LINK DVD player...
Owner's Manual - English
Page 17
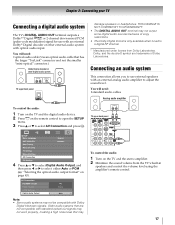
...with an external Dolby® Digital decoder or other digital audio system LINE IN LR Optical Audio IN TV upper back panel damage speakers or headphones. "Selecting the optical audio output format" on the remote control to open the SETUP menu. 3 Press B or b to a digital RF channel. * ...Manufactured under license from the TV's built-in speakers and control the volume level using the amplifier's remote control. 17 AV Connection PC/HDMI 1 Audio HDMI 1 Audio HDMI Settings Digital Audio Output PC Digital Auto Note: &#...
...with an external Dolby® Digital decoder or other digital audio system LINE IN LR Optical Audio IN TV upper back panel damage speakers or headphones. "Selecting the optical audio output format" on the remote control to open the SETUP menu. 3 Press B or b to a digital RF channel. * ...Manufactured under license from the TV's built-in speakers and control the volume level using the amplifier's remote control. 17 AV Connection PC/HDMI 1 Audio HDMI 1 Audio HDMI Settings Digital Audio Output PC Digital Auto Note: &#...
Owner's Manual - English
Page 19
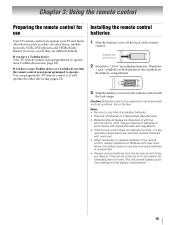
... remove batteries from leaking into the battery compartment. 19 Chapter 3: Using the remote control Preparing the remote control for an extended period of the remote control. If you have a Toshiba device: Your TV remote control is preprogrammed to operate: You can operate your TV and many other device (- Caution: Batteries must not be disposed of with new...
... remove batteries from leaking into the battery compartment. 19 Chapter 3: Using the remote control Preparing the remote control for an extended period of the remote control. If you have a Toshiba device: Your TV remote control is preprogrammed to operate: You can operate your TV and many other device (- Caution: Batteries must not be disposed of with new...
Owner's Manual - English
Page 20
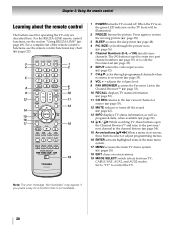
... not available. 20 Press again to control the TV. Chapter 3: Using the remote control Learning about the remote control The buttons used to enter two part channel numbers (- page 42). 13 INFO displays TV status information as well as program details, when available (- page 52). 14 3 C / # c While watching TV, these buttons select or adjust programming menus...
... not available. 20 Press again to control the TV. Chapter 3: Using the remote control Learning about the remote control The buttons used to enter two part channel numbers (- page 42). 13 INFO displays TV status information as well as program details, when available (- page 52). 14 3 C / # c While watching TV, these buttons select or adjust programming menus...
Owner's Manual - English
Page 21
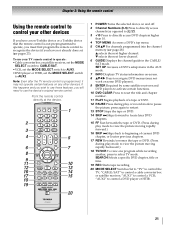
...of a tape or DVD. 12 PAUSE Press during play or record mode to pause the picture; Chapter 3: Using the remote control Using the remote control to control your TV remote control to operate: •Cable converter box or satellite receiver, set the MODE SELECT switch to CABLE/SAT. •.... 20 MODE SELECT Switches Set to "TV" to control a cable converter box or satellite receiver; To use those features, you have a non-Toshiba device or a Toshiba device that the remote control is not preprogrammed to operate, you must first program the remote control to recognize the device (if you...
...of a tape or DVD. 12 PAUSE Press during play or record mode to pause the picture; Chapter 3: Using the remote control Using the remote control to control your TV remote control to operate: •Cable converter box or satellite receiver, set the MODE SELECT switch to CABLE/SAT. •.... 20 MODE SELECT Switches Set to "TV" to control a cable converter box or satellite receiver; To use those features, you have a non-Toshiba device or a Toshiba device that the remote control is not preprogrammed to operate, you must first program the remote control to recognize the device (if you...
Owner's Manual - English
Page 22
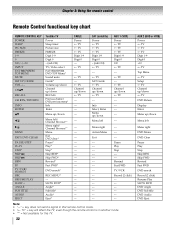
... Fast FWD* DVD search* REC MENU* --SLOW FWD* Angle* Sub title* Audio* Eject* CABLE Power s TV s TV s TV Digit 1-9 Digit 0 --s TV --- Chapter 3: Using the remote control Remote Control functional key chart REMOTE CONTROL KEY POWER SLEEP PIC SIZE FREEZE 1-9 0 100/-/+10 INPUT FAV BROWSER/ TOP MENU MUTE SET UP/GUIDE VOL... EXIT/DVD CLEAR PAUSE/STEP PLAY STOP SKIP Z SKIP z REW FF TV/VCR/ SEARCH REC RESUME PLAY SLOW + ANGLE SUB TITLE AUDIO EJECT Toshiba TV Power Sleep timer Picture size FREEZE Digit 1-9 Digit 0 - (sub CH) TV/Video select FAV BROWSER DVD TOP Menu* Sound mute Guide* Volume up...
... Fast FWD* DVD search* REC MENU* --SLOW FWD* Angle* Sub title* Audio* Eject* CABLE Power s TV s TV s TV Digit 1-9 Digit 0 --s TV --- Chapter 3: Using the remote control Remote Control functional key chart REMOTE CONTROL KEY POWER SLEEP PIC SIZE FREEZE 1-9 0 100/-/+10 INPUT FAV BROWSER/ TOP MENU MUTE SET UP/GUIDE VOL... EXIT/DVD CLEAR PAUSE/STEP PLAY STOP SKIP Z SKIP z REW FF TV/VCR/ SEARCH REC RESUME PLAY SLOW + ANGLE SUB TITLE AUDIO EJECT Toshiba TV Power Sleep timer Picture size FREEZE Digit 1-9 Digit 0 - (sub CH) TV/Video select FAV BROWSER DVD TOP Menu* Sound mute Guide* Volume up...
Owner's Manual - English
Page 23
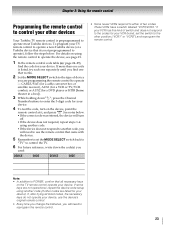
... device does not respond, repeat steps 1-4 using the remote control to operate - If more than one that it , and press p. Chapter 3: Using the remote control Programming the remote control to control your other devices Your Toshiba TV remote control is listed, try each one separately until you find... the code for your device. For details on the device, point the remote control at it is not ...
... device does not respond, repeat steps 1-4 using the remote control to operate - If more than one that it , and press p. Chapter 3: Using the remote control Programming the remote control to control your other devices Your Toshiba TV remote control is listed, try each one separately until you find... the code for your device. For details on the device, point the remote control at it is not ...

Owner's Manual - English
Page 24
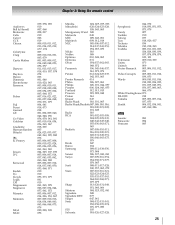
... codes In some cases, you may use the device's remote control. S. Electronics 087, 096, 098 United Cable 082 Universal 065, 092, 097, 099, 102, 103 Wards ... 031, 056 Uniden 021, 028, 030, 032, 035, 039, 043, 045, 047, 058 Zenith 027 TV/VCR Combo Action GE Goldstar Panasonic Precision Quasar Realistic Sony Toshiba Zenith Totevision 078 059, 062 065 065 078 065 079 074 057 065 009, 010, 065 DVD/VCR Combo...100 Tocom 071, 084, 085 U. Your device may not be able to operate your device with the TV remote control. If this happens, use a code that is not recognized by the...
... codes In some cases, you may use the device's remote control. S. Electronics 087, 096, 098 United Cable 082 Universal 065, 092, 097, 099, 102, 103 Wards ... 031, 056 Uniden 021, 028, 030, 032, 035, 039, 043, 045, 047, 058 Zenith 027 TV/VCR Combo Action GE Goldstar Panasonic Precision Quasar Realistic Sony Toshiba Zenith Totevision 078 059, 062 065 065 078 065 079 074 057 065 009, 010, 065 DVD/VCR Combo...100 Tocom 071, 084, 085 U. Your device may not be able to operate your device with the TV remote control. If this happens, use a code that is not recognized by the...
Owner's Manual - English
Page 25
Chapter 3: Using the remote control Audiovox Bell & Howell Broksonic Calix Carver CCE Citizen Colortyme Craig Curtis Mathes Daewoo Daytron Denon Dimensia Electrohome Emerson Fisher Fuji Funai Garrard GE Go ..., 044, 072 Symphonic 018, 050, 051, 053, 073, 079 Tandy 007 Tashiko 010 Tatung 037 Teac 018, 029, 037 Technics 036 Teknika 010, 018, 065 Toshiba 000, 011, 021, 023, 024, 028, 030, 039, 057, 074, 078, 079, 100, 101 Totevision 009, 010, 065 Unitec 073 Unitech 009 Vector Research 005...
Chapter 3: Using the remote control Audiovox Bell & Howell Broksonic Calix Carver CCE Citizen Colortyme Craig Curtis Mathes Daewoo Daytron Denon Dimensia Electrohome Emerson Fisher Fuji Funai Garrard GE Go ..., 044, 072 Symphonic 018, 050, 051, 053, 073, 079 Tandy 007 Tashiko 010 Tatung 037 Teac 018, 029, 037 Technics 036 Teknika 010, 018, 065 Toshiba 000, 011, 021, 023, 024, 028, 030, 039, 057, 074, 078, 079, 100, 101 Totevision 009, 010, 065 Unitec 073 Unitech 009 Vector Research 005...
Owner's Manual - English
Page 26
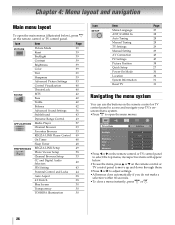
... 43 Parental Control and Locks 44 Auto Aspect 38 4:3 Stretch 38 Blue Screen 30 Transparency 30 TOSHIBA Illumination 30 Icon SETUP Item Menu Language ANT/CABLE In Auto Tuning Manual Tuning TV Settings Manual Setting AV Connection PC Settings Picture Position Quick Setup Power-On Mode Location System Information... 47 38 27 30 30 31 31 Navigating the menu system You can use the items, press B or b on the remote control or TV control panel to access and navigate your TV's onscreen menu system. •Press Y to open the main menus (illustrated below . •To use the buttons on...
... 43 Parental Control and Locks 44 Auto Aspect 38 4:3 Stretch 38 Blue Screen 30 Transparency 30 TOSHIBA Illumination 30 Icon SETUP Item Menu Language ANT/CABLE In Auto Tuning Manual Tuning TV Settings Manual Setting AV Connection PC Settings Picture Position Quick Setup Power-On Mode Location System Information... 47 38 27 30 30 31 31 Navigating the menu system You can use the items, press B or b on the remote control or TV control panel to access and navigate your TV's onscreen menu system. •Press Y to open the main menus (illustrated below . •To use the buttons on...
Owner's Manual - English
Page 28
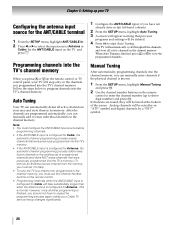
...ANT/CABLE input is configured for Cable will stop only on the channels you programmed into the TV's channel memory When you press < or , on the remote control or TV control panel, your Cable TV service lineup changes significantly. 1 Configure the ANT/CABLE input, if you have to enter the .... 1 From the SETUP menu, highlight Manual Tuning and press T. 2 Use the channel number buttons on the remote control to repeat the programming process again unless your TV will take substantially longer than when the antenna input is finished, you must configure the ANT/CABLE input source before...
...ANT/CABLE input is configured for Cable will stop only on the channels you programmed into the TV's channel memory When you press < or , on the remote control or TV control panel, your Cable TV service lineup changes significantly. 1 Configure the ANT/CABLE input, if you have to enter the .... 1 From the SETUP menu, highlight Manual Tuning and press T. 2 Use the channel number buttons on the remote control to repeat the programming process again unless your TV will take substantially longer than when the antenna input is finished, you must configure the ANT/CABLE input source before...
Owner's Manual - English
Page 29
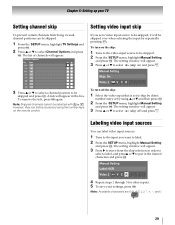
...press T. The list of channels will appear. 3 Press c to move from being viewed, channel positions can be skipped. 1 From the SETUP menu, highlight TV Settings and press T. 2 Press B or b to be skipped and press T. The setting window will appear in the desired characters and press T. A ...skipped, it will appear. 3 Press B or b to select 8 (skip on the remote control. Manual Setting Label: VCR Video 2 V C R 4 Repeat steps 1 through 3 for other inputs. 5 To save your TV Setting channel skip Setting video input skip To prevent certain channels from the skip selection in ...
...press T. The list of channels will appear. 3 Press c to move from being viewed, channel positions can be skipped. 1 From the SETUP menu, highlight TV Settings and press T. 2 Press B or b to be skipped and press T. The setting window will appear in the desired characters and press T. A ...skipped, it will appear. 3 Press B or b to select 8 (skip on the remote control. Manual Setting Label: VCR Video 2 V C R 4 Repeat steps 1 through 3 for other inputs. 5 To save your TV Setting channel skip Setting video input skip To prevent certain channels from the skip selection in ...
Owner's Manual - English
Page 32
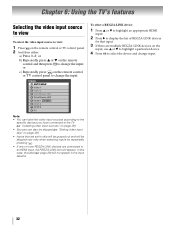
...have connected to an HDMI input, the REGZA-LINK icon will appear. "Labeling video input sources" on the remote control or TV control panel to change the input. Chapter 6: Using the TV's features Selecting the video input source to view To select the video input source to view: 1 Press +... skipped over only when selecting inputs by repeatedly pressing +. • If one or more REGZA-LINK devices are multiple REGZA-LINK devices on the remote control or TV control panel. 2 And then either: a) Press 0-8; In this case, the label (- To select a REGZA-LINK device: 1 Press B or b to ...
...have connected to an HDMI input, the REGZA-LINK icon will appear. "Labeling video input sources" on the remote control or TV control panel to change the input. Chapter 6: Using the TV's features Selecting the video input source to view To select the video input source to view: 1 Press +... skipped over only when selecting inputs by repeatedly pressing +. • If one or more REGZA-LINK devices are multiple REGZA-LINK devices on the remote control or TV control panel. 2 And then either: a) Press 0-8; In this case, the label (- To select a REGZA-LINK device: 1 Press B or b to ...
Owner's Manual - English
Page 33
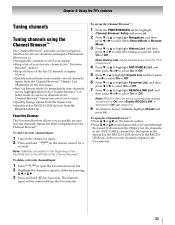
...out and set up a favorite channels/inputs list that is switched to open the Channel Browser™: •Press 3 C or # c on the remote control for 3 seconds. To add a favorite channel/input: 1 Tune to tune). •Quickly change inputs from the Inputs List. •Quickly select... channel or input. 2 Press and hold = for 3 seconds. To delete a favorite channel/input: 1 Press n to Off. (- Chapter 6: Using the TV's features Tuning channels Tuning channels using the Channel Browser™ The Channel Browser™ provides an easy navigation interface for all of your inputs. •...
...out and set up a favorite channels/inputs list that is switched to open the Channel Browser™: •Press 3 C or # c on the remote control for 3 seconds. To add a favorite channel/input: 1 Tune to tune). •Quickly change inputs from the Inputs List. •Quickly select... channel or input. 2 Press and hold = for 3 seconds. To delete a favorite channel/input: 1 Press n to Off. (- Chapter 6: Using the TV's features Tuning channels Tuning channels using the Channel Browser™ The Channel Browser™ provides an easy navigation interface for all of your inputs. •...


