Owner's Manual - English
Page 3
...is required when the apparatus has been damaged in case the product requires service. 19) NEVER route the product's power cord inside the TV contains glass and a toxic liquid. Never place the TV on the floor or a sturdy, level, stable surface that can be easily unplugged in any broken glass or ...into an outlet that is tight, secure, and parallel to the floor. A grounding type plug has two blades and a third grounding prong. The LCD panel inside a wall or similar enclosed area. 20) Never modify this apparatus during lightning storms or when unused for replacement of the...
...is required when the apparatus has been damaged in case the product requires service. 19) NEVER route the product's power cord inside the TV contains glass and a toxic liquid. Never place the TV on the floor or a sturdy, level, stable surface that can be easily unplugged in any broken glass or ...into an outlet that is tight, secure, and parallel to the floor. A grounding type plug has two blades and a third grounding prong. The LCD panel inside a wall or similar enclosed area. 20) Never modify this apparatus during lightning storms or when unused for replacement of the...
Owner's Manual - English
Page 4
... grounded to clean the LCD screen, follow these sounds become frequent or continuous, unplug the power cord and contact a Toshiba Authorized Service Center. 39) WARNING: RISK OF SERIOUS PERSONAL INJURY OR EQUIPMENT DAMAGE! Care For better performance and safer operation of your TV from lightning and power surges, always unplug the power cord and disconnect the...
... grounded to clean the LCD screen, follow these sounds become frequent or continuous, unplug the power cord and contact a Toshiba Authorized Service Center. 39) WARNING: RISK OF SERIOUS PERSONAL INJURY OR EQUIPMENT DAMAGE! Care For better performance and safer operation of your TV from lightning and power surges, always unplug the power cord and disconnect the...
Owner's Manual - English
Page 6
...meeting strict guidelines set the Power-On mode to Part 15 of the FCC rules. therefore, Toshiba is connected. • Consult the dealer or an experienced radio/TV technician for perceived issues resulting...LCD TV The following two conditions: (1) this device may increase energy consumption, possibly beyond the limits required for a long period of this television meet ENERGY STAR® requirements. FCC Declaration of Conformity Compliance Statement (Part 15): The Toshiba 40XV645U, 46XV645U and 52XV645U Televisions comply with this TV. Picture Settings, Auto Brightness Sensor, Power...
...meeting strict guidelines set the Power-On mode to Part 15 of the FCC rules. therefore, Toshiba is connected. • Consult the dealer or an experienced radio/TV technician for perceived issues resulting...LCD TV The following two conditions: (1) this device may increase energy consumption, possibly beyond the limits required for a long period of this television meet ENERGY STAR® requirements. FCC Declaration of Conformity Compliance Statement (Part 15): The Toshiba 40XV645U, 46XV645U and 52XV645U Televisions comply with this TV. Picture Settings, Auto Brightness Sensor, Power...

Owner's Manual - English
Page 7
...LCD TV 5 Chapter 1: Introduction 9 Features of your new TV 9 Overview of steps for installing, setting up, and using your new TV 9 TV front and side panel controls and connections . . . . 10 TV back panel connections 11 Chapter 2: Connecting your TV...time zone 30 Selecting the location 30 Selecting the TOSHIBA Illumination mode 30 Selecting the Power-On Mode 30 Using Blue Screen 30 Setting ...audio mode 51 Displaying TV status information 52 Understanding the auto power off feature 52 Understanding the last mode memory feature 52 Chapter 7: Using the TV's advanced features 53 Using...
...LCD TV 5 Chapter 1: Introduction 9 Features of your new TV 9 Overview of steps for installing, setting up, and using your new TV 9 TV front and side panel controls and connections . . . . 10 TV back panel connections 11 Chapter 2: Connecting your TV...time zone 30 Selecting the location 30 Selecting the TOSHIBA Illumination mode 30 Selecting the Power-On Mode 30 Using Blue Screen 30 Setting ...audio mode 51 Displaying TV status information 52 Understanding the auto power off feature 52 Understanding the last mode memory feature 52 Chapter 7: Using the TV's advanced features 53 Using...
Owner's Manual - English
Page 9
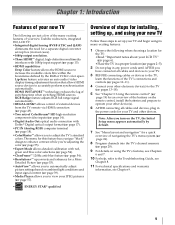
...® Digital optical output format (- page 6). •Place the TV in the power cords for a separate digital converter set up your TV and begin using its many exciting features of your new Toshiba widescreen, integrated HD, LCD TV: •Integrated digital tuning (8VSB ATSC and QAM) eliminates the ...need for your new TV Follow these steps to set -top box (in any power cords until AFTER you turn on using your TV and other electronic device(s)...
...® Digital optical output format (- page 6). •Place the TV in the power cords for a separate digital converter set up your TV and begin using its many exciting features of your new Toshiba widescreen, integrated HD, LCD TV: •Integrated digital tuning (8VSB ATSC and QAM) eliminates the ...need for your new TV Follow these steps to set -top box (in any power cords until AFTER you turn on using your TV and other electronic device(s)...
Owner's Manual - English
Page 10
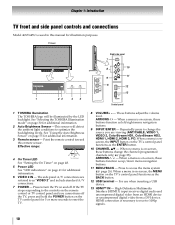
... navigation buttons. 9 INPUT/ENTER - When no menu is on and off the TV, press and hold the POWER button on page 30 for illustration purposes. ARROWS U u - TV front 1 23 45 Right side panel 7 8 10 11 9 6 12 13 Control panel 1 TOSHIBA Illumination The TOSHIBA logo will detect the ambient light conditions to turn off . ARROWS I i - page...
... navigation buttons. 9 INPUT/ENTER - When no menu is on and off the TV, press and hold the POWER button on page 30 for illustration purposes. ARROWS U u - TV front 1 23 45 Right side panel 7 8 10 11 9 6 12 13 Control panel 1 TOSHIBA Illumination The TOSHIBA logo will detect the ambient light conditions to turn off . ARROWS I i - page...
Owner's Manual - English
Page 11
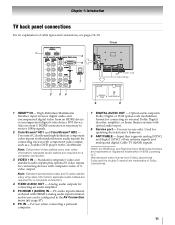
Chapter 1: Introduction TV back panel connections For an explanation of ColorStream high-definition component video inputs (with standard stereo audio inputs) for connecting devices with component video output, such as a Toshiba DVD player with ColorStream. High-Definition Multimedia Interface input ...OUT - Input that supports analog (NTSC) and digital (ATSC) off-air antenna signals and analog and digital Cable TV (QAM) signals. Also see pages 12-18. 1 5 6 7 TV back Power cord Cable Strap 2 34 8 9 1 HDMI™ IN - separate audio cables are trademarks or registered trademarks...
Chapter 1: Introduction TV back panel connections For an explanation of ColorStream high-definition component video inputs (with standard stereo audio inputs) for connecting devices with component video output, such as a Toshiba DVD player with ColorStream. High-Definition Multimedia Interface input ...OUT - Input that supports analog (NTSC) and digital (ATSC) off-air antenna signals and analog and digital Cable TV (QAM) signals. Also see pages 12-18. 1 5 6 7 TV back Power cord Cable Strap 2 34 8 9 1 HDMI™ IN - separate audio cables are trademarks or registered trademarks...
Owner's Manual - English
Page 20
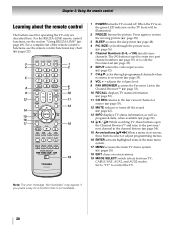
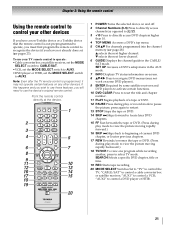
...directly tune channels. page 33). 6 INPUT selects the video input source (- page 33). 10 RECALL displays TV status information (- pages 22). 1 POWER turns the TV on -screen menus. 19 MODE SELECT switch selects between TV, CABLE/SAT, AUX1, and AUX2 modes. page 35). 8 VOL + - pages 26). 18 EXIT ...closes on and off the sound (- page 52). 14 3 C / # c While watching TV, these buttons select or adjust ...
...directly tune channels. page 33). 6 INPUT selects the video input source (- page 33). 10 RECALL displays TV status information (- pages 22). 1 POWER turns the TV on -screen menus. 19 MODE SELECT switch selects between TV, CABLE/SAT, AUX1, and AUX2 modes. page 35). 8 VOL + - pages 26). 18 EXIT ...closes on and off the sound (- page 52). 14 3 C / # c While watching TV, these buttons select or adjust ...
Owner's Manual - English
Page 21
... title or time. 19 REC Starts tape recording. 20 MODE SELECT Switches Set to "TV" to directly access DVD chapters higher than 10. 4 TOP MENU Accesses a DVD's top...8226;DVD player or HTIB, set the MODE SELECT switch to AUX2. Note: Even after the TV remote control is programmed, it may not work on some DVD players). 9 ENTER Required by ...Toshiba device that the remote control is not preprogrammed to operate, you must first program the remote control to recognize the device (if you will need to control a DVD player or HTIB. 21 Point the remote control directly at the device. 16 17 18 19 1 POWER...
... title or time. 19 REC Starts tape recording. 20 MODE SELECT Switches Set to "TV" to directly access DVD chapters higher than 10. 4 TOP MENU Accesses a DVD's top...8226;DVD player or HTIB, set the MODE SELECT switch to AUX2. Note: Even after the TV remote control is programmed, it may not work on some DVD players). 9 ENTER Required by ...Toshiba device that the remote control is not preprogrammed to operate, you must first program the remote control to recognize the device (if you will need to control a DVD player or HTIB. 21 Point the remote control directly at the device. 16 17 18 19 1 POWER...
Owner's Manual - English
Page 22
... INFO ENTER Bb C 3 c # MENU EXIT/DVD CLEAR PAUSE/STEP PLAY STOP SKIP Z SKIP z REW FF TV/VCR/ SEARCH REC RESUME PLAY SLOW + ANGLE SUB TITLE AUDIO EJECT Toshiba TV Power Sleep timer Picture size FREEZE Digit 1-9 Digit 0 - (sub CH) TV/Video select FAV BROWSER DVD TOP Menu* Sound mute Guide* Volume up/down Channel up...
... INFO ENTER Bb C 3 c # MENU EXIT/DVD CLEAR PAUSE/STEP PLAY STOP SKIP Z SKIP z REW FF TV/VCR/ SEARCH REC RESUME PLAY SLOW + ANGLE SUB TITLE AUDIO EJECT Toshiba TV Power Sleep timer Picture size FREEZE Digit 1-9 Digit 0 - (sub CH) TV/Video select FAV BROWSER DVD TOP Menu* Sound mute Guide* Volume up/down Channel up...
Owner's Manual - English
Page 23
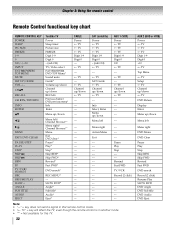
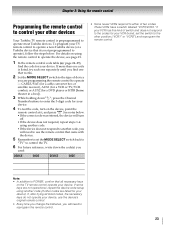
...These VCRs have a switch labeled "VCR1/VCR2." Note: • In addition to POWER, confirm that it , and press p. See notes below . To program your TV remote control to operate a non-Toshiba device (or a Toshiba device that all listed codes, the necessary keys do not operate your device, use ...VCR2") and reprogram the remote control. Chapter 3: Using the remote control Programming the remote control to control your other devices Your Toshiba TV remote control is listed, try each one separately until you find the code for your device. If, after trying all necessary keys ...
...These VCRs have a switch labeled "VCR1/VCR2." Note: • In addition to POWER, confirm that it , and press p. See notes below . To program your TV remote control to operate a non-Toshiba device (or a Toshiba device that all listed codes, the necessary keys do not operate your device, use ...VCR2") and reprogram the remote control. Chapter 3: Using the remote control Programming the remote control to control your other devices Your Toshiba TV remote control is listed, try each one separately until you find the code for your device. If, after trying all necessary keys ...
Owner's Manual - English
Page 26
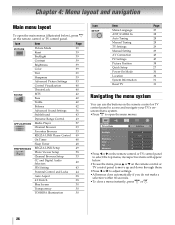
... Aspect 38 4:3 Stretch 38 Blue Screen 30 Transparency 30 TOSHIBA Illumination 30 Icon SETUP Item Menu Language ANT/CABLE In Auto Tuning Manual Tuning TV Settings Manual Setting AV Connection PC Settings Picture Position Quick Setup Power-On Mode Location System Information Reset TV Page 27 28 28 28 29 29 43 47 38... 27 30 30 31 31 Navigating the menu system You can use the items, press B or b on the remote control or TV control panel to move up and...
... Aspect 38 4:3 Stretch 38 Blue Screen 30 Transparency 30 TOSHIBA Illumination 30 Icon SETUP Item Menu Language ANT/CABLE In Auto Tuning Manual Tuning TV Settings Manual Setting AV Connection PC Settings Picture Position Quick Setup Power-On Mode Location System Information Reset TV Page 27 28 28 28 29 29 43 47 38... 27 30 30 31 31 Navigating the menu system You can use the items, press B or b on the remote control or TV control panel to move up and...
Owner's Manual - English
Page 30
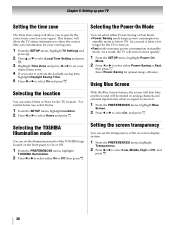
...This feature will turn on more quickly. 1 From the SETUP menu, highlight Power-On Mode. 2 Press C or c to select either On or Off, then press O. Selecting the TOSHIBA Illumination mode You can select Home or Store for the TV to select Home and press O. For normal home use, select Home. 1... From the SETUP menu, highlight Location. 2 Press C or c to turn on . •Fast mode increases power consumption in standby mode to select...
...This feature will turn on more quickly. 1 From the SETUP menu, highlight Power-On Mode. 2 Press C or c to select either On or Off, then press O. Selecting the TOSHIBA Illumination mode You can select Home or Store for the TV to select Home and press O. For normal home use, select Home. 1... From the SETUP menu, highlight Location. 2 Press C or c to turn on . •Fast mode increases power consumption in standby mode to select...
Owner's Manual - English
Page 33
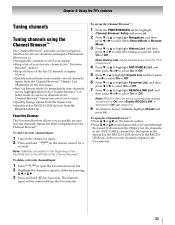
... add a favorite channel/input: 1 Tune to Off. (- Note: REGZA-LINK List will be automatically grayed out and set to Off when Enable REGZA-LINK is powered off. 4 Press b or B to highlight ANT/CABLE List, and then press C or c to select On or Off. 5 Press b or B to highlight Inputs ...3 Press b or B to highlight History List, and then press C or c to select the setting you to select On or Off. Chapter 6: Using the TV's features Tuning channels Tuning channels using the Channel Browser™ The Channel Browser™ provides an easy navigation interface for all of your inputs. •...
... add a favorite channel/input: 1 Tune to Off. (- Note: REGZA-LINK List will be automatically grayed out and set to Off when Enable REGZA-LINK is powered off. 4 Press b or B to highlight ANT/CABLE List, and then press C or c to select On or Off. 5 Press b or B to highlight Inputs ...3 Press b or B to highlight History List, and then press C or c to select the setting you to select On or Off. Chapter 6: Using the TV's features Tuning channels Tuning channels using the Channel Browser™ The Channel Browser™ provides an easy navigation interface for all of your inputs. •...
Owner's Manual - English
Page 46
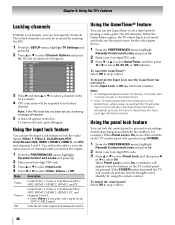
...174;: Select Off in step 3 above . left -hand column). If the POWER button is pressed the TV will appear when 10 minutes, 3 minutes, and 1 minute remain on the GameTimer. • If the TV loses power with time remaining on the TV control panel are pressed. Mode Description Video Video+ Off Locks Video 1, Video 2,... to select 30, 60, 90, or 120 minutes. When Panel Lock is restored the TV will not be required to set to On, a reminder will appear when the buttons on the GameTimer, when power is On, none of channels will have to select Channel Options and press T. Using the...
...174;: Select Off in step 3 above . left -hand column). If the POWER button is pressed the TV will appear when 10 minutes, 3 minutes, and 1 minute remain on the GameTimer. • If the TV loses power with time remaining on the TV control panel are pressed. Mode Description Video Video+ Off Locks Video 1, Video 2,... to select 30, 60, 90, or 120 minutes. When Panel Lock is restored the TV will not be required to set to On, a reminder will appear when the buttons on the GameTimer, when power is On, none of channels will have to select Channel Options and press T. Using the...
Owner's Manual - English
Page 48
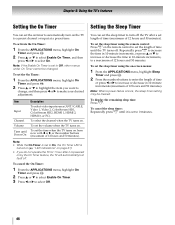
... C or c to increase or decrease in 10-minute increments, to a maximum of 12 hours and 50 minutes). To cancel the sleep timer: Repeatedly press [ until Power On Description To select video input source (ANT/CABLE, Video 1, Video 2, ColorStream HD1, ColorStream HD2, HDMI 1, HDMI 2, HDMI 3, or PC). Setting the Sleep... timer to automatically turn itself off. To set the sleep timer using the on the remote control to set the length of time until the TV turns off. Repeatedly press [ to increase the time in 10-minute increments, or press B or b to increase or decrease the time in ...
... C or c to increase or decrease in 10-minute increments, to a maximum of 12 hours and 50 minutes). To cancel the sleep timer: Repeatedly press [ until Power On Description To select video input source (ANT/CABLE, Video 1, Video 2, ColorStream HD1, ColorStream HD2, HDMI 1, HDMI 2, HDMI 3, or PC). Setting the Sleep... timer to automatically turn itself off. To set the sleep timer using the on the remote control to set the length of time until the TV turns off. Repeatedly press [ to increase the time in 10-minute increments, or press B or b to increase or decrease the time in ...

Owner's Manual - English
Page 49
...HDMI input is set to On, the following conditions: - The Enable REGZA-LINK item is currently selected. - Enters contents menu, etc. Item Description Power Turns the select device on the devices connected. Setup Menu Access the setup menu of a DVD during playback. Menu Accesses the menu of a DVD ... Setup menu is connected to the HDMI input, you can control the connected REGZA-LINK playback device you want to control Toshiba REGZA-LINK compatible devices from the TV remote via HDMI connection (- REGZA-LINK® playback device (DVD player, etc.) control With your...
...HDMI input is set to On, the following conditions: - The Enable REGZA-LINK item is currently selected. - Enters contents menu, etc. Item Description Power Turns the select device on the devices connected. Setup Menu Access the setup menu of a DVD during playback. Menu Accesses the menu of a DVD ... Setup menu is connected to the HDMI input, you can control the connected REGZA-LINK playback device you want to control Toshiba REGZA-LINK compatible devices from the TV remote via HDMI connection (- REGZA-LINK® playback device (DVD player, etc.) control With your...
Owner's Manual - English
Page 50
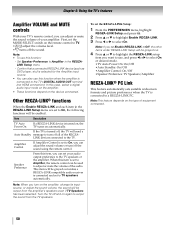
...8226; To use , and press C or c to select On or desired mode. • TV Auto Power On: On/Off • Auto Standby: On/Off • Amplifier Control: On/Off • Speaker Preference: TV Speakers/Amplifier REGZA-LINK® PC Link This feature automatically sets suitable widescreen formats and picture preferences... or adjust the sound volume, the sound will be grayed out unless a REGZA-LINK compatible audio receiver is turned on, the TV turns on the type of the REGZA- Item Description TV Auto Power On If a REGZA-LINK device is connected and set your audio output preference to the...
...8226; To use , and press C or c to select On or desired mode. • TV Auto Power On: On/Off • Auto Standby: On/Off • Amplifier Control: On/Off • Speaker Preference: TV Speakers/Amplifier REGZA-LINK® PC Link This feature automatically sets suitable widescreen formats and picture preferences... or adjust the sound volume, the sound will be grayed out unless a REGZA-LINK compatible audio receiver is turned on, the TV turns on the type of the REGZA- Item Description TV Auto Power On If a REGZA-LINK device is connected and set your audio output preference to the...
Owner's Manual - English
Page 52
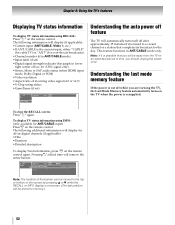
... 5 : 29min Stereo 480i 4:3 Understanding the auto power off feature The TV will automatically turn itself off after approximately 15 minutes if it is tuned to memory.) 52 To display TV status information using RECALL: Press E on the TV when the power is on-screen. (The last position will be stored...RECALL or INFO display is resupplied. Understanding the last mode memory feature If the power is the current input, either "CABLE" (for cable TV) or "ANT" (for off while you are viewing the TV, the Last Mode Memory feature automatically turns on the remote control. Chapter 6: ...
... 5 : 29min Stereo 480i 4:3 Understanding the auto power off feature The TV will automatically turn itself off after approximately 15 minutes if it is tuned to memory.) 52 To display TV status information using RECALL: Press E on the TV when the power is on-screen. (The last position will be stored...RECALL or INFO display is resupplied. Understanding the last mode memory feature If the power is the current input, either "CABLE" (for cable TV) or "ANT" (for off while you are viewing the TV, the Last Mode Memory feature automatically turns on the remote control. Chapter 6: ...
Owner's Manual - English
Page 59
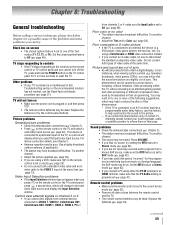
Black box on • Make sure the power cord is plugged in rare instances, when viewing certain content (e.g. TV stops responding to controls • If the TV stops responding to the controls on the remote control or TV control panel and you cannot turn on -screen • The closed caption ...8226; If you select that has a programmable audio delay feature, use the Reset Factory Defaults procedure (- TV will not turn off the TV, press and hold the POWER button on the remote control or the TV control panel, press + a second time, which may be dead. Other problems • If your ...
Black box on • Make sure the power cord is plugged in rare instances, when viewing certain content (e.g. TV stops responding to controls • If the TV stops responding to the controls on the remote control or TV control panel and you cannot turn on -screen • The closed caption ...8226; If you select that has a programmable audio delay feature, use the Reset Factory Defaults procedure (- TV will not turn off the TV, press and hold the POWER button on the remote control or the TV control panel, press + a second time, which may be dead. Other problems • If your ...


