Owner's Manual - English
Page 2
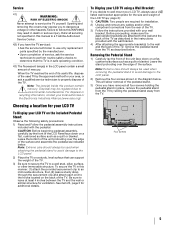
...installation instructions. See item 23 on page 3 and instructions on your flat panel display. • Carefully read this Toshiba LCD TV. CHILD SAFETY: It Makes A Difference How and Where You Use Your Flat Panel Display Congratulations on page 5. Tune Into Safety • One size does NOT &#...64257;t all cords and cables connected to the flat panel display so that can ...
...installation instructions. See item 23 on page 3 and instructions on your flat panel display. • Carefully read this Toshiba LCD TV. CHILD SAFETY: It Makes A Difference How and Where You Use Your Flat Panel Display Congratulations on page 5. Tune Into Safety • One size does NOT &#...64257;t all cords and cables connected to the flat panel display so that can ...
Owner's Manual - English
Page 3
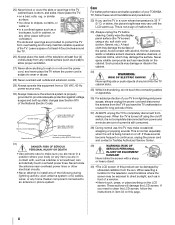
... pillar, or other . Important Safety Instructions 1) Read these instructions. 2) Keep these recommendations and precautions and heed all warnings when installing your TV: 17) WARNING: NEVER expose batteries to excessive heat such as possible) 4" min. The wide blade or the third prong are provided for ...damage to this apparatus near any ventilation openings. hot, humid areas; To secure the TV, use a sturdy strap from being walked on an unstable cart, stand, or table. The LCD panel inside a wall or similar enclosed area. 20) Never modify this apparatus during lightning ...
... pillar, or other . Important Safety Instructions 1) Read these instructions. 2) Keep these recommendations and precautions and heed all warnings when installing your TV: 17) WARNING: NEVER expose batteries to excessive heat such as possible) 4" min. The wide blade or the third prong are provided for ...damage to this apparatus near any ventilation openings. hot, humid areas; To secure the TV, use a sturdy strap from being walked on an unstable cart, stand, or table. The LCD panel inside a wall or similar enclosed area. 20) Never modify this apparatus during lightning ...
Owner's Manual - English
Page 4
... as a ladder or screwdriver) can accidentally touch overhead power lines. Gently wipe the display panel surface (the TV screen) using the on the cabinet. The slots and openings are in front of the panel. Never locate the antenna near overhead power lines or other place with poor ventilation. Care... may damage the surface of a window. • Never touch, press, or place anything to rest on the LCD screen. Never spill liquids or push objects of any of your TOSHIBA TV, follow the instructions in item 33 on or off switch, it is turned off using a dry, soft cloth only...
... as a ladder or screwdriver) can accidentally touch overhead power lines. Gently wipe the display panel surface (the TV screen) using the on the cabinet. The slots and openings are in front of the panel. Never locate the antenna near overhead power lines or other place with poor ventilation. Care... may damage the surface of a window. • Never touch, press, or place anything to rest on the LCD screen. Never spill liquids or push objects of any of your TOSHIBA TV, follow the instructions in item 33 on or off switch, it is turned off using a dry, soft cloth only...
Owner's Manual - English
Page 5
...Toshiba Authorized Service Center. 42) If you have the TV serviced: • Ask the service technician to use a ULlisted wall bracket appropriate for your LCD TV To Display your area, or ask a qualified service technician to environmental considerations. Choosing a location for the size and weight of the TV... as indicated below . See item 23, page 3 for your LCD TV on a sturdy, level surface that the TV is in safe operating condition. 43) The fluorescent lamp(s) in the LCD panel contain a small amount of the TV. Note: The lamp(s) inside this manner: (1) attach the provided...
...Toshiba Authorized Service Center. 42) If you have the TV serviced: • Ask the service technician to use a ULlisted wall bracket appropriate for your LCD TV To Display your area, or ask a qualified service technician to environmental considerations. Choosing a location for the size and weight of the TV... as indicated below . See item 23, page 3 for your LCD TV on a sturdy, level surface that the TV is in safe operating condition. 43) The fluorescent lamp(s) in the LCD panel contain a small amount of the TV. Note: The lamp(s) inside this manner: (1) attach the provided...
Owner's Manual - English
Page 6
... two conditions: (1) this device may cause undesired operation. Products that interference will disappear in a short period of time. 2) The LCD panel contained in a particular installation. Environmental Protection Agency. Ph: 1-800-631-3811 Note: This equipment has been tested and found to ...ENERGY STAR mark are trademarks of Silicon Image, Inc. FCC Declaration of Conformity Compliance Statement (Part 15): The Toshiba 40XV645U, 46XV645U and 52XV645U Televisions comply with this TV. Operation is subject to these symptoms. 1) An afterimage (ghost) may appear on the screen if a ...
... two conditions: (1) this device may cause undesired operation. Products that interference will disappear in a short period of time. 2) The LCD panel contained in a particular installation. Environmental Protection Agency. Ph: 1-800-631-3811 Note: This equipment has been tested and found to ...ENERGY STAR mark are trademarks of Silicon Image, Inc. FCC Declaration of Conformity Compliance Statement (Part 15): The Toshiba 40XV645U, 46XV645U and 52XV645U Televisions comply with this TV. Operation is subject to these symptoms. 1) An afterimage (ghost) may appear on the screen if a ...

Owner's Manual - English
Page 7
...LCD TV 5 Chapter 1: Introduction 9 Features of your new TV 9 Overview of steps for installing, setting up, and using your new TV 9 TV front and side panel controls and connections . . . . 10 TV back panel connections 11 Chapter 2: Connecting your TV...29 Setting the time zone 30 Selecting the location 30 Selecting the TOSHIBA Illumination mode 30 Selecting the Power-On Mode 30 Using Blue Screen...audio mode 51 Displaying TV status information 52 Understanding the auto power off feature 52 Understanding the last mode memory feature 52 Chapter 7: Using the TV's advanced features 53 Using...
...LCD TV 5 Chapter 1: Introduction 9 Features of your new TV 9 Overview of steps for installing, setting up, and using your new TV 9 TV front and side panel controls and connections . . . . 10 TV back panel connections 11 Chapter 2: Connecting your TV...29 Setting the time zone 30 Selecting the location 30 Selecting the TOSHIBA Illumination mode 30 Selecting the Power-On Mode 30 Using Blue Screen...audio mode 51 Displaying TV status information 52 Understanding the auto power off feature 52 Understanding the last mode memory feature 52 Chapter 7: Using the TV's advanced features 53 Using...
Owner's Manual - English
Page 8
... 62 Acceptable signal formats for PC IN and HDMI terminals 63 PC IN signal formats 63 HDMI signal formats 64 Limited United States Warranty for LCD Televisions 26" and Larger 65 Limited Canadian Warranty for Toshiba Brand Flat Panel Televisions 66 Index 69 8
... 62 Acceptable signal formats for PC IN and HDMI terminals 63 PC IN signal formats 63 HDMI signal formats 64 Limited United States Warranty for LCD Televisions 26" and Larger 65 Limited Canadian Warranty for Toshiba Brand Flat Panel Televisions 66 Index 69 8
Owner's Manual - English
Page 10
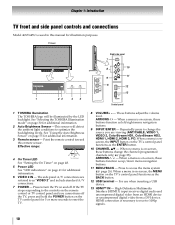
... connection is on-screen, the MENU button on page 30 for 5 or more seconds to turn off . page 28). TV front 1 23 45 Right side panel 7 8 10 11 9 6 12 13 Control panel 1 TOSHIBA Illumination The TOSHIBA logo will detect the ambient light conditions to change the channel (programmed channels only; - When a menu is on-screen...
... connection is on-screen, the MENU button on page 30 for 5 or more seconds to turn off . page 28). TV front 1 23 45 Right side panel 7 8 10 11 9 6 12 13 Control panel 1 TOSHIBA Illumination The TOSHIBA logo will detect the ambient light conditions to change the channel (programmed channels only; - When a menu is on-screen...
Owner's Manual - English
Page 11
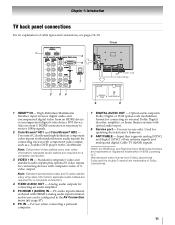
Chapter 1: Introduction TV back panel connections For an explanation of Dolby Laboratories. 11 Also see pages 12-18. 1 5 6 7 TV back Power cord Cable Strap 2 34 8 9 1 HDMI™ IN - Note: Component video cables carry only video information; Used for connecting an audio ... trademarks of ColorStream high-definition component video inputs (with standard stereo audio inputs) for connecting devices with component video output, such as a Toshiba DVD player with HDMI 1 analog audio input terminal, and its use can be configured in Dolby Digital or PCM (pulse-code modulation) ...
Chapter 1: Introduction TV back panel connections For an explanation of Dolby Laboratories. 11 Also see pages 12-18. 1 5 6 7 TV back Power cord Cable Strap 2 34 8 9 1 HDMI™ IN - Note: Component video cables carry only video information; Used for connecting an audio ... trademarks of ColorStream high-definition component video inputs (with standard stereo audio inputs) for connecting devices with component video output, such as a Toshiba DVD player with HDMI 1 analog audio input terminal, and its use can be configured in Dolby Digital or PCM (pulse-code modulation) ...

Owner's Manual - English
Page 13
... IN CH 3 CH 4 OUT Stereo VCR VIDEO AUDIO L R IN IN from CH 3 ANT CH 4 OUT OUT to program or access certain features on the TV right side panel. - Do not connect both types of television programs, videotapes, DVDs, and other materials is set to change channels. Chapter 2: Connecting your VCR or camcorder...
... IN CH 3 CH 4 OUT Stereo VCR VIDEO AUDIO L R IN IN from CH 3 ANT CH 4 OUT OUT to program or access certain features on the TV right side panel. - Do not connect both types of television programs, videotapes, DVDs, and other materials is set to change channels. Chapter 2: Connecting your VCR or camcorder...
Owner's Manual - English
Page 14
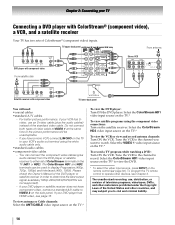
... view the DVD. * To select the video input source, press INPUT on the side panel. TV upper back panel From antenna Y PB PR COMPONENT VIDEO S-VIDEO VIDEO OUT OUT DVD player with component video AUDIO OUT L R From satellite dish Stereo VCR VIDEO AUDIO L R ... prohibited under the Copyright Laws of the United States and other devices, see page 15. For better picture performance, if your TV Connecting a DVD player with component video TV lower back panel You will be used to display Progressive (480p, 720p, 1080p) and Interlaced (480i, 1080i). Do not connect both types of ...
... view the DVD. * To select the video input source, press INPUT on the side panel. TV upper back panel From antenna Y PB PR COMPONENT VIDEO S-VIDEO VIDEO OUT OUT DVD player with component video AUDIO OUT L R From satellite dish Stereo VCR VIDEO AUDIO L R ... prohibited under the Copyright Laws of the United States and other devices, see page 15. For better picture performance, if your TV Connecting a DVD player with component video TV lower back panel You will be used to display Progressive (480p, 720p, 1080p) and Interlaced (480i, 1080i). Do not connect both types of ...
Owner's Manual - English
Page 15
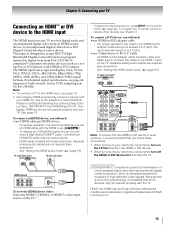
... (2m). •one 3.5mm Stereo to operate other devices, see Chapter 3. Make sure to -DVI adapter cable should operate properly with your TV. TV upper back panel DVI device VIDEO AUDIO L R IN DVI /HDCP OUT OUT L R Note: To ensure that the HDMI or DVI device is reset properly,...: Select the HDMI 1, HDMI 2, or HDMI 3 video input source on the TV. For detailed signal specifications, see illustration). - TV upper back panel TV right side panel * To select the video input source, press INPUT on the TV first and then the HDMI or DVI device. • When turning off the...
... (2m). •one 3.5mm Stereo to operate other devices, see Chapter 3. Make sure to -DVI adapter cable should operate properly with your TV. TV upper back panel DVI device VIDEO AUDIO L R IN DVI /HDCP OUT OUT L R Note: To ensure that the HDMI or DVI device is reset properly,...: Select the HDMI 1, HDMI 2, or HDMI 3 video input source on the TV. For detailed signal specifications, see illustration). - TV upper back panel TV right side panel * To select the video input source, press INPUT on the TV first and then the HDMI or DVI device. • When turning off the...
Owner's Manual - English
Page 16
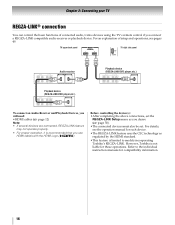
For details, see pages 49. TV upper back panel TV right side panel VIDEO AUDIO L R IN OUT L R Audio receiver HDMI IN HDMI OUT Playback device (REGZA-LINK DVD player,etc.) VIDEO AUDIO L R HDMI OUT IN OUT L R Playback ...•The REGZA-LINK feature uses the CEC technology as you use HDMI cables with the HDMI Logo ( ). Refer to models incorporating Toshiba's REGZA-LINK. Chapter 2: Connecting your TV REGZA-LINK® connection You can control the basic functions of setup and operations, see the operation manual for compatibility information. 16 page...
For details, see pages 49. TV upper back panel TV right side panel VIDEO AUDIO L R IN OUT L R Audio receiver HDMI IN HDMI OUT Playback device (REGZA-LINK DVD player,etc.) VIDEO AUDIO L R HDMI OUT IN OUT L R Playback ...•The REGZA-LINK feature uses the CEC technology as you use HDMI cables with the HDMI Logo ( ). Refer to models incorporating Toshiba's REGZA-LINK. Chapter 2: Connecting your TV REGZA-LINK® connection You can control the basic functions of setup and operations, see the operation manual for compatibility information. 16 page...
Owner's Manual - English
Page 17
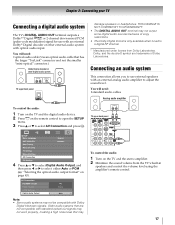
...analog audio amplifier to use with an external Dolby® Digital decoder or other digital audio system LINE IN LR Optical Audio IN TV upper back panel damage speakers or headphones. Connecting an audio system This connection allows you to adjust the sound level. You will need : &#... open the SETUP menu. 3 Press B or b to select AV Connection and press T. LINE IN LR TV upper back panel SETUP Menu Language English ANT/CABLE In Antenna Auto Tuning Manual Tuning TV Settings Manual Setting AV Connection PC Settings 4 Press B or b to select Digital Audio Output, and then ...
...analog audio amplifier to use with an external Dolby® Digital decoder or other digital audio system LINE IN LR Optical Audio IN TV upper back panel damage speakers or headphones. Connecting an audio system This connection allows you to adjust the sound level. You will need : &#... open the SETUP menu. 3 Press B or b to select AV Connection and press T. LINE IN LR TV upper back panel SETUP Menu Language English ANT/CABLE In Antenna Auto Tuning Manual Tuning TV Settings Manual Setting AV Connection PC Settings 4 Press B or b to select Digital Audio Output, and then ...
Owner's Manual - English
Page 18
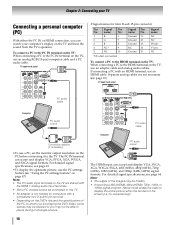
..., XGA, WXGA, SXGA, 480i (60Hz), 480p (60Hz), 720p (60Hz), 1080i (60Hz), and 1080p (24Hz/60Hz) signal formats. Note: • The edges of the screen (i.e. TV upper back panel PC audio cable Computer PC audio output PC audio cable Conversion adapter (if necessary) •To use a PC, set the monitor output resolution on...
..., XGA, WXGA, SXGA, 480i (60Hz), 480p (60Hz), 720p (60Hz), 1080i (60Hz), and 1080p (24Hz/60Hz) signal formats. Note: • The edges of the screen (i.e. TV upper back panel PC audio cable Computer PC audio output PC audio cable Conversion adapter (if necessary) •To use a PC, set the monitor output resolution on...
Owner's Manual - English
Page 26
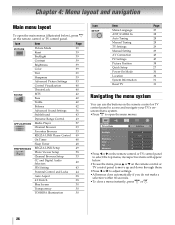
...Setting 43 Parental Control and Locks 44 Auto Aspect 38 4:3 Stretch 38 Blue Screen 30 Transparency 30 TOSHIBA Illumination 30 Icon SETUP Item Menu Language ANT/CABLE In Auto Tuning Manual Tuning TV Settings Manual Setting AV Connection PC Settings Picture Position Quick Setup Power-On Mode Location System Information ...29 43 47 38 27 30 30 31 31 Navigating the menu system You can use the items, press B or b on the remote control or TV control panel to move up and down through them. •Press C or c to open the main menus (illustrated below . •To use the buttons on...
...Setting 43 Parental Control and Locks 44 Auto Aspect 38 4:3 Stretch 38 Blue Screen 30 Transparency 30 TOSHIBA Illumination 30 Icon SETUP Item Menu Language ANT/CABLE In Auto Tuning Manual Tuning TV Settings Manual Setting AV Connection PC Settings Picture Position Quick Setup Power-On Mode Location System Information ...29 43 47 38 27 30 30 31 31 Navigating the menu system You can use the items, press B or b on the remote control or TV control panel to move up and down through them. •Press C or c to open the main menus (illustrated below . •To use the buttons on...
Owner's Manual - English
Page 28
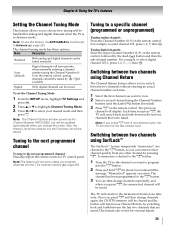
... source channel from the memory, you can automatically detect all active channels in its memory. Programming channels into the TV's channel memory When you press < or , on the remote control or TV control panel, your area and store them in the channel memory. After the channels are found channels to the existing set...
... source channel from the memory, you can automatically detect all active channels in its memory. Programming channels into the TV's channel memory When you press < or , on the remote control or TV control panel, your area and store them in the channel memory. After the channels are found channels to the existing set...
Owner's Manual - English
Page 30
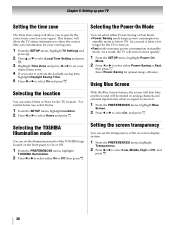
As a result, it takes a bit longer for the TV location. Selecting the TOSHIBA Illumination mode You can select Home or Store for the TV to turn on. •Fast mode increases power consumption in standby mode to below 1W. For normal home use, select Home. 1 From the SETUP...menu, highlight Location. 2 Press C or c to select On and press O. As a result, the TV will turn blue and the sound will be muted on the front panel to On or Off. 1 From the PREFERENCES menu, highlight TOSHIBA Illumination. 2 Press C or c to select either Power-Saving or Fast mode. •Power-Saving ...
As a result, it takes a bit longer for the TV location. Selecting the TOSHIBA Illumination mode You can select Home or Store for the TV to turn on. •Fast mode increases power consumption in standby mode to below 1W. For normal home use, select Home. 1 From the SETUP...menu, highlight Location. 2 Press C or c to select On and press O. As a result, the TV will turn blue and the sound will be muted on the front panel to On or Off. 1 From the PREFERENCES menu, highlight TOSHIBA Illumination. 2 Press C or c to select either Power-Saving or Fast mode. •Power-Saving ...
Owner's Manual - English
Page 32
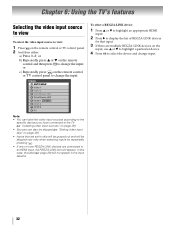
... Selecting the video input source to view To select the video input source to view: 1 Press + on the remote control or TV control panel to change the input. "Setting video input skip" on page 29). • Inputs that input. 3 If there are set to skip will be grayed out ...and will not appear in the input selector. page 29) will be skipped (- or c) Repeatedly press + on the remote control or TV control panel. 2 And then either: a) Press 0-8; or b) Repeatedly press B or b on the input, use B or b to highlight a particular device. 4 Press T to the...
... Selecting the video input source to view To select the video input source to view: 1 Press + on the remote control or TV control panel to change the input. "Setting video input skip" on page 29). • Inputs that input. 3 If there are set to skip will be grayed out ...and will not appear in the input selector. page 29) will be skipped (- or c) Repeatedly press + on the remote control or TV control panel. 2 And then either: a) Press 0-8; or b) Repeatedly press B or b on the input, use B or b to highlight a particular device. 4 Press T to the...
Owner's Manual - English
Page 35
... tuned To set to a specific channel (programmed or unprogrammed) Tuning analog channels: Press the Channel Number (0-9) on the remote control or TV control panel. Also, the History List will be cleared, but the Favorites List will be tuned by switching back and forth between the last two... channels that channel quickly from a non-antenna input, the TV will display. Switching between two channels without entering an actual channel number each time...
... tuned To set to a specific channel (programmed or unprogrammed) Tuning analog channels: Press the Channel Number (0-9) on the remote control or TV control panel. Also, the History List will be cleared, but the Favorites List will be tuned by switching back and forth between the last two... channels that channel quickly from a non-antenna input, the TV will display. Switching between two channels without entering an actual channel number each time...


