Owner's Manual - English
Page 3
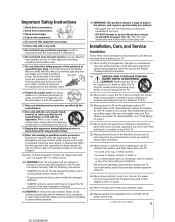
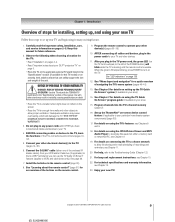
... the power cord is dropped and the cabinet or enclosure surface has been damaged or the TV does not operate normally, take the following precautions: • ALWAYS turn off the TV and unplug the power cord to avoid possible electric shock or fire. • To prevent ...aquariums, any other apparatus (including amplifiers) that can be inserted completely to prevent blade exposure. 16) WARNING: This product contains a lamp to project the picture, and requires special safety precautions: • See pages 129-131 for this equipment. Changes or modifications may fall, causing serious ...
... the power cord is dropped and the cabinet or enclosure surface has been damaged or the TV does not operate normally, take the following precautions: • ALWAYS turn off the TV and unplug the power cord to avoid possible electric shock or fire. • To prevent ...aquariums, any other apparatus (including amplifiers) that can be inserted completely to prevent blade exposure. 16) WARNING: This product contains a lamp to project the picture, and requires special safety precautions: • See pages 129-131 for this equipment. Changes or modifications may fall, causing serious ...
Owner's Manual - English
Page 4
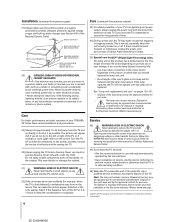
... user settings. This may expose you are trademarks of mercury may be reduced and the lamp may notice a reduction in this happens, turn off . If this product has a limited service life. For disposal or recycling information, please contact your local authorities or the Electronic ...the DLP medallion are never in front of the used lamp unit by the approved method for your TOSHIBA TV, follow this manual to a Toshiba Authorized Service Center. 37) If you leave the TV unattended or unused for 6 to 7 hours to allow the condensation to evaporate. Clean only with ...
... user settings. This may expose you are trademarks of mercury may be reduced and the lamp may notice a reduction in this happens, turn off . If this product has a limited service life. For disposal or recycling information, please contact your local authorities or the Electronic ...the DLP medallion are never in front of the used lamp unit by the approved method for your TOSHIBA TV, follow this manual to a Toshiba Authorized Service Center. 37) If you leave the TV unattended or unused for 6 to 7 hours to allow the condensation to evaporate. Clean only with ...
Owner's Manual - English
Page 5
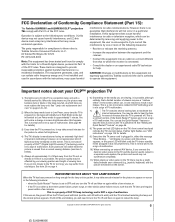
...this device must replace the lamp unit. You will need to turn the TV off . Such pixels are blinking, you turn the TV off . These limits are viewing, it may take several minutes for this TV is encouraged to try to correct the interference by one or ...which time you are designed to obtain full brightness. 4) The TV's display is finished restarting the lamp and the normal picture appears. FCC Declaration of Conformity Compliance Statement (Part 15): The Toshiba 52HMX95 and 62HMX95 DLP™ projection TVs comply with a limited service life. This is a normal function...
...this device must replace the lamp unit. You will need to turn the TV off . Such pixels are blinking, you turn the TV off . These limits are viewing, it may take several minutes for this TV is encouraged to try to correct the interference by one or ...which time you are designed to obtain full brightness. 4) The TV's display is finished restarting the lamp and the normal picture appears. FCC Declaration of Conformity Compliance Statement (Part 15): The Toshiba 52HMX95 and 62HMX95 DLP™ projection TVs comply with a limited service life. This is a normal function...
Owner's Manual - English
Page 6
...notes about your DLP™ projection TV 5 Chapter 1: Introduction 8 Welcome to Toshiba 8 Features of your new TV 8 Overview of steps for installing, setting up, and using your new TV 9 Chapter 2: Connecting your TV 10 TV front panel touchpad and side panel controls and connections 10 TV back panel connections 11 Overview ... menu layout 41 Navigating the menu system 41 Chapter 5: TV Guide On Screen® setup 42 Setting up the TV Guide On Screen® system 42 TV Guide On Screen® Reminder 45 Turning off the TV Guide On Screen® automatic display feature 45 Chapter 6:...
...notes about your DLP™ projection TV 5 Chapter 1: Introduction 8 Welcome to Toshiba 8 Features of your new TV 8 Overview of steps for installing, setting up, and using your new TV 9 Chapter 2: Connecting your TV 10 TV front panel touchpad and side panel controls and connections 10 TV back panel connections 11 Overview ... menu layout 41 Navigating the menu system 41 Chapter 5: TV Guide On Screen® setup 42 Setting up the TV Guide On Screen® system 42 TV Guide On Screen® Reminder 45 Turning off the TV Guide On Screen® automatic display feature 45 Chapter 6:...
Owner's Manual - English
Page 7
...: Appendix 129 Lamp unit replacement 129-131 Specifications 132 Limited United States Warranty 133 Index 135 Copyright © 2005 TOSHIBA CORPORATION. Set up file sharing on the TV 106 Memory card care and handling 106 Chapter 11: Using the THINC™ home network feature .... 107 A. Using... feature 91 Using the SRS WOW™ surround sound feature .......... 92 Using the virtual surround sound feature (Dolby Virtual/TruSurround 92 Turning off feature 96 Understanding the last mode memory feature 96 Using the Gray Level feature 96 Chapter 9: Using the Locks menu 97 ...
...: Appendix 129 Lamp unit replacement 129-131 Specifications 132 Limited United States Warranty 133 Index 135 Copyright © 2005 TOSHIBA CORPORATION. Set up file sharing on the TV 106 Memory card care and handling 106 Chapter 11: Using the THINC™ home network feature .... 107 A. Using... feature 91 Using the SRS WOW™ surround sound feature .......... 92 Using the virtual surround sound feature (Dolby Virtual/TruSurround 92 Turning off feature 96 Understanding the last mode memory feature 96 Using the Gray Level feature 96 Chapter 9: Using the Locks menu 97 ...
Owner's Manual - English
Page 8
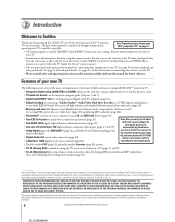
...following are just a few of the many exciting features of your new Toshiba widescreen, integrated HD, DLP™ projection TV: • Integrated digital tuning (8VSB ATSC and QAM) eliminates the need...remote control. In the United States, TV Guide and other equipment to models 52HMX95 and 62HMX95. The TV Guide On Screen system is protected by U.S. GEMSTAR-TV GUIDE INTERNATIONAL INC. Use of this ...network to guide you through setting up the TV Guide On Screen® system (Chapter 5), the program guide opens automatically by default when you turn on the market. AND/OR ITS RELATED...
...following are just a few of the many exciting features of your new Toshiba widescreen, integrated HD, DLP™ projection TV: • Integrated digital tuning (8VSB ATSC and QAM) eliminates the need...remote control. In the United States, TV Guide and other equipment to models 52HMX95 and 62HMX95. The TV Guide On Screen system is protected by U.S. GEMSTAR-TV GUIDE INTERNATIONAL INC. Use of this ...network to guide you through setting up the TV Guide On Screen® system (Chapter 5), the program guide opens automatically by default when you turn on the market. AND/OR ITS RELATED...
Owner's Manual - English
Page 9
... See "Menu layout and navigation" for details on the TV. Program channels into the TV's channel memory (page 47). 16. For details on connecting the TV to a home network to turn on using the TV Guide On Screen® program guide (if available in ...TOSHIBA CORPORATION. Chapter 1: Introduction Overview of steps for installing, setting up, and using your new TV Follow these steps to operate your other device(s) (pages 33-39). 10. Carefully read the important safety, installation, care, and service information on page 125. 12. See "Learning about your DLP™ projection TV...
... See "Menu layout and navigation" for details on the TV. Program channels into the TV's channel memory (page 47). 16. For details on connecting the TV to a home network to turn on using the TV Guide On Screen® program guide (if available in ...TOSHIBA CORPORATION. Chapter 1: Introduction Overview of steps for installing, setting up, and using your new TV Follow these steps to operate your other device(s) (pages 33-39). 10. Carefully read the important safety, installation, care, and service information on page 125. 12. See "Learning about your DLP™ projection TV...

Owner's Manual - English
Page 10
...recording is on-screen, these buttons change the input source you cannot turn off the TV, press and hold the POWER button on the TV front panel for additional information. 0 VIDEO-3 - Point the remote control toward this area of TV VIDEO-3 IN Memory card 0 slots !¡ 1 Remote sensor (...functions as left /right menu navigation buttons. 5 MENU (ENTER) - All rights reserved. 2 Connecting your TV or listen to MP3 audio files (see Chapter 10). 10 Copyright © 2005 TOSHIBA CORPORATION. When a menu is open, the MENU button on -screen, these buttons function as the EXIT...
...recording is on-screen, these buttons change the input source you cannot turn off the TV, press and hold the POWER button on the TV front panel for additional information. 0 VIDEO-3 - Point the remote control toward this area of TV VIDEO-3 IN Memory card 0 slots !¡ 1 Remote sensor (...functions as left /right menu navigation buttons. 5 MENU (ENTER) - All rights reserved. 2 Connecting your TV or listen to MP3 audio files (see Chapter 10). 10 Copyright © 2005 TOSHIBA CORPORATION. When a menu is open, the MENU button on -screen, these buttons function as the EXIT...
Owner's Manual - English
Page 15
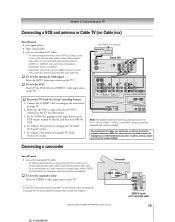
...VCR is connected to the A/V OUT terminals on TV right side panel Copyright © 2005 TOSHIBA CORPORATION. Camcorder VIDEO AUDIO OUT L R VIDEO 3 inputs on the TV (see illustration). 3. All rights reserved. 15 Chapter 2: Connecting your TV Connecting a VCR and antenna or Cable TV (no Cable box) You will need : ...; For better picture performance, if your VCR owner's manual for details on the TV.* To view the VCR: Turn ON the VCR. To view the camcorder video: Select the VIDEO 3 video input source on the TV.* To select the video input source, press INPUT on page 28. 2. To ...
...VCR is connected to the A/V OUT terminals on TV right side panel Copyright © 2005 TOSHIBA CORPORATION. Camcorder VIDEO AUDIO OUT L R VIDEO 3 inputs on the TV (see illustration). 3. All rights reserved. 15 Chapter 2: Connecting your TV Connecting a VCR and antenna or Cable TV (no Cable box) You will need : ...; For better picture performance, if your VCR owner's manual for details on the TV.* To view the VCR: Turn ON the VCR. To view the camcorder video: Select the VIDEO 3 video input source on the TV.* To select the video input source, press INPUT on page 28. 2. To ...
Owner's Manual - English
Page 16
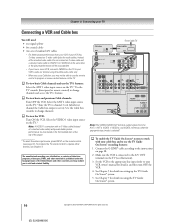
... the standard video cable. Set the VCR to the appropriate line input (refer to your VCR's audio out terminal using the TV Guide On Screen® system. 16 Copyright © 2005 TOSHIBA CORPORATION. To view basic Cable channels and use , distribution, or revision of television programs, videotapes, DVDs, and other materials... United States and other countries, and may not be able to use the remote control to program or access certain features on the TV. To view the VCR: Turn ON the VCR. Do not connect an S-video cable and a standard video cable to VIDEO 1 (or VIDEO 2) at the top of ...
... the standard video cable. Set the VCR to the appropriate line input (refer to your VCR's audio out terminal using the TV Guide On Screen® system. 16 Copyright © 2005 TOSHIBA CORPORATION. To view basic Cable channels and use , distribution, or revision of television programs, videotapes, DVDs, and other materials... United States and other countries, and may not be able to use the remote control to program or access certain features on the TV. To view the VCR: Turn ON the VCR. Do not connect an S-video cable and a standard video cable to VIDEO 1 (or VIDEO 2) at the top of ...
Owner's Manual - English
Page 17
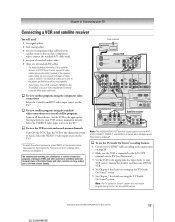
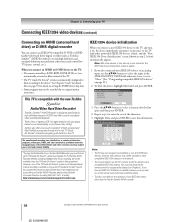
...TV TV CH 3 CH 4 VIDEO AUDIO LR IN OUT LR From satellite dish Satellite receiver Satellite IN S-VIDEO OUT Y PB PR COMPONENT VIDEO VIDEO OUT AUDIO L OUT L R R Note: The VIDEO/AUDIO OUT terminals output signals from or for details on the remote control (see page 72). Copyright © 2005 TOSHIBA... is selected.* To use , distribution, or revision of television programs, videotapes, DVDs, and other materials is connected to record satellite programs: Turn on the TV (VIDEO 1) to operate other countries, and may subject you want to your VCR owner's manual for details on the...
...TV TV CH 3 CH 4 VIDEO AUDIO LR IN OUT LR From satellite dish Satellite receiver Satellite IN S-VIDEO OUT Y PB PR COMPONENT VIDEO VIDEO OUT AUDIO L OUT L R R Note: The VIDEO/AUDIO OUT terminals output signals from or for details on the remote control (see page 72). Copyright © 2005 TOSHIBA... is selected.* To use , distribution, or revision of television programs, videotapes, DVDs, and other materials is connected to record satellite programs: Turn on the TV (VIDEO 1) to operate other countries, and may subject you want to your VCR owner's manual for details on the...
Owner's Manual - English
Page 18
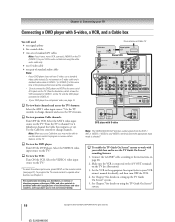
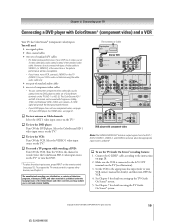
.... 18 Copyright © 2005 TOSHIBA CORPORATION. Use the Cable box controls to use the TV Guide On Screen® recording features: 1. The unauthorized recording, use, distribution, or revision of television programs, videotapes, DVDs, and other materials is selected.* To view the DVD player: Turn ON the DVD player. All .... • Do not connect the DVD player and VCR to the same set to). See Chapter 7 for details), and then turn OFF the VCR. 4. Chapter 2: Connecting your TV Connecting a DVD player with S-video, a VCR, and a Cable box You will be able to use the remote control to ...
.... 18 Copyright © 2005 TOSHIBA CORPORATION. Use the Cable box controls to use the TV Guide On Screen® recording features: 1. The unauthorized recording, use, distribution, or revision of television programs, videotapes, DVDs, and other materials is selected.* To view the DVD player: Turn ON the DVD player. All .... • Do not connect the DVD player and VCR to the same set to). See Chapter 7 for details), and then turn OFF the VCR. 4. Chapter 2: Connecting your TV Connecting a DVD player with S-video, a VCR, and a Cable box You will be able to use the remote control to ...
Owner's Manual - English
Page 19
...on the remote control (see page 21. To program the TV remote control to record. Copyright © 2005 TOSHIBA CORPORATION. To select the video input source, press INPUT on the TV.* To record a TV program while watching a DVD: Turn ON the VCR. See Chapter 7 for details on setting... up the TV Guide On Screen® system. 5. Chapter 2: Connecting your TV Connecting a DVD player with...
...on the remote control (see page 21. To program the TV remote control to record. Copyright © 2005 TOSHIBA CORPORATION. To select the video input source, press INPUT on the TV.* To record a TV program while watching a DVD: Turn ON the VCR. See Chapter 7 for details on setting... up the TV Guide On Screen® system. 5. Chapter 2: Connecting your TV Connecting a DVD player with...
Owner's Manual - English
Page 20
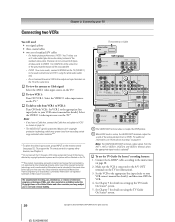
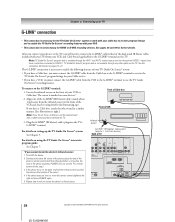
...1 using the white audio cable only. • Do not connect the same VCR to the instructions on using the TV Guide On Screen® system. 20 Copyright © 2005 TOSHIBA CORPORATION. Connect the G-LINK® cable according to the output and input terminals on setting up the...information, see "Notes about recording" on the remote control (see Chapter 3. ** Do not connect the TV through VCRs may prevent you to the A/V OUT terminals on the TV.* To view VCR 1: Turn ON VCR 1. Note: The VIDEO/AUDIO OUT terminals output signals from recording certain copy-restricted video materials...
...1 using the white audio cable only. • Do not connect the same VCR to the instructions on using the TV Guide On Screen® system. 20 Copyright © 2005 TOSHIBA CORPORATION. Connect the G-LINK® cable according to the output and input terminals on setting up the...information, see "Notes about recording" on the remote control (see Chapter 3. ** Do not connect the TV through VCRs may prevent you to the A/V OUT terminals on the TV.* To view VCR 1: Turn ON VCR 1. Note: The VIDEO/AUDIO OUT terminals output signals from recording certain copy-restricted video materials...

Owner's Manual - English
Page 21
...on page 55. To connect a DVI device, you follow these procedures: • When turning on your electronic components, turn on your electronic components, turn off your TV receives digital audio and uncompressed digital video from an HDMI device, or uncompressed digital video from... EIA/CEA-861/861B-compliant[4] consumer electronic devices (such as possible. Copyright © 2005 TOSHIBA CORPORATION. ...
...on page 55. To connect a DVI device, you follow these procedures: • When turning on your electronic components, turn on your electronic components, turn off your TV receives digital audio and uncompressed digital video from an HDMI device, or uncompressed digital video from... EIA/CEA-861/861B-compliant[4] consumer electronic devices (such as possible. Copyright © 2005 TOSHIBA CORPORATION. ...
Owner's Manual - English
Page 22
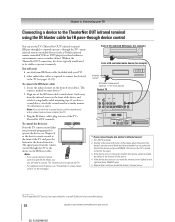
...control (that you locate the device's infrared sensor. If the device turns on, the point at right.) Note: If you have a second device, coil the second wand with your TV) other audio/video cables as Toshiba infrared remote-controlled VCRs or DVD players) enclosed within an entertainment center ...infrared sensor on , move the remote control slightly to operate it touches the front of the TV's TheaterNet OUT terminals. Front of IR-controlled DVD player (for example) Front of your device. Turn OFF the device. 2. You will need to be visible to the right and press POWER ...
...control (that you locate the device's infrared sensor. If the device turns on, the point at right.) Note: If you have a second device, coil the second wand with your TV) other audio/video cables as Toshiba infrared remote-controlled VCRs or DVD players) enclosed within an entertainment center ...infrared sensor on , move the remote control slightly to operate it touches the front of the TV's TheaterNet OUT terminals. Front of IR-controlled DVD player (for example) Front of your device. Turn OFF the device. 2. You will need to be visible to the right and press POWER ...

Owner's Manual - English
Page 24
... page 93. Analog audio amplifier LINE IN LR TV 24 Copyright © 2005 TOSHIBA CORPORATION. Highlight Audio Setup and press ENTER. Audio Audio Settings Advanced Audio Settings Audio Setup 4. Turn off the TV's built-in speakers (see "Turning off the TV's built-in speakers in single-window mode. ...audio cable that has the larger "TosLink" connector and not the smaller "mini-optical" connector.) To control the audio: 1. Turn on the TV and the digital audio device. 2. Audio Setup MTS Language Speakers Optical Output Format Reset Stereo English On Dolby Digital Done 5. Older...
... page 93. Analog audio amplifier LINE IN LR TV 24 Copyright © 2005 TOSHIBA CORPORATION. Highlight Audio Setup and press ENTER. Audio Audio Settings Advanced Audio Settings Audio Setup 4. Turn off the TV's built-in speakers (see "Turning off the TV's built-in speakers in single-window mode. ...audio cable that has the larger "TosLink" connector and not the smaller "mini-optical" connector.) To control the audio: 1. Turn on the TV and the digital audio device. 2. Audio Setup MTS Language Speakers Optical Output Format Reset Stereo English On Dolby Digital Done 5. Older...
Owner's Manual - English
Page 26
... full benefits of your Symbio AVHD Recorder, you connect a new IEEE1394 device to the TV and turn it set up to one -touch recording* of the United States and other than the Toshiba Symbio AVHD recorder. 26 Copyright © 2005 TOSHIBA CORPORATION. The unauthorized recording, use, distribution, or revision of television programs, videotapes, DVDs...
... full benefits of your Symbio AVHD Recorder, you connect a new IEEE1394 device to the TV and turn it set up to one -touch recording* of the United States and other than the Toshiba Symbio AVHD recorder. 26 Copyright © 2005 TOSHIBA CORPORATION. The unauthorized recording, use, distribution, or revision of television programs, videotapes, DVDs...

Owner's Manual - English
Page 27
... in the chain back to -IEEE1394B converters (available at some electronics suppliers) may not work properly with the other devices in the TV's memory. Copyright © 2005 TOSHIBA CORPORATION. Follow the on -screen, as shown in the chain. • The maximum length for longer distances between each chain. ...existing IEEE1394A devices. • The transmission capability of IEEE1394 cable used with the slowest communication speed at the end of the chain and turn ON the power switch when any device is used. To edit the IEEE1394 device information: 1. You can edit this...
... in the chain back to -IEEE1394B converters (available at some electronics suppliers) may not work properly with the other devices in the TV's memory. Copyright © 2005 TOSHIBA CORPORATION. Follow the on -screen, as shown in the chain. • The maximum length for longer distances between each chain. ...existing IEEE1394A devices. • The transmission capability of IEEE1394 cable used with the slowest communication speed at the end of the chain and turn ON the power switch when any device is used. To edit the IEEE1394 device information: 1. You can edit this...
Owner's Manual - English
Page 28
... On Screen® program listings for your VCR and Cable box (if applicable) to use the TV's remote control for this TV. If the device turns on the TV. Align one of VCR Infrared sensor G-LINK® (IR blaster) cable wand (approx. 1 inch from your Cable service. • If you ...7. *If you do not have a VCR, you locate the device's infrared sensor. 28 Copyright © 2005 TOSHIBA CORPORATION. Locate the infrared sensor on some devices.* 2. Turn OFF the device. 2. TV Guide On Screen® program data is the location of your VCR. • This connection is marked on the ...
... On Screen® program listings for your VCR and Cable box (if applicable) to use the TV's remote control for this TV. If the device turns on the TV. Align one of VCR Infrared sensor G-LINK® (IR blaster) cable wand (approx. 1 inch from your Cable service. • If you ...7. *If you do not have a VCR, you locate the device's infrared sensor. 28 Copyright © 2005 TOSHIBA CORPORATION. Locate the infrared sensor on some devices.* 2. Turn OFF the device. 2. TV Guide On Screen® program data is the location of your VCR. • This connection is marked on the ...


