Owner's Manual - English
Page 4
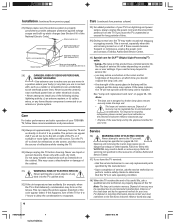
... regulated due to the left or right of the quartz glass in this manual to a Toshiba Authorized Service Center. 37) If you use or user settings. If this happens, turn off the TV for 6 to 7 hours to allow the condensation to follow these sounds become frequent or ...continuous, unplug the power cord and contact a Toshiba Authorized Service Center. 35) Special care for example, when the TV is first delivered), condensation may result...
... regulated due to the left or right of the quartz glass in this manual to a Toshiba Authorized Service Center. 37) If you use or user settings. If this happens, turn off the TV for 6 to 7 hours to allow the condensation to follow these sounds become frequent or ...continuous, unplug the power cord and contact a Toshiba Authorized Service Center. 35) Special care for example, when the TV is first delivered), condensation may result...
Owner's Manual - English
Page 5
... 41 Manually adding and deleting channels in the channel memory 42 (Continued on next page) Copyright © 2004 TOSHIBA CORPORATION. This is a structural property of DLP™ projection TV technology, and is not a sign of viewing time. The picture quality may take several seconds to moderate the ...or dark pixel on the television display. If you may see item 29 on page 4). 4) Depending on this type, and is turned off . This is a function of the Quick Restart Low Power Shutdown mode and is turned off . You can , in rare instances, result in front of the...
... 41 Manually adding and deleting channels in the channel memory 42 (Continued on next page) Copyright © 2004 TOSHIBA CORPORATION. This is a structural property of DLP™ projection TV technology, and is not a sign of viewing time. The picture quality may take several seconds to moderate the ...or dark pixel on the television display. If you may see item 29 on page 4). 4) Depending on this type, and is turned off . This is a function of the Quick Restart Low Power Shutdown mode and is turned off . You can , in rare instances, result in front of the...
Owner's Manual - English
Page 6
...TV Guide On Screen™ interactive program guide 52 Setting up the TV Guide On Screen system 52 Navigating the TV Guide On Screen system 53 TV... Guide On Screen remote control functions .......... 53 Video Window 54 Panel Menus 54 Info Box 55 TV Guide On Screen Icons 55 TV... 8: Using the TV's features 66 Selecting...your audio adjustments 80 Turning off the built-in...timer 86 Displaying TV setting information on...PIN code 88 Blocking TV programs and movies by... LED indications 94 TV Guide On Screen...
...TV Guide On Screen™ interactive program guide 52 Setting up the TV Guide On Screen system 52 Navigating the TV Guide On Screen system 53 TV... Guide On Screen remote control functions .......... 53 Video Window 54 Panel Menus 54 Info Box 55 TV Guide On Screen Icons 55 TV... 8: Using the TV's features 66 Selecting...your audio adjustments 80 Turning off the built-in...timer 86 Displaying TV setting information on...PIN code 88 Blocking TV programs and movies by... LED indications 94 TV Guide On Screen...

Owner's Manual - English
Page 8
...is set up your VCR and/or Cable box (if applicable) to the G-LINK jack so you can use only with the Toshiba stand listed in your other electronic device(s) to the TV (pages 12-25). 6. For warranty information, see Chapter 11. 21. See page 25. 7. For details on the...). 16. Use with other devices. 11. AFTER connecting all cables and devices to your other device(s) (pages 27-33). 10. Note: The TV Guide On Screen program guide opens automatically when you turn on the screen. • Place the TV far enough from your TV and begin using its many exciting features. 1.
...is set up your VCR and/or Cable box (if applicable) to the G-LINK jack so you can use only with the Toshiba stand listed in your other electronic device(s) to the TV (pages 12-25). 6. For warranty information, see Chapter 11. 21. See page 25. 7. For details on the...). 16. Use with other devices. 11. AFTER connecting all cables and devices to your other device(s) (pages 27-33). 10. Note: The TV Guide On Screen program guide opens automatically when you turn on the screen. • Place the TV far enough from your TV and begin using its many exciting features. 1.
Owner's Manual - English
Page 9
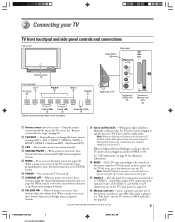
...referred to change the channel (programmed channels only; Copyright © 2004 TOSHIBA CORPORATION. Point the remote control toward this button to turn the TV off . 7 CHANNEL yz - When red lights solid (not blinking), it indicates that the TV power cord is open, this button functions as "VIDEO 3" and include...clip or similar object to access the menu system (see page 82). When a menu is on-screen, these buttons change the source you cannot turn the TV on -screen menu instantly. 4 ARROWS zyx • - see page 10.) !™ Memory card slots - When no menu is on ,...
...referred to change the channel (programmed channels only; Copyright © 2004 TOSHIBA CORPORATION. Point the remote control toward this button to turn the TV off . 7 CHANNEL yz - When red lights solid (not blinking), it indicates that the TV power cord is open, this button functions as "VIDEO 3" and include...clip or similar object to access the menu system (see page 82). When a menu is on-screen, these buttons change the source you cannot turn the TV on -screen menu instantly. 4 ARROWS zyx • - see page 10.) !™ Memory card slots - When no menu is on ,...

Owner's Manual - English
Page 13
... the VCR. Select the ANT 1 video input source.* To view the VCR: Turn ON the VCR. Select the ANT 1 video input source.* Tune the TV to the instructions on the TV.* or...Turn ON the VCR. Connecting a camcorder You will need : one set of standard A/V cables •...; For better picture performance, if your camcorder has S-video, use an S-video cable (plus the audio cables) instead of the standard video cable. Copyright © 2004 TOSHIBA...
... the VCR. Select the ANT 1 video input source.* To view the VCR: Turn ON the VCR. Select the ANT 1 video input source.* Tune the TV to the instructions on the TV.* or...Turn ON the VCR. Connecting a camcorder You will need : one set of standard A/V cables •...; For better picture performance, if your camcorder has S-video, use an S-video cable (plus the audio cables) instead of the standard video cable. Copyright © 2004 TOSHIBA...

Owner's Manual - English
Page 14
... OUT Note: The VIDEO/AUDIO OUT jacks output the signals from ANT OUT to the instructions on this page. To view the VCR: Turn ON the VCR. From Cable TV Cable box OUT CH 3 IN CH 4 Cable splitter IN OUT OUT Stereo VCR IN from the ANT 1, ANT 2, VIDEO 1, VIDEO ...the Cable box controls to civil and criminal liability. 14 Copyright © 2004 TOSHIBA CORPORATION. Select the VIDEO 1 video input source.* Note: This will provide better picture performance if you to change channels and access the TV's features. Make sure the VCR is prohibited under the Copyright Laws of the ...
... OUT Note: The VIDEO/AUDIO OUT jacks output the signals from ANT OUT to the instructions on this page. To view the VCR: Turn ON the VCR. From Cable TV Cable box OUT CH 3 IN CH 4 Cable splitter IN OUT OUT Stereo VCR IN from the ANT 1, ANT 2, VIDEO 1, VIDEO ...the Cable box controls to civil and criminal liability. 14 Copyright © 2004 TOSHIBA CORPORATION. Select the VIDEO 1 video input source.* Note: This will provide better picture performance if you to change channels and access the TV's features. Make sure the VCR is prohibited under the Copyright Laws of the ...

Owner's Manual - English
Page 15
... all three devices. Connect the G-LINK cable according to the A/V OUT jacks on the TV.* To view the VCR or view and record antenna channels: Turn ON the VCR. HMX94(E)012-25(2B-Cnct) 15 Copyright © 2004 TOSHIBA CORPORATION. Make sure the VCR is prohibited under the Copyright Laws of standard A/V cables...
... all three devices. Connect the G-LINK cable according to the A/V OUT jacks on the TV.* To view the VCR or view and record antenna channels: Turn ON the VCR. HMX94(E)012-25(2B-Cnct) 15 Copyright © 2004 TOSHIBA CORPORATION. Make sure the VCR is prohibited under the Copyright Laws of standard A/V cables...

Owner's Manual - English
Page 16
...instead. Use the Cable box controls to change channels. Note: When you use a Cable box, you to civil and criminal liability. 16 Copyright © 2004 TOSHIBA CORPORATION. one S-video cable one pair of the United States and other countries, and may subject you may not be unacceptable. • If your DVD... a Cable box You will be able to use the remote control to program or access certain features on the TV. To view the DVD player: Turn ON the DVD player. To enable the TV Guide On Screen system to work with S-video AUDIO OUT L R Note: The VIDEO/AUDIO OUT jacks output the ...
...instead. Use the Cable box controls to change channels. Note: When you use a Cable box, you to civil and criminal liability. 16 Copyright © 2004 TOSHIBA CORPORATION. one S-video cable one pair of the United States and other countries, and may subject you may not be unacceptable. • If your DVD... a Cable box You will be able to use the remote control to program or access certain features on the TV. To view the DVD player: Turn ON the DVD player. To enable the TV Guide On Screen system to work with S-video AUDIO OUT L R Note: The VIDEO/AUDIO OUT jacks output the ...

Owner's Manual - English
Page 17
... greatly enhance picture quality. See Chapter 5 for details on the TV (see illustration). 3. HMX94(E)012-25(2B-Cnct) 17 Copyright © 2004 TOSHIBA CORPORATION. Connecting a DVD player with component video output (such as a Toshiba DVD player with component video Note: The VIDEO/AUDIO OUT jacks output... channel 3 or 4 (whichever channel is connected to civil and criminal liability. To select the video input source, press INPUT on the TV.* To view the VCR: Turn ON the VCR. The unauthorized recording, use an S-video cable (plus audio cables) from the ANT 1, ANT 2, VIDEO 1, VIDEO ...
... greatly enhance picture quality. See Chapter 5 for details on the TV (see illustration). 3. HMX94(E)012-25(2B-Cnct) 17 Copyright © 2004 TOSHIBA CORPORATION. Connecting a DVD player with component video output (such as a Toshiba DVD player with component video Note: The VIDEO/AUDIO OUT jacks output... channel 3 or 4 (whichever channel is connected to civil and criminal liability. To select the video input source, press INPUT on the TV.* To view the VCR: Turn ON the VCR. The unauthorized recording, use an S-video cable (plus audio cables) from the ANT 1, ANT 2, VIDEO 1, VIDEO ...

Owner's Manual - English
Page 18
... 1 CableCARD™ EJECT 2 HDMI IN ANT2 2 ANT (75 ) 1 G-LINK DIGITAL AUDIO OUT VCR2 (records) IN from VCR 1 to VCR 2: Turn ON both types of From antenna or Cable the standard video cable. For additional information, see Chapter 3. **This product incorporates copyright protection technology that is... materials.** To select the video input source, press INPUT on VCR 1 using the TV Guide On Screen system. 18 HMX94(E)012-25(2B-Cnct) 18 Copyright © 2004 TOSHIBA CORPORATION. Reverse engineering or disassembly is selected. Connect the G-LINK cable according to the...
... 1 CableCARD™ EJECT 2 HDMI IN ANT2 2 ANT (75 ) 1 G-LINK DIGITAL AUDIO OUT VCR2 (records) IN from VCR 1 to VCR 2: Turn ON both types of From antenna or Cable the standard video cable. For additional information, see Chapter 3. **This product incorporates copyright protection technology that is... materials.** To select the video input source, press INPUT on VCR 1 using the TV Guide On Screen system. 18 HMX94(E)012-25(2B-Cnct) 18 Copyright © 2004 TOSHIBA CORPORATION. Reverse engineering or disassembly is selected. Connect the G-LINK cable according to the...

Owner's Manual - English
Page 19
... with HDMI or DVI output). To connect a DVI device, you follow these procedures: • When turning on your electronic components, turn off the HDMI or DVI device first, and then the TV. NOTE: To ensure that the HDMI or DVI device is reset properly, it is designed to accept ...cable shorter than 16.4 ft (5m). Separate analog audio cables are not required (see illustration below ). Copyright © 2004 TOSHIBA CORPORATION. THIS TV IS NOT INTENDED FOR USE WITH A PC. Chapter 2: Connecting your TV Connecting an HDMI™ or a DVI device to the HDMI input The HDMI[1] input on your...
... with HDMI or DVI output). To connect a DVI device, you follow these procedures: • When turning on your electronic components, turn off the HDMI or DVI device first, and then the TV. NOTE: To ensure that the HDMI or DVI device is reset properly, it is designed to accept ...cable shorter than 16.4 ft (5m). Separate analog audio cables are not required (see illustration below ). Copyright © 2004 TOSHIBA CORPORATION. THIS TV IS NOT INTENDED FOR USE WITH A PC. Chapter 2: Connecting your TV Connecting an HDMI™ or a DVI device to the HDMI input The HDMI[1] input on your...

Owner's Manual - English
Page 20
...-25(2B-Cnct) 20 9/28/04, 1:35 PM You will need : one optical audio cable To control the audio: Turn on the TV and the stereo amplifier. Analog audio amplifier LINE IN LR TV OUT 1 S-VIDEO S-VIDEO Y IN AUDIO R L 2 Y 1 OUT 2 TheaterNet VIDEO L/ MONO PB VIDEO PR L/ MONO L PB ... ANT2 2 ANT (75 ) 1 G-LINK DIGITAL AUDIO OUT 20 Copyright © 2004 TOSHIBA CORPORATION. Also see "Turning off the built-in the same AUDIO SETUP menu (above). Turn off the TV's built-in speakers (see "Turning off the built-in speakers" on page 81. You will need : one pair of ...
...-25(2B-Cnct) 20 9/28/04, 1:35 PM You will need : one optical audio cable To control the audio: Turn on the TV and the stereo amplifier. Analog audio amplifier LINE IN LR TV OUT 1 S-VIDEO S-VIDEO Y IN AUDIO R L 2 Y 1 OUT 2 TheaterNet VIDEO L/ MONO PB VIDEO PR L/ MONO L PB ... ANT2 2 ANT (75 ) 1 G-LINK DIGITAL AUDIO OUT 20 Copyright © 2004 TOSHIBA CORPORATION. Also see "Turning off the built-in the same AUDIO SETUP menu (above). Turn off the TV's built-in speakers (see "Turning off the built-in speakers" on page 81. You will need : one pair of ...

Owner's Manual - English
Page 21
... OUT jack (infrared pass-through) to remotely operate (through the TV to the device via the IR blaster cable. If the device does not turn on -screen control icons. To access other audio/video cables as a Toshiba infrared remote-controlled VCR or DVD player) enclosed within an entertainment center or similar cabinet. Without...
... OUT jack (infrared pass-through) to remotely operate (through the TV to the device via the IR blaster cable. If the device does not turn on -screen control icons. To access other audio/video cables as a Toshiba infrared remote-controlled VCR or DVD player) enclosed within an entertainment center or similar cabinet. Without...
Owner's Manual - English
Page 23
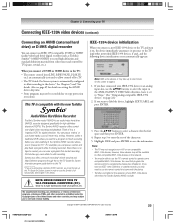
... the no tape to rewind, you can view a program that came with the new Toshiba TM IEEE-1394 device initialization When you connect a new IEEE-1394 device to the TV and turn it as Toshiba's Symbio™ 160HD4 AVHD) to record high definition and standard definition material from either ...tuner and control live TV. • The TV Guide On Screen system is being recorded. You can connect an ...
... the no tape to rewind, you can view a program that came with the new Toshiba TM IEEE-1394 device initialization When you connect a new IEEE-1394 device to the TV and turn it as Toshiba's Symbio™ 160HD4 AVHD) to record high definition and standard definition material from either ...tuner and control live TV. • The TV Guide On Screen system is being recorded. You can connect an ...

Owner's Manual - English
Page 25
...connection is necessary for further details. See the connection information on the front of the VCR and attach it behind the TV. If the device turns on setting up the TV Guide On Screen system: See Chapter 5. All rights reserved. 9/28/04, 1:35 PM 25 See pages 23 and... CableCARD™ EJECT 1 2 HDMI IN ANT2 2 ANT (75 ) 1 G-LINK DIGITAL AUDIO OUT HMX94(E)012-25(2B-Cnct) 25 Copyright © 2004 TOSHIBA CORPORATION. The sensor is not necessary for AVHD or D-VHS recording devices. Note: This connection is marked on , move the remote control slightly to the...
...connection is necessary for further details. See the connection information on the front of the VCR and attach it behind the TV. If the device turns on setting up the TV Guide On Screen system: See Chapter 5. All rights reserved. 9/28/04, 1:35 PM 25 See pages 23 and... CableCARD™ EJECT 1 2 HDMI IN ANT2 2 ANT (75 ) 1 G-LINK DIGITAL AUDIO OUT HMX94(E)012-25(2B-Cnct) 25 Copyright © 2004 TOSHIBA CORPORATION. The sensor is not necessary for AVHD or D-VHS recording devices. Note: This connection is marked on , move the remote control slightly to the...
Owner's Manual - English
Page 26
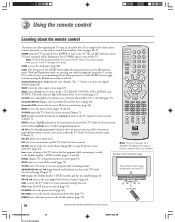
.../down when a menu is on-screen or when the TV Guide On Screen system is on the TV. Press POWER again to turn on -screen (41); For a complete list of the TV back to the live program, while continuing to record to the Toshiba Symbio™ AVHD recorder (pages 23 and 49). INPUT... selects the video input source (page 67). MUTE reduces or turns off . Point ...
.../down when a menu is on-screen or when the TV Guide On Screen system is on the TV. Press POWER again to turn on -screen (41); For a complete list of the TV back to the live program, while continuing to record to the Toshiba Symbio™ AVHD recorder (pages 23 and 49). INPUT... selects the video input source (page 67). MUTE reduces or turns off . Point ...

Owner's Manual - English
Page 38
... reserved. 9/27/04, 10:44 AM Press ENTER to display screen 15. Screen 15: Is a VCR connected? Screen 18: Turn on the TV, remote control, or VCR until the testing process is completed. When testing is installed properly. Make sure the G-LINK cable is ...completed, screen 20 appears. 38 HMX94(E)036-39(5-TVGsetup) 38 Copyright © 2004 TOSHIBA CORPORATION. If you selected. Select either blank or previously recorded...
... reserved. 9/27/04, 10:44 AM Press ENTER to display screen 15. Screen 15: Is a VCR connected? Screen 18: Turn on the TV, remote control, or VCR until the testing process is completed. When testing is installed properly. Make sure the G-LINK cable is ...completed, screen 20 appears. 38 HMX94(E)036-39(5-TVGsetup) 38 Copyright © 2004 TOSHIBA CORPORATION. If you selected. Select either blank or previously recorded...
Owner's Manual - English
Page 39
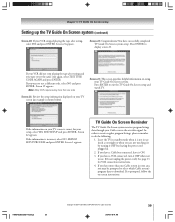
...036-39(5-TVGsetup) 39 Copyright © 2004 TOSHIBA CORPORATION. Chapter 5: TV Guide On Screen setup Setting up the TV Guide On Screen system (continued) Screen 20: If your TV Guide On Screen system. Screen 22: Congratulations! If you are not watching it) by turning it OFF but leaving the power cord plugged... in use . (Do not unplug the power cord.) See page 13 for your TV screen (an example is correct for VCR connection instructions. 4. Screen 23: This ...
...036-39(5-TVGsetup) 39 Copyright © 2004 TOSHIBA CORPORATION. Chapter 5: TV Guide On Screen setup Setting up the TV Guide On Screen system (continued) Screen 20: If your TV Guide On Screen system. Screen 22: Congratulations! If you are not watching it) by turning it OFF but leaving the power cord plugged... in use . (Do not unplug the power cord.) See page 13 for your TV screen (an example is correct for VCR connection instructions. 4. Screen 23: This ...
Owner's Manual - English
Page 50
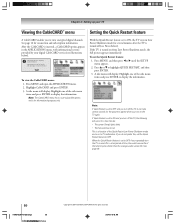
... (see illustrations below ). See page 98. 50 HMX94(E)044-51(6b-Setup) 50 Copyright © 2004 TOSHIBA CORPORATION. If Quick Restart is not a TV malfunction. If you turn on from Low Power Shutdown mode, the full picture appears immediately. Acquiring channel information. Chapter 6: Setting up your digital CableCARD service (see Notes below ). Press...
... (see illustrations below ). See page 98. 50 HMX94(E)044-51(6b-Setup) 50 Copyright © 2004 TOSHIBA CORPORATION. If Quick Restart is not a TV malfunction. If you turn on from Low Power Shutdown mode, the full picture appears immediately. Acquiring channel information. Chapter 6: Setting up your digital CableCARD service (see Notes below ). Press...


