Owner's Manual - English
Page 3
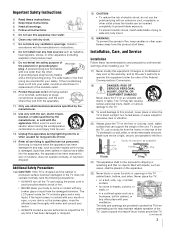
..., or sold with the manufacturer's instructions. 8) Do not install near water. 6) Clean only with poor ventilation. The LCD panel inside the TV contains glass and a toxic liquid. Never place the TV on a bed, sofa, rug, or similar surface; • too close to help maintain reliable operation of the unit...the floor or a sturdy, level, stable surface that produce heat. 9) Do not defeat the safety purpose of the obsolete outlet. 10) Protect the power cord from being walked on the apparatus. 22) Never block or cover the slots or openings in a confined space such as possible) 4" min....
..., or sold with the manufacturer's instructions. 8) Do not install near water. 6) Clean only with poor ventilation. The LCD panel inside the TV contains glass and a toxic liquid. Never place the TV on a bed, sofa, rug, or similar surface; • too close to help maintain reliable operation of the unit...the floor or a sturdy, level, stable surface that produce heat. 9) Do not defeat the safety purpose of the obsolete outlet. 10) Protect the power cord from being walked on the apparatus. 22) Never block or cover the slots or openings in a confined space such as possible) 4" min....
Owner's Manual - English
Page 4
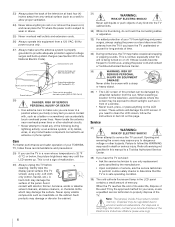
...TOSHIBA TV, follow this product contain mercury. Note: The lamp(s) inside this WARNING may expose you need to clean the LCD screen, follow the instructions in a position where your area, or ask a qualified service technician to direct sunlight, such as insecticide on or roll over the power cord, and never place the TV where the power...may make sure you have the TV serviced: • Ask the service technician to use , the TV may be regulated due to follow these sounds become frequent or continuous, unplug the power cord and contact a Toshiba Authorized Service Center. 35) ...
...TOSHIBA TV, follow this product contain mercury. Note: The lamp(s) inside this WARNING may expose you need to clean the LCD screen, follow the instructions in a position where your area, or ask a qualified service technician to direct sunlight, such as insecticide on or roll over the power cord, and never place the TV where the power...may make sure you have the TV serviced: • Ask the service technician to use , the TV may be regulated due to follow these sounds become frequent or continuous, unplug the power cord and contact a Toshiba Authorized Service Center. 35) ...
Owner's Manual - English
Page 6
...LCD TV The following symptoms are technical limitations of LCD Display technology and are trademarks of SRS Labs, Inc. Trademark Information • WOW, SRS and l symbol are not an indication of malfunction; However, there is incorporated under license from Dolby Laboratories. therefore, Toshiba... (Part 15): The Toshiba 42HL167, 47HL167, and 52HL167 Televisions comply with the ...TV is manufactured using an extremely high level of light) that may be determined by removing and applying power to the equipment, the user is encouraged to try to correct the interference by Toshiba...
...LCD TV The following symptoms are technical limitations of LCD Display technology and are trademarks of SRS Labs, Inc. Trademark Information • WOW, SRS and l symbol are not an indication of malfunction; However, there is incorporated under license from Dolby Laboratories. therefore, Toshiba... (Part 15): The Toshiba 42HL167, 47HL167, and 52HL167 Televisions comply with the ...TV is manufactured using an extremely high level of light) that may be determined by removing and applying power to the equipment, the user is encouraged to try to correct the interference by Toshiba...
Owner's Manual - English
Page 7
...to Toshiba 9 Features of your new TV 9 Overview of steps for installing, setting up, and using your new TV 10 TV front and side panel controls and connections 11 TV back panel connections 12 Chapter 2: Connecting your TV ... digital signal meter 44 Viewing the system status 44 Selecting the Power-On Mode 45 Chapter 6: Using the TV's features 46 Selecting the video input source to view 46 Labeling... 3 only 51 Using the auto aspect ratio feature 52 Selecting the cinema mode (480i and 1080i signals 52 Using the FREEZE feature 52 Adjusting the picture 53 Selecting the picture mode 53...
...to Toshiba 9 Features of your new TV 9 Overview of steps for installing, setting up, and using your new TV 10 TV front and side panel controls and connections 11 TV back panel connections 12 Chapter 2: Connecting your TV ... digital signal meter 44 Viewing the system status 44 Selecting the Power-On Mode 45 Chapter 6: Using the TV's features 46 Selecting the video input source to view 46 Labeling... 3 only 51 Using the auto aspect ratio feature 52 Selecting the cinema mode (480i and 1080i signals 52 Using the FREEZE feature 52 Adjusting the picture 53 Selecting the picture mode 53...
Owner's Manual - English
Page 10
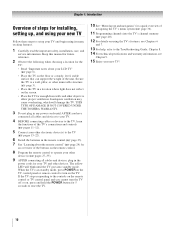
...blink until AFTER you cannot turn the TV off or on, press and hold the POWER button for 5 seconds to turn on using its many exciting features. 1 Carefully read the important safety, installation, care, and service information. page 23). 7 See "Learning about your LCD TV" (- pages 27-35). 9 ... For technical specifications and warranty information, see Chapter 9. 15 Enjoy your new TV! 10 Secure the TV to the TV, learn the functions of the TV's connections and controls (- THIS TYPE OF DAMAGE IS NOT COVERED UNDER THE TOSHIBA WARRANTY. 3 Do not plug in the remote control (- page 24) for...
...blink until AFTER you cannot turn the TV off or on, press and hold the POWER button for 5 seconds to turn on using its many exciting features. 1 Carefully read the important safety, installation, care, and service information. page 23). 7 See "Learning about your LCD TV" (- pages 27-35). 9 ... For technical specifications and warranty information, see Chapter 9. 15 Enjoy your new TV! 10 Secure the TV to the TV, learn the functions of the TV's connections and controls (- THIS TYPE OF DAMAGE IS NOT COVERED UNDER THE TOSHIBA WARRANTY. 3 Do not plug in the remote control (- page 24) for...
Owner's Manual - English
Page 11
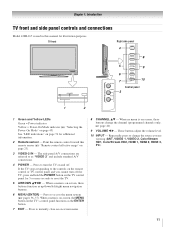
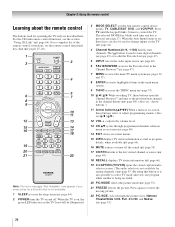
... menu navigation buttons. 6 MENU (ENTER) - "Remote control effective range" on page 74 for illustration purposes. When no menu is on the TV's control panel functions as "VIDEO 2" and include standard A/V connections. 4 POWER - page 40). 9 VOLUME C c - The side panel A/V connections are viewing (ANT, VIDEO 1, VIDEO 2, ColorStream HD1, ColorStream HD2, HDMI 1, HDMI 2, HDMI 3, PC...
... menu navigation buttons. 6 MENU (ENTER) - "Remote control effective range" on page 74 for illustration purposes. When no menu is on the TV's control panel functions as "VIDEO 2" and include standard A/V connections. 4 POWER - page 40). 9 VOLUME C c - The side panel A/V connections are viewing (ANT, VIDEO 1, VIDEO 2, ColorStream HD1, ColorStream HD2, HDMI 1, HDMI 2, HDMI 3, PC...
Owner's Manual - English
Page 12
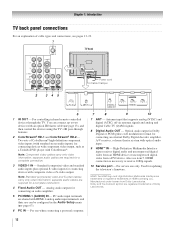
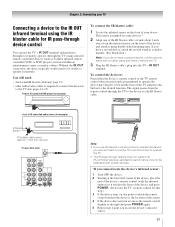
...; HD-1 and ColorStream® HD-2 - separate audio cables are required for connecting devices with component video output, such as a Toshiba DVD player with an optical IR blaster cable (- PC audio input terminals are trademarks or registered trademarks of ColorStream® high-definition component... input. 9 HDMI™ IN - HDMI connection is necessary to two devices with ColorStream®. Also see pages 13-22. 1 TV back 2 345 Power cord Cable Clamper 6 1 IR OUT - Standard (composite) video and standard audio inputs plus optional S-video inputs for connecting an external...
...; HD-1 and ColorStream® HD-2 - separate audio cables are required for connecting devices with component video output, such as a Toshiba DVD player with an optical IR blaster cable (- PC audio input terminals are trademarks or registered trademarks of ColorStream® high-definition component... input. 9 HDMI™ IN - HDMI connection is necessary to two devices with ColorStream®. Also see pages 13-22. 1 TV back 2 345 Power cord Cable Clamper 6 1 IR OUT - Standard (composite) video and standard audio inputs plus optional S-video inputs for connecting an external...
Owner's Manual - English
Page 17
...Point either the device's remote control or the TV remote control (that you locate the device's infrared sensor. 17 pages 14-19) Front of the device and attach it remotely. Chapter 2: Connecting your device. page 13) • other audio/video cables as Toshiba infrared remotecontrolled VCRs or DVD players) enclosed within...do not have a second device, coil the second wand with the infrared emitter) so it touches the front of the device and press POWER. (Do not use the TV's remote control for this step.) 3 If the device turns on, the point at the lower left corner of the device, place ...
...Point either the device's remote control or the TV remote control (that you locate the device's infrared sensor. 17 pages 14-19) Front of the device and attach it remotely. Chapter 2: Connecting your device. page 13) • other audio/video cables as Toshiba infrared remotecontrolled VCRs or DVD players) enclosed within...do not have a second device, coil the second wand with the infrared emitter) so it touches the front of the device and press POWER. (Do not use the TV's remote control for this step.) 3 If the device turns on, the point at the lower left corner of the device, place ...
Owner's Manual - English
Page 24
...the volume level. 13 CH Bb cycles through the picture sizes: Natural, TheaterWide 1/2/3, Full, 4:3 HD, and Native (- Press again to control the TV. For the CE-Link remote control functions, see the remote control functional key chart (- For a complete list of the remote control's functions, see...Numbers (0-9, -/100) directly tune channels. page 55). 17 CH RTN returns to edit the Favorite List (- page 53). 24 page 64). 2 POWER turns the TV on -screen, these buttons open the Channel Browser™ and tune to change inputs on -screen (- page 37). 10 3 C / # c While watching...
...the volume level. 13 CH Bb cycles through the picture sizes: Natural, TheaterWide 1/2/3, Full, 4:3 HD, and Native (- Press again to control the TV. For the CE-Link remote control functions, see the remote control functional key chart (- For a complete list of the remote control's functions, see...Numbers (0-9, -/100) directly tune channels. page 55). 17 CH RTN returns to edit the Favorite List (- page 53). 24 page 64). 2 POWER turns the TV on -screen, these buttons open the Channel Browser™ and tune to change inputs on -screen (- page 37). 10 3 C / # c While watching...
Owner's Manual - English
Page 25
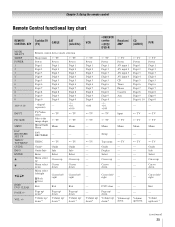
... key chart REMOTE CONTROL KEY Toshiba TV (TV) CABLE SAT (satellite) MODE SELECT SLEEP POWER 1 2 3 4 5 6 7 8 9 0 100/-/+10 INPUT PIC SIZE MENU FAV BROWSER/ SET UP THINC/ TOP MENU GUIDE INFO ENTER B b C3 #c EXIT/ DVD CLEAR PAGE +/- s TV Power Digit 1 Digit 2 Digit 3 Digit 4 Digit 5 Digit 6 Digit 7 Digit 8 Digit 9 Digit 0 -/--, +10, +100 s TV s TV Menu s TV Power AV input 1 AV input 2 AV...
... key chart REMOTE CONTROL KEY Toshiba TV (TV) CABLE SAT (satellite) MODE SELECT SLEEP POWER 1 2 3 4 5 6 7 8 9 0 100/-/+10 INPUT PIC SIZE MENU FAV BROWSER/ SET UP THINC/ TOP MENU GUIDE INFO ENTER B b C3 #c EXIT/ DVD CLEAR PAGE +/- s TV Power Digit 1 Digit 2 Digit 3 Digit 4 Digit 5 Digit 6 Digit 7 Digit 8 Digit 9 Digit 0 -/--, +10, +100 s TV s TV Menu s TV Power AV input 1 AV input 2 AV...
Owner's Manual - English
Page 36
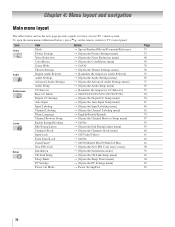
... layout and navigation Main menu layout The tables below ), press Y on the next page provide a quick overview of your TV's menu system. Icon Video Audio Preferences Locks Setup Item Mode Picture Settings Noise Reduction ColorMaster Game Mode Theater Settings Digital Audio... Rating Blocking Edit Rating Limits Channels Block Input Lock Front Panel Lock GameTimer® New PIN Code Installation CE-Link Setup Sleep Timer PC Settings Power-On Mode Option S Sports/Standard/Movie/Document/Preference S [Opens the Picture Settings menu] S [Opens the Noise Reduction menu] S [Opens the ColorMaster ...
... layout and navigation Main menu layout The tables below ), press Y on the next page provide a quick overview of your TV's menu system. Icon Video Audio Preferences Locks Setup Item Mode Picture Settings Noise Reduction ColorMaster Game Mode Theater Settings Digital Audio... Rating Blocking Edit Rating Limits Channels Block Input Lock Front Panel Lock GameTimer® New PIN Code Installation CE-Link Setup Sleep Timer PC Settings Power-On Mode Option S Sports/Standard/Movie/Document/Preference S [Opens the Picture Settings menu] S [Opens the Noise Reduction menu] S [Opens the ColorMaster ...
Owner's Manual - English
Page 39
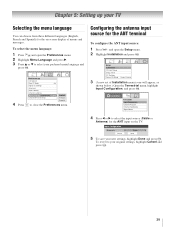
...231;ais Español 4 Press O to select your preferred menu language and press T. Setup Installation CE-Link Setup Sleep Timer PC Settings Power-On Mode Power-Saving 3 (A new set of menus and messages. To select the menu language: 1 Press Y and open the Setup menu. 2 Highlight Installation... and press T. Chapter 5: Setting up your TV Selecting the menu language You can choose from three different languages (English, French and Spanish) ...
...231;ais Español 4 Press O to select your preferred menu language and press T. Setup Installation CE-Link Setup Sleep Timer PC Settings Power-On Mode Power-Saving 3 (A new set of menus and messages. To select the menu language: 1 Press Y and open the Setup menu. 2 Highlight Installation... and press T. Chapter 5: Setting up your TV Selecting the menu language You can choose from three different languages (English, French and Spanish) ...
Owner's Manual - English
Page 40
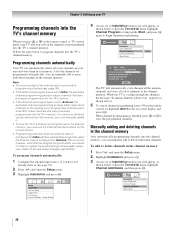
... channels. Installation Terrestrial Input Configuration Channel Program Channel Add/Delete Signal Meter Start ANT Cable Scanning channels, please wait ... 52% Number of Installation menu icons will take substantially longer than when the antenna input is cycling through all the antenna channels... and press T again to begin channel programming. Programming channels automatically Your TV can manually add or delete individual channels. Setup Installation CE-Link Setup Sleep Timer PC Settings Power-On Mode Power-Saving 4 (A new set to Cable, the automatic channel programming process ...
... channels. Installation Terrestrial Input Configuration Channel Program Channel Add/Delete Signal Meter Start ANT Cable Scanning channels, please wait ... 52% Number of Installation menu icons will take substantially longer than when the antenna input is cycling through all the antenna channels... and press T again to begin channel programming. Programming channels automatically Your TV can manually add or delete individual channels. Setup Installation CE-Link Setup Sleep Timer PC Settings Power-On Mode Power-Saving 4 (A new set to Cable, the automatic channel programming process ...
Owner's Manual - English
Page 41
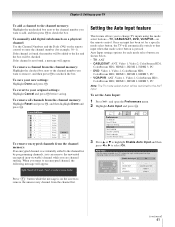
...that mode select button is on your original settings: Highlight Cancel and press T before saving. Enable Auto Input On SLEEP POWER MODE SELECT CABLE/SAT DVD TV VCR/PVR TV CABLE/SAT DVD VCR/PVR -ColorStream HD1 HDMI 1 Video 1 Reset Done (continued) 41 To remove a channel from... control. To revert to the channel list by programming channels, you can remove the unwanted encrypted (non-viewable) channel while you are shown below. • TV: ANT • CABLE/SAT: ANT, Video 1, Video 2, ColorStream HD1, ColorStream HD2, HDMI 1, HDMI 2, HDMI 3, PC • DVD: Video 1, Video 2, ...
...that mode select button is on your original settings: Highlight Cancel and press T before saving. Enable Auto Input On SLEEP POWER MODE SELECT CABLE/SAT DVD TV VCR/PVR TV CABLE/SAT DVD VCR/PVR -ColorStream HD1 HDMI 1 Video 1 Reset Done (continued) 41 To remove a channel from... control. To revert to the channel list by programming channels, you can remove the unwanted encrypted (non-viewable) channel while you are shown below. • TV: ANT • CABLE/SAT: ANT, Video 1, Video 2, ColorStream HD1, ColorStream HD2, HDMI 1, HDMI 2, HDMI 3, PC • DVD: Video 1, Video 2, ...
Owner's Manual - English
Page 42
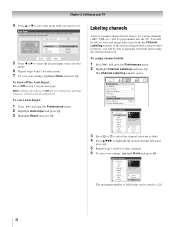
... Custom Clear All Done The maximum number of common channel labels (logos) for that can be stored is not provided in step 3 on your TV's automatic input switching feature when changing modes on previous page. The Channel Labeling window opens. Custom Clear All Done 3 Press < or , to ...settings; Auto Input Use this menu to view and assign these logos from the Channel Labeling window. Enable Auto Input On SLEEP POWER MODE SELECT CABLE/SAT DVD TV VCR/PVR TV CABLE/SAT DVD VCR/PVR -ColorStream HD1 HDMI 1 Video 1 Reset Done 5 Press C or c to select the desired ...
... Custom Clear All Done The maximum number of common channel labels (logos) for that can be stored is not provided in step 3 on your TV's automatic input switching feature when changing modes on previous page. The Channel Labeling window opens. Custom Clear All Done 3 Press < or , to ...settings; Auto Input Use this menu to view and assign these logos from the Channel Labeling window. Enable Auto Input On SLEEP POWER MODE SELECT CABLE/SAT DVD TV VCR/PVR TV CABLE/SAT DVD VCR/PVR -ColorStream HD1 HDMI 1 Video 1 Reset Done 5 Press C or c to select the desired ...
Owner's Manual - English
Page 45
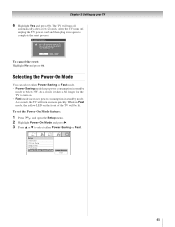
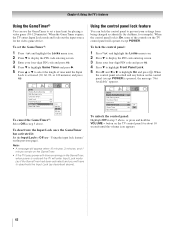
...: Highlight No and press T. The TV will turn on . • Fast mode increases power consumption in again to turn off , unplug the TV power cord and then plug it takes a bit longer for the TV to complete the reset process. As a result, the TV will turn on more quickly. Setup ...Installation CE-Link Setup Sleep Timer PC Settings Power-On Mode Power-Saving Power-Saving Fast 45 System Information ...
...: Highlight No and press T. The TV will turn on . • Fast mode increases power consumption in again to turn off , unplug the TV power cord and then plug it takes a bit longer for the TV to complete the reset process. As a result, the TV will turn on more quickly. Setup ...Installation CE-Link Setup Sleep Timer PC Settings Power-On Mode Power-Saving Power-Saving Fast 45 System Information ...
Owner's Manual - English
Page 48
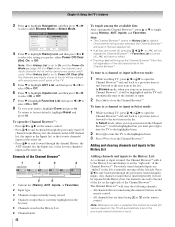
..., Inputs, or Favorites) 2 Input type 3 Channel or input currently being viewed 4 Channel or input that cannot be tuned (for various reasons), the TV will be saved every power on an item in the History List Adding channels and inputs to select On or Off. 8 To save your entries, highlight Done and... press T. To tune to a channel or input in Browse mode: 1 While watching TV, press 3 C or # c to open the Channel Browser™ and surf back to a previous item or forward to Power Off Clear (On), the channels and inputs stored in the list. In Browse mode, when you prefer...
..., Inputs, or Favorites) 2 Input type 3 Channel or input currently being viewed 4 Channel or input that cannot be tuned (for various reasons), the TV will be saved every power on an item in the History List Adding channels and inputs to select On or Off. 8 To save your entries, highlight Done and... press T. To tune to a channel or input in Browse mode: 1 While watching TV, press 3 C or # c to open the Channel Browser™ and surf back to a previous item or forward to Power Off Clear (On), the channels and inputs stored in the list. In Browse mode, when you prefer...
Owner's Manual - English
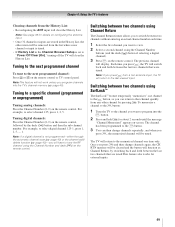
Page 49
...Note: If a digital channel is set to "Power Off Clear (On)," turning off the TV will clear the History List. page 40)-you ...specific channel (programmed or unprogrammed) Tuning analog channels: Press the Channel Number (0-9) on the remote control or TV control panel. Note:This feature will return to the memorized channel one channel to the R button, so...followed by switching back and forth between the last two channels that channel quickly from a non-antenna input, the TV will clear the History List. Tuning digital channels: Press the Channel Number (0-9) on -screen. For example, to...
...Note: If a digital channel is set to "Power Off Clear (On)," turning off the TV will clear the History List. page 40)-you ...specific channel (programmed or unprogrammed) Tuning analog channels: Press the Channel Number (0-9) on the remote control or TV control panel. Note:This feature will return to the memorized channel one channel to the R button, so...followed by switching back and forth between the last two channels that channel quickly from a non-antenna input, the TV will clear the History List. Tuning digital channels: Press the Channel Number (0-9) on -screen. For example, to...
Owner's Manual - English
Page 62
... 5 Press B or b to select the length of the controls on the TV control panel will have to deactivate the Input Lock (as if the GameTimer had been activated) and you will operate except POWER. To deactivate the Input Lock once the GameTimer has activated it: Set the Input..." appears. Note: • A message will appear when 10 minutes, 3 minutes, and 1 minute remain on the GameTimer. • If the TV loses power with time remaining on the control panel (except POWER) is restored the TV will enter Input Lock mode (as described above). "Using the input lock feature" on the...
... 5 Press B or b to select the length of the controls on the TV control panel will have to deactivate the Input Lock (as if the GameTimer had been activated) and you will operate except POWER. To deactivate the Input Lock once the GameTimer has activated it: Set the Input..." appears. Note: • A message will appear when 10 minutes, 3 minutes, and 1 minute remain on the GameTimer. • If the TV loses power with time remaining on the control panel (except POWER) is restored the TV will enter Input Lock mode (as described above). "Using the input lock feature" on the...
Owner's Manual - English
Page 63
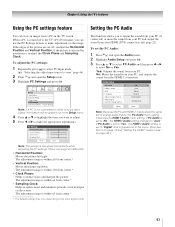
...reduce noise and sharpen the picture. The adjustment range is within ±10 from center.* * The default settings may vary depending on the TV screen. This function allows you to select PC input mode (- This is disrupted momentarily when adjusting the PC settings. The adjustment range is...• Vertical Position: Moves the picture up/down. Setup Installation CE-Link Setup Sleep Timer PC Settings Power-On Mode Power-Saving Note: If a PC is not connected or there is connected to the TV's PC IN terminal, you want to adjust. 5 Press C or c to reduce noise and minimize ...
...reduce noise and sharpen the picture. The adjustment range is within ±10 from center.* * The default settings may vary depending on the TV screen. This function allows you to select PC input mode (- This is disrupted momentarily when adjusting the PC settings. The adjustment range is...• Vertical Position: Moves the picture up/down. Setup Installation CE-Link Setup Sleep Timer PC Settings Power-On Mode Power-Saving Note: If a PC is not connected or there is connected to the TV's PC IN terminal, you want to adjust. 5 Press C or c to reduce noise and minimize ...


