
Printable Spec Sheet
Page 1
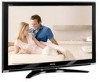
...twice the pixel resolution of each video frame, and automatically adjusts the backlight intensity based on the image content. While standard LCD panels may only reproduce 72% of the NTSC color gamut, ColorBurst™ utilizes enhanced CCFL back-light technology to expand the color...looking picture without image banding. PixelPure 3G™ - A wide 176 degree viewing angle ensures that are vibrant and natural. PRELIMINARY 52HL167 52" Diagonal REGZA™ LCD TV 1080p Full HD Display - With Full HD, there's no need to scale down a 1080 signal. This advanced third-generation ...
...twice the pixel resolution of each video frame, and automatically adjusts the backlight intensity based on the image content. While standard LCD panels may only reproduce 72% of the NTSC color gamut, ColorBurst™ utilizes enhanced CCFL back-light technology to expand the color...looking picture without image banding. PixelPure 3G™ - A wide 176 degree viewing angle ensures that are vibrant and natural. PRELIMINARY 52HL167 52" Diagonal REGZA™ LCD TV 1080p Full HD Display - With Full HD, there's no need to scale down a 1080 signal. This advanced third-generation ...
Owner's Manual - English
Page 3
...equipment. or • in a confined space such as vases, shall be inserted completely to operate this product at least 4 (four) inches around the TV. (continued) 3 Installation, Care, and Service Installation Follow these instructions. 3) Heed all warnings. 4) Follow all instructions. 5) Do not use the ...periods of the Federal Communications Commission. 18) DANGER: RISK OF SERIOUS PERSONAL INJURY, DEATH, OR EQUIPMENT DAMAGE! The LCD panel inside the TV contains glass and a toxic liquid. Leave a space of Wide blade the polarized or grounding type plug. Hooks Clip Clip...
...equipment. or • in a confined space such as vases, shall be inserted completely to operate this product at least 4 (four) inches around the TV. (continued) 3 Installation, Care, and Service Installation Follow these instructions. 3) Heed all warnings. 4) Follow all instructions. 5) Do not use the ...periods of the Federal Communications Commission. 18) DANGER: RISK OF SERIOUS PERSONAL INJURY, DEATH, OR EQUIPMENT DAMAGE! The LCD panel inside the TV contains glass and a toxic liquid. Leave a space of Wide blade the polarized or grounding type plug. Hooks Clip Clip...
Owner's Manual - English
Page 4
... spill liquids or push objects of any kind into the TV cabinet slots. 32) While it is in safe operating condition. 39) The cold cathode fluorescent lamp in the LCD panel contains a small amount of mercury. Never strike the screen with , such as a ladder or screwdriver) can...recycling information, contact your area, or ask a qualified service technician to properly dispose of the TV. If these recommendations and precautions: 29) If you are never in a position where your TOSHIBA TV, follow the instructions in death or serious injury. Never attempt to an antenna or phone ...
... spill liquids or push objects of any kind into the TV cabinet slots. 32) While it is in safe operating condition. 39) The cold cathode fluorescent lamp in the LCD panel contains a small amount of mercury. Never strike the screen with , such as a ladder or screwdriver) can...recycling information, contact your area, or ask a qualified service technician to properly dispose of the TV. If these recommendations and precautions: 29) If you are never in a position where your TOSHIBA TV, follow the instructions in death or serious injury. Never attempt to an antenna or phone ...
Owner's Manual - English
Page 5
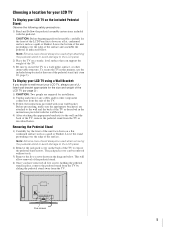
... to the LCD panel. 2) Place the TV on a flat, cushioned surface such as indicated below. page 2) : 1) CAUTION: Two people are attached to the wall and the back of the TV as described below . Note: Extreme care should always be used when attaching the pedestal stand to avoid damage to wall mount your LCD TV, always use...
... to the LCD panel. 2) Place the TV on a flat, cushioned surface such as indicated below. page 2) : 1) CAUTION: Two people are attached to the wall and the back of the TV as described below . Note: Extreme care should always be used when attaching the pedestal stand to avoid damage to wall mount your LCD TV, always use...
Owner's Manual - English
Page 6
... and can be an occasional pixel (dot of light) that interference will disappear in a short period of time. 2) The LCD panel contained in a residential installation. Important notes about your warranty. however, there may be determined by removing and applying power to ...LCD TV The following two conditions: (1) this device may cause harmful interference to Part 15 of the FCC rules. Such pixels are trademarks or registered trademarks of HDMI Licensing LLC. 6 Wayne, NJ 07470. FCC Declaration of Conformity Compliance Statement (Part 15): The Toshiba 42HL167, 47HL167, and 52HL167...
... and can be an occasional pixel (dot of light) that interference will disappear in a short period of time. 2) The LCD panel contained in a residential installation. Important notes about your warranty. however, there may be determined by removing and applying power to ...LCD TV The following two conditions: (1) this device may cause harmful interference to Part 15 of the FCC rules. Such pixels are trademarks or registered trademarks of HDMI Licensing LLC. 6 Wayne, NJ 07470. FCC Declaration of Conformity Compliance Statement (Part 15): The Toshiba 42HL167, 47HL167, and 52HL167...
Owner's Manual - English
Page 7
...and Service 3 Chapter 1: Introduction 9 Welcome to Toshiba 9 Features of your new TV 9 Overview of steps for installing, setting up, and using your new TV 10 TV front and side panel controls and connections 11 TV back panel connections 12 Chapter 2: Connecting your TV 13 Overview of cable types 13 About the ... TheaterWide® picture (TheaterWide 2 and 3 only 51 Using the auto aspect ratio feature 52 Selecting the cinema mode (480i and 1080i signals 52 Using the FREEZE feature 52 Adjusting the picture 53 Selecting the picture mode 53 Adjusting the picture quality 53 Using the...
...and Service 3 Chapter 1: Introduction 9 Welcome to Toshiba 9 Features of your new TV 9 Overview of steps for installing, setting up, and using your new TV 10 TV front and side panel controls and connections 11 TV back panel connections 12 Chapter 2: Connecting your TV 13 Overview of cable types 13 About the ... TheaterWide® picture (TheaterWide 2 and 3 only 51 Using the auto aspect ratio feature 52 Selecting the cinema mode (480i and 1080i signals 52 Using the FREEZE feature 52 Adjusting the picture 53 Selecting the picture mode 53 Adjusting the picture quality 53 Using the...
Owner's Manual - English
Page 8
Chapter 7: Using the TV's advanced features 67 Using the advanced picture settings features 67 Using dynamic contrast 67 Using the static gamma feature 67 Selecting the color temperature 68 ... WOW™ surround sound feature 71 Chapter 8: Troubleshooting 72 General troubleshooting 72 LED indications 74 Chapter 9: Appendix 75 Specifications 75 Limited United States Warranty for LCD Televisions 26" and Larger 76 Limited Canadian Warranty for Toshiba Brand Flat Panel Televisions 77 Index 80 8
Chapter 7: Using the TV's advanced features 67 Using the advanced picture settings features 67 Using dynamic contrast 67 Using the static gamma feature 67 Selecting the color temperature 68 ... WOW™ surround sound feature 71 Chapter 8: Troubleshooting 72 General troubleshooting 72 LED indications 74 Chapter 9: Appendix 75 Specifications 75 Limited United States Warranty for LCD Televisions 26" and Larger 76 Limited Canadian Warranty for Toshiba Brand Flat Panel Televisions 77 Index 80 8
Owner's Manual - English
Page 10
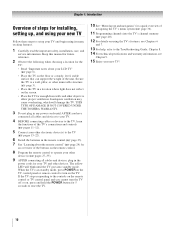
... and other objects to allow proper ventilation. pages 11-12). 5 Connect your other device(s) (- If the TV stops responding to the controls on the remote control or TV control panel and you have connected all cables and devices, plug in a location where light does not reflect on using ...IS NOT COVERED UNDER THE TOSHIBA WARRANTY. 3 Do not plug in the remote control (- page 24) for an overview of the buttons on the floor or a sturdy, level, stable surface that can support the weight of navigating the TV's menu system (- page 23). 7 See "Learning about your LCD TV" (- pages 27-35...
... and other objects to allow proper ventilation. pages 11-12). 5 Connect your other device(s) (- If the TV stops responding to the controls on the remote control or TV control panel and you have connected all cables and devices, plug in a location where light does not reflect on using ...IS NOT COVERED UNDER THE TOSHIBA WARRANTY. 3 Do not plug in the remote control (- page 24) for an overview of the buttons on the floor or a sturdy, level, stable surface that can support the weight of navigating the TV's menu system (- page 23). 7 See "Learning about your LCD TV" (- pages 27-35...
Owner's Manual - English
Page 11
...to turn off . When a menu is on-screen, the MENU button on the remote control or TV control panel and you are referred to access the menu system (- If the TV stops responding to reset the TV. 5 ARROWS BbC c - When a menu is on page 74 for 5 or more seconds ...2, ColorStream HD1, ColorStream HD2, HDMI 1, HDMI 2, HDMI 3, PC). 11 Repeatedly press to instantly close an on and off the TV, press and hold the POWER button on the TV control panel for additional information. 2 Remote sensor - Press to change the channel (programmed channels only; - Press to as "VIDEO 2" and ...
...to turn off . When a menu is on-screen, the MENU button on the remote control or TV control panel and you are referred to access the menu system (- If the TV stops responding to reset the TV. 5 ARROWS BbC c - When a menu is on page 74 for 5 or more seconds ...2, ColorStream HD1, ColorStream HD2, HDMI 1, HDMI 2, HDMI 3, PC). 11 Repeatedly press to instantly close an on and off the TV, press and hold the POWER button on the TV control panel for additional information. 2 Remote sensor - Press to change the channel (programmed channels only; - Press to as "VIDEO 2" and ...
Owner's Manual - English
Page 12
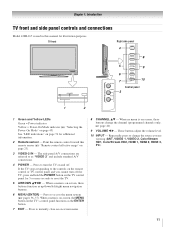
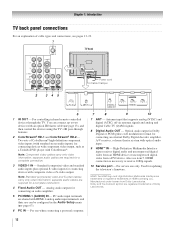
... from Dolby Laboratories. Used for a complete connection. 4 Fixed Audio OUT - Manufactured under license from a DVI device. Chapter 1: Introduction TV back panel connections For an explanation of cable types and connections, see item 5. Note: Standard (composite) video and S-video cables carry only video information... optional S-video inputs for connecting devices with component video output, such as a Toshiba DVD player with optical audio input. 9 HDMI™ IN - page 63). 6 PC IN - Also see pages 13-22. 1 TV back 2 345 Power cord Cable Clamper 6 1 IR OUT - HDMI, the...
... from Dolby Laboratories. Used for a complete connection. 4 Fixed Audio OUT - Manufactured under license from a DVI device. Chapter 1: Introduction TV back panel connections For an explanation of cable types and connections, see item 5. Note: Standard (composite) video and S-video cables carry only video information... optional S-video inputs for connecting devices with component video output, such as a Toshiba DVD player with optical audio input. 9 HDMI™ IN - page 63). 6 PC IN - Also see pages 13-22. 1 TV back 2 345 Power cord Cable Clamper 6 1 IR OUT - HDMI, the...
Owner's Manual - English
Page 14
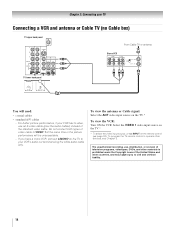
... of video cable to operate other countries, and may subject you have a mono VCR, connect L/MONO on the TV to your TV Connecting a VCR and antenna or Cable TV (no Cable box) TV upper back panel From Cable TV or antenna Stereo VCR VIDEO AUDIO L R IN CH 3 CH 4 OUT L R IN from ANT OUT to... civil and criminal liability. 14 Select the VIDEO 1 video input source on the TV.* * To select the video input source, press ...
... of video cable to operate other countries, and may subject you have a mono VCR, connect L/MONO on the TV to your TV Connecting a VCR and antenna or Cable TV (no Cable box) TV upper back panel From Cable TV or antenna Stereo VCR VIDEO AUDIO L R IN CH 3 CH 4 OUT L R IN from ANT OUT to... civil and criminal liability. 14 Select the VIDEO 1 video input source on the TV.* * To select the video input source, press ...
Owner's Manual - English
Page 15
TV upper back panel From Cable TV Cable box IN CH 3 CH 4 OUT TV lower back panel stereo VCR VIDEO AUDIO L R IN CH 3 CH 4 OUT L R IN from ANT OUT to change channels. Note: When you use a Cable box, you may subject you have a mono VCR, connect L/MONO on the TV.* Tune the TV to ). Select the VIDEO 1 video...
TV upper back panel From Cable TV Cable box IN CH 3 CH 4 OUT TV lower back panel stereo VCR VIDEO AUDIO L R IN CH 3 CH 4 OUT L R IN from ANT OUT to change channels. Note: When you use a Cable box, you may subject you have a mono VCR, connect L/MONO on the TV.* Tune the TV to ). Select the VIDEO 1 video...
Owner's Manual - English
Page 16
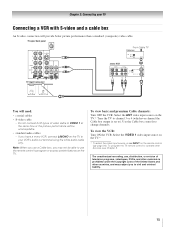
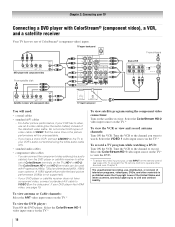
...DVD player or satellite receiver does not have a mono VCR, connect L/MONO on the side panel. To view antenna or Cable channels: Select the ANT video input source on the TV.* To record a TV program while watching a DVD: Turn ON the VCR. Select the VIDEO 1 video input source... OUT L Satellite COMPONENT VIDEO S-VIDEO VIDEO R IN OUT OUT Satellite receiver with component video TV lower back panel You will be used with ColorStream® (component video), a VCR, and a satellite receiver Your TV has two sets of ColorStream® (component video) inputs. The ColorStream HD-1 and HD-2...
...DVD player or satellite receiver does not have a mono VCR, connect L/MONO on the side panel. To view antenna or Cable channels: Select the ANT video input source on the TV.* To record a TV program while watching a DVD: Turn ON the VCR. Select the VIDEO 1 video input source... OUT L Satellite COMPONENT VIDEO S-VIDEO VIDEO R IN OUT OUT Satellite receiver with component video TV lower back panel You will be used with ColorStream® (component video), a VCR, and a satellite receiver Your TV has two sets of ColorStream® (component video) inputs. The ColorStream HD-1 and HD-2...
Owner's Manual - English
Page 17
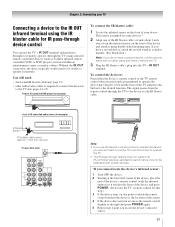
...: If you previously programmed to the IR OUT infrared terminal using double-sided mounting tape. page 13) • other audio/video cables as Toshiba infrared remotecontrolled VCRs or DVD players) enclosed within an entertainment center or similar cabinet. Chapter 3) toward the front of your... sensor is the location of IR-controlled audio device (for example) Infrared sensor IR blaster cable wand (approx.1 inch from device) TV upper back panel Note: • If you use the TV's remote control for this step.) 3 If the device turns on the front of the device and attach it behind the...
...: If you previously programmed to the IR OUT infrared terminal using double-sided mounting tape. page 13) • other audio/video cables as Toshiba infrared remotecontrolled VCRs or DVD players) enclosed within an entertainment center or similar cabinet. Chapter 3) toward the front of your... sensor is the location of IR-controlled audio device (for example) Infrared sensor IR blaster cable wand (approx.1 inch from device) TV upper back panel Note: • If you use the TV's remote control for this step.) 3 If the device turns on the front of the device and attach it behind the...
Owner's Manual - English
Page 18
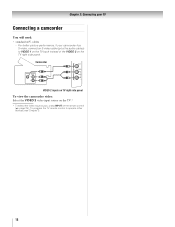
... the audio cables) to operate other devices, see Chapter 3. 18 To program the TV remote control to VIDEO 1 on the TV back instead of the VIDEO 2 on the remote control (- Camcorder VIDEO AUDIO OUT L R VIDEO 2 inputs on TV right side panel To view the camcorder video: Select the VIDEO 2 video input source on the...
... the audio cables) to operate other devices, see Chapter 3. 18 To program the TV remote control to VIDEO 1 on the TV back instead of the VIDEO 2 on the remote control (- Camcorder VIDEO AUDIO OUT L R VIDEO 2 inputs on TV right side panel To view the camcorder video: Select the VIDEO 2 video input source on the...
Owner's Manual - English
Page 19
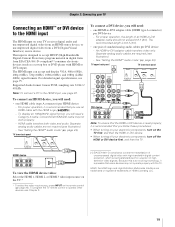
... need: • one HDMI-to -DVI adapter cable should not exceed 9.8 ft (3m). HDMI cable transfers both video and audio. TV lower back panel To connect a DVI device, you use an HDMI cable with HDMI or DVI output). For proper operation, the length of standard analog audio...(see illustration). - See "Setting the HDMI™ audio mode" (- page 43). Separate analog audio cables are not required (see illustration). - TV upper back panel TV lower back panel DVI device VIDEO AUDIO L R IN IN DVI / HDCP OUT OUT L R Note: To ensure that the HDMI or DVI device is reset properly...
... need: • one HDMI-to -DVI adapter cable should not exceed 9.8 ft (3m). HDMI cable transfers both video and audio. TV lower back panel To connect a DVI device, you use an HDMI cable with HDMI or DVI output). For proper operation, the length of standard analog audio...(see illustration). - See "Setting the HDMI™ audio mode" (- page 43). Separate analog audio cables are not required (see illustration). - TV upper back panel TV lower back panel DVI device VIDEO AUDIO L R IN IN DVI / HDCP OUT OUT L R Note: To ensure that the HDMI or DVI device is reset properly...
Owner's Manual - English
Page 20
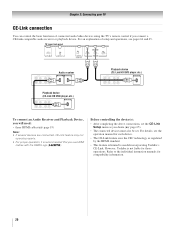
...controlling the device(s): • After completing the above connections, set . For details, see pages 64 and 65. Refer to models incorporating Toshiba's CE-Link. page 65). • The connected devices must also be set the CE-Link Setup menu as regulated by the HDMI standard.... • This feature is limited to the individual instruction manuals for those operations. TV lower back panel VIDEO AUDIO L R IN OUT L R Audio receiver HDMI IN HDMI OUT Playback device (CE-Link HD DVD player,etc.) VIDEO AUDIO L ...
...controlling the device(s): • After completing the above connections, set . For details, see pages 64 and 65. Refer to models incorporating Toshiba's CE-Link. page 65). • The connected devices must also be set the CE-Link Setup menu as regulated by the HDMI standard.... • This feature is limited to the individual instruction manuals for those operations. TV lower back panel VIDEO AUDIO L R IN OUT L R Audio receiver HDMI IN HDMI OUT Playback device (CE-Link HD DVD player,etc.) VIDEO AUDIO L ...
Owner's Manual - English
Page 21
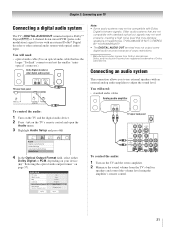
... g or 2-channel down-mixed PCM (pulse-code modulation) signal for use external speakers with Dolby Digital bitstream signals. LINE IN LR TV upper back panel Audio Digital Audio Selector Audio Settings Advanced Audio Settings Audio Setup 4 In the Optical Output Format field, select either Dolby Digital or PCM... connection allows you to use with an external Dolby® Digital decoder or other digital audio system LINE IN LR Optical Audio IN TV lower back panel Note: • Some audio systems may damage speakers or headphones. You will need : • optical audio cable (Use an...
... g or 2-channel down-mixed PCM (pulse-code modulation) signal for use external speakers with Dolby Digital bitstream signals. LINE IN LR TV upper back panel Audio Digital Audio Selector Audio Settings Advanced Audio Settings Audio Setup 4 In the Optical Output Format field, select either Dolby Digital or PCM... connection allows you to use with an external Dolby® Digital decoder or other digital audio system LINE IN LR Optical Audio IN TV lower back panel Note: • Some audio systems may damage speakers or headphones. You will need : • optical audio cable (Use an...
Owner's Manual - English
Page 22
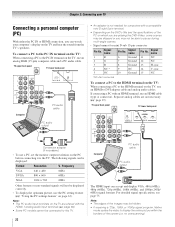
... 480p (60Hz), 720p (60Hz), 1080i (60Hz), and 1080p (24Hz/ 60Hz) signal formats. For detailed signal specifications, see page 75. TV upper back panel TV lower back panel Computer PC audio cable • An adapter is not needed for mini D-sub 15-pin connector Pin No. "Using the PC settings feature... Computer PC audio cable PC audio output The HDMI input can be connected to DVI adapter cable and analog audio cables. TV upper back panel TV lower back panel PC audio output Conversion adapter (if necessary) • To use the PC setting feature (- page 63). • Some PC ...
... 480p (60Hz), 720p (60Hz), 1080i (60Hz), and 1080p (24Hz/ 60Hz) signal formats. For detailed signal specifications, see page 75. TV upper back panel TV lower back panel Computer PC audio cable • An adapter is not needed for mini D-sub 15-pin connector Pin No. "Using the PC settings feature... Computer PC audio cable PC audio output The HDMI input can be connected to DVI adapter cable and analog audio cables. TV upper back panel TV lower back panel PC audio output Conversion adapter (if necessary) • To use the PC setting feature (- page 63). • Some PC ...
Owner's Manual - English
Page 36
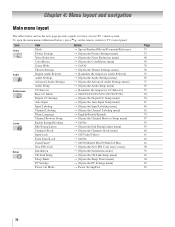
... tables below ), press Y on the next page provide a quick overview of your TV's menu system. To open the main menus (illustrated below and on the remote control or TV control panel. Icon Video Audio Preferences Locks Setup Item Mode Picture Settings Noise Reduction ColorMaster Game Mode...Settings Auto Input Input Labeling Channel Labeling Menu Language Channel Browser Setup Enable Rating Blocking Edit Rating Limits Channels Block Input Lock Front Panel Lock GameTimer® New PIN Code Installation CE-Link Setup Sleep Timer PC Settings Power-On Mode Option S Sports/Standard/Movie/Document...
... tables below ), press Y on the next page provide a quick overview of your TV's menu system. To open the main menus (illustrated below and on the remote control or TV control panel. Icon Video Audio Preferences Locks Setup Item Mode Picture Settings Noise Reduction ColorMaster Game Mode...Settings Auto Input Input Labeling Channel Labeling Menu Language Channel Browser Setup Enable Rating Blocking Edit Rating Limits Channels Block Input Lock Front Panel Lock GameTimer® New PIN Code Installation CE-Link Setup Sleep Timer PC Settings Power-On Mode Option S Sports/Standard/Movie/Document...

