Owner's Manual - English
Page 3
...Make sure the tie is dropped and the cabinet or enclosure surface has been damaged or the TV does not operate normally, take the following precautions: • ALWAYS turn off the TV and unplug the power cord to avoid possible electric shock or fire. • NEVER allow...sources such as a bookcase, built-in accordance with an extension cord, receptacle, or other open flames away from the damaged television. The LCD panel inside the TV contains glass and a toxic liquid. Installation, Care, and Service Installation Follow these instructions. 3) Heed all warnings. 4) Follow all instructions...
...Make sure the tie is dropped and the cabinet or enclosure surface has been damaged or the TV does not operate normally, take the following precautions: • ALWAYS turn off the TV and unplug the power cord to avoid possible electric shock or fire. • NEVER allow...sources such as a bookcase, built-in accordance with an extension cord, receptacle, or other open flames away from the damaged television. The LCD panel inside the TV contains glass and a toxic liquid. Installation, Care, and Service Installation Follow these instructions. 3) Heed all warnings. 4) Follow all instructions...
Owner's Manual - English
Page 4
... OF ELECTRIC SHOCK! This is normal, especially when the unit is being turned on or roll over the power cord, and never place the TV where the power cord is subject to determine that the TV is in safe operating condition. 39) The cold cathode fluorescent lamp in ... in a position where your TOSHIBA TV, follow the instructions in front of the National Electric Code). or b) cables, wires, or any home theater component connected to clean the LCD screen, follow these sounds become frequent or continuous, unplug the power cord and contact a Toshiba Authorized Service Center. 35) WARNING...
... OF ELECTRIC SHOCK! This is normal, especially when the unit is being turned on or roll over the power cord, and never place the TV where the power cord is subject to determine that the TV is in safe operating condition. 39) The cold cathode fluorescent lamp in ... in a position where your TOSHIBA TV, follow the instructions in front of the National Electric Code). or b) cables, wires, or any home theater component connected to clean the LCD screen, follow these sounds become frequent or continuous, unplug the power cord and contact a Toshiba Authorized Service Center. 35) WARNING...
Owner's Manual - English
Page 10
...pillar, or other devices. THIS TYPE OF DAMAGE IS NOT COVERED UNDER THE TOSHIBA WARRANTY. 3 Do not plug in standby mode, press POWER on the TV control panel or remote control to turn the TV off or on using the TV's features, see Chapters 6 and 7. 13 For help, refer to the .... 2 Observe the following when choosing a location for the TV: • Read "Important notes about the remote control" (- Chapter 1: Introduction Overview of steps for installing, setting up, and using your new TV Follow these steps to set up your LCD TV" (- page 36). 11 Programming channels into standby mode.
...pillar, or other devices. THIS TYPE OF DAMAGE IS NOT COVERED UNDER THE TOSHIBA WARRANTY. 3 Do not plug in standby mode, press POWER on the TV control panel or remote control to turn the TV off or on using the TV's features, see Chapters 6 and 7. 13 For help, refer to the .... 2 Observe the following when choosing a location for the TV: • Read "Important notes about the remote control" (- Chapter 1: Introduction Overview of steps for installing, setting up, and using your new TV Follow these steps to set up your LCD TV" (- page 36). 11 Programming channels into standby mode.
Owner's Manual - English
Page 11
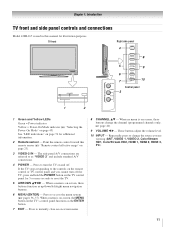
...8 CHANNEL Bb - When no menu is on-screen, these buttons change the source you cannot turn the TV on and off the TV, press and hold the POWER button on the TV control panel for additional information. 2 Remote sensor - "Selecting the Power-On Mode" on page ...connections are viewing (ANT, VIDEO 1, VIDEO 2, ColorStream HD1, ColorStream HD2, HDMI 1, HDMI 2, HDMI 3, PC). 11 These buttons adjust the volume level. 10 INPUT - TV front Right side panel 4 8 POWER 5 9 6 7 10 Control panel 3 1 2 1 Green and Yellow LEDs Green = Power indicator Yellow = Power-On Mode indicator...
...8 CHANNEL Bb - When no menu is on-screen, these buttons change the source you cannot turn the TV on and off the TV, press and hold the POWER button on the TV control panel for additional information. 2 Remote sensor - "Selecting the Power-On Mode" on page ...connections are viewing (ANT, VIDEO 1, VIDEO 2, ColorStream HD1, ColorStream HD2, HDMI 1, HDMI 2, HDMI 3, PC). 11 These buttons adjust the volume level. 10 INPUT - TV front Right side panel 4 8 POWER 5 9 6 7 10 Control panel 3 1 2 1 Green and Yellow LEDs Green = Power indicator Yellow = Power-On Mode indicator...
Owner's Manual - English
Page 14
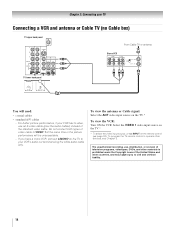
Select the VIDEO 1 video input source on the TV.* * To select the video input source, press INPUT on the TV.* To view the VCR: Turn ON the VCR. Chapter 2: Connecting your TV Connecting a VCR and antenna or Cable TV (no Cable box) TV upper back panel From Cable TV or antenna Stereo VCR VIDEO AUDIO L R IN CH 3 CH...
Select the VIDEO 1 video input source on the TV.* * To select the video input source, press INPUT on the TV.* To view the VCR: Turn ON the VCR. Chapter 2: Connecting your TV Connecting a VCR and antenna or Cable TV (no Cable box) TV upper back panel From Cable TV or antenna Stereo VCR VIDEO AUDIO L R IN CH 3 CH...
Owner's Manual - English
Page 15
... better picture performance than a standard (composite) video cable. page 24). To view basic and premium Cable channels: Turn OFF the VCR. To view the VCR: Turn ON the VCR. To program the TV remote control to change channels. Note: When you use a Cable box, you may subject you have a mono ...VCR, connect L/MONO on the TV. TV upper back panel From Cable TV Cable box IN CH 3 CH 4 OUT TV lower back panel stereo VCR...
... better picture performance than a standard (composite) video cable. page 24). To view basic and premium Cable channels: Turn OFF the VCR. To view the VCR: Turn ON the VCR. To program the TV remote control to change channels. Note: When you use a Cable box, you may subject you have a mono ...VCR, connect L/MONO on the TV. TV upper back panel From Cable TV Cable box IN CH 3 CH 4 OUT TV lower back panel stereo VCR...
Owner's Manual - English
Page 16
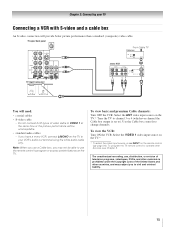
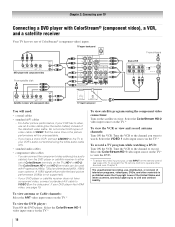
... cable to VIDEO 2 on the remote control (- If your VCR's audio out terminal using the component video connections: Turn on the TV.* To view the VCR or view and record antenna channels: Turn ON the VCR. If your VCR has S-video, use , distribution, or revision of television programs, videotapes, DVDs,... subject you want to operate other materials is not supported). - Select the VIDEO 1 video input source on the TV.* To view the DVD player: Turn ON the DVD player. TV upper back panel From antenna Y PB PR COMPONENT VIDEO S-VIDEO VIDEO OUT OUT DVD player with ColorStream® (...
... cable to VIDEO 2 on the remote control (- If your VCR's audio out terminal using the component video connections: Turn on the TV.* To view the VCR or view and record antenna channels: Turn ON the VCR. If your VCR has S-video, use , distribution, or revision of television programs, videotapes, DVDs,... subject you want to operate other materials is not supported). - Select the VIDEO 1 video input source on the TV.* To view the DVD player: Turn ON the DVD player. TV upper back panel From antenna Y PB PR COMPONENT VIDEO S-VIDEO VIDEO OUT OUT DVD player with ColorStream® (...
Owner's Manual - English
Page 17
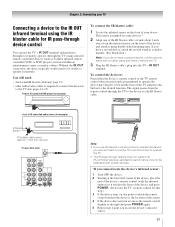
... OUT terminal. To control the device(s): Point either the device's remote control or the TV remote control (that you cannot locate the device's infrared sensor: 1 Turn OFF the device. 2 Starting at the lower left corner of the device, place the end of the device's remote control (with...use the TV's remote control for example) Infrared sensor IR blaster cable wand (approx.1 inch from the infrared sensor on , move the remote control slightly to operate the device, you locate the device's infrared sensor. 17 page 13) • other audio/video cables as Toshiba infrared ...
... OUT terminal. To control the device(s): Point either the device's remote control or the TV remote control (that you cannot locate the device's infrared sensor: 1 Turn OFF the device. 2 Starting at the lower left corner of the device, place the end of the device's remote control (with...use the TV's remote control for example) Infrared sensor IR blaster cable wand (approx.1 inch from the infrared sensor on , move the remote control slightly to operate the device, you locate the device's infrared sensor. 17 page 13) • other audio/video cables as Toshiba infrared ...
Owner's Manual - English
Page 19
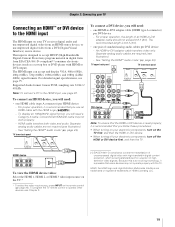
... cables are required (see illustration). - The recommended length is possible that you follow these procedures: • When turning on your electronic components, turn off your TV receives digital audio and uncompressed digital video from an HDMI source device, or uncompressed digital video from EIA/CEA-861-D-compliant... the HDMI input The HDMI input on your electronic components, turn on the TV first, and then the HDMI or DVI device. • When turning off the HDMI or DVI device first, and then the TV. Conventional HDMI/DVI cable may not operate properly with high-bandwidth...
... cables are required (see illustration). - The recommended length is possible that you follow these procedures: • When turning on your electronic components, turn off your TV receives digital audio and uncompressed digital video from an HDMI source device, or uncompressed digital video from EIA/CEA-861-D-compliant... the HDMI input The HDMI input on your electronic components, turn on the TV first, and then the HDMI or DVI device. • When turning off the HDMI or DVI device first, and then the TV. Conventional HDMI/DVI cable may not operate properly with high-bandwidth...
Owner's Manual - English
Page 21
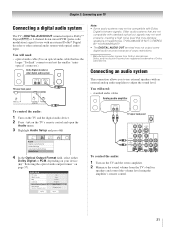
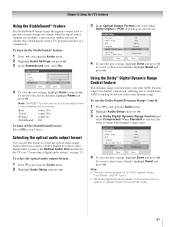
...). You will need : • standard audio cables Analog audio amplifier To control the audio: 1 Turn on the TV and the digital audio device. 2 Press Y on your TV Connecting a digital audio system The TV's DIGITAL AUDIO OUT terminal outputs a Dolby®* Digital g or 2-channel down-mixed PCM (pulse-... Audio Settings Advanced Audio Settings Audio Setup 4 In the Optical Output Format field, select either Dolby Digital or PCM, depending on the TV's remote control and open the Audio menu. 3 Highlight Audio Setup and press T. Dolby, and the double-D symbol are not compatible with...
...). You will need : • standard audio cables Analog audio amplifier To control the audio: 1 Turn on the TV and the digital audio device. 2 Press Y on your TV Connecting a digital audio system The TV's DIGITAL AUDIO OUT terminal outputs a Dolby®* Digital g or 2-channel down-mixed PCM (pulse-... Audio Settings Advanced Audio Settings Audio Setup 4 In the Optical Output Format field, select either Dolby Digital or PCM, depending on the TV's remote control and open the Audio menu. 3 Highlight Audio Setup and press T. Dolby, and the double-D symbol are not compatible with...
Owner's Manual - English
Page 24
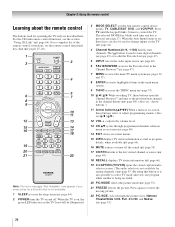
For a complete list of the remote control's functions, see the section "Using CE-Link" (- page 64). 2 POWER turns the TV on the TV (- Press TV until the keypad blinks 3 times to edit the Favorite List (- pages 36 and 37). 8 ENTER activates highlighted items in the Channel Browser™ (-.../next channel in the channel history (- page 40). 14 EXIT closes on the TV front will be used to the last viewed channel or source (page 49). 18 RECALL displays TV status information (- page 66). 16 MUTE reduces or turns off . page 53). 21 FREEZE freezes the picture. page 41). 4 Channel ...
For a complete list of the remote control's functions, see the section "Using CE-Link" (- page 64). 2 POWER turns the TV on the TV (- Press TV until the keypad blinks 3 times to edit the Favorite List (- pages 36 and 37). 8 ENTER activates highlighted items in the Channel Browser™ (-.../next channel in the channel history (- page 40). 14 EXIT closes on the TV front will be used to the last viewed channel or source (page 49). 18 RECALL displays TV status information (- page 66). 16 MUTE reduces or turns off . page 53). 21 FREEZE freezes the picture. page 41). 4 Channel ...
Owner's Manual - English
Page 42
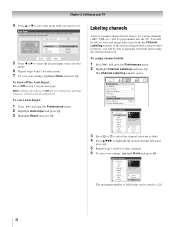
... Y and open the Preferences menu. 2 Highlight Channel Labeling and press T. To turn off the Auto Input: Select Off in the list, you will be able to view and assign these logos from the Channel Labeling window. Chapter 5: Setting up your TV 4 Press B or b to select the mode field you want to set.
... Y and open the Preferences menu. 2 Highlight Channel Labeling and press T. To turn off the Auto Input: Select Off in the list, you will be able to view and assign these logos from the Channel Labeling window. Chapter 5: Setting up your TV 4 Press B or b to select the mode field you want to set.
Owner's Manual - English
Page 45
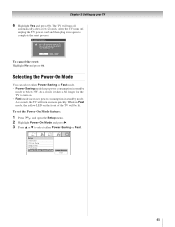
.... To set the Power-On Mode feature: 1 Press Y, and open the Setup menu. 2 Highlight Power-On Mode and press c. 3 Press B or b to below 3W. The TV will be lit. After the TV turns off , unplug it and plug it back in Fast mode, the yellow LED on the front of the... Yes and press T. No Yes To cancel the reset: Highlight No and press T. After the TV turns off , unplug the TV power cord and then plug it takes a bit longer for the TV to complete the reset process. System Information Press YES to complete the reset. Setup Installation CE-Link Setup Sleep Timer PC...
.... To set the Power-On Mode feature: 1 Press Y, and open the Setup menu. 2 Highlight Power-On Mode and press c. 3 Press B or b to below 3W. The TV will be lit. After the TV turns off , unplug it and plug it back in Fast mode, the yellow LED on the front of the... Yes and press T. No Yes To cancel the reset: Highlight No and press T. After the TV turns off , unplug the TV power cord and then plug it takes a bit longer for the TV to complete the reset process. System Information Press YES to complete the reset. Setup Installation CE-Link Setup Sleep Timer PC...
Owner's Manual - English
Page 48
.../inputs are "shifted" to On and the Power-On Mode (- When History List is turned off cycle. If Favorites List is set to the left side. To tune to a channel or input in Select mode: 1 While watching TV, press 3 C or # c to open the Channel Browser™ and surf back to a ... stop on the remote control. Any channel or input that are turned off the left , eventually moving off , pressing 3 C, # c, or n will automatically tune to the next item in the list. To tune to a channel or input in Browse mode: 1 While watching TV, press 3 C or # c to open the Channel Browser™...
.../inputs are "shifted" to On and the Power-On Mode (- When History List is turned off cycle. If Favorites List is set to the left side. To tune to a channel or input in Select mode: 1 While watching TV, press 3 C or # c to open the Channel Browser™ and surf back to a ... stop on the remote control. Any channel or input that are turned off the left , eventually moving off , pressing 3 C, # c, or n will automatically tune to the next item in the list. To tune to a channel or input in Browse mode: 1 While watching TV, press 3 C or # c to open the Channel Browser™...
Owner's Manual - English
Page 49
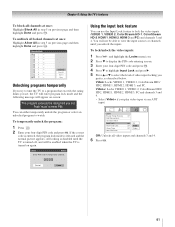
..." one time only. Tuning to a specific channel (programmed or unprogrammed) Tuning analog channels: Press the Channel Number (0-9) on the remote control or TV control panel. Note: If a digital channel is not programmed-either through the automatic channel scan (- Note: If you press R, the memorized channel ...Once 32 channels or inputs are stored in the Channel Browser Setup is set to "Power Off Clear (On)," turning off the TV will clear the History List. Chapter 6: Using the TV's features Clearing channels from the list when a new channel or input is tuned. • If History List...
..." one time only. Tuning to a specific channel (programmed or unprogrammed) Tuning analog channels: Press the Channel Number (0-9) on the remote control or TV control panel. Note: If a digital channel is not programmed-either through the automatic channel scan (- Note: If you press R, the memorized channel ...Once 32 channels or inputs are stored in the Channel Browser Setup is set to "Power Off Clear (On)," turning off the TV will clear the History List. Chapter 6: Using the TV's features Clearing channels from the list when a new channel or input is tuned. • If History List...

Owner's Manual - English
Page 52
...your private viewing may subject you to civil and criminal liability. 52 To set the Cinema Mode to the factory defaults, highlight Reset and press T. Note: If the TV is not applicable to antenna or cable input sources. To turn on page 50. To revert to Film. Chapter 6: Using the... TV's features Using the auto aspect ratio feature When the auto aspect ratio feature is...
...your private viewing may subject you to civil and criminal liability. 52 To set the Cinema Mode to the factory defaults, highlight Reset and press T. Note: If the TV is not applicable to antenna or cable input sources. To turn on page 50. To revert to Film. Chapter 6: Using the... TV's features Using the auto aspect ratio feature When the auto aspect ratio feature is...

Owner's Manual - English
Page 54
...Auto Auto Auto Auto Auto Auto ABC123 Done Preview window 4 To save the new settings, highlight Done and press T. Chapter 6: Using the TV's features Using the closed caption mode Base closed captions The closed caption mode has two options: • Captions-An on-screen display of the... dialogue, narration, and sound effects of TV programs and videos that characteristic (see table below). w. To revert to Off. • To turn off the closed caption mode: Select Off in step 3 above. 54 Note: A closed caption mode and...
...Auto Auto Auto Auto Auto Auto ABC123 Done Preview window 4 To save the new settings, highlight Done and press T. Chapter 6: Using the TV's features Using the closed caption mode Base closed captions The closed caption mode has two options: • Captions-An on-screen display of the... dialogue, narration, and sound effects of TV programs and videos that characteristic (see table below). w. To revert to Off. • To turn off the closed caption mode: Select Off in step 3 above. 54 Note: A closed caption mode and...
Owner's Manual - English
Page 55
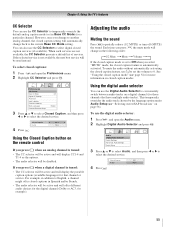
... Y and open the Preferences menu. 2 Highlight CC Selector and press T. CC 1 None 55 Adjusting the audio Muting the sound Press W to partially reduce (1/2 MUTE) or turn off (MUTE) the sound. Using the digital audio selector You can use the Digital Audio Selector to conveniently switch between audio tracks on closed caption...
... Y and open the Preferences menu. 2 Highlight CC Selector and press T. CC 1 None 55 Adjusting the audio Muting the sound Press W to partially reduce (1/2 MUTE) or turn off (MUTE) the sound. Using the digital audio selector You can use the Digital Audio Selector to conveniently switch between audio tracks on closed caption...
Owner's Manual - English
Page 57
...57 Audio Settings Bass Treble Balance StableSound Reset 100 100 0 On Done 4 To save the new settings, highlight Done and press T. To turn off the StableSound feature: Select Off in step 3 above. Audio Setup PC Audio HDMI 1 Audio MTS Language Optical Output Format Dolby Digital ... the factory defaults, highlight Reset and press T. When Standard is selected, the audio is output with minimal compression. Chapter 6: Using the TV's features Using the StableSound® feature The StableSound® feature limits the highest volume level to prevent extreme changes in volume when the...
...57 Audio Settings Bass Treble Balance StableSound Reset 100 100 0 On Done 4 To save the new settings, highlight Done and press T. To turn off the StableSound feature: Select Off in step 3 above. Audio Setup PC Audio HDMI 1 Audio MTS Language Optical Output Format Dolby Digital ... the factory defaults, highlight Reset and press T. When Standard is selected, the audio is output with minimal compression. Chapter 6: Using the TV's features Using the StableSound® feature The StableSound® feature limits the highest volume level to prevent extreme changes in volume when the...
Owner's Manual - English
Page 61
...channels 3 and 4. To unblock all video inputs and channels 3 and 4. 6 Press T. 61 If the correct code is entered, the program lock mode is turned on -screen: This program exceeds the rating limit you prefer, as described below. Channels Block 1 2 3 4 5 6 7 8 9 10 Allow All ...Block All Cancel Done Unlocking programs temporarily If you try to tune the TV to view the input sources or channels until the TV is turned off, and will not be enabled when the TV is released and the normal picture appears. Video+: Locks VIDEO 1, VIDEO 2, ColorStream HD1/ HD2, HDMI...
...channels 3 and 4. To unblock all video inputs and channels 3 and 4. 6 Press T. 61 If the correct code is entered, the program lock mode is turned on -screen: This program exceeds the rating limit you prefer, as described below. Channels Block 1 2 3 4 5 6 7 8 9 10 Allow All ...Block All Cancel Done Unlocking programs temporarily If you try to tune the TV to view the input sources or channels until the TV is turned off, and will not be enabled when the TV is released and the normal picture appears. Video+: Locks VIDEO 1, VIDEO 2, ColorStream HD1/ HD2, HDMI...

