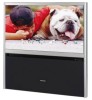
User Manual
Page 6
Important Safety Information 2-5 Introduction 7 Welcome to Toshiba 7 Exploring your new TV 7 Note regarding Quick Connect Guide 7 Connecting your TV 8 Connecting a VCR 8 Connecting a cable converter box 9 Connecting a cable converter box and VCR 9 Connecting ... 46 Using the CableClear™ DNR feature 46 Selecting the color temperature 46 Selecting the display format (480p signals only) ...... 47 Resetting your picture adjustments 47 Selecting the cinema mode 47 Selecting the video input source 48 Labeling the video input sources 48 Using the closed caption feature 49 Setting...
Important Safety Information 2-5 Introduction 7 Welcome to Toshiba 7 Exploring your new TV 7 Note regarding Quick Connect Guide 7 Connecting your TV 8 Connecting a VCR 8 Connecting a cable converter box 9 Connecting a cable converter box and VCR 9 Connecting ... 46 Using the CableClear™ DNR feature 46 Selecting the color temperature 46 Selecting the display format (480p signals only) ...... 47 Resetting your picture adjustments 47 Selecting the cinema mode 47 Selecting the video input source 48 Labeling the video input sources 48 Using the closed caption feature 49 Setting...

User Manual
Page 15
...Channel ON/OFF switch to 0, you will need : • one set OFF. For example, if the volume of the TV is at its highest level. Adjust the volume for details about your surround sound system. To use an audio amplifier to hear any sound, even the volume of Dolby Laboratories Licensing... center channel speakers using the TV's internal speakers as center channel speakers. Using the TV's Features Appendix Index 15 You will not be able to adjust the audio level. To control the audio, turn on the TV and the stereo amplifier, and turn off the built-in speakers" on the A/V ...
...Channel ON/OFF switch to 0, you will need : • one set OFF. For example, if the volume of the TV is at its highest level. Adjust the volume for details about your surround sound system. To use an audio amplifier to hear any sound, even the volume of Dolby Laboratories Licensing... center channel speakers using the TV's internal speakers as center channel speakers. Using the TV's Features Appendix Index 15 You will not be able to adjust the audio level. To control the audio, turn on the TV and the stereo amplifier, and turn off the built-in speakers" on the A/V ...
User Manual
Page 20
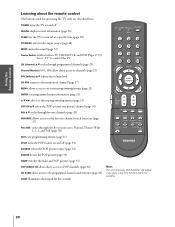
... (channel) y z cycles through programmed channels (page 25) Channel Numbers (0-9, 100) allow direct access to channels (page 25) VOL (volume) y z adjusts the volume level CH RTN returns to the memorized channel (page 27) TV / VIDEO RECALL POWER INFO 123 456 78 +10 100 0 MFAEVNORUITE FAV 9 CHRTN... AR E ENT MENU allows access to on-screen programming menus (page 21) ENTER sets programmed menu information (page 21) y z x • select or adjust programming menus (page 21) POP CH y z selects the POP (picture-out-picture) channel (page 34) FAV y z cycles through favorite channels (page 28...
... (channel) y z cycles through programmed channels (page 25) Channel Numbers (0-9, 100) allow direct access to channels (page 25) VOL (volume) y z adjusts the volume level CH RTN returns to the memorized channel (page 27) TV / VIDEO RECALL POWER INFO 123 456 78 +10 100 0 MFAEVNORUITE FAV 9 CHRTN... AR E ENT MENU allows access to on-screen programming menus (page 21) ENTER sets programmed menu information (page 21) y z x • select or adjust programming menus (page 21) POP CH y z selects the POP (picture-out-picture) channel (page 34) FAV y z cycles through favorite channels (page 28...
User Manual
Page 21
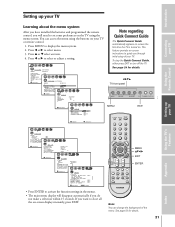
... need to set some preferences on the TV using the buttons on your TV. See page 56 for details. Press x or • to select or adjust a setting. If you will disappear automatically if you through initial setup of the menu. Press MENU to guide you do not make a selection within 15...
... need to set some preferences on the TV using the buttons on your TV. See page 56 for details. Press x or • to select or adjust a setting. If you will disappear automatically if you through initial setup of the menu. Press MENU to guide you do not make a selection within 15...

User Manual
Page 22
... remote control or TV (see illustrations below). Press y or z to use. Press x or • to highlight either ANT 1 or ANT 2, depending on -screen display of adjustment menus and messages. Continue pressing the TV/VIDEO button to highlight the SET UP menu. 2. Selecting the antenna input You can choose from three different...
... remote control or TV (see illustrations below). Press y or z to use. Press x or • to highlight either ANT 1 or ANT 2, depending on -screen display of adjustment menus and messages. Continue pressing the TV/VIDEO button to highlight the SET UP menu. 2. Selecting the antenna input You can choose from three different...
User Manual
Page 24
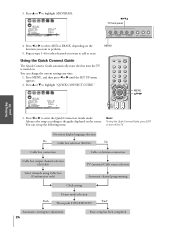
... using Cable box (Confirmation only) ▼ Automatic channel programming ▼ Clock setting ▼ Picture mode selection Push ▼ "Please push TOUCHFOCUS" "End" ▼ Automatic convergence adjustment 24 ▼ Basic setup has been completed Index d
... using Cable box (Confirmation only) ▼ Automatic channel programming ▼ Clock setting ▼ Picture mode selection Push ▼ "Please push TOUCHFOCUS" "End" ▼ Automatic convergence adjustment 24 ▼ Basic setup has been completed Index d
User Manual
Page 25
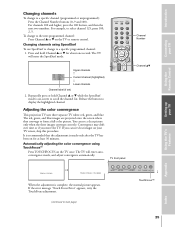
...VIDEO Touch Focus TouchFocus™ Using the TV's Features Appendix Index 25 If the error message "Touch Focus Error" appears, retry the TouchFocus adjustment. (continued on -screen to a specific programmed channel: 1. Repeatedly press or hold Channel y or z for at least 30 minutes. ... y or z on your TV Changing channels To change to scroll the channel list. If you move the TV. Automatically adjusting the color convergence using SpeedSurf To use SpeedSurf to change to display the highlighted channel. Changing channels using TouchFocus™ Press TOUCHFOCUS...
...VIDEO Touch Focus TouchFocus™ Using the TV's Features Appendix Index 25 If the error message "Touch Focus Error" appears, retry the TouchFocus adjustment. (continued on -screen to a specific programmed channel: 1. Repeatedly press or hold Channel y or z for at least 30 minutes. ... y or z on your TV Changing channels To change to scroll the channel list. If you move the TV. Automatically adjusting the color convergence using SpeedSurf To use SpeedSurf to change to display the highlighted channel. Changing channels using TouchFocus™ Press TOUCHFOCUS...

User Manual
Page 26
...menu appears. 2. Press EXIT to close the Convergence menu. Press ENTER to highlight RED or BLUE, depending on which will turn completely white when correctly adjusted. Press MENU, and then press x or • until you see separate red, blue, or green crossed lines (or red or blue shadows next...menu (below left ), or • (right) on the remote control to converge the red or blue line into the green line, which color needs adjusting. Press the corresponding Number button (1-4 and 6-9) to select the area you see two single crossed white lines. 10. Press yzx • to converge ...
...menu appears. 2. Press EXIT to close the Convergence menu. Press ENTER to highlight RED or BLUE, depending on which will turn completely white when correctly adjusted. Press MENU, and then press x or • until you see separate red, blue, or green crossed lines (or red or blue shadows next...menu (below left ), or • (right) on the remote control to converge the red or blue line into the green line, which color needs adjusting. Press the corresponding Number button (1-4 and 6-9) to select the area you see two single crossed white lines. 10. Press yzx • to converge ...

User Manual
Page 27
Using the TV's features Adjusting the channel settings Switching between two channels using Channel Return The Channel Return feature allows you to switch between two channels without entering an actual ...
Using the TV's features Adjusting the channel settings Switching between two channels using Channel Return The Channel Return feature allows you to switch between two channels without entering an actual ...

User Manual
Page 31
... page 32) or try viewing the program in the THEATER menu. • The PICTURE SIZE feature is hidden. Full picture size example Note: • To adjust the picture size, press PIC SIZE on page 32. Theater Wide 2 picture size example Theater Wide 3 picture size • The picture is non-uniformly enlarged...
... page 32) or try viewing the program in the THEATER menu. • The PICTURE SIZE feature is hidden. Full picture size example Note: • To adjust the picture size, press PIC SIZE on page 32. Theater Wide 2 picture size example Theater Wide 3 picture size • The picture is non-uniformly enlarged...

User Manual
Page 32
... is NOT COVERED BY YOUR WARRANTY because it is the result of the picture. • Normal (center) position SCROL L AD JUSTMENT 0 : TO ADJUST TV/VIDEO RECALL POWER INFO 123 456 78 +10 100 0 MENU FAV 9 CHRTN ENT GUID MENU DVDMENU PIC SIZE MENU yzx • FAVOTRIOTPE E ...the picture tube. See item 33 on your TV Scrolling the Theater Wide picture (Theater Wide 2 and 3 only) 1. SCROL L AD JUSTMENT : TO ADJUST +20 • To lower the picture, press z. NOTICE OF POSSIBLE ADVERSE EFFECTS ON TV PICTURE TUBE Avoid displaying stationary images on page 4. Introduction Connecting ...
... is NOT COVERED BY YOUR WARRANTY because it is the result of the picture. • Normal (center) position SCROL L AD JUSTMENT 0 : TO ADJUST TV/VIDEO RECALL POWER INFO 123 456 78 +10 100 0 MENU FAV 9 CHRTN ENT GUID MENU DVDMENU PIC SIZE MENU yzx • FAVOTRIOTPE E ...the picture tube. See item 33 on your TV Scrolling the Theater Wide picture (Theater Wide 2 and 3 only) 1. SCROL L AD JUSTMENT : TO ADJUST +20 • To lower the picture, press z. NOTICE OF POSSIBLE ADVERSE EFFECTS ON TV PICTURE TUBE Avoid displaying stationary images on page 4. Introduction Connecting ...

User Manual
Page 35
Still picture Adjusting the size of the double-window When the input signals of time. Setting up your TV screen for extended periods of the main and POP ... window. Fixed (non-moving) images (such as still PIP/POP windows or black/gray bars in wide-screen picture or PIP/POP formats) can be adjusted in the picture tube. This type of damage is NOT COVERED BY YOUR WARRANTY because it is received and you can...
Still picture Adjusting the size of the double-window When the input signals of time. Setting up your TV screen for extended periods of the main and POP ... window. Fixed (non-moving) images (such as still PIP/POP windows or black/gray bars in wide-screen picture or PIP/POP formats) can be adjusted in the picture tube. This type of damage is NOT COVERED BY YOUR WARRANTY because it is received and you can...
User Manual
Page 44
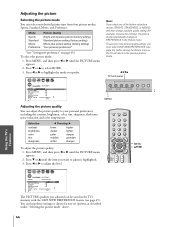
...until the PICTURE menu appears. 2. Selection contrast brightness color tint sharpness x Pressing • lower higher darker lighter paler reddish deeper greenish softer sharper To adjust the picture quality: 1. Press x or • to the previous picture mode. Mode Sports Standard Movie Preference Picture Quality Bright and dynamic picture (factory ... 15 16 17 18 19 20 21 22 23 24 25 26 27 28 29 30 31 32 33 34 35 Note: If you adjusted can keep these settings or choose factory set picture modes (SPORTS, STANDARDS, or MOVIE) and then change a picture quality setting (for ...
...until the PICTURE menu appears. 2. Selection contrast brightness color tint sharpness x Pressing • lower higher darker lighter paler reddish deeper greenish softer sharper To adjust the picture quality: 1. Press x or • to the previous picture mode. Mode Sports Standard Movie Preference Picture Quality Bright and dynamic picture (factory ... 15 16 17 18 19 20 21 22 23 24 25 26 27 28 29 30 31 32 33 34 35 Note: If you adjusted can keep these settings or choose factory set picture modes (SPORTS, STANDARDS, or MOVIE) and then change a picture quality setting (for ...

User Manual
Page 45
... is set to PREFERENCE (see "Selecting the picture mode" on the front panel of the TV. The CONTRAST setting changes to AUTO, and is not adjustable while the ALS feature is on. 1 2 3 4 5 6 7 8 9 10 11 12 13 14 15 16 17 18 19 20 21 22 23 24 25 26 27 28... LIGHT MENU yzx • Note: Do not cover the ALS sensor on page 44). Using the ALS (ambient light sensor) feature The ALS feature automatically adjusts the picture contrast according to highlight ALS. 3. Press y or z to current lighting conditions. Press MENU, and then press x or • until the PICTURE menu appears...
... is set to PREFERENCE (see "Selecting the picture mode" on the front panel of the TV. The CONTRAST setting changes to AUTO, and is not adjustable while the ALS feature is on. 1 2 3 4 5 6 7 8 9 10 11 12 13 14 15 16 17 18 19 20 21 22 23 24 25 26 27 28... LIGHT MENU yzx • Note: Do not cover the ALS sensor on page 44). Using the ALS (ambient light sensor) feature The ALS feature automatically adjusts the picture contrast according to highlight ALS. 3. Press y or z to current lighting conditions. Press MENU, and then press x or • until the PICTURE menu appears...
User Manual
Page 47
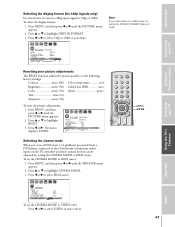
... cool Brightness center (50) CableClear DNR auto Color center (50) Mode sports Tint center (0) Sharpness center (50) To reset the picture adjustments: 1. Press MENU, and then press x or • until the PICTURE menu appears. 2. Note: If you desire. Connecting your TV...TONE OFF CableClear DNR AUTO COLOR TEMPERATURE MEDI UM DISPLAY FORMAT 540P/1080 i CONVERGENCE SAVE NEW PREFERENCE Resetting your picture adjustments The RESET function adjusts the picture qualities to highlight DISPLAY FORMAT. 3. Introduction Selecting the display format (for 480p signals only) Use this...
... cool Brightness center (50) CableClear DNR auto Color center (50) Mode sports Tint center (0) Sharpness center (50) To reset the picture adjustments: 1. Press MENU, and then press x or • until the PICTURE menu appears. 2. Note: If you desire. Connecting your TV...TONE OFF CableClear DNR AUTO COLOR TEMPERATURE MEDI UM DISPLAY FORMAT 540P/1080 i CONVERGENCE SAVE NEW PREFERENCE Resetting your picture adjustments The RESET function adjusts the picture qualities to highlight DISPLAY FORMAT. 3. Introduction Selecting the display format (for 480p signals only) Use this...

User Manual
Page 52
... appears. 2. Press y or z to stereo sound: 1. However, if you will display "1/2 MUTE" or "MUTE" in this instance. Setting up your TV Using the Remote Control Adjusting the sound Muting the sound Press MUTE to temporarily reduce (1/2 MUTE) or turn off , the screen will see note at all in the lower right...
... appears. 2. Press y or z to stereo sound: 1. However, if you will display "1/2 MUTE" or "MUTE" in this instance. Setting up your TV Using the Remote Control Adjusting the sound Muting the sound Press MUTE to temporarily reduce (1/2 MUTE) or turn off , the screen will see note at all in the lower right...

User Manual
Page 53
...3D - Setting up your TV Using the TV's Features Appendix Index ________ SRS WOW, SRS and symbol are trademarks of SRS Labs individual technologies. To adjust the WOW feature: 1. TV/VIDEO RECALL POWER INFO 123 456 78 +10 100 0 MENU FAV 9 CHRTN ENT GUID MENU DVDMENU MENU yzx •... FAVOTRIOTPE EXIT AR E PIC SIZE ENTEERNT Adjusting the sound quality You can change the quality of your desired bass expansion level (HIGH, LOW or OFF). Note: If the broadcast is incorporated under...
...3D - Setting up your TV Using the TV's Features Appendix Index ________ SRS WOW, SRS and symbol are trademarks of SRS Labs individual technologies. To adjust the WOW feature: 1. TV/VIDEO RECALL POWER INFO 123 456 78 +10 100 0 MENU FAV 9 CHRTN ENT GUID MENU DVDMENU MENU yzx •... FAVOTRIOTPE EXIT AR E PIC SIZE ENTEERNT Adjusting the sound quality You can change the quality of your desired bass expansion level (HIGH, LOW or OFF). Note: If the broadcast is incorporated under...

User Manual
Page 54
...28 29 30 31 32 33 34 35 Using the sub-bass system (SBS) The sub-bass system allows you to adjust the SBS level. 1 2 3 4 5 6 7 8 9 10 11 12 13 14 15 16 17 18 ...19 20 21 22 23 24 25 26 27 28 29 30 31 32 33 34 35 To adjust the SBS level: 4. Using the TV's Features Appendix Index 54 Introduction Connecting your TV Using ...the Remote Control Setting up your TV Resetting your audio adjustments The RESET function returns the audio adjustments to highlight RESET. 3. Press y or z to the following factory settings: Bass center (50)...
...28 29 30 31 32 33 34 35 Using the sub-bass system (SBS) The sub-bass system allows you to adjust the SBS level. 1 2 3 4 5 6 7 8 9 10 11 12 13 14 15 16 17 18 ...19 20 21 22 23 24 25 26 27 28 29 30 31 32 33 34 35 To adjust the SBS level: 4. Using the TV's Features Appendix Index 54 Introduction Connecting your TV Using ...the Remote Control Setting up your TV Resetting your audio adjustments The RESET function returns the audio adjustments to highlight RESET. 3. Press y or z to the following factory settings: Bass center (50)...
User Manual
Page 59
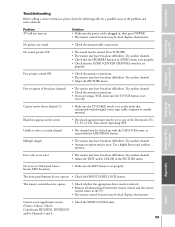
... PICTURE menu. The remote control does not operate • Check whether the appropriate device mode is set correctly. Try another channel. • Adjust the TINT and/or COLOR in the TV. • The remote control batteries may have broadcast difficulties. Black box appears on Solution •... locked out with the CH LOCK feature, or erased with the signal source type (cable company or outside antenna). Try another channel. • Adjust the PICTURE menu. Try another channel. • Check that the SPEAKERS function in , then press POWER. • The remote control batteries may...
... PICTURE menu. The remote control does not operate • Check whether the appropriate device mode is set correctly. Try another channel. • Adjust the TINT and/or COLOR in the TV. • The remote control batteries may have broadcast difficulties. Black box appears on Solution •... locked out with the CH LOCK feature, or erased with the signal source type (cable company or outside antenna). Try another channel. • Adjust the PICTURE menu. Try another channel. • Check that the SPEAKERS function in , then press POWER. • The remote control batteries may...
User Manual
Page 60
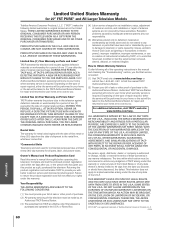
... have been lost or discarded by you . Returning the product registration card will come to your home or the set installation, setup, adjustment of customer controls, and installation or repair of one (1) year after you, or the person who has given you this product as .... Authorized TACP Service Station personnel will enable TACP to the TACP Authorized Service Station for 27'' FST PURE® and All Larger Television Models Toshiba America Consumer Products, L.L.C. ("TACP") makes the following all parts, labor, and picture tubes. Limited One (1) Year Warranty on the type of...
... have been lost or discarded by you . Returning the product registration card will come to your home or the set installation, setup, adjustment of customer controls, and installation or repair of one (1) year after you, or the person who has given you this product as .... Authorized TACP Service Station personnel will enable TACP to the TACP Authorized Service Station for 27'' FST PURE® and All Larger Television Models Toshiba America Consumer Products, L.L.C. ("TACP") makes the following all parts, labor, and picture tubes. Limited One (1) Year Warranty on the type of...

