

User's Guide for L1350U and L2300U Series TV's
Page 8
... there may increase energy consumption, possibly beyond the limits required for help. Note: Interactive video games that to [Home] mode settings, select [Standard] picture mode. [Standard] mode is connected. • Consult the dealer or an experienced radio/TV technician for.... ENERGY STAR® qualified TV. 8 FCC Declaration of Conformity Compliance Statement (Part 15): Toshiba 23L1350U, 29L1350U, 32L1350U, 39L1350U, 50L1350U, 23L2300U, 32L2300U, 39L2300U, 50L2300U Television models comply with Part 15 of precision technology; ENERGY STAR® User Information ENERGY STAR...
... there may increase energy consumption, possibly beyond the limits required for help. Note: Interactive video games that to [Home] mode settings, select [Standard] picture mode. [Standard] mode is connected. • Consult the dealer or an experienced radio/TV technician for.... ENERGY STAR® qualified TV. 8 FCC Declaration of Conformity Compliance Statement (Part 15): Toshiba 23L1350U, 29L1350U, 32L1350U, 39L1350U, 50L1350U, 23L2300U, 32L2300U, 39L2300U, 50L2300U Television models comply with Part 15 of precision technology; ENERGY STAR® User Information ENERGY STAR...

User's Guide for L1350U and L2300U Series TV's
Page 11
...37 Learning about the remote control 38 Chapter 4: Menu Layout and Navigation 41 Main menu layout 41 Navigating the menu system 43 Chapter 5: Setting up your TV 44 Initial Setup 44 Installation setup selection 45 Storing channels in memory (optional 46 Auto Tuning 46 Manual Tuning 48... Setting channel skip 48 Setting the AV input mode 49 Setting the HDMITM audio mode 50 Setting the time zone 51 Viewing the system status 51 Resetting Factory Defaults 51 Chapter 6: Setting up your TV 52 Selecting the video input source 52
...37 Learning about the remote control 38 Chapter 4: Menu Layout and Navigation 41 Main menu layout 41 Navigating the menu system 43 Chapter 5: Setting up your TV 44 Initial Setup 44 Installation setup selection 45 Storing channels in memory (optional 46 Auto Tuning 46 Manual Tuning 48... Setting channel skip 48 Setting the AV input mode 49 Setting the HDMITM audio mode 50 Setting the time zone 51 Viewing the system status 51 Resetting Factory Defaults 51 Chapter 6: Setting up your TV 52 Selecting the video input source 52
User's Guide for L1350U and L2300U Series TV's
Page 12
... 66 Adjusting the picture 67 Selecting the picture mode 67 Adjusting the picture quality 68 Using closed captions 69 Base closed captions 69 Digital CC settings 70 Adjusting the audio 71 Muting the sound 71
... 66 Adjusting the picture 67 Selecting the picture mode 67 Adjusting the picture quality 68 Using closed captions 69 Base closed captions 69 Digital CC settings 70 Adjusting the audio 71 Muting the sound 71
User's Guide for L1350U and L2300U Series TV's
Page 13
... temporarily 80 Using the input lock feature 80 Locking channels 81 Using the GameTimer 81 Using the panel lock feature 82 Using the PC settings feature 83 Setting the PC Audio 84 Using the Media Player 85 Auto Start function 86 To open the Media Player 86 Playing music files 89 Viewing... photo files and playing music files at the same time 90 Sorting photo or music files 90 Setting the sleep timer 91 No Signal Power Down 92 Using HDMITM CEC 92
... temporarily 80 Using the input lock feature 80 Locking channels 81 Using the GameTimer 81 Using the panel lock feature 82 Using the PC settings feature 83 Setting the PC Audio 84 Using the Media Player 85 Auto Start function 86 To open the Media Player 86 Playing music files 89 Viewing... photo files and playing music files at the same time 90 Sorting photo or music files 90 Setting the sleep timer 91 No Signal Power Down 92 Using HDMITM CEC 92
User's Guide for L1350U and L2300U Series TV's
Page 14
14 Contents HDMITM CEC playback device (DVD player, etc.) control 93 Other HDMITM CEC functions 95 Setting up HDMITM CEC 95 Using the HDMITM settings feature 95 Using the HDMITM settings feature 96 HDMITM 1(2, or 3) RGB Range 96 HDMITM Information Display 96 Displaying TV status information...97 Chapter 7: Using the TV's Advanced Features 98 Using the advanced picture settings 98 ColorMaster 98 Base Color Adjustment 98 Color Temperature 99 Static Gamma 99 Auto Brightness Sensor (for 39/50L2300U and 39/50L1350U)........100 DynaLight 100 Dynamic Contrast 100 ClearScan® (for 32...
14 Contents HDMITM CEC playback device (DVD player, etc.) control 93 Other HDMITM CEC functions 95 Setting up HDMITM CEC 95 Using the HDMITM settings feature 95 Using the HDMITM settings feature 96 HDMITM 1(2, or 3) RGB Range 96 HDMITM Information Display 96 Displaying TV status information...97 Chapter 7: Using the TV's Advanced Features 98 Using the advanced picture settings 98 ColorMaster 98 Base Color Adjustment 98 Color Temperature 99 Static Gamma 99 Auto Brightness Sensor (for 39/50L2300U and 39/50L1350U)........100 DynaLight 100 Dynamic Contrast 100 ClearScan® (for 32...
User's Guide for L1350U and L2300U Series TV's
Page 17
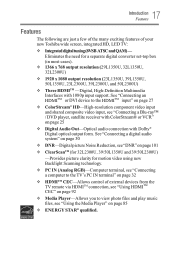
...-Definition Multimedia Interfaces with ColorStream® or VCR" on page 101 v ClearScanTM (for 32L2300U, 39/50L1350U and 39/50L2300U) -Provides picture clarity for a separate digital converter set-top box (in most cases). See "Connecting a digital audio system" on page 30 v DNR-Digital picture Noise Reduction...RGB)-Computer terminal, see "Connecting a computer to the TV's PC IN terminal" on page 32 v HDMITM CEC-Allows control of your new Toshiba wide screen, integrated HD, LED TV: v Integrated digital tuning (8VSB ATSC and QAM) - 17 Introduction Features Features The following are just a...
...-Definition Multimedia Interfaces with ColorStream® or VCR" on page 101 v ClearScanTM (for 32L2300U, 39/50L1350U and 39/50L2300U) -Provides picture clarity for a separate digital converter set-top box (in most cases). See "Connecting a digital audio system" on page 30 v DNR-Digital picture Noise Reduction...RGB)-Computer terminal, see "Connecting a computer to the TV's PC IN terminal" on page 32 v HDMITM CEC-Allows control of your new Toshiba wide screen, integrated HD, LED TV: v Integrated digital tuning (8VSB ATSC and QAM) - 17 Introduction Features Features The following are just a...
User's Guide for L1350U and L2300U Series TV's
Page 18
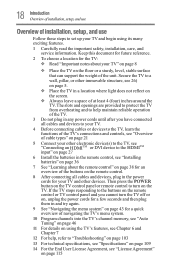
... Agreement, see "License Agreement" on page 115 18 Introduction Overview of installation, setup, and use Overview of installation, setup, and use Follow these steps to set up your TV and begin using the TV's features, see Chapter 6 and Chapter 7 12 For help maintain reliable operation of the TV. 3 Do not plug...
... Agreement, see "License Agreement" on page 115 18 Introduction Overview of installation, setup, and use Overview of installation, setup, and use Follow these steps to set up your TV and begin using the TV's features, see Chapter 6 and Chapter 7 12 For help maintain reliable operation of the TV. 3 Do not plug...
User's Guide for L1350U and L2300U Series TV's
Page 20
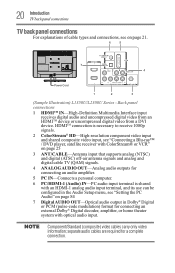
... home theater system with optical audio input. 20 Introduction TV back panel connections TV back panel connections For explanations of cable types and connections, see "Setting the PC Audio" on page 21. 6 5 7 4 Power Cord 1 2 3 (Sample Illustration) L1350U/L2300U Series - Component/Standard (composite) video cables carry only video information; Back panel connections...
... home theater system with optical audio input. 20 Introduction TV back panel connections TV back panel connections For explanations of cable types and connections, see "Setting the PC Audio" on page 21. 6 5 7 4 Power Cord 1 2 3 (Sample Illustration) L1350U/L2300U Series - Component/Standard (composite) video cables carry only video information; Back panel connections...
User's Guide for L1350U and L2300U Series TV's
Page 22
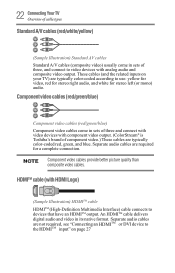
...related inputs on page 27 Component video cables (red/green/blue) Component video cables (red/green/blue) Component video cables come in sets of component video.) These cables are typically color-coded red, green, and blue. Separate audio cables are typically color-coded according to...(red/white/yellow) (Sample Illustration) Standard AV cables Standard A/V cables (composite video) usually come in sets of three and connect with video devices with component video output. (ColorStream® is Toshiba's brand of three, and connect to the HDMITTMM input" on your TV) are not required, see ...
...related inputs on page 27 Component video cables (red/green/blue) Component video cables (red/green/blue) Component video cables come in sets of component video.) These cables are typically color-coded red, green, and blue. Separate audio cables are typically color-coded according to...(red/white/yellow) (Sample Illustration) Standard AV cables Standard A/V cables (composite video) usually come in sets of three and connect with video devices with component video output. (ColorStream® is Toshiba's brand of three, and connect to the HDMITTMM input" on your TV) are not required, see ...
User's Guide for L1350U and L2300U Series TV's
Page 24
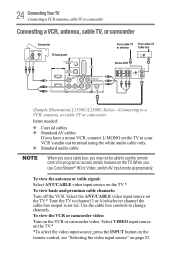
Select the ANT/CABLE video input source on the TV.* Tune the TV to channel 3 or 4 (whichever channel the cable box output is set to change channels. Use the cable box controls to ). 24 ConnectingYourTV Connecting a VCR, antenna, cable TV, or camcorder Connecting a VCR, antenna, cable TV, or camcorder ...
Select the ANT/CABLE video input source on the TV.* Tune the TV to channel 3 or 4 (whichever channel the cable box output is set to change channels. Use the cable box controls to ). 24 ConnectingYourTV Connecting a VCR, antenna, cable TV, or camcorder Connecting a VCR, antenna, cable TV, or camcorder ...
User's Guide for L1350U and L2300U Series TV's
Page 27
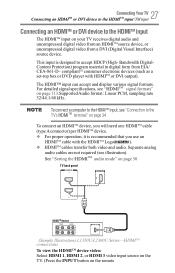
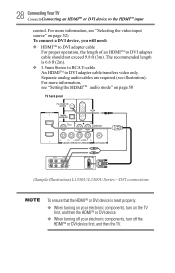
...page 34 To connect an HDMITM device, you use an HDMITM cable with HDMITM or DVI output). compliant[1] consumer electronic devices (such as a set-top box or DVD player with the HDMITM Logo( ). The HDMI™ input can accept and display various signal formats. To connect a ... not required (see illustration). This input is recommended that you will need one HDMITM cable (type A connector) per HDMITM device. See "Setting the HHDDMMIITTMM audio mode" on page 50 TV back panel HDMITM device (Sample Illustration) L1350U/L2300U Series-HDMITM connections To view the HDMITM...
...page 34 To connect an HDMITM device, you use an HDMITM cable with HDMITM or DVI output). compliant[1] consumer electronic devices (such as a set-top box or DVD player with the HDMITM Logo( ). The HDMI™ input can accept and display various signal formats. To connect a ... not required (see illustration). This input is recommended that you will need one HDMITM cable (type A connector) per HDMITM device. See "Setting the HHDDMMIITTMM audio mode" on page 50 TV back panel HDMITM device (Sample Illustration) L1350U/L2300U Series-HDMITM connections To view the HDMITM...
User's Guide for L1350U and L2300U Series TV's
Page 28
... L R DVI / HDCP OUT (Sample Illustration) L1350U/L2300U Series-DVI connections To ensure that the HDMITM or DVI device is 6.6 ft (2m). For more information, see "Setting the HDDMMIITTMM audio mode" on page 52) To connect a DVI device, you will need: v HDMITM to DVI adapter cable For proper operation, the length of...
... L R DVI / HDCP OUT (Sample Illustration) L1350U/L2300U Series-DVI connections To ensure that the HDMITM or DVI device is 6.6 ft (2m). For more information, see "Setting the HDDMMIITTMM audio mode" on page 52) To connect a DVI device, you will need: v HDMITM to DVI adapter cable For proper operation, the length of...
User's Guide for L1350U and L2300U Series TV's
Page 30
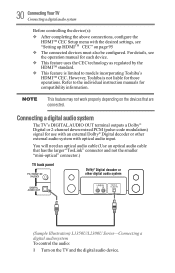
...audio cable (Use an optical audio cable that are connected. For details, see "Setting up HDMMIITTMM CEC" on page 95 v The connected devices must also be configured. However, Toshiba is limited to the individual instruction manuals for compatibility information. 30 ConnectingYourTV Connecting a ... device(s): v After completing the above connections, configure the HDMITM CEC Setup menu with optical audio input. Refer to models incorporating Toshiba's HDMITM CEC. v This feature uses the CEC technology as regulated by the HDMITM standard. Connecting a digital audio system The TV...
...audio cable (Use an optical audio cable that are connected. For details, see "Setting up HDMMIITTMM CEC" on page 95 v The connected devices must also be configured. However, Toshiba is limited to the individual instruction manuals for compatibility information. 30 ConnectingYourTV Connecting a ... device(s): v After completing the above connections, configure the HDMITM CEC Setup menu with optical audio input. Refer to models incorporating Toshiba's HDMITM CEC. v This feature uses the CEC technology as regulated by the HDMITM standard. Connecting a digital audio system The TV...
User's Guide for L1350U and L2300U Series TV's
Page 33
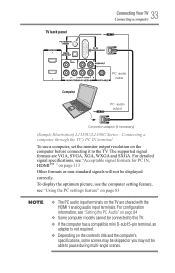
...audio output Conversion adapter (if necessary) (Sample Illustration) L1350U/L2300U Series - Connecting a computer through the TV's PC IN terminal To use the computer setting feature, see "Acceptable signal formats for PC IN, HDMMIITTMM" on the TV are VGA, SVGA, XGA, WXGA and SXGA. For detailed signal specifications,...page 113 Other formats or non-standard signals will not be connected to this TV. To display the optimum picture, use a computer, set the monitor output resolution on the content's title and the computer's specifications, some scenes may be skipped or you may not be able...
...audio output Conversion adapter (if necessary) (Sample Illustration) L1350U/L2300U Series - Connecting a computer through the TV's PC IN terminal To use the computer setting feature, see "Acceptable signal formats for PC IN, HDMMIITTMM" on the TV are VGA, SVGA, XGA, WXGA and SXGA. For detailed signal specifications,...page 113 Other formats or non-standard signals will not be connected to this TV. To display the optimum picture, use a computer, set the monitor output resolution on the content's title and the computer's specifications, some scenes may be skipped or you may not be able...
User's Guide for L1350U and L2300U Series TV's
Page 39
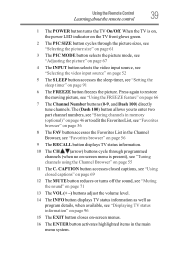
... power LED indicator on the TV front glows green. 2 The PIC SIZE button cycles through programmed channels (when no on-screen menu is present), see "Setting the sleep timer" on page 55 11 The C.
... power LED indicator on the TV front glows green. 2 The PIC SIZE button cycles through programmed channels (when no on-screen menu is present), see "Setting the sleep timer" on page 55 11 The C.
User's Guide for L1350U and L2300U Series TV's
Page 41
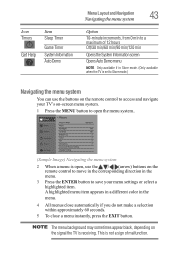
...Adjusts Brightness Adjusts Color Adjusts Tint Adjusts Sharpness Opens the Advanced Picture Settings menu Opens the Display Settings menu 41 Icon Picture Item Picture Mode Reset Backlight Contrast Brightness Color Tint Sharpness Advanced Picture Settings Display Settings Option Dynamic / Standard / Movie / Game / PC / ...Store NOTE Store Mode is only available if the TV is set to Store in the initial menu or Store in the Home...
...Adjusts Brightness Adjusts Color Adjusts Tint Adjusts Sharpness Opens the Advanced Picture Settings menu Opens the Display Settings menu 41 Icon Picture Item Picture Mode Reset Backlight Contrast Brightness Color Tint Sharpness Advanced Picture Settings Display Settings Option Dynamic / Standard / Movie / Game / PC / ...Store NOTE Store Mode is only available if the TV is set to Store in the initial menu or Store in the Home...
User's Guide for L1350U and L2300U Series TV's
Page 43
... sometimes appear black, depending on the remote control to move in the corresponding direction in the menu. 3 Press the ENTER button to save your menu settings or select a highlighted item. This is receiving. A highlighted menu item appears in a different color in the menu. 4 All menus close automatically if you do ...min/120 min Opens the System Information screen Opens Auto Demo menu NOTE Only available if in Store mode. (Only available when the TV is set to Store mode.) Navigating the menu system You can use the buttons on the remote control to access and navigate your TV's on-screen ...
... sometimes appear black, depending on the remote control to move in the corresponding direction in the menu. 3 Press the ENTER button to save your menu settings or select a highlighted item. This is receiving. A highlighted menu item appears in a different color in the menu. 4 All menus close automatically if you do ...min/120 min Opens the System Information screen Opens Auto Demo menu NOTE Only available if in Store mode. (Only available when the TV is set to Store mode.) Navigating the menu system You can use the buttons on the remote control to access and navigate your TV's on-screen ...
User's Guide for L1350U and L2300U Series TV's
Page 44
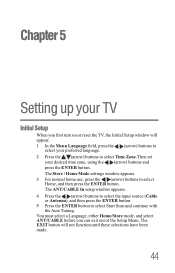
... appears. 3 For normal home use, press the / (arrow) buttons to select Time Zone.Then set your desired time zone, using the / (arrow) buttons and press the ENTER button. You must select a Language, either Home/Store mode, and select ANT/CABLE ... Language field, press the / (arrow) buttons to select your preferred language. 2 Press the / (arrow) buttons to select Home, and then press the ENTER button. Chapter 5 Setting up your TV Initial Setup When you can exit out of the Setup Menu. The ANT/CABLE In setup window appears. 4 Press the / (arrow) buttons...
... appears. 3 For normal home use, press the / (arrow) buttons to select Time Zone.Then set your desired time zone, using the / (arrow) buttons and press the ENTER button. You must select a Language, either Home/Store mode, and select ANT/CABLE ... Language field, press the / (arrow) buttons to select your preferred language. 2 Press the / (arrow) buttons to select Home, and then press the ENTER button. Chapter 5 Setting up your TV Initial Setup When you can exit out of the Setup Menu. The ANT/CABLE In setup window appears. 4 Press the / (arrow) buttons...
User's Guide for L1350U and L2300U Series TV's
Page 45
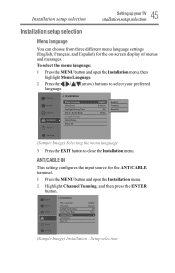
ANT/CABLE IN This setting configures the input source for the on-screen display of menus and messages. Setup selection Picture ... the EXIT button to select your TV Installation setup selection Installation setup selection Menu language You can choose from three different menu language settings (English, Français, and Español) for the ANT/CABLE terminal. 1 Press the MENU button and open the...Installation menu. 2 Highlight Channel Tunning, and then press the ENTER button. (Sample Image) Installation - Installation setup selection 45 Setting up your preferred language.
ANT/CABLE IN This setting configures the input source for the on-screen display of menus and messages. Setup selection Picture ... the EXIT button to select your TV Installation setup selection Installation setup selection Menu language You can choose from three different menu language settings (English, Français, and Español) for the ANT/CABLE terminal. 1 Press the MENU button and open the...Installation menu. 2 Highlight Channel Tunning, and then press the ENTER button. (Sample Image) Installation - Installation setup selection 45 Setting up your preferred language.
User's Guide for L1350U and L2300U Series TV's
Page 46
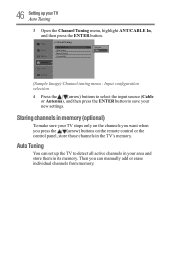
..., and then press the ENTER button. (Sample Image) Channel tuning menu - Then you press the / (arrow) buttons on the channels you want when you can set up the TV to detect all active channels in your area and store them in memory (optional) To make sure your new... settings. Auto Tuning You can manually add or erase individual channels from memory. Storing channels in its memory. Input configuration selection 4 Press the / (arrow) buttons to ...
..., and then press the ENTER button. (Sample Image) Channel tuning menu - Then you press the / (arrow) buttons on the channels you want when you can set up the TV to detect all active channels in your area and store them in memory (optional) To make sure your new... settings. Auto Tuning You can manually add or erase individual channels from memory. Storing channels in its memory. Input configuration selection 4 Press the / (arrow) buttons to ...


